How to replace brushes on a VAZ 2114 generator?
Removal and repair of the VAZ 2114 generator: faults and how to fix them
The generator is responsible for the functioning of the electricity system of the VAZ 2114 car. This electricity distribution system has its drawbacks, both purely individual and more common.
Main malfunctions of the VAZ 2114 generator
- The fuse has blown. To fix this problem, you just need to change the fuse. But first you need to find out the reason.
- The circuit supplying the devices is broken. Be sure to check the connection of the neutral wire with other contacts.
- Damage to the ignition switch. Make sure the ignition switch circuit board is in good condition.
- Indicator lamp malfunction.
- Brush malfunction. To eliminate the problem, it is necessary to replace the brush holder and the brushes themselves; it is enough to clean the oxidized slip rings with gasoline, or treat them with WD-40.
- Malfunction in the voltage regulator.
- Damage or malfunction of the alternator belt.
- The bearing is faulty or broken.
The described malfunctions are very common, if you ignore them and do not make the necessary repairs in a timely manner, the generator will be permanently damaged, and subsequently it will have to be completely replaced. Which in monetary terms is much more expensive than repairing minor problems.
But don't rely on yourself if you don't have the appropriate training. The best solution would be to contact a service station for qualified assistance.
Generator location
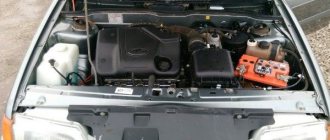
Engine VAZ 2114
The generator is located under the hood of the car, to the left of the engine.
How to Change Brushes on a VAZ 2114 Generator
Not far from the front right headlight of the car, relative to the interior.
Checking the serviceability of the generator
Defects in the operation of the generator can have unpredictable consequences. If there is insufficient charge coming from the alternator, the consequence will be that the battery will die and as a result the car will simply stall. But the most dangerous thing is that if the alternator produces high voltage, the entire electrical system of the vehicle will be damaged as a result.
We check the power of the VAZ 2114 generator using a tester:
- After turning on the ignition key, make sure that the instrument panel lights are on, only then the engine starts. If the battery icon is lit or blinks dimly, this indicates damage to the generator circuit.
- The engine must be warmed up to 90 degrees, only after that all energy-consuming devices must be turned on.
- We connect the tester directly to the battery. The assistant accelerates, keeping the rpm at approximately 3200 - 2500. If the voltage is 13V, the generator is working.
- We turn off the devices consuming energy, and again take measurements, also at engine speeds of 3200 - 3500. The generator is operational if the voltage is 14.7V.
On a note! The main reason why the generator produces low voltage, below the level of 13V, may be due to malfunctions: insufficient tension of the generator belt, the generator circuit is damaged, the voltage regulator is damaged, the brushes are completely worn out, the generator must be replaced.
While the car is running, you need to pay attention to the sounds coming from the generator; if you hear a hum, this is an indicator of bearing wear, in this case it needs to be replaced.
Why does the battery icon light up on the dashboard?
When you turn the ignition key, the system displays all icons on the instrument panel to check the vehicle’s serviceability, i.e. All system lights are fully functional. Then the engine starts, so the lights should go out when the machine is in full working order. But if one of the lights does not go out, this indicates an existing problem.
Accordingly, if the battery icon does not go out, this is a consequence of the fact that the generator supplies too little voltage, or it is completely absent.
Replacing generator brushes after their natural depreciation
Reasons for depreciation of generator brushes:
- Voltage drop.
- At dusk, there is insufficient illumination from headlights.
- The battery is not charging.
- and etc.
During normal maintenance, no one pays attention to small problems of the generator; for this reason, worn brushes are always a surprise. Do not rush headlong to change brushes if primary symptoms of problems occur. Find out the source of the problem, then disassemble the generator housing.
How to dismantle the generator brushes:
Before carrying out work on replacing the generator brushes, it is necessary to remove the assembly together with the voltage regulator, so we unfasten the minus terminal and disconnect the wires from the casing.
- Disconnect the wires.
- We remove the cap from the output wire system to +, disconnect the nut securing this bundle and remove it from the block.
- We remove the plastic casing, having first disconnected the clamps.
- Disconnect the voltage regulator fasteners.
- When removing the regulator, do not forget to disconnect the wire block.
- We change the brushes using the same method, but the sequence changes; we install everything in its original place.
Just a note! Be sure to check the wear of the brushes; they change when the length of the rod wears down to less than 0.5 mm. If the brushes are of normal length, a possible reason for the lack of charge is a malfunction of the voltage regulator or brush regulator circuit.
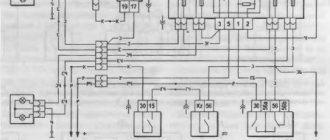
Checking the voltage regulator
As we have already found out, the voltage regulator is checked together with the brush holders, so that if the circuit between the brushes and the regulator is damaged, we can immediately see this problem.
First, we check the brushes to see if they are broken or worn out; therefore, on your VAZ 2114, replacing the generator brushes is inevitable.
We prepare the necessary parts for testing, these are wires, a car battery, a 12V light bulb, AA batteries, to build two circuits:
Checking the voltage regulator
Checking the voltage regulator
Replacing generator brushes on VAZ-2113, 2114, 2115
The generator brushes serve as conductors of electric current: they supply and discharge it. Thanks to their work, the generator generates voltage, which contributes to the stable functioning of the car’s electronic mechanisms.
Brushes are made of graphite, carbon parts are especially popular, and for engines operating at high speeds, brushes are impregnated with special
motors4x4.ru
Lada 2114 › Logbook › Lost charging, replacing the generator brush assembly (brushes)
The other day I noticed that after starting the engine, it was not charging.
After 30 seconds of engine operation, after re-gasping it appears. I came to the conclusion that it was time to change the brush assembly. Everyone never got around to stopping by and buying brushes. This morning before going to work I noticed that the charger had completely disappeared. I still had to urgently buy a unit. (Like the law of meanness, I just arrived at work and the charger appeared)
These are the readings given by the on-board engine when the engine is running. We begin to treat the patient.
(To begin with, of course, disconnect the positive terminal from the battery, so as not to cause a short circuit and fire.) Next, unscrew the positive wire on the generator
Unscrew the positive wire from the generator
Turn off the excitement.
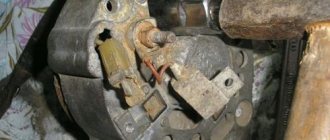
We begin to dismantle the protective casing of the generator, under which the cause of our illness is located (brush assembly)
Unscrew the two bolts and disconnect the wiring going to the brushes.
This is, in fact, the reason for the lack of charging, or rather, the brushes have run out.
Sample of an old brush assembly.
This is what the new brush assembly with cap looks like
For comparison, old and new brushes. (how long should the brushes be)
Be sure to check the stem at anchor. (the place where the brushes come into contact with the generator shaft)
In my case, I need to grind the anchor... the offset is quite large. But to do this you need to remove the generator. Unfortunately, there is simply no time or opportunity for this, since it needs to be clamped into a lathe. so I’ll install the brushes like this (knowing in advance that they won’t last for a long time) ASSEMBLY IN THE REVERSE ORDER!
The result is obvious! All work took about 15-20 minutes
Issue price: 135 ₽
Likes 15 Shares: Subscribe to car
www.drive2.ru
Work order
Before starting work, you must read the instructions in full on how to fix the problem. This will allow you to act confidently. You need to understand that the reason for the loss of functionality of the generator may be not only the failure of the brushes, but also the belt or relay regulator. It is possible that the entire generator set is worn out. Therefore, during repairs, you need to check the condition of all elements. First you need to prepare the car for work: remove the terminal from the battery to eliminate problems, and disconnect the plus from the generator.
Now you can start the main work:
- Unscrew the alternator belt mounting bolt.
- Move the unit towards the engine and remove the belt.
- Disconnect the tensioner bar, plug, and terminals.
- We remove the engine.
- Now you need to make the brush assembly accessible for work; to do this, you need to open the protective casing. It is secured with three latches.
- After unscrewing the two bolts, disconnect the wires.
- There is a nut on the right that also needs to be unscrewed.
- Now you need to raise the voltage regulator.
We remove the brushes of the VAZ 2114, 2113 or 2115 generator and check them. It often happens that they are completely over.
Be sure to check the stem at anchor. It is located at the point of contact between the shaft and brushes. If it is large, it needs to be sanded.
- Now you need to thoroughly clean the location of the brush assembly, clean the contacts, and check the reliability of the springs.
- Installation of new parts.
- Reassemble in reverse order.
Compare old and new brush lengths.
Also watch the video of replacing the VAZ 2114 generator brushes without removing the generator:
You can also proceed in the following order:
- We de-energize the battery by disconnecting the negative terminal.
- Disconnect the contacts.
- We unscrew the two fasteners located on the brush holder body.
- We remove the node.
- Inspect the structure for defects.
- Measuring the protruding part of the brushes.
- Installing new components.
- Installation of the unit in reverse order.
This option is relevant if you are absolutely sure that the brushes are the cause of the generator malfunction. After the work has been correctly completed, the following message appears on the dashboard.
Replacing generator brushes on a VAZ
Many car enthusiasts repair their cars themselves. But not everyone in this matter is professionals, and many questions arise during repairs. How to change alternator brushes on VAZ cars? There is nothing complicated about it. Replacing generator brushes on a VAZ, for example, model 2114, is quick and easy. First, you should find out how the generator works.
Structure
Generator design
The generator consists of three windings, they are installed so that the voltage occurs on different windings each time.
Stator windings - they always need voltage, they get it from the battery. The windings act as magnets. They form a magnetic field, which relieves tension. The voltage is removed from 18 V. But the maximum permissible voltage is 14.7 V. For this, a stabilizer is installed.
The stabilizer or brush mechanism is installed on the generator itself. Thanks to it, one voltage is maintained.
What role does it play?
The generator is responsible for driving the car. It maintains the battery charge and is responsible for energizing the starter when starting the car.
Replacement procedure for VAZ 2114
Before replacing brushes on a VAZ 2114, it will be more convenient to remove the generator.
Removing the generator
Removing the generator 2114-2115
- The car is placed on the handbrake, and wheel chocks are additionally installed.
- The negative terminal from the battery is disconnected.
- The tension bolt is lowered.
- The wires under the rubber boot are disconnected and the connector through which voltage goes to the winding is disconnected.
- Using a large screwdriver, you need to move the generator towards the engine.
- After this, you can remove the alternator belt.
- The mounting bolt is lowered. To do this, first, using a 15mm socket, unscrew the bolts holding the bracket. Then turn the generator clockwise. You can remove the axis attached to the bracket.
- The nut is unscrewed with a 19mm wrench and pulled out with the bushing, the axle is knocked out of the bracket.
- The generator can be easily removed upwards.
Replacement
Generator brushes 2114
The generator for the VAZ 2114 has brushes that are responsible for voltage regulation.
If it's time to change the alternator brushes, proceed as follows:
- The first thing to do is disconnect the terminal from the battery.
- Next you need to disconnect the block with wires.
- Then unscrew the clamp nut.
- Then the power wires are removed from the stud.
- The latches that hold the plastic cover around the perimeter are released.
- The cover is removed and the brushes themselves are found.
- After the brushes are found, the bolts that secure the brushes are unscrewed.
- The brushes themselves are pulled out.
- Before installing new brushes, check the size of the graphite contacts; their normal protrusion is considered to be at least 0.5 centimeters.
- New brushes are installed and, based on the above procedure, we assemble the generator.
Photo instructions
Disconnect the block
Remove protection
Remove the tension bolt
Unscrew the top fastening
Remove the tension bar
Unscrew the bottom fastening
Remove the spacer bushing
Removing the generator
Replacement for VAZ 2110
On VAZ 2110 cars, the battery charge mainly depends on the operation of the generator. If the battery charge light remains on after starting the engine, this means that there is a malfunction in the generator. And in most cases, this means it's time to change the alternator brushes. Replacing generator brushes is also not difficult.
What you need
To replace the brushes you will need a set of tools and gloves. In addition, you need supports for the rear wheels.
Before replacing the generator brushes, it will be more convenient to remove the generator.
Removing the generator
- It will be more convenient if you drive the car into the inspection hole. If the device is not removed from a pit, jack up the front of the machine.
- Install wheel chocks.
- Having opened the hood, turn off the power by removing the wire from the minus terminal.
- Unscrew the crankcase protection bolts and remove it.
- Slightly loosen the nuts located at the top and bottom of the generator.
- The adjustment bolt is unscrewed.
- The generator belt is removed.
- The output terminal D is removed.
- The rubber cover is removed.
- The nut securing the plug is unscrewed.
- The plug is disconnected from the bolt with contacts
- The nut located at the bottom and top of the generator mounts must be unscrewed and removed.
- Then remove the tension bar and spacer sleeve.
- Holding the generator, remove the remaining mounting bolt.
- That's it - the generator has been removed.
Replacing brushes
It is best to disassemble the generator on a clean surface, you can lay a cloth.
- We place the generator so that the pulley is at the bottom.
- When you see the springy holders, you need to snap them off with a flat screwdriver.
- Then you can remove the generator cover.
- Now you will need a Phillips screwdriver to remove the screws that hold the brush assembly in place.
- The brush holder itself is pulled out.
- The terminal is removed from the brush holder.
- The nut is unscrewed from the contact bolt.
- Having seen two spring washers, we remove them.
- The capacitor wire is disconnected.
- The screw securing the capacitor is unscrewed.
Before replacing brushes on a VAZ 2110, the size of the contact protrusion is checked and the entire procedure is carried out in the reverse order.
Photo instructions
Remove the cover
Disconnect the brush contact
Unscrew two bolts
And one nut
Replacing brushes on a VAZ 2107
The principle of operation of the generator on VAZ 2107 cars is the same as on the cars listed above. After the engine starts, the battery light comes on, which means it’s time to replace the alternator brushes.
Since replacing generator brushes takes very little time, many car enthusiasts are ready to do it themselves.
Generator VAZ 2107
When replacing the generator brushes on a VAZ 2107, you can remove the generator, but this can be done without resorting to these measures. Simply disconnect the wire from the negative terminal.
Changing brushes
- The wire is disconnected from the terminal.
- Unscrew the two screws that secure the brush holder housing.
- The brush holder itself is pulled out.
Before replacing the brushes, it is better to check whether they are the problem.
Checking the brushes
To check for brush malfunctions, you will need a 12 V light bulb.
We put a plus on the terminal, and a minus on the ground terminal. The light comes on, let's check further. We add voltage to 16 V, if the light continues to light, this is the main sign of a malfunction of the brushes.
Checking the serviceability of the brushes
In this case, before installing new brushes, it is worth checking the protrusion of the graphite contacts. A normal protrusion is considered to be a protrusion of at least 0.5 centimeters , after which new brushes are installed, and everything is installed back, based on the above steps.
It happens that repairing a generator does not end with just replacing the brushes. If brush wear is not detected in time, then the remaining parts of the generator also wear out, since all elements of the generator are interconnected. That is why, after replacing the brushes alone, the malfunction in the generator will not completely disappear, but the signs of breakdown will disappear for a while.
When replacing brushes, it is best to remove the generator and examine it, trying to identify what other faults may be in it.
Video
For instructions on replacing brushes without removing the generator, see below:
auto-wiki.ru
Generator VAZ 2115
A generator of type 94.3701 is installed on cars - alternating current, three-phase, with a built-in rectifier unit and an electronic voltage regulator, right rotation (on the drive side).
The generator rotor 94.3701 is driven by a poly-V belt from the engine crankshaft pulley (on some VAZ-2111 engines - from a damper).
Replacement
In order to remove the generator on the VAZ 2114 - 15, we need:
key for 10 key for 13 key for 15 key 17 x 19 pry bar
If everything is ready, then take step number one - remove the negative terminal from the battery.
Step No. 2 - first we unscrew the protection and boot under the car, on the right side (under the generator), you can do without it, but it will be more convenient to unscrew the lower bolts of the generator.
It is enough to unscrew a few bolts and lower the protection with the boot down.
Step No. 3 - weaken the tension of the generator belt, to do this, unscrew bolt 1 and loosen bolt 2.
Step No. 4 - press the generator to the engine and remove the generator belt
Step No. 5 - since we will be removing the generator completely, we will completely unscrew the belt tensioner bar 3 from the engine block.
Step No. 6 - remove the plug (female) and unscrew terminal 4 from the generator.
Step No. 7 - since the generator is attached to an axle at the bottom, a nut holds it there, this axle (essentially a long bolt) is usually difficult to pull out, it will be easier to unscrew not the axle, but the entire mount of the generator to the engine, there are 15 bolts there.
Step No. 8 - we take out the generator and unscrew the axle (the long bolt on which the generator itself sits), after which we slowly knock out the axle with a wedge (another unnecessary bolt).
That's it, the generator is free, now you can replace it with a new one.
Assembly occurs in reverse order.
You can tighten the generator belt with a pry bar by inserting it between the generator and the engine. Next, adjust the tension using bolt 2.
In this case, the belt tension should not be weak or too strong.
A weak tension will allow the belt to spin, while a strong tension can damage the generator bearing.
Usually the tension is measured by the deflection of the belt; it should not be more than 1-1.5 cm.
Instructions: which battery is better.
What to do if the fuel pump fuse is on, the material is available at the link.
How to remove the mounting block https://vz15-up.ru/lkt/montazhnyj-blok-vaz-2115.html#t3.
How to remove
You will need: keys “8”, “10”, “13”, socket head “17”, wrench.
1. Disconnect the wire from the “–” terminal of the battery.
2. Remove the engine protection.
3. Remove the generator drive belt (see “Replacing and adjusting the tension of the generator drive belt”).
4. Disconnect the block with the wire from terminal “D” of the generator.
5. Remove the protective rubber cover, unscrew the nut and disconnect the wires from the contact bolt (terminal “B+”).
6. Remove the tension bolt.
7. Finally unscrew the nut of the upper mounting of the generator.
8. Remove the tension bar.
9. Finally unscrew the nut of the lower mounting of the generator.
10. Remove the spacer bushing.
11. Holding the generator, remove the bolt securing it and remove the generator down
How to check
To test the generator we need an assistant and a regular tester.
First of all, turn on the ignition key and make sure that all the lights on the dashboard are on (alternator (battery), oil, brakes, handbrake, check engine, etc.). Next, we start the engine and look at the dashboard: A burning or dimly flashing “battery” light indicates a malfunction in the generator circuit. List of possible faults.
How to change brushes on a VAZ-2114 generator: step-by-step video instructions
The conductors of electric current in a car are the generator brushes, which both supply and discharge current to all electronic elements of the car. Unfortunately, the brush generator also sometimes fails, so sooner or later the brushes, which are most often made of a graphite base, have to be replaced. How, according to the rules, you can change the brushes on a VAZ-2114 generator, we will analyze in this article.
Symptoms of a problem
Most often, brushes fail due to simple wear, and a malfunction will first be indicated by a poor battery charge. Car owners can independently understand that this part has failed based on the following signs:
- there will be constant disruptions in voltage;
- the battery will begin to charge very quickly or will not charge at all;
- optical devices will begin to illuminate the road worse;
- the lights on the dashboard will blink constantly;
- It will not be possible to operate electronics, for example, a car radio, due to insufficient voltage.
If the above signs of malfunction are detected, it is recommended to replace the brushes as soon as possible in order to maintain the functionality of the generator itself. After all, if this element fails, the cost of repairs will double or even triple.
According to experts, replacement is best done after 45,000 - 50,000 km.
In addition, it is advisable to have spare components so that, if necessary, you can replace a failed element yourself, without waiting for a tow truck, for whose services you will have to pay a lot of money.
Phased replacement
Replacing old brushes that have become unusable with new ones is quite simple if you follow the instructions and recommendations
professionals. And you will need to prepare the following tools for work:
- key size 13;
- an ordinary screwdriver, it is better to use a flat one;
- head size 8, socket with ratchet.
Replacement can be done in two ways:
- without removing the generator;
- after its removal.
If the car owner is convinced that the malfunction is caused precisely by wear of the brushes, then it is possible, without removing the generator, to eliminate the cause of the breakdown:
- The negative terminal and connecting wires are disconnected from the power supply.
- The two fixing bolts are disconnected from the brush holder body.
- The entire structure is carefully removed, its integrity and the protruding size of the brushes are checked, which should not exceed 5 mm.
- Components that have become unusable are replaced.
- Assembly is carried out in reverse order.
Why change brushes?
If signs of brush breakage are detected, they should be replaced. If repairs are not carried out in a timely manner, there is a possibility that you will soon need to purchase a new generator, and this is a completely different expense. The battery can only hold the ignition without brushes for a few minutes, which means it will have to be constantly charged. And soon it will be replaced.
You can check the condition of the brushes by the size of their protrusion from the seat. If the protrusion size does not reach five millimeters , then they should be replaced immediately to avoid possible problems.
It is recommended to replace it every 50,000 km or every season, which is the key to safe operation of the vehicle. It is better to have a spare set of spare parts so as not to get into an unpleasant situation on the road and then call a tow truck.
For a set of brushes you will need to pay from 150 to 200 rubles, depending on the store. The cost of repairs at a car service center will cost 200-300 rubles, inexpensive, of course, but why pay for something that you can do yourself?