Technical regulations for replacement
The manufacturer recommends checking the condition of the alternator belt every fifteen thousand kilometers. And every 30,000 you need to change the belt, even if you are one hundred percent satisfied with its appearance.
The rules given here are not exhaustive, because It is impossible to foresee absolutely all dangerous situations that may arise when performing vehicle maintenance. When performing work, use common sense, caution and caution.
Chevrolet Niva
In order to replace the air conditioning belt on a Chevrolet Niva, you need to use only one 12 key. There are no difficulties in carrying out repairs; it is enough to install the car on an inspection hole or overpass.
This makes it much easier to make repairs, because the belt is located at the bottom. To remove it, you will need to loosen the roller mount. After installing the new belt, simply tighten it using the bolt installed on the roller. Please note that when replacing all belts in a comprehensive manner, this should be installed last. First replace the timing belt, then the generator, and lastly the air conditioner.
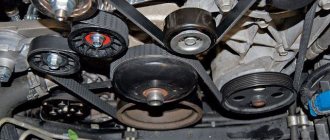
It is recommended to buy belts from well-known brands, the quality of which has been tested by time. The layout of the drive mechanisms is shown in the photo.
To work you will need a tool:
- screwdriver;
- jack;
- set of socket wrenches;
- mounting blade.
The manufacturer of the Chevrolet Niva recommends changing the alternator belt every 50 thousand kilometers. Original drive belts can withstand increased loads up to 75 thousand kilometers. Consumables of Chinese origin have to be changed every 15-20 thousand kilometers. Additionally, a visual inspection should be carried out every 10-15 thousand kilometers.
Signs that the drive belt needs to be replaced:
- Visual wear: abrasions, unevenness, tears and cracks;
- Rubber peeling;
- Presence of oil stains.
Signs of a belt failure:
- Extraneous characteristic whistle. Appears at maximum load on the electrical system;
- The battery light is on on the dashboard. Talks about its accelerated discharge;
- Disabling some electrical appliances that require power from the generator.
Before carrying out the procedure, you need to prepare for it. You will need to collect the necessary tools, materials and study safety precautions.
Safety precautions
Basic safety rules:
- When replacing the drive, disconnect the negative terminal of the battery;
- Wait until the engine cools down (20-30 minutes);
- Carry out the replacement procedure with gloves. This will reduce the likelihood of burns.
List of tools and materials:
- Set of wrenches;
- Set of heads;
- Two screwdrivers (slotted and Phillips);
- Mount;
- Jack;
- New part.
Tighten the nuts securing the tension roller bracket. We start the engine, stop it and check the belt tension again.
Attention! Do not overtighten the belt! Excessive belt tension leads to premature failure of the alternator belt and bearings, coolant pump and power steering pump.
We replace the drive belt for auxiliary units when cracks, ruptures and detachments of rubber from the fabric base are detected on it. On a car with air conditioning, remove the air conditioning compressor drive belt.
Loosen the nuts securing the tension roller bracket (see above) and rotate the adjusting bolt counterclockwise, loosening the belt tension.
Also interesting: Chevrolet Niva gearbox diagram video
The ignition must be turned off. After this, open the hood and remove the plastic trim. Then loosen the air duct clamp. You can use a regular screwdriver for this.
Then use a 10 mm socket wrench to unscrew the screw holding the air filter. After this, remove the air duct from the filter housing. At this point the preparation stage can be considered complete.
According to the manufacturer’s recommendations, the belt drive on the Chevrolet Niva generator should be changed after 50 thousand kilometers. But this is not the main criterion. The belt can last longer; if it is an original product, it will last 65-75 thousand kilometers. Belts made in China have to be changed after 15-20 thousand kilometers. Therefore, it should be visually inspected regularly.
Wedge tensioning diagram
Replacement is carried out if the following defects are detected:
- traces of surface wear: abrasions, cracks, bulges, unevenness;
- peeling of material from the base;
- oil stains on the surface;
- frayed ends. Installed new consumables
A sign of a malfunction is:
- the appearance of extraneous whistles at maximum load on the electrical system;
- the battery discharge light is on;
- turning off devices that require power to operate.
Common causes of a broken alternator belt on a Kia Rio
So, why do the alternator belts break on the Kia Rio? Experts say one of the main reasons is that the pulley is installed crookedly. Lack of mutual alignment leads to the fact that the belt rotates incorrectly, touches various mechanisms with its sides, and quickly wears out.
If a new strap breaks or the straps constantly wear out, this may be due to:
- wear of the main elements of the product;
- incorrect installation of the pulley, high belt rigidity;
- lack of alignment;
- wear of bearing elements;
- incorrect selection and installation of the belt;
- wear and failure of the tension roller;
- failure of fastenings;
- lack of or damage to protection on the generating set;
- simultaneous use of a large number of voltage consumers or installation of Chinese equipment on a car.
Description and location
The generator's job is to provide power to the vehicle's electrical equipment. Like other components in a car, the generator is powered by the engine; to ensure constant rotation of the rotor, pulleys are installed on the generator shaft and the crankshaft of the power plant. A belt is pulled between them. After starting the engine, the crankshaft begins to rotate, and the movement is transmitted through the belt to the rotor.
Read more: Do-it-yourself guide to replacing an air conditioner compressor bearing
On the latest Priora models, this element operates the air conditioning and power steering. This material discusses the replacement and tensioning of the belt in a new model car, where additional equipment is installed.
The belt is a consumable item that requires replacement after 45-60 thousand kilometers. The size of the standard belt on a Priora with air conditioning is 1125 mm.
Open the hood, you will see a belt near the right wheel
Symptoms of a problem
| Malfunctions | Diagnostics | Elimination |
| The appearance of a creaking, metallic grinding sound | Dismantling, inspection | Filling the bearing with graphite grease |
| Smell of burning | Inspection | Part replacement |
| Whistle when the belt rotates | Dismantling, inspection | Part replacement |
When we start to hear such a whistle, it is not critical and not scary, but of course it is not pleasant. It’s just that such a sound begins to indicate the beginning of problems with the alternator belt and its possible imminent failure.
The fact is that when the belt weakens, it becomes more difficult for the generator to work and it is not able to produce the maximum charge. The worst thing can happen is when the constant sound of the generator occurs without load and with load. This already indicates that an urgent replacement of the belt is necessary.
Alternator belt: when to change and why
First of all, before replacing the alternator belt, you need to accurately determine that the specified element needs to be replaced. Let's start with the fact that in terms of time and mileage it is better to change such a belt every 5 years or 80-100 thousand mileage, regardless of the condition of the belt. Even during operation, the belt must be periodically checked every 20-30 thousand km.
At the initial stage of inspections, you should pay attention to signs of belt wear. For example, the need for an unscheduled check will be indicated by a characteristic whistle during operation of the internal combustion engine, which is localized in the area of the drive of attached units. If the whistle only occurs periodically and in wet weather, it is not a cause for great concern.
However, if the indicated whistling noise is constant, it indicates a problem. As a rule, a worn alternator belt whistles “cold” and “hot”, under load and without load. Extraneous noise also appears with increasing load on the vehicle's electrical network. In such a situation, a whistle indicates that the alternator belt is, at a minimum, insufficiently tensioned.
Currently reading:
Replacing tie rods and ends: what you need to know
Jun 21, 2020
What oil to fill in Kia Rio: what you need to know
Jun 21, 2020
To check the belt tension, press the middle with your thumb. If the belt bends by 2-3 mm, this is normal. If it bends by 5 mm or more, you first need to try to tighten it if possible.
If it is not possible to tighten it, it is a mistake to believe that this problem is not serious, since there is often a systematic undercharging of the battery precisely because of a stretched and slipping belt. In turn, this occurs as a result of poor performance of the generator itself as a result of problems with its drive. Sooner or later the battery will be severely discharged, which will not allow the engine to start.
Another constant whistling indirectly indicates that the risk of belt breakage is increasing. Moreover, on a car with power steering, this can even be dangerous if a break occurs while driving. The fact is that the power steering pump will stop working and turning the wheels will require a lot of force on the steering wheel. At high speeds, the driver may simply lose his bearings and fail to control the vehicle.
Replacement is also needed when, upon visual inspection, it is clear that the belt has sagged greatly and it is no longer possible to tighten it; obvious signs of wear are visible in the form of cracks, delaminations, etc. It is also better to replace the belt if technical fluids or oils have come into contact with it.
Remember, even when the element is relatively new, visually intact and has no defects, the ingress of technical fluids can lead to rapid destruction of the rubber product. As a result, the belt may delaminate, stretch or break at the most inopportune moment.
Checking the condition of the alternator belt
The average service life of a drive belt is about 50 thousand kilometers, but this figure is significantly influenced by the conditions of use. To check the alternator belt, you should first diagnose the tension. In operating condition, the RG should only sag a short distance, which is regulated by the machine manufacturer. The installation diagram is described in detail here, so you can learn how to change the alternator belt if necessary.
It is also necessary to assess the condition of the RG for wear or mechanical damage. If you see that the RG begins to delaminate and there are traces of fuel and lubricants on it, then you need to remove the alternator belt and replace it with a new one. The selection of a new strap is carried out in accordance with the model of the vehicle, as well as its type.
Tools and materials
You can replace the alternator belt not only in car repair shops. It is quite possible to perform this procedure yourself. To do this you need to have tools, materials and hands. Many Volkswagen owners refuse to carry out car repairs themselves, preferring to entrust them to professionals. But in reality, anyone can replace the drive belt on a Volkswagen Polo.
Tools required:
- jack;
- key to 16;
- nail.
A fairly affordable set for any driver, so we recommend not spending money and updating the belt yourself.
Features of choosing a generator belt
When selecting parts, give preference to original ones, with factory catalog numbers. A complete list of compatible search indexes is specified in the operating instructions for the technical device.
Foreign analogues have similar quality, but the cost is 10-15% higher. The final choice is up to the car owner.
Installation of new parts
When replacing the timing belt on a Chevrolet Niva, follow these steps.
- Remove the air conditioning and cooling radiators completely. Before this, of course, you will have to drain the liquid from the cooling system and bleed off the freon. There is no need to remove the fans from them.
- Remove the air purification filter housing.
- Remove the A/C compressor and alternator drive belts. Be sure to remove the tension mechanisms as well.
- Remove the upper part of the timing housing.
- Place marks on the shaft gears. They must definitely match. There is a notch on the engine crankcase that should match the mark on the pulley.
The first step is to prepare the generator for the repair and replacement process. To do this, old parts are removed. To do this, you will need wrenches of diameter 10 and 17.
1. First of all, you need to loosen the belt and remove it, otherwise you will not have access to the bearings themselves. To do this, you need to loosen the roller, which is held by a platform with nuts. There are three nuts, they require a 10mm wrench. Once they are all unscrewed, you need to unscrew the adjusting screw so that it moves up from the platform.
- Place the car in first gear to prevent the crankshaft from turning;
- Unscrew the nut that secures the part
- Remove the spring washer and remove the part.
Also interesting: How much oil is in the Niva 21214 engine
The process of removing generator rollers on a Niva Chevrolet is identical to any other car.
5. The new ring is installed in its place;6. A new roller is installed in place of the old bearing. Before doing this, you should check the diameters of both parts to avoid the mechanism not working;7. Next, the bearing is fixed using a washer with a spring mechanism and a nut;
8. After this, the belt is put on the new roller.
1. You can put the car in 4th gear, put the belt on the roller and push in the direction of rotation of the crankshaft. When it starts to turn, you need to pull the belt onto the generator pulley, and it will fall into place on its own.
2. In the same way, you can not push the car, but lift the wheel and spin it, or spin the generator itself.
This makes it easy and quick to replace the Chevrolet Niva generator belt rollers. You should regularly diagnose the moving parts of the car in order to prevent possible breakdowns in time and replace faulty parts.
We recommend replacing the bearings and belt every 40 thousand kilometers.
Replacing the alternator belt on a Kia Rio - step-by-step instructions
Tool: 14mm wrench, 10mm socket.
In order to replace the alternator belt on a Kia Rio you must:
- Place the car on a lift, or jack up the right front wheel, first braking the car with the parking brake and installing wheel chocks under the rear wheels.
- Remove the crankcase protection (if installed) and the right engine splash guard (see here). Remove the right front wheel.
- Turn the tensioner roller counterclockwise with a wrench to loosen the belt tension and remove the belt from the tensioner pulley.
- Remove the drive belt for the generator and auxiliary units.
- Install the accessory drive belt in the reverse order of removal.
- Rotate the crankshaft three full turns to ensure the accessory drive belt is correctly positioned on the pulleys.
The information is relevant for KIA Rio 3 cars of 2011, 2012, 2013, 2014, 2020, 2020, 2020, with a sedan body, with gasoline engines of 1.4 l (107 hp), 1.6 l (123 hp). For other engine options, the instructions may differ.
How to remove a generator on a grant
It needs to be removed for repairs, replacement of bearings or rollers.
New Lada: Lada Granta Granta. (gray green)›Logbook›The airbag light is on.
The step-by-step process involves:
- remove the negative terminal from the battery;
- working with the generator: disconnect the wiring harness from it;
- remove the cover of the power wire nut, remove the nut and remove the wire from the bolt;
- unscrew and pull out the upper and lower fastening bolts - to work with the lower one, you may need to climb into a hole, throw off the tin protection of the internal combustion engine and dismantle it from below;
- move the part to the right mudguard, remove the belt, and remove it.
You can do without a hole. Example:
Common Questions
Now let's look at general questions related to the alternator belt, but not related to replacing it.
Tension check
There are two approaches: visual assessment and physical.
Visual assessment of condition:
- the car is on a flat surface, the gear is in neutral, the handbrake is off, the hood is open;
- We don’t start the car - we put it in 5th gear;
- We opened the hood and found a generator: we push the car back, resting against the bumper;
- We inspect the required part along its entire length: are there any breaks or cracks? It needs to be changed.
Physical assessment:
- if you have a tool that measures pressure force: press the belt with a force of 10 kg*s - the deflection should be no more than 10 mm;
- there is no special tool: we try to turn it across - it should turn no more than 90 degrees.
How to tighten the alternator belt on a Kia Rio
This section applies only to machines with a tensioner. No - change the part or see above how to install it.
Subsequence:
- we use ring wrenches 8, 19;
- Throw key 19 onto the lead screw;
- wrench 8 for locknut;
- we touch;
- Now you can turn the lead screw: clockwise to loosen, counterclockwise to tighten;
- got the desired result - tighten the locknut.
Reviews
| № | Positive |
| 1. | Victor: This is my second year driving a Lada Granta, there are no complaints, the mechanisms work properly. At 35,000 km I tightened the converter belt. I didn’t contact the service, I did everything on my own. |
| 2. | Vitaly: I’ve been actively using the car for three years now, I haven’t made any special investments, only the purchase of consumables, oils, filters. I think it is important to comply with technical inspection deadlines and buy original parts. |
| 3. | Ivan: I bought a car at the dealership, the managers recommended strictly observing the maintenance deadlines. I don’t break rules, I always put down marks on time. I take care of my equipment and treat it with care. |
| 4. | Kirill: at 45,000 km I tightened the converter belt and visited the service center. The master assured that the old one was still worth several tens of thousands. |
| 5. | Valentin: during the year of using the car, the converter creaked once, I thought about changing it, but the creaking disappeared on its own. There are no complaints about quality, all mechanisms work properly. |
| 6. | Ignat: at 97,000 km I replaced the converter belt. I consider the resource quite worthy of a domestic car. |
| 7. | Vladislav: I’ve heard negative criticism of the Lada Grant, but I can’t confirm it, since the car works like a watch. I systematically carry out inspections, fill in high-quality oils, and do not exceed the speed limit. |
| Negative | |
| 1. | Gennady: for the first time the converter flew 40,000 km. I visited the service center and they replaced it under warranty. We'll see how long the new one lasts. |
| 2. | Vasily: despite the manufacturer’s warranty of 100,000 km, my generator lasted only 60,000 km. The workmanship is low. The Granta model is raw, not run-in. |
| 3. | Ignat: I do not recommend the Lada Granta, since during the year of use I visited the service station twice unscheduled for diagnostics and replacement. In addition, the generator failed ahead of schedule. |
Examination.
The correctly tensioned alternator belt on a Chevrolet Niva can be checked by pressing on it at point P indicated in the figure. With a force of 75N, the permissible deflection should be 1-1.2 centimeters.
It is possible to more accurately measure the tension level only in a service station that has the necessary equipment for this. The same applies to tightening the nuts. The manufacturer recommends tightening with a force of 20-25 N*m. A special torque wrench is used for this.
The main feature of the Chevrolet Niva engine is that in addition to the generator, this belt also drives the cooling system pump. If it is weakened, then over time it may slip and, in addition to insufficient voltage supplied by the generator, there is a risk of engine overheating as a result of the pump stopping. The risk of higher wear and tear on the pulleys it drives also increases due to increased vibration.
1. De-energize the car by disconnecting the terminals from the battery.
2. Pull out the connector from the crankshaft sensor; this can be done by unscrewing the mounting bolt with a Phillips screwdriver. Then remove the sensor.
3. Lightly unscrew the device that is secured with a nut and move it towards the block.
4. Remove the belt that is worn out; this is easy to do since the device is loose.
5. The right side should be jacked up, placing emphasis on the wheels in advance. We put the field in fourth speed, since we will rotate the right wheel.
6. We pull it gradually, removing it from the pump pulley, we turn the wheel, gradually pulling out the belt from the pulley.
The belt that you have removed, as a rule, cannot be repaired, so after removing the old one, we immediately proceed to installing a new one.
1. First we throw it on the crankshaft pulley, and only then on everything else.
What are the signs to recognize a malfunction?
A number of signs indicate the need to replace old rollers with new ones. They appear both directly while driving, in the form of extraneous noise, and during visual inspection.
- Mechanical damage on the surface of the rollers;
- Noticeable play;
- Grinding noises when turning. This is a clear sign that the car needs repairs;
- Damaged bracket or bearing;
- Leaking oil;
- High temperature during operation;
- Strong vibration during operation;
- Difficulty in turning the shaft.
Also interesting: Fender covers for Niva - mounting of wheel arches on VAZ 2121 Urban
