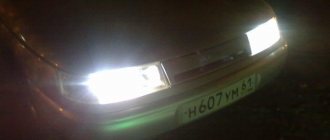
Low beam lamps, their types and malfunctions
Lada Kalina is a budget project of the domestic AvtoVAZ plant, and as befits an economy-class car, it cannot please you with high-quality components that can last at least a couple of years without interruptions. Most often, low beam lamps fail. There may be several reasons for malfunctions. This:
- The headlight is not sealed, which leads to its clogging. Dust settles in the lamp and leads to destructive overheating.
- Increased voltage in the on-board network, which is directly related to the operation of low beam headlights. In order to find out what voltage the generator produces, you need to diagnose it using a tester. The voltage should not exceed 14.4 V.
- Overvoltage causes the fuse to overheat.
- Violation of the electrical circuits of the right and left lamps.
- Oxidation of contacts.
There are other reasons, but these are the most common.
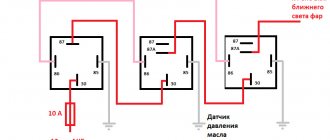
In order to find out whether the lamp needs to be replaced, or whether the breakdown lies in other parts, for example, in a defective fuse ( F12 and F13 ), you must first check it with a multimeter, put it on a continuity test and touch the parallel contacts on the fuse or lamp if it rings Either it works properly, it is silent, then you need to change the faulty part.
It is important to find out whether voltage is supplied at all to all terminals. If voltage is not supplied, then you need to ring the wire until the cause of the breakdown is discovered .
Here it is worth clarifying that driving without low beam lamps is categorically unacceptable, since in the dark, such an omission can lead to a serious accident.
At the moment there is a wide range of lamps. Experienced motorists put the following on the Lada Kalina:
- Lamps from Osram, which cost about 310 rubles.
- Narva, which cost a little less, 290-300 rubles.
- An excellent option for the Lada Kalina are Philips H7 halogen lamps, costing 290 rubles. a piece.
There are also all kinds of modifications: all-weather lamps, improved visual effect, heavy-duty, designed for round-the-clock operation, etc.
Replacing low beam lamps on Lada Kalina
Before starting work on replacing low beam lamps, it is worth clarifying that the Lada Kalina is equipped with two types of engines, eight- and sixteen-valve, which have different designs, and, therefore, all dismantling/installation manipulations with equipment are somehow related with an engine, will have a slightly different character.
On a sixteen-valve engine, it is more difficult to change the lamps; on the right side, if you do not have sufficient flexibility in your hands or it is large, you need to remove the washer reservoir.
And one more point needs to be clarified: when replacing one lamp, it is very advisable to change the second one (that is, both left and right), and in no case should you take the lamp by the base , since in this case dark spots will remain or it will quickly burn out.
First you need to remove the rubber plug behind which the lamps are located.
Next, the wire contacts from the lamp are disconnected.
The next step is to release the lamp from the spring.
The defective lamp is carefully removed and replaced with a new one, fixed with a holder.
The wire blocks are put in place and the tightness is checked. After replacement, it is better to adjust the headlights.
Low illumination of Kalina: factors of problems
The most common malfunction in vehicles is burnt out light bulbs. Sometimes this happens quite often, indicating the appearance of an auxiliary cause that caused the breakdown.
Note: When dismantling halogen light bulbs, you need to ensure that the bulb is sterile. It is very important to keep debris and dirt out. Therefore, sometimes the touch of fingers can play a cruel joke.
Low beam lighting on the Lada Kalina refuses to shine in the following cases:
- The fuse that protects the light bulb's power circuit fails.
- The headlight housing has become depressurized, dirt and foreign particles have gotten inside. The reflector along with the bulb bulb becomes clogged, and this leads to overheating and, accordingly, damage to the filament.
- Unstable operation of the generator voltage stabilizer. As is known, power surges significantly increase the breakdown of halogen light bulbs.
- The power supply to the lighting equipment has been damaged, for example, oxidation has occurred, a wire has broken, or the contact of the light bulb plugs does not work.
Bulbs on Kalina: types
First of all, you will need to choose the right device for your Lada Kalina. The low beam lighting is installed in a separate compartment of the headlamp. Kalina's headlight itself has 3 sections:
- low beam lighting;
- distant;
- turn indicator.
On domestic Lada Kalina vehicles, 55-watt lamps are dismantled by OSRAM (Germany) during assembly. They are designed to work with a voltage of 12 V. They can be replaced with Phillips X-treme Vision lamps, as well as GE SportLight. These brands have a rather high cost, although they have an excellent service life coupled with the power of the luminous flux. If you want to save money on dismantling light bulbs in your Lada Kalina, it makes sense to take a closer look at the products. The devices of this company have quite affordable prices, and are in no way inferior to foreign analogues.
Important! You shouldn’t save too much when choosing light bulbs. Cheap products from unknown manufacturers require frequent replacement, therefore the costs are the same. Remember, a high-quality light bulb costs more.
To dismantle or repair low beam devices, prepare:
- the actual lamps;
- screwdriver;
- pliers;
- set of keys;
- fabric gloves;
- clean rag;
- alcohol.
Important! Before dismantling the light bulb, it is necessary to check the fuse, as well as the contact terminals and blocks, for serviceability.
Conclusion
Replacing lamps or restoring their functionality is not a difficult task, so it can be done without involving car service specialists right on the road. To do this, you need to make sure that you always have the necessary spare parts - a set of fuses, a relay and the appropriate light bulb. The video in this article will give you the opportunity to find additional information on the above topic.
The efficient functioning of the lighting devices of the Lada Kalina car is a guarantee of safe movement. Over time, light bulbs reach the end of their lifespan and require replacement. Here, the practical domestic model Lada Kalina cannot be included in the cohort of exceptions. Low beam bulbs in the car we are considering play an important role, since in the daytime they allow you to identify the vehicle, and at night they illuminate the roadway in traffic or in suburban areas. Please note that regulatory regulations prohibit operation with low-beam mode bulbs that are not working or not turned on. The low beam lamp can also be replaced by hand.
Replacing low beam devices in Lada Kalina: instructions
So, immediately before replacing the light bulb, you will need to place the machine on a level area. Next, turn on the parking brake. The next step is to disconnect the ground wire from the battery.
The order of dismantling the left and then the right light bulb. The approach to the right one is blocked by the windshield washer reservoir. To extract it you need to perform some manipulations:
- remove the power terminals for the electric washer motor (Kalina hatchback and station wagon have 2 motors installed);
- unscrew the bolt securing the washer reservoir located above the headlight;
- unscrew the nut securing the reservoir from the rear to the body next to the right shock absorber strut;
- remove the tank
Important! When removing the reservoir, act as carefully as possible to avoid washer fluid from spilling.
With open access to the headlight, the low beam bulbs (right and left) are removed in the same way when dismantling. To match the left bulb, the equipped expansion tank will interfere. Dismantling the latter without loss of coolant is difficult. To remove the lamp on Kalina you will need to perform a number of steps:
- remove the rubber cover, thereby providing access to the headlight;
- remember the placement of 2 power wires connected to the headlamp, disconnect them;
- press the latch bracket (steel), lifting it;
- remove the latch bracket from the grooves, moving it to the side;
- remove the low beam bulb, carefully grasping it by the contacts.
Low beam lamp on Kalina. Using a multimeter. Replacing the relay and fuse
Did you like the article? Follow our channel for new ideas of useful car tips. Subscribe to us in Yandex.Zen. Subscribe.
During the day, the driver fully relies on his vision and reactions, but with the onset of darkness the situation changes dramatically. At this time, our eyes are unable to see much, so the head light becomes an indispensable assistant. Accordingly, if it is faulty, you cannot use the car, so you need to be able to repair it yourself, without resorting to the help of car mechanics.
Video “Replacing the BS lamp”
This video clearly shows the entire process of replacing parts (the author of the video is KalinaAutoChannel)
How to replace a low beam lamp on a Lada Kalina
In the daytime, every car enthusiast relies on daylight, his vision and reaction. However, when darkness falls, everything changes. At this time, you need to be especially careful, since often accidents due to negligence occur precisely when visibility is poor. To prevent this from happening, the headlights must be in good working order. If they do not work, then no movement can be carried out. Even if you want, you won’t be able to, because visibility will be zero. Therefore, it is very important to keep your flashlights clean and shining brightly.
Replacing the low beam bulb on a Lada Kalina: what you need to know
The Lada Kalina model is a popular and sought-after domestic car, which is not so difficult to service independently if necessary. Of course, often we are not talking about serious repairs of complex units.
However, changing the oil in the engine and gearbox, antifreeze or antifreeze of the cooling system, spark plugs or replacing the Kalina low beam lamp is quite within the capabilities of an ordinary car enthusiast in the conditions of an ordinary garage.
What types of lamps are recommended?
For the Lada Kalina in the second generation, the manufacturer provides for the use of modifications of lamps with an “H7” socket as low-beam head optics. The donor of these products is the legendary German manufacturer OSRAM. The power of the lamps is 55 W, which is quite enough for optimal light characteristics, and the power consumption is the standard 12 V. Which lamps are best to use?
There are analogues that owners, at their own discretion, can use as an alternative. Among the recommended options, you can consider products from such global brands:
- "Philips Extreme Vision";
- "GE SportLight".
These options will not please you with the price, since it is very high, but in terms of their parameters and durability they will be much more acceptable than other offers. It is up to the car owner to decide which lamps are best to choose.
If the owner of LADA Kalina feels limited in finances for the purchase of lamps, then we recommend turning your attention to Russian manufacturers of these products. It has succeeded here, having achieved an enviable balance of consumer qualities for its products. Low beam lamps from the specified manufacturer will have a favorable price, and their reliability will arouse “respect” from famous brands. No unexpected failures of these lighting elements were identified.
AvtoVAZ specialists do not recommend installing lamps from manufacturers who do not provide their products with the entire list of permits regarding import and sale on Russian territory.
Low beam bulbs Kalina: how to replace it yourself
Let's start with the fact that if the car is actively used, especially in the dark, the main load falls on the side lights and low beam lamps. In other words, Kalina’s low beam is precisely the light that is used almost constantly, especially if the car does not have PTF or DRL.
In this case, in order to avoid fines and deterioration in the quality of road lighting, the only way out of the situation is to change the Kalina low beam lamp independently. In this case, replacement is often carried out in the field.
One way or another, there is nothing complicated about it. The main thing is that you need a correctly selected lamp. The Kalina low beam is installed in a separate section of the headlamp. The Lada Kalina headlight itself has 3 sections: low beam, high beam and turn signal. In this case, you can replace Kalina lamps without removing the headlight itself, which simplifies the task. Let's look at replacing lamps in more detail.
Let's sum it up
The role of lamps as light emitters in any car, including the Lada Kalina, is very important. If you have to replace any of the components we examined, then first of all pay close attention to the quality of the product. This will avoid the unpleasant moment associated with a sudden burnout of the source, which is especially dangerous in the dark.
In our next article we want to tell you everything about the lamps used on the Kalina-2 car. If earlier, when coming to an auto parts store with a burnt-out brake light bulb, no one thought about what to buy as a replacement, but today there are a great variety of lighting devices on the shelves, for every taste. It is very easy to get confused in such diversity. In addition, you can buy LED alternative lamps. Let's try to figure it all out in order.
Headlights
The headlights have 3 different bulbs, not counting the direction indicators.
High beam
— Type of lamps used — H1.
The LED analogue is 4456, but preference should still be given to incandescent lamps, due to their more regular beam of light in the reflector.
Low beam
— Type H7 is installed here.
The Chinese LED analogue is 3528. But LEDs in the low beam headlights will not provide you with decent road illumination, so this idea should also be abandoned.
Side and running lights
- W21/5W. These are combined headlights and running lights.
It is very difficult to choose an LED analogue, since the type of pinout used is 3157 or 7443. More details about replacing these lamps are described in our article about LED running lights.
Bulbs used in taillights
Brake lights
- The most common bulbs are P21W. Chinese equivalent - 1156 (s25, ba15s).
When installing LED lights, make sure that the beam of light is scattered 360 degrees when it hits the diffuser.
Reversing light Hatchback
— R10W type lamps. These are small-sized lamps with the same base as P21W(BA15S). Their difference is in length. For an R10W lamp it should be no more than 3.75 mm.
LED lamp type - 1156, but with the appropriate length. Be careful!
Reversing light Station wagon
— lamps type W16W. This is a baseless analogue of P21W and R10W lamps.
Type T15 is suitable for LEDs. Look for lamps with a 360-degree spread.
Side lights and fog lights
— double lamp type P21/4W. Has 2 filaments. The base is the same as the P21W, but with 2 contacts - don’t confuse it!
For LEDs, look for type 1157.
P21W yellow lamps are used as turn indicators on Novaya Kalina. Their type is PY21W. 2 in front and 2 in rear optics.
If you want to purchase LEDs instead, then look for lamps of type 1156, but yellow. W5W or LED T10 lamps are used as side turn indicator repeaters.
Fog lights
If you have a luxury version of the new Kalina, then the car has front fog lights, the lamps of which are of the H11 type.
There are also LED analogues with the same type - H11, but again look for a dispersion angle of 360 g
At night, visibility, and, consequently, the safety of driving a car, primarily depends on the condition of the headlights. If during the day the driver only needs vision to monitor the road situation, then at night or when driving through tunnels it is impossible to do without artificial lighting of the road. Driving at night with non-functioning lamps or missing headlights is prohibited by traffic rules. In many countries, regulations require that lights be turned on even when driving during the day. Knowing how to change a low beam light bulb on a Kalina allows the driver to fix the problem right on the road, without wasting time on a trip to the service station.
Lada Kalina: lamps and their replacement
Let's start with the fact that in addition to the low beam, other bulbs Kalina 1, Kalina 2, etc. may need replacement. To complete the picture, below we will consider replacing the low and high beams, as well as turn signals, headlight glass, the entire headlight itself, etc. So, the first thing you should do is disconnect the negative terminal from the battery. Only after this can you begin to carry out certain work.
- First, let's move on to replacing the turn signal bulbs. First of all, you should turn the turn signal socket 45 degrees counterclockwise. After this, it can be removed from the headlight housing.
- If the low beam lamp on a Lada Kalina needs to be replaced, then replacing the low beam lamps begins with removing the protective rubber cover from the headlight housing. To remove the cover, just pull the characteristic petals that are made on it.
Now you should disconnect the wire tips from the lamp contacts, remove the spring clamp from engagement with the hooks (2 hooks), and then remove the clamp from the lamp.
Next, you can remove the lamp from the headlight housing. As for the Kalina model, the low beam lamp on this model is H7 (the standard low beam Kalina halogen lamp, power 55 W).
- To change the high beam lamps on Kalina, such light requires H1 bulbs with a power of 55 W. Replacing high beam lamps begins by disconnecting the wire block from the lamp, then compress the ends of the spring clip.
Now you can disengage them from the hooks, after which the latch is removed from the lamp. Next, you can remove the lamp from the headlight, install a new H1 lamp and begin reassembly.
Let us also add that to replace the side light bulbs, you should remove the following rubber cover, then remove the socket with the lamp, remove the lamp from the socket and install a new side light bulb. The dimensions on Kalina are W5W lamps, power 5 W.
Please note that when replacing lamps on any car (for example, Lada Kalina, low beam, H7 lamp), you should not touch the lamp bulb itself with your finger! The reason is that when heated, the lamp will darken. If you accidentally touch it, you need to carefully remove grease and dirt from the flask using a napkin or rag that is slightly moistened with alcohol.
How to replace light bulbs in a Lada Kalina 2 headlight
Sooner or later, the lamps in the headlights begin to burn out, so you may need instructions on how to replace the lamps in the headlights of the new Kalina 2. Here we will publish a photo diagram that will describe in detail the replacement of various lamps.
You can replace the lamps without removing Kalina's headlights. For clarity, the replacement process is shown with the headlight removed. Don't forget to remove the negative terminal from the battery.
Replacing the low beam lamp:
1. Remove the protective rubber cover from the headlight housing by pulling one of its three petals.
2. Disconnect the wire ends from the lamp.
3. Remove the spring clamp from engagement with the two hooks and move it away from the lamp.
4. Remove the low beam lamp from the Kalina 2 headlight housing.
Installing a new lamp is carried out in the reverse order.
Attention.
Do not touch the lamp bulb! It is recommended to replace the lamp with cotton gloves. After installing the new low beam lamp, make sure that the protective rubber cover fits snugly to the headlight housing.
Let us remind you that the previous article on our website was about replacing the side mirrors from a Lada Grant with a Kalina 2. The car will look much more beautiful. Installation of high beam lamps Kalina 2
To replace the high beam headlight bulb you will need:
1. Disconnect the wire block from the lamp.
2. Remove the latch from engagement by squeezing its ends.
3. Remove the high beam lamp from the Kalina 2 headlight.
The rest of the headlights are very easy to change. The installation of lamps in the headlights of Lada Kalina 2 was successful, enjoy your trip at night.
vazgarage.ru
How to change the headlight glass of a Lada Kalina, headlight assembly or side turn signal
During operation, the headlight glass may become cloudy or damaged. If polishing the headlights cannot solve the problem, on Kalina you can replace the headlight glass separately if necessary. This is done without removing the headlight itself.
First, use a screwdriver to pry up and remove the 6 spring brackets that press the lens to the headlight seal. After this, you can remove the headlight glass, as well as the glass seal. After this, you can install new glass and reassemble it.
Next, you need to remove the front bumper, then use a cross-head screwdriver to unscrew the screw of the upper headlight mounting, and also use head 8 to unscrew the three bolts that secure the headlight. After removing all fasteners, the headlight can be removed.
If the headlight is right-handed, for replacement you need to use an analogue with the RE marking on the body. For the left headlight the marking will be LE. Installing a new headlight on a car is done in the reverse order.
- We also add that to replace the side turn signal or its lamp, you need to move the turn signal forward and then remove it from the hole in the fender.
To change the lamp, you need to turn the socket counterclockwise. This will allow you to remove it from the side turn signal housing. To replace the turn signal housing, you should put the existing socket in the new housing, and then reassemble it, installing the side turn signal in place.
What's the result?
As you can see, if the low beam or other lamps on Kalina need to be replaced, the procedure can be performed on the spot with your own hands. The main thing you need to remember is that each lamp (low, high, side light) has its own designation and power. For this reason, only suitable labeling and power solutions should be purchased in advance.
It is also not difficult to replace the side turn signal bulb or the entire turn signal housing itself. The main thing is to pay attention to the recommendations given above, and also separately take into account some features when removing and installing certain elements.
How to polish car headlights yourself: grinding headlights and polishing optics made of plastic and glass. How to polish headlights, subtleties and nuances. Recommendations.
How to change the heater radiator on Kalina: the recommended method, as well as replacement without removing the dashboard. Choosing a replacement radiator for the Kalina stove.
Heated rear window: repair or install a heated rear window yourself. Subtleties and nuances, what to pay attention to, recommendations.
Selecting PTF for VAZ 2114 and 2115: how to choose VAZ fog lights (housing, type of lamp, standard or universal, etc.). Installation of fog lights VAZ 2114, 2115.
How to connect PTF in a car yourself: do-it-yourself fog light connection diagram. Subtleties and nuances, what to pay attention to when connecting.
Why is engine cut-off needed, types: by speed, by maximum speed, by exhaust gas pressure, etc. Why is the internal combustion engine cutoff pushed back?
Diagnosis of lamp faults
It is quite easy to find out if a lamp is faulty. When switching the light to low mode, the lamp stops lighting. To finally verify that it is faulty, you can pull it out and connect the contacts to the battery directly using two wires. One of the contacts is negative, the other two are positive. If the lamp lights up, it means that it was working properly and the problem lies in a faulty electrical circuit (poor contact) or the low beam relay has failed. Most often, a problem in the circuit can be caused by charred contacts or even a melted lamp socket. Moreover, the latter phenomenon is not so rare.
If the lamp does not light up when connected directly, it means that it has really burned out and needs to be replaced. This is also confirmed by a torn tungsten filament inside the bulb (just look closely at the inside of the lamp).
The service life and quality of a lamp are directly proportional to its price. Therefore, if you want to do less replacement work, you will have to spend a lot of money on a set of good lamps. The average price for an acceptable set of light bulbs is currently about 300 rubles.
When and why to change
The factory light is adjusted during the production process, at the time of passing technical inspection. In the new car, the modules shine with maximum power and at the peak of their capabilities. The need for replacement is determined by the following main criteria:
- Reducing light intensity.
- The appearance of yellowness and cloudy areas on the cut-off strip.
- Complete shutdown of one of the light modules.
- Increased brightness after the suspension hits a pothole or has mechanical contact with the headlight.
Kalina lamps installed on the conveyor last no more than 4 years. Cloudiness, deterioration of visibility and the appearance of unlit areas appear after the filament burns and the bulb smokes. In this case, the light does not pass through the dirt well and does not reach the desired areas of the reflector. There are yellow spots of light and darkened areas on the road.
The thickness of the light module filament is calculated by production engineers. When struck, the lamp shakes and the spiral becomes thinner. An external examination reveals a large increase in beam power. This indicates that the halogen lamp will soon fail, since the thin filament heats up above the set temperature and begins to melt. The service life of a damaged part ranges from one minute to several hours.
Which lamps are best to use in Kalina
To find out which lamps are installed in Kalina during assembly, you need to remove the cover and pull out the part. The name, model and type of spare part are printed on the case. AvtoVAZ uses products from Philips as the main light. However, some models contain parts from Osram.
When searching for light bulbs in Kalina, you should be guided by proven options:
- number on the Kalina body or in the vehicle passport;
- a burnt-out sample previously removed from the lantern.
The body number is entered into a special window that pops up when you visit online resources with catalogues. Such systems independently determine the year of production, configuration and type of lighting equipment and offer a list of original spare parts and replacements for Kalina.
The number is provided to the seller in the store to accurately determine the part code. A simple and reliable way is to remove the lamp from the base and buy a new one based on the sample. In this case, you avoid purchasing the wrong part and having to go back to the store for an exchange.
The Kalina hatchback and sedan use the same lighting devices. The type of spare parts is no different for the station wagon.
When choosing a light bulb, it is important to adhere to the recommended parameters from the Kalina manufacturer. Installing a light with a higher power will lead to melting of the internal parts of the optics and damage to the contact group. After installing cheap substitutes, damage is possible due to poor quality assembly of the part and even explosion of the bulb.
How to replace the lamps yourself
Changing a light bulb in Kalina yourself is not difficult. The time spent on the work depends on the skill of the driver and the size of the hands. Some owners change light fixtures in 15-20 minutes without removing the headlight, while others suffer for more than an hour and ultimately dismantle the optics.
When replacing, cloth gloves are used. This helps protect the skin on your hands and also prevents contact with the bulb. When touched, fingerprints remain, which heat up when the light is turned on and after a while burn through the thin glass.
During work, the battery terminal is unscrewed to avoid a short circuit, which will lead to burnout of the fuse link in the fuse box.
Far module
Replacing the high beam lamp is easier than in the low beam module, since the cover is located closer to the radiator grille.
To perform the operation you will need:
- Turn off the Kalina engine.
- Open the hood lid.
- Remove the protective boot on the back of the flashlight.
- Carefully disconnect the plastic chip.
- Open the latch.
- Pull out the lamp.
Assembly is carried out in reverse order. When installing the terminal, you need to check the contacts and, if necessary, clean them using a flat-head screwdriver, sandpaper or a special chemical spray.
Low beam
Replacing a low beam lamp on a Lada Kalina depends on the experience of the owner and is divided into two types:
- Without removing the headlight.
- With module dismantling.
Most Kalina owners cannot replace the lamp in the left headlight due to limited space. In this case, you will have to ask a more dexterous friend or dismantle the lighting device yourself for convenience.
To change lamps on installed optics:
- Unscrew the filter housing near the left headlight and move it towards the engine.
- Disconnect the washer motor terminal, remove the screws and move the reservoir to the side.
- Open the light module seals.
- Remove the block with wires.
- Remove the spring clip.
- Remove the part.
Assembling the headlight with a new spare part is carried out in the reverse order.
To dismantle the headlights, you need to unscrew the grille, fasten the modules and disconnect the contact chip. Place the removed optics on a convenient surface and replace the light elements.
Dimensions and DRLs
In the first generation Kalina, the dimensions are installed under the cover of the near reflector.
Replacement is no different from work in the near headlight compartment, however, to disconnect the lamp, it is turned counterclockwise. Drivers often install a diode instead of the original light source, which has a bright glow and can work for more hours.
Replacing DRL lamps on second generation Kalina:
- Open the hood.
- Find the plastic retainer at the bottom of the lamp near the radiator grille.
- Turn left 90°.
- Pull towards yourself.
Daytime running lamps do not contain halogen in the bulb, so they can be handled by hand when installing. Parts without gas include reverse elements, which are changed by bending the trim in the luggage compartment. To replace the Kalina station wagon's brake light bulb, you will have to unscrew the plastic plug on the fifth door, disconnect the chip and pull out the old spare part.
Turn signal
If the marker light on Kalina is freely accessible, then it is more difficult to get to the turn signal module.
To install a new lamp, you need:
- Unscrew the screws holding the air intake barrel and washer fluid reservoir.
- Move the parts towards the engine.
- Feel for the plastic cartridge and turn it to the left.
- The lamp is removed from its seat by slightly pressing and turning it 90° to the left.
To install a new part, you need:
- Install it into the cartridge.
- Press and turn to the right until it stops.
The finished element is mounted in a standard hole. You can check the operation of the light by turning on the corresponding key on the Kalina instrument panel.
Fog lights
When replacing the fog lights, partial dismantling of the locker will be required. To do this you need:
- Turn the wheel towards the engine compartment.
- Unscrew the screws and unclip the clips where they are attached to the bumper.
- Bend the fender liner.
- Turn the light bulb to the left until it stops.
- Pull towards yourself.
- Disconnect the plug.
To install a new light source in the PTF, you must first snap the connector, insert the part into the lamp and turn it to the right.
After carrying out the work, you need to check the correct functioning of the light and adjust the angle of the reflector. A properly functioning car light ensures good visibility in all conditions and safety on the road.
Installing a new one: sequential instructions
The procedure for removing and installing a headlight, which is located on the right or left side, is not particularly different from each other. It is only important to act strictly according to the instructions. When installing a new light bulb, you must only hold it by the base and do not touch it with your hands. When removed, you can completely hold it in your hands.
Note that for the Lada Kalina (16-valve engine) a lamp with an H7 socket is required. Install the new one as follows:
- Determine the seat so that the protrusion in the base coincides with the groove on the headlight. It must be firmly fixed. Only then will it be clear that the protrusion has fallen into the groove;
- press the latch against the lamp so that the center of the base is between the antennae of the latch;
- snap the latch into place;
- connect both wires to the clamp and close the lid tightly.
After completing this procedure, you need to turn on the headlights at close range and check their operation. If everything is fine, then the installation was completed correctly. Otherwise, you will have to take the car to a car service center and pay money for it. Lamps should only be purchased in special stores. It is advisable to give preference to well-known manufacturers and models with a guarantee. Osram H7 12V 55W headlights for the Lada Kalina Cross are very popular today.
You should not save money and purchase low-quality headlights, as they will not last long and will require frequent adjustment or replacement. It is important to understand that not only your safety, but also that of pedestrians depends on these light bulbs. It is especially important that the lighting is of high quality at night in order to avoid tragic consequences.
There is a special offer on our website. You can get a free consultation with our corporate lawyer by simply submitting your question in the form below.
A burnt-out low beam lamp is a fairly common occurrence, since we use low beam most often. Let's consider how to perform such an operation as replacing Kalina low beam lamps with your own hands.
The Lada Kalina car is equipped with low beam lamps with H7 socket. To replace a lamp, you first need to remove the burnt one.
For this:
Remove the rubber plug on the headlight housing
We remember which connector of which color the wire is connected to, disconnect both
After this, carefully move the clamp and the lamp toward you, holding them. You need to be careful here - if the clamp suddenly jumps out of the fasteners, it may fall inside the headlight, and to remove it you will have to remove the entire headlight.
We take out the burnt out lamp; the retainer should remain hanging on the headlight housing.
Attention! The new lamp should only be held by the base; do not allow the lamp to come into contact with your fingers, otherwise it will quickly fail.
- We install the lamp in the seat, the protrusion on the base should coincide with the groove on the headlight. If the protrusion gets into the groove, then the light bulb should not be turned by hand, but be fixed
Gently press the clamp against the lamp, while the central part of the base should remain between the antennae of the clamp.
Press the latch until it clicks into the fasteners.
We check that the lamp is securely fixed, connect both wires in place and tightly close the headlight cover.
After this, do not forget to turn on the low beam and check the functionality of the lamp.
OUR PARTNERS:
Website about German cars
Any modern car or truck can be serviced and repaired independently, in a regular garage. All you need for this is a set of tools and a factory repair manual with a detailed (step-by-step) description of the operations. Such a manual should contain the types of operating fluids, oils and lubricants used, and most importantly, the tightening torques of all threaded connections of parts of vehicle components and assemblies. Italian cars - Fiat (Fiat) Alfa Romeo (Alfa Romeo) Lancia (Lancia) Ferrari (Ferrari) Mazerati (Maserati) have their own design features. Also, all French cars can be distinguished into a special group - Peugout (Peugeot), Renault (Renault) and Citroen (Citroen). German cars are complex. This especially applies to Mercedes Benz, BMW, Audi and Porsche, and to a lesser extent to Volkswagen and Opel. The next large group, separated by design features, consists of American manufacturers - Chrysler, Jeep, Plymouth, Dodge, Eagle, Chevrolet, GMC, Cadillac, Pontiac, Oldsmobile, Ford, Mercury, Lincoln. Among the Korean companies, Hyundai / Kia, GM - DAT (Daewoo), SsangYong should be noted.
More recently, Japanese cars were distinguished by their relatively low initial cost and affordable prices for spare parts, but recently they have caught up with prestigious European brands in these indicators. Moreover, this applies almost equally to all brands of cars from the land of the rising sun - Toyota (Toyota), Mitsubishi (Mitsubishi), Subaru (Subaru), Isuzu (Isuzu), Honda (Honda), Mazda (Mazda or as Matsuda used to say) , Suzuki (Suzuki), Daihatsu (Daihatsu), Nissan (Nissan). Well, and cars produced under the Japanese-American brands Lexus, Scion, Infinity,
During the day, the driver fully relies on his vision and reactions, but with the onset of darkness the situation changes dramatically. At this time, our eyes are unable to see much, so the head light becomes an indispensable assistant. Accordingly, if it is faulty, you cannot use the car, so you need to be able to repair it yourself, without resorting to the help of car mechanics.
Before changing the low beam lamp on Kalina, you need to check the integrity of the on-board network:
- When understanding the causes of failure of any component of electrical equipment, you should first make sure:
- the fuse is in good working order;
- look at the circuit connectors, which should be well secured;
- Often the causes of electrical equipment malfunctions are the oxidized ends of the pads; their terminals should be cleaned.
- Take a good look at the places where the car is connected to ground. Often, due to the lack of reliable fastening, disturbances in the functioning of electrical equipment occur, so replacing low beam lamps on Kalina may not always help with the problem.
In the photo - check the ground on the car
Use the tester:
- the equipment will help to find faulty places in the electrical circuit;
- is a combined electrical measuring device.
There are several types of such devices:
- digital, equipped with a liquid crystal display;
- analog;
- universal models, characterized by the presence of a liquid crystal screen and a dial indicator.
Multimeter
To check de-energized circuits, the device should be switched to ohmmeter mode:
- if you need to measure very low resistance (for example, within a few Ohms), you should enter a clarification - from the obtained indicator we subtract the internal resistance, the electrical resistance of the probes and multimeter wires (within 0.07 Ohms);
- to determine a more accurate value, the device is switched to the mode for measuring low resistance values (up to two hundred Ohms), then the ends of the probes should be short-circuited.
To check live circuits, the multimeter should be switched to voltmeter mode (the limits of permissible measurements are up to twenty volts). The device is capable of measuring the current consumed by electrical equipment of vehicles (up to ten amperes).
In cases where the task is to find out whether or not there is voltage in a certain section of the circuit, without resorting to measuring the value, you can use a special indicator light designed for twelve volts. You can also use a test lamp.
You can make it yourself:
- you will need a car lamp with a power of up to 4 W;
- take 2 two wires, the length of which is from 500 mm;
- solder them to the lamp.
