VESKO-TRANS.RU
AutoNews / Reviews / Tests
Replacing the VAZ 2107 Generator Brushes Without Removal
replacing the generator
brush on VAZ-2113, 2114, 2115
Brush generator
they serve as conductors of electronic current: they bring it and take it away. Thanks to their work, the alternator generates voltage, which helps measure the functioning of the vehicle's electrical devices.
The brushes are made of graphite, carbon parts are especially popular, and for engines operating at high speeds, the brushes are impregnated with a special compound that prevents them from being used in a timely manner.
Basic faults
The main reason why alternator brushes fail is because they wear out, causing them to feel bad. Replacing the gear lever on a VAZ 2107. I sent a classic engine and gearbox to the engine, tell me what to do? The gear shift lever on the VAZ 2107 has come off (5-speed. Replacing the VAZ 2108 generator brushes yourself. You can identify the faulty part due to the following problems:
- power outage;
- the battery discharges quickly or does not charge at all;
- lights begin to burn much less or flash;
- flashing lights flash;
- There is not enough voltage to operate the electronics and they turn off (for example, the radio).
Why change brushes
If there are signs of brush breakage, replace them. VAZ 2104 - 2107; replacement of generator brushes on VAZ-2113, 2114, 2115. Without dismantling the generator. Repair of generator brushes on VAZ 2105-2107 models. Do it yourself Vase 2107 Windshield replacement | auto guide If you don't complete the repairs on time, chances are you'll soon have to buy a new generator, which will have a completely different cost. Replacing the brushes of the VAZ 2107 generator. Photo, instructions on how to do it. The battery can only hold brushless ignition for a few minutes, which means it must be constantly charged. Replacement of VAZ 2110, Pin and Bearing Generator and Replacement Coming Soon.
You can check the condition of the brushes by the size of their protrusion from the socket. Replacing the VAZ 2107 generator brushes is a simple procedure and usually takes a few minutes; There is no need to remove the generator, just turn it off. If the projection size does not reach five millimeters , they must be replaced immediately to avoid possible problems.
Worth checking out:
- Removing a VAZ 2107 generator with your own hands
- Installation of a new VAZ 2110 starter
- How to replace a VAZ 2110 timing belt and tension roller at home
Do-it-yourself repair of the VAZ 2101 generator: disassembly, cleaning, replacement of parts
- Remove the control relay from the generator.
- Use a hammer to knock out the rotor using the hole under the relay.
Do-it-yourself repair of the VAZ 2101 generator: disassembly, cleaning, replacement of parts
- Using a socket wrench set to “8”, unscrew the 3 nuts that secure the stator of the diode bridge. If the bolts turn, you need to fix them with pliers on the other side.
Do-it-yourself repair of the VAZ 2101 generator: disassembly, cleaning, replacement of parts
- Before removing the stator, treat the joints with WD-40 penetrating fluid. Wait a few minutes, then carefully knock it out with a hammer. After removing the stator, remove the diode bridge. Unscrew the condenser and use a universal puller to press out the rear rotor bearing.
Do-it-yourself repair of the VAZ 2101 generator: disassembly, cleaning, replacement of parts
- Remove the front cover and tie plates. Damage to the bolts installed there is possible, so it was necessary to prepare 4 “8” nuts in advance.
- Remove the plates and press the bearing through the frame.
Do-it-yourself repair of the VAZ 2101 generator: disassembly, cleaning, replacement of parts
What are brushes and what are they for?
It usually happens that when driving speed increases, the intensity of the low or high beam headlights, as well as the dashboard illumination, suddenly decreases, the radio and cigarette lighter do not work. Inexperienced drivers begin to look for the cause either in the electrical wiring, fuses, or associate this behavior of the devices with a short to ground. You can spend a whole day troubleshooting, but what a surprise it will be when it turns out that the whole thing is just two small black pieces of metal in the form of bricks with wires, which are called generator brushes.
It is known from a school physics course that any generator basically has a stator (fixed part) and a rotor (moving part), each with its own windings, usually made of copper wire. Due to the force of the magnets, the rotor rotates, electricity to which is supplied through the armature and touching metal parts called brushes. Since the friction force on the ground acts on all objects, as a result of the constant rotation of the rotor, the parts we are considering are gradually erased, even though the material from which the brushes are made is quite strong.
Replacing the VAZ 2101 Generator Brushes Without Removal
Disassembling the generator / replacing the carbon brush
The carbon brushes of the generator wear out quite slowly; on average every 120,000 km. It is recommended to replace the brushes a little earlier in order to remove the generator.
- Heat the housing to 50-60°C by holding a 200W soldering iron over the bearing housing for 3-4 minutes.
If the bearing housing does not heat up, the bearing cannot be removed because the rear bearing and rear mount are very tightly connected.
- Unscrew and remove 3 bolts. Insert a flathead screwdriver between the stator and the front mount and separate the two parts.
Do not insert the screwdriver very deeply; otherwise the stator you like will be more scratched. When separating parts, make sure that the compressed spring does not protrude into the rear bearing area.
- Carefully hold the rotor in a vice and remove the center bolt of the belt pulley. Remove the belt pulley using the impeller and spacer.
- Unscrew the rectifier from the rear cover of the generator.
- Separate the rear mount and stator from each other.
- Solder the stator winding cable from the rectifier holder, holding the terminal with pliers to remove heat from the rectifier. Do not hold the soldering iron for more than 5 seconds.
- Replace the carbon brushes when the wear limit (8mm or less) is reached. To do this, solder the contacts.
- If necessary, check the wear of the sliding rings on the rotor.
- Check that both rotor bearings move easily. if you want to change. The rear bearing is pressed in and requires a press to change.
- Insert the brushes and springs into the holder and solder the contacts. Cut out any protruding areas. At the same time, solder the wires so that the brush wear line is opposite the end of the brush holder at a distance of 2.4. 3mm ahead.
Through the protruding lumps, the contacts are compressed and the brushes become unusable.
Generator brushes. How to replace.
- After installation, check that the new brushes move easily in the holders.
- To solder the stator cable to the rectifier board, do not overheat the rectifier.
- Attach the rear housing to the rotor and connect.
- Install the front bearing shield together with the spacer sleeve and collar sleeve.
- Install the impeller with the belt pulley and spring washer and tighten the nut. 60 Nm .
- Insert the thrust spring into the eccentric groove of the rear bearing. The protruding part of the spring should, in all this, fit into the best deep part of the groove. The edge of the groove is chamfered at its deepest point.
Do not forget to pay attention to the correct position of the thrust spring, because of this the projection spring on the groove is miniature, which simplifies installation. Even today, spring is not so heavily loaded, and for this reason the stubborn influence increases.
- Before installing, bend the wire connection of the rectifier so that they do not touch the rotor. Insert the brushes with your finger into the brush holder, insert the wire (4mm wide, 40.50mm long) into the rear bearing hole, holding the brushes in this way, clamping them.
- Assemble the generator housing by preheating the soldering iron, see Paragraph Dilution .
- Secure housing 3 with bolts.
Remove the wire holding the brushes from the hole on the back of the generator.
Source
Replacing brushes on VAZ-2107, 2110, 2114 - is there a difference?
Brushes are the part that most often requires replacement, and therefore all car manufacturers design generators in such a way that no difficulties arise in such a process. If you purchased the car not so long ago, there will be no problems with replacing brushes. Their abrasion is a long process, depending on the intensity and service life of the machine. When purchasing a vehicle with a fairly high mileage, it is better not to wait for these parts to become unusable, but to replace them immediately. Fortunately, brushes are not in short supply, and their price is quite reasonable.
Disassembling the generator
Generator 37.3701. Clean and blow out the generator with compressed air. Lock the generator pulley with the clamp included in the set of tool 67.7823.9504, unscrew the pulley fastening nut and compress the pulley using a puller. Remove the key and conical washer from the pulley.
The set of tool 67.7823.9504 includes a regular puller and grip. The latter consists of two steel half-rings that are inserted into the pulley groove. The half rings have the same cross-section as the generator drive belt. On one side they are hinged, and on the other they are equipped with levers that are compressed with one hand when removing the pulley.
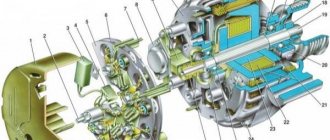
| Rice. 8–12. Generator parts 37.3701: 1 - voltage regulator assembled with brush holder for generators produced since 1996; 2 - voltage regulator and brush holder for generators manufactured before 1996; 3 — terminal block for additional diodes; 4 — insulating bushings; 5 - rectifier block; 6 — contact bolt; 7 - stator; 8 - rotor; 9 — spacer sleeve; 10—inner bearing mounting washer; 11 — cover from the drive side; 12 - pulley; 13 - outer bearing mounting washer; 14 - coupling bolt; 15 — front rotor ball bearing; 16 — bushing; 17 — cover from the side of the slip rings; 18 — buffer sleeve; 19 — clamping sleeve; 20 - capacitor |
Disconnect the wire from plug “B” of the voltage regulator. Disconnect the wires of the regulator and capacitor from terminal “30” of the generator and unscrew the screws securing the voltage regulator. For generators manufactured before 1996, to avoid breaking the brushes when removing the brush holder, insert the blade of a screwdriver between the regulator body 2 () and the brush holder and partially pull the regulator out of the generator, leaving the brush holder in place. After this, tilt and remove the regulator together with the brush holder from the generator. Remove capacitor 20 by unscrewing the fastening screw.
Unscrew the nuts of the coupling bolts 14 and remove the generator cover 11 and the rotor 8. Unscrew the nuts of the bolts connecting the tips of the diodes to the terminals of the stator winding and remove the stator 7 from the generator cover 17.
Unscrew the nut of the contact bolt 6, disconnect the plug of the wire of additional diodes from block 3 and remove the rectifier block 5.
| Rice. 8–13. Details of the front part of the G-222 generator: 1 - casing; 2 - voltage regulator; 3 - base; 4 — brush holder with brushes; 5 — generator cover from the slip ring side; 6 — plug block of the central output of the stator winding; 7 — terminal “15” of the generator (terminal “B” of the voltage regulator) |
The G-222 generator is disassembled in the same order. To remove the voltage regulator, you need to unscrew the fastening screws and remove the casing 1 () assembled with the regulator 2, base 3 and brush holder 4. Then, unscrewing the screws, disconnect the regulator, base and brush holder with brushes.
Further disassembly of the G-222 generator is similar to the disassembly of the 37.3701 generator.
Replacement process and small tricks
Now let's move on directly to how the replacement should be made. First of all, protect yourself from electric shock. Disconnect the negative battery terminal. Although the current in the electrical circuit of a car is not as strong as in an electric locomotive, a random spark strikes quite noticeably.
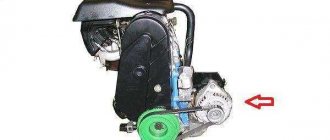
In the VAZ-2107, 2110 and 2114 models, the generator is traditionally located on the right side of the engine compartment, or, more simply, near the headlight on the passenger side. It doesn’t matter what the engine layout is, whether the car has rear-wheel drive or not. Here Zhiguli adheres to traditions. The generator housing is attached to the engine, and you can recognize it by the flywheel on which the drive belt is tensioned.
Location of the generator in the car
Now you need to decide how it is more convenient for you to carry out the replacement procedure: either by removing the generator completely, or without disconnecting it. The peculiarity here is that after the repair it will be necessary to adjust the belt tension. If in cars with indexes 2110 and 2114 this adjustment does not present any particular difficulty, then on the VAZ-2107 the procedure may be delayed due to the ill-conceived layout of the units. So look at the circumstances.
The order of further actions is as follows:
- We disconnect the protective cover from the generator housing.
- We remove the plastic power terminal from the socket.
- We unscrew the two bolts that secure the holder with the parts of interest, and remove it together with them.
- We check the wear of the brushes - they should protrude from the socket by at least 5 mm - and replace them.
- Reassemble in reverse order.
Pay special attention to installing the brushes in the holder. They should “sit” freely in their nests.
Installing new brushes
To alleviate the plight of car enthusiasts, the industry has long been producing a holder complete with a voltage regulator and brushes. It costs 100–150 rubles more than a set of two small parts. It is clear that everyone is trying to make a purchase cheaper, but think about how much you will gain from such savings? After all, such a replacement is done infrequently, perhaps only once during the entire life of the vehicle.
By the way, malfunctions can be associated with this same voltage regulator. Before installing the unit into the generator, connect the “positive” wire of the car battery to its plug connector, and the “negative” wire to the body of this unit. Then connect a 3 W, 12 V lamp and a rheostat to the brushes. If everything is connected properly, it will light up. Gradually increase the voltage, bringing its value to 16 V. When this limit is reached, the light bulb should go out. If this does not happen, the voltage regulator is faulty.
Worth checking out:
- How to make heated seats on a VAZ 2110 without going to a service station
- How to install a rear view camera on a VAZ 2112 with your own hands
- Tuning VAZ 2115: LED backlighting of the instrument panel at home
Next, the generator assembled in the reverse order. The rotor is reinstalled using hammer blows. At the very end of assembly, it is important to lock the bolts.
Recommendation: if the capacitor seating surface is sanded, the contact will improve and become more stable.
Car owners who have an outdated version of the diode bridge installed may encounter difficulties with the output of pin 61, because it is difficult to fit into the hole on the back cover. One way to solve the problem is to enlarge the hole with a file.
Do-it-yourself repair of the VAZ 2101 generator: disassembly, cleaning, replacement of parts
Do-it-yourself repair of the VAZ 2101 generator: disassembly, cleaning, replacement of parts
After all the above steps have been completed, the repair of the VAZ 2101 generator can be considered complete. Next, you need to install it on the vehicle and test it in action.
Lada 2107 1.6 › Logbook › The epic with the generator is over))
Hello everyone)) Finally I finished) Today turned out to be a fairly warm day, only -2 degrees. Let's start in the morning. In the morning (at about 7:45) I left the house with my warm battery) I installed it and started the engine. Charging was almost completely at maximum. The car warmed up and I went to school. In the afternoon (at about 13:30) I left the school to warm up the car and leave. After getting into the car and turning on the ignition, I saw the following: There is almost no charge. The arrow lies in the red zone. Without hesitation, I gathered all my classmates and let’s push. After 2 unsuccessful attempts, it started, and on the dashboard...
it burned brighter as the revs increased. At 2000 it burned as if the network was not 12 volts but 20, it was already blinding. Arriving at the garage, I took the gene from the VAZ 2101 and began to look at it. For comparison:
There is no such thing in the VAZ 2101 generator. Since the regulator is located directly outside the brushes. For comparison:
Required tools:
- a universal puller necessary to remove the bearing (it is possible to use a rod puller, but this is not so convenient);
- metal brush, sandpaper with a cloth base;
- hammer;
- penetrating fluid WD-40;
- standard set with keys and screwdrivers.
In the photo you can see a VAZ 2101 generator before repair. After repair, changes in it will be obvious.
Do-it-yourself repair of the VAZ 2101 generator: disassembly, cleaning, replacement of parts
Do-it-yourself repair of the VAZ 2101 generator: disassembly, cleaning, replacement of parts
Recommendations
Comments 16
My brain explodes at the end of the article! Maybe I didn’t understand correctly, but from what I read I concluded that from the generator, namely, from the brushes, we throw the wire to the relay on pin 67, and from pin 15 we throw the wire again on the generator, namely on the M8 threaded stud, where 2 thick wires. So? Did I understand everything correctly?
So, here it would be necessary to be more precise. if you have a wire from the brushes going to the diode bridge, then you need 67 from the brushes and 15 to the wire that was inserted into the brushes. if not, then the wire comes from the brushes at 67 and 15 goes to that pin. But in this and in the case that the wire is a pin, this is the + output.
In general, I have an Oda and it has a VAZ2105 type generator with a tablet in the generator on the brushes, I bought myself a generator from a VAZ 2101 and now I’m looking for information on how to connect it. I have only 2 wires coming from my original generator, one double, on the M8 stud, the other to the terminal on the generator, and now a terminal has formed from the brushes, that’s the question, that’s why I’m asking how to properly connect with an external relay. I myself am not an electrician, for me these are murky miracles))) That is, as I understand it, we loop the relay on the generator from brushes 67 and from 15 to the M8 pin, leaving everything else unchanged? I looked at the diagram in the article, where the wire from the gene goes to 67 in the relay, and from 15 to the fuse block, here I am in a stupor... firstly, where to connect in the block, and secondly, the option with a loop confused me, because . It turns out 2 different connection options.
Yes that's right. you do this. But in the diagram it says it's a fuse. M8 is the output + for the fuse and for the battery)) the tablet is the same thing, just a shorter version.
Ok, I'll try it today.
Yes that's right. you do this. But in the diagram it says it's a fuse. M8 is the output + for the fuse and for the battery)) the tablet is the same thing, just a shorter version.
I did it and it didn’t work. Charging 18.5 sucks!
umm... from a brush to 67 from 15 to a hairpin?
Weird. maybe a relay?
No, the relay is new, everything is fine with it. This connection diagram is not correct for this car model.
Either the skis don’t work or I’m an idiot, but: a) from the pre we have a wire going to the excitation winding of the generator, although no, that’s not the case, the pre is f10, responsible for the tidy (including the devices inside it and the first start of the genes), turn signal relay , the carb valve and the excitation winding, yes, yes on 222 generators, the fashion has become that through the tidy light bulb and the 12-volt diode from the tidy goes to the excitation winding for the first time. For 221 genes, aka a penny light bulb is purely an indicator. On modern cars, the light bulb is also an indicator; it is placed in parallel with resistors. b) RN is also a tablet, it takes the voltage from the additional diodes and checks it (a simple test method, if the voltage is more than 14 volts, we extinguish the generator, start it less, yes, we have a pulse 3-phase generator), made by AvtoVAZ to decouple the tablet from the on-board network. It was the same white wire that you had fallen out. c) In order for the gene to charge the battery, after starting the car (the biggest thing here is the starter, it eats decently), you need to drive a decent distance at rpm d) in principle, we can’t kill the generator on a vase, and can be treated by replacing any part. So, in general, it’s great, with repairing a car with improvised means, but the 221 generator (a cheap one) is, in principle, weaker than its 222 brother, EMNIP, 42A, versus 55A (the gene produces complete nonsense at 3000-3500 engine speeds)
You need to look at what the voltage is, and if the arrow lies completely, it may not be so good, since when the arrow lies completely, this is an overcharge. Because the light on the device from the generator was shining brightly, there was a lot of recharging - it was lucky that the battery didn’t boil. So check the voltage.
did you install an external relay from 2101 to 2107?
yes, with alteration of brushes from VAZ 2107
is the other wire not connected?
The relay simply turns off, there is one wire going to the M6 pin and the other to the brushes, these 2 wires are not needed afterwards
Also check out
- Self-replacement of the VAZ 2110 CV joint
- Checking the diode bridge of a VAZ generator without contacting a service station
- VAZ 2114 starter repair: do-it-yourself Bendix replacement
Do-it-yourself repair of the VAZ 2101 generator: disassembly, cleaning, replacement of parts
Now the VAZ 2101 generator is disassembled, all its parts need to be cleaned and washed (for this you should use sandpaper, a knife, or a wire brush).
Do-it-yourself repair of the VAZ 2101 generator: disassembly, cleaning, replacement of parts
The photographs show a 1996 model, but since that time the location of pin 61 has changed. On the old diode bridge the contact was placed on a wire, on the new one it is directly soldered into the bridge.
Do-it-yourself repair of the VAZ 2101 generator: disassembly, cleaning, replacement of parts
How to Change Brushes on a VAZ 2107 Generator
Replacing VAZ generator brushes 2107
Despite the obvious ease of operation, if you need to replace the brushes of a VAZ 2107 generator, this malfunction should not surprise you.
Before you begin replacing the brush, it is necessary to introduce the general operating principle of the device that generates electricity. Structurally, the VAZ 2107 automobile generator is no different from similar devices of other brands.
Principle of operation of the generator When the generator rotates away from the engine, the rotating rotor windings create an alternating magnetic field and interact with the stator windings, exciting the same magnetic field. This interaction results in the development of alternating current. Subsequently, the electric current is rectified as it passes through the diode bridge and, passing through a special relay, is sent to the vehicle's power system. This place is simple and special brushes are used.
The electric current generated by the VAZ 2107 generator is the power source for all consumers involved in the operation of the vehicle. These include the current consumers of the engine (plugs, sensors, etc.), as well as the current drawn by the operation of the air conditioning, exterior lighting, multimedia system, etc. When the alternator is running, the battery is also charged, which is part of the current generated when starting the engine.
Repair of VAZ 2101 generator: disassembly, cleaning, replacement of parts
- Clean the generator from accumulated dirt, dust, and oil.
- Position the generator so that the pulley rests on the floor, unscrew the pulley nut, and put a key on it at “19”. Next, hit the key with a hammer several times, holding the pulley from turning.
Do-it-yourself repair of the VAZ 2101 generator: disassembly, cleaning, replacement of parts
Do-it-yourself repair of the VAZ 2101 generator: disassembly, cleaning, replacement of parts
- Using a “10” wrench, unscrew the 4 bolts of the tie rods connecting the generator into one piece.
Do-it-yourself repair of the VAZ 2101 generator: disassembly, cleaning, replacement of parts
- Install the generator so that the shaft is on top, knock out the key with a chisel, hitting it with a hammer.
- Remove the front cover of the generator. If this cannot be done easily, you need to knock it out by weight.
Replacing generator brushes with your own hands
As you know, there are two electric motors in a regular car - one starts the piston unit, and the second generates the electric current necessary for the life of the car. The latter, like any electric motor, ages and breaks down over time. It's not just about aging, though. Most often, you just need to replace the generator brushes.
After all, these elements fail in the electric motor first. Why is this happening? Here are some reasons:
- they simply wear out, such a banal reason is more common than others;
- humidity inside the electric motor, it appears due to careless washing or driving through deep puddles;
- constantly poor contact with the anchor;
- frequent operation of the electric motor at extreme conditions.
The wear of these parts in contact with the armature to supply it with electric current can be diagnosed by measuring the voltage at the motor terminals. If the output voltage is reduced or disappears altogether, it means that the generator brushes most likely need to be replaced.
When removing them, they also look at the working size of these limit switches and check them with the passport data. If the value is below normal, new parts must be installed. Let’s look at how to perform this reinstallation using the example of several cars. Also read about replacing the clutch cable of the priors and how much it costs to bore the crankshaft.
Replacing generator brushes on a VAZ 2106 Zhiguli
- Repair manuals
- Repair manual for VAZ 2106 (Zhiguli) 1976-2005.
- Replacing generator brushes
↓ Comments ↓
1. General information
1.0 General information 1.1 Safety precautions
2. Diagnosis of faults
2.0 Diagnostics of faults 2.1 diagnostics of faults in the engine and its systems 2.2 Diagnostics of faults in the clutch 2.3 diagnostics of faults in the gearbox 2.4 Diagnostics of faults in the driveline, rear axle, chassis, steering and braking system 2.5 Diagnosis of faults in the body 2.6. Diagnosis of electrical equipment faults
3. Engine
3.0 Engine 3.1 Cylinder head and timing mechanism 3.2 Lubrication system 3.3 Oil change 3.4 Replacing the camshaft drive chain guide 3.5 Replacing the camshaft and valve levers 3.6 Replacing the valve stem seals 3.7 Replacing the intake and exhaust manifold gaskets 3.8 Replacing the cylinder head gasket ov 3.9 Disassembling the head cylinder block, valve grinding
4. Engine power system
4.0 Engine power system 4.1 Replacing the air filter element 4.2 Replacing the fuel pump 4.3 Repairing the fuel pump 4.4 Replacing the fuel tank and its hatch cover
5. Carburetor
5.0 General information about the carburetor 5.1 Cleaning the fuel filter 5.2 Replacing the idle air system solenoid valve 5.3. Adjusting the carburetor 5.4 Replacing the carburetor 5.5. Carburetor repair
6. Engine cooling system
6.0 Engine cooling system 6.1 Replacing the coolant 6.2 Replacing the coolant pump 6.3. Replacing the thermostat 6.4 Replacing the engine radiator
7. Exhaust system
7.0 Exhaust system 7.1 Replacing exhaust system parts
8. Clutch
8.0 Clutch 8.1 Replacing fluid and bleeding the clutch hydraulic drive 8.2 Adjusting the drive 8.3 Replacing the clutch master cylinder 8.4 Repairing the clutch master cylinder 8.5 Replacing the clutch slave cylinder 8.6 Replacing the pressure plate assembly and clutch release bearing
9. Gearbox
9.0 Gearbox 9.1 Checking the level and changing the oil in the gearbox 9.2 Replacing the reverse light switch 9.3 Replacing the secondary shaft cuff 9.4 Replacing the gearbox 9.5 Repairing the gearbox 9.6 Replacing the speedometer drive 9.7 Features of repairing a five-speed gearbox
10. Cardan transmission
10.0 Cardan transmission 10.1. Maintenance 10.2. Replacing the driveshaft
11. Rear axle
11.0 Rear axle 11.1 Checking the serviceability of the rear axle 11.2 Changing the oil 11.3 Replacing the axle shaft and its cuff 11.4 Removing and installing the rear axle 11.5 Replacing the cuff of the drive gear 11.6 Replacing the gearbox 11.7 Repairing the gearbox
12. Front suspension
12.0 Front suspension 12.1. Maintenance 12.2 Replacing the bearings and hub cuff 12.3 Replacing the cushions and stabilizer bar 12.4 Replacing the ball joints 12.5 Replacing the shock absorbers 12.6 Replacing the springs 12.7 Replacing the upper arms and their rubber-metal hinges 12.8 Replacing the rubber-metal joints of the lower arms on a car 12.9 Replacing the lower arms 12.12 . Adjusting wheel alignment angles
13. Rear suspension
13.0 Rear suspension 13.1 Checking technical condition 13.2. Replacement of rear suspension parts
14. Steering
14.0 Steering 14.1 Adding oil 14.2 Checking the condition of the steering 14.3 Adjusting the gear engagement 14.4 Replacing steering rods 14.5 Replacing and repairing the pendulum arm 14.6 Removing and installing the steering wheel 14.7 Removing and installing the steering shaft 14.8 Removing and installing the steering mechanism 14.9 Removing the bipod
15. Brake system
15.0 Brake system 15.1 Checking the condition of the hydraulic drive 15.2 Checking the vacuum brake booster 15.3 Checking the functionality of the pressure regulator 15.4 Replacing brake fluid and bleeding the brake system 15.5 Replacing the brake pads of the front wheels 15.6 Replacing the brake pads of the rear wheels 15.7 Replacing the brake caliper of the front wheel 15.8 Replacing the brake cylinders of the front wheels 15 .9 Repair of front wheel brake cylinders
16. General information
16.0 General information 16.1. Checking electrical circuits 16.2 Fuse blocks 16.3 Replacing fuses 16.4 Replacing the main and additional fuse blocks 16.5. Replacing the relay 16.6 Replacing the ignition switch 16.7 Replacing the contact part of the ignition switch 16.8 Battery 16.9. Generator 16.10. Starter 16.11. Ignition system 16.12. Lighting, light and sound alarms 16.13. Windshield cleaner and washer 16.14. Repair of the electric heater motor 16.15. Control devices
17. Body
17.0 Body 17.1 Replacing the front bumper 17.2 Replacing the radiator grille 17.3 Replacing the hood latch 17.4 Replacing the hood 17.5 Replacing the windshield 17.6 Replacing the interior rear view mirror 17.7 Replacing the sun visor 17.8 Replacing the headliner 17.9 Replacing the ceiling grab handle
18. Heating and ventilation system
18.0 Heating and ventilation system 18.1 Replacing the electric heater fan 18.2 Replacing the heater radiator 18.3 Replacing the radiator casing 18.4 Replacing the heater valve
19. Car body care
19.0 Car body care 19.1 Car washing 19.2 Preservation and protection of paintwork
20. Applications
20.0 Applications 20.1 Tools used in addition to the standard set 20.2 Electrical diagram of VAZ-2106, VAZ-21061, VAZ-21063 cars produced in 1976–1987. 20.4 Tightening torques for threaded connections 20.5 Basic data for adjustments and monitoring 20.6 Characteristics of spark plugs 20.7 Fuel, lubricants and operating fluids used 20.8 Lamps used on the vehicle 20.9 Lip seals (oil seals)
| EXECUTION ORDER |
Restoring an electric motor at a VAZ
Let's first look at how to replace the brushes of a VAZ 2107 generator. For work, we will be equipped with the following tools:
- set of spanners;
- screwdrivers - set;
- rubber hammer.
So, we begin work on changing the generator brushes on the VAZ 2107.
- We disconnect the terminals of the battery, and also unscrew the cables from the terminals of the electric motor, dismantle it by unscrewing the fasteners. Loosen the belt and remove the electric motor.
- Unscrew the pulley mount while holding the rotor with a tool.
- Disconnect the traction relay.
- After unscrewing the nuts, remove the front cover of the assembly unit using a rubber hammer.
- We also use a rubber hammer to push the rotor out.
- We detach the back cover from the stator.
- We remove the brush holder from the stator and reinstall the worn parts.
- The electric motor is assembled in the reverse order.
This process, if something is not clear, you can also visually study the video called “replacing VAZ 2107 brushes.” Replacing brushes in a VAZ 2106 generator is done in exactly the same way.
If we turn to VAZ models with front-wheel drive, then there are not so many differences in the procedure. For example, let’s first consider how to replace brushes on a VAZ 2110, for which we first take this:
- spanners;
- Screwdriver Set;
- hammer, block, or rubber-tipped mallet.
- Having loosened the belt, disconnected the wires and unscrewed the three bolts, we dismantle the electric motor.
- Having taken the unit out of the car, remove the pulley, holding the rotor with a screwdriver. In principle, the traction relay and rotor do not need to be dismantled; for the “seven” we did this for ease of work.
- Next, unclip the latches on the back of the electric motor, and then remove the plastic casing.
- We immediately see the voltage regulator assembly along with the brush holder.
- Unscrew the two screws and remove the brush holder.
- We renew worn parts.
- We do the assembly in reverse.
By the way, changing brushes on the VAZ 2112 is carried out one by one according to the same instructions.
Now let’s figure out how to replace an element on a VAZ 2109.
We will need to prepare:
- set of spanners;
- Phillips and slotted screwdrivers;
- rubber hammer.
Here's what we do (this is an option without removing the traction relay).
- After loosening the belt and removing the tensioner bar, we dismantle the entire unit.
- On the dismantled unit, unscrew the pulley.
- After unscrewing the nuts, remove the front cover of the electric motor.
- Push the rotor out with a rubber hammer.
- We detach the stator from the back of the electric motor.
- We unfasten the diode bridge, take out our failed graphite tips and install new ones.
- Assembly is done on the way back.
It must be said that the work of replacing brushes on a VAZ 2114 takes place in exactly the same sequence. The same applies to work on the VAZ 2115.
In general, all VAZ electric motors for generating current have almost the same design. We have only discussed different methods of how to get to the treasured details.
There is even a way without dismantling the unit. Let's say, to replace the alternator brushes on a Priora, without removing the alternator, you need to do this: take a screwdriver and wrenches and open the hood.
- Disconnect the battery.
- Unfasten the wires from the electric motor.
- Remove the field circuit terminal.
- Remove the rear plastic casing of the electric motor by unscrewing the screws.
- Unfasten the voltage regulator, and then remove it complete with the brush assembly.
- Now we can reinstall our parts.
- Then you need to assemble everything in reverse order.
So, changing the alternator brushes on a Priora can be done directly on the car by opening the hood.
At the same time, it is better to change the Lada Kalina by removing the electric motor from the car. After all, it is compact and is attached to the bracket with just two bolts. Taking the same tools as in the previous case, you need to reproduce the following steps.
- Disconnect the battery and electric motor wires.
- Loosen the belt and unscrew the two fasteners and remove the electric motor.
- Remove the rear casing.
- After unscrewing the screws, remove the brush holder with the regulator and reinstall the parts.
- Put everything back together.
These are the simple steps you need to perform to change the generator brushes on the Lada Kalina.
Repairing an electric motor at Renault
And now, in order to get a complete picture of such an important operation, let’s consider its production on a foreign car.
To replace an element on a Renault Megane 2 car, we will need:
We start by dismantling the electric motor.
- Having loosened the belt drive, unscrew the three fastenings of the unit.
- On the removed assembly unit, remove the connector and unscrew the cable.
- Remove the plastic cover.
- After unscrewing the two bolts, remove the relay with the brush holder.
- We update defective parts.
- We do the assembly, moving back point by point.
In essence, this technology resembles those previously described, since, we repeat, all electric motors are designed the same.
Therefore, for example, if you change the generator brushes on a Ford Focus 2, you will have to perform manipulations that are also similar to those just outlined.
Price for simple work
We have determined the cost of the described work in car repair shops, taking into account the removal of the entire unit from the car, in major cities of Russia, although only approximately. All data is collected in this table.
| City | Price |
| Moscow | 1100 rub. |
| St. Petersburg | 1000 rub. |
| Ekaterinburg | 950 – 850 rub. |
The price is indicated for an average foreign car without dismantling additional components. On Lada the cost of the operation is twenty percent less.
The result is obvious: all the described technologies for replacing brushes in alternators of cars of various brands are simple and accessible to any car enthusiast who has at least a little understanding of technology, as well as the structure of the electric motor.
Generators that replace G - 221
What models of generators are suitable for replacement in a VAZ 2101 - 2106 car?
- The first option is a generator from a VAZ 2105; it produces a maximum current of 55A. Not much, but if you don’t use a lot of additional equipment, then this is an ideal option. This generator replaces the G-221 generator without any modifications to the mounting. There are only minor changes in the connection to the electrical wiring; they are due to the fact that in the connection diagram of the G-221 generator the relay-regulator is placed separately, while in the five-wheel generator the relay regulator is combined with the design of the brushes.
- The next option for installing a chisel generator on a VAZ 2101 - 2106. It produces 55A, which is quite acceptable for a small amount of additional equipment.
- The third option for replacing a standard VAZ generator is a generator from a VAZ 21074, its marking is 372.3701-03. It is capable of delivering about 73A of current, which will be sufficient for the average motorist. The installation is practically no different from the previous one.
- The fourth option is to install a generator from an injection Niva. It produces about 80A, which will satisfy the requirements even if a large number of additional light bulbs and amplifiers are installed. It will not let the light go out at idle. But the installation does not require very big changes.
- The fifth and final option is to replace the standard G - 221 with a generator from a VAZ 2110, which produces 105 - 110A (depending on the specific model).
- There are other options (foreign cars, Chinese, our semi-underground companies), but you can consider them here endlessly.
We have listed the most realistic and easiest ways to replace a generator in a VAZ 2106 car. Next we will look at how to practically implement the installation of a generator from a VAZ 21074.
Causes of failure
A VAZ 2107 generator, the price of which is about 4,000 rubles, can be found quite easily, but if it breaks down on the road, there may simply not be a store nearby. Therefore, it is better to have an idea of possible breakdowns, among them are:
- severe wear of the brushes or their freezing;
- stator short circuit or winding break;
- faulty diode bridge;
- failure of the excitation winding;
- voltage regulator failure;
- bearings are seized or damaged.
Do-it-yourself replacement of VAZ 2107 generator brushes
Welcome, friends, to the DIY car repair website. Despite the large number of foreign cars, cars of the VAZ family are still in demand and find their use among motorists who know a lot about technology and appreciate the advantages of the domestic automotive industry.
VAZ brushes
As you know, operation and repair are inseparable concepts, and in the event of failure of any component, identifying and repairing the fault can be done on your own. Let's look at a simple repair using the example of a VAZ 2107 car generator.
Malfunctions and principle of operation of generator brushes
The electrical system of your iron horse provides a fault indication when the VAZ 2107 generator does not work; a red warning light with a battery symbol lights up on the instrument panel.
Quite often the cause is wear or sticking of the brushes. Those who are familiar with the principle of operation of a generator know that an excitation voltage is supplied to the armature through the brushes, which not only starts the electric machine (generator) into operation, but also regulates its output power.
The regulation itself occurs due to a special device, a relay-regulator, which can be implemented directly on the brush holder or installed separately (on earlier models).
As a rule, such a malfunction manifests itself gradually, initially accompanied by short interruptions in the operation of the generator, gradually leading to its complete failure, but other options are also possible, for example, a sudden failure.
Replacing the VAZ 2107 generator brushes yourself
The brush repair itself usually boils down to replacing them, but first you need to remove the brush assembly from the generator housing and assess the degree of wear, inspect for chips and cracks.
generator
Replacing the brushes of a VAZ 2107 generator is a simple procedure and usually takes a few minutes; replacing the brushes does not require removing the generator, just disconnect the power wire, unscrew the two screws securing the brush holder housing and carefully remove this unit, do not forget to disconnect the negative terminal of the battery first.
Attention! The battery should be disconnected during any work related to the electrical equipment of the car!
Check the dismantled assembly for freezing, jamming of the brushes and their protruding working part, which should be at least 12 millimeters. In case of discrepancy, the part must be replaced; brushes for the VAZ 2107 generator can be purchased at almost any auto parts store.
After eliminating the malfunction, or purchasing new ones (it’s better to buy small parts with a sample of old ones, so that you don’t have to change them later), you need to install them in the reverse order.
Tips and tricks
If, before repairing the generator brushes of your car, you noticed noise in its operation, this may indicate that the bearings of the VAZ 2107 generator may be worn out, and in this case, it is necessary to remove and disassemble the VAZ 2107 generator.
A worn bearing has increased play of the rolling elements and must, in this case, be replaced with a new one. You should know that premature bearing failure is not only due to lack of lubrication.
Often an over-tightened generator drive belt contributes to this, and an over-tightened belt can damage the cooling system pump bearing.
Therefore, check this unit regularly in accordance with the manufacturer's recommendations. It is better to get into the habit of regularly inspecting the engine compartment with the engine running, this will allow you to detect and eliminate the problem earlier and at minimal cost.
Correct diagnosis will help you avoid additional work and unexpected breakdowns.
remontavtovaz.ru