The rating is compiled according to the community rules. Articles about DIY repairs
- So I had problems with the right mirror after trying to fold it in severe frost.
The problem was that when the ignition was turned on, the mirror folding motor hummed constantly and it was not possible to cure it either by hand or by briefly pressing the folding button.
Then I decided to perform an autopsy.
The mirror is attached to the door with three bolts, two of which can be removed without problems from the outside, you just need to remove the decorative plastic trim from the bottom of the mirror, but very carefully, it is only held on by thin plastic latches, they are very easy to break, but one bolt is set with the head inward, so the door trim needs to be removed.
To remove the casing, perform the following steps:
Unscrew the three screws at the bottom of the door;
Carefully remove the plastic piston in the upper left corner of the door (I removed it very easily, but other people had problems with it)
We remove the door handle tray, to do this we open the hatch, there is a screw under it,
unscrew it, then use a screwdriver between the lock lock button and the opening handle to loosen the tray, first from below, then from above and remove it from the latches, there is another latch in the center, the tray hooks onto it, so when removing it you need to move it to the right
then remove the power window button block
to do this, we move it away from us towards the end in the form of an angle and use a screwdriver to press the latch on the wide end, it will be visible (for me this latch broke off due to strong force, but to be honest, it didn’t make it worse, but it became much easier to remove the block of buttons) , then carefully pull it out by hand, freeing the block from the latches; when removing it, the plastic can very easily crack, so be careful (Figure 1)
Picture 1
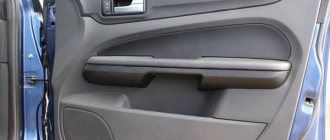
Remove the large soft door handle (also known as the armrest)
this is easily done by inserting your hand into the hole in the power window block, simply pulling up, starting from the far left end
Having removed it, you can see two screws in the door, unscrew them (Figure 2)
Figure 2
after all the manipulations, the casing is held only by the side latches and can be easily removed by hand, pull the casing towards you, the latches come out, then removing the casing, pull it up and towards you
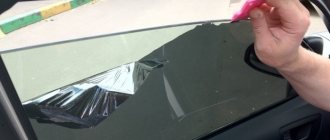
The casing has been removed, now we carefully free the upper left corner from the polyethylene, unscrew the third bolt and disconnect the mirror from the connector, there is a small plastic stopper on this connector that prevents it from being easily pulled out, you need to press it and the connector is easily disconnected (Figure 3)
Figure 3
The mirror has been removed, now we climb into its insides
first you need to pull out the mirror itself (glass), to do this, lift it up with your hands and pull it by the lower edge (you need to pull slowly, but with force), the mirror will come out of the grooves (Figure 4)
Figure 4
Then we remove the steel piece that attaches the mirror to the door
one screw is visible immediately below, the other two are hidden under a rubber gasket, which must be carefully removed (Figure 5)
Figure 5
We remove the white plate, it is held on by one screw and unscrew all the screws that are visible (that’s all)
the angle adjustment mechanism is held on by three long thin screws
folding mechanism on three short thick ones and one more small one at the bottom where the wire goes into the mirror (Figure 6)
to do this, you need to remove its cover by pulling it up, shown in Figure 6 with an arrow, in theory this cover is attached to flimsy latches and sealant, but someone had already climbed into the mirror, so the cover was only on glue, the latches were broken and torn out I can do it without much difficulty, the cover is removed and parts of the folding mechanism are visible (Figure 7)
Figure 7
in my case, this part broke, I had to grind a new one (picture 
Figure 8
The cover that we removed contains a motor and a microcircuit. If everything is fine with the motor, DO NOT TOUCH this cover, but if there are problems with it, we’ll take it further)))
first you need to disconnect the wires that go to the microcircuit (Figure 9) to do this we pick out the rubber plug and pull out the wires (in theory this is easy, but I couldn’t get them out, I had to bite them)
Figure 9
Then we remove the bottom, from where the little white drive from the motor sticks out, it is glued, to do this, unscrew the two screws and press the bottom away from the body with a screwdriver (Figure 10)
Figure 10
if necessary, pull out the microcircuit and the motor, which is attached to the holes on two contact pins
during the reassembly process, do not be lazy to add fresh silicone grease to the mechanism, which is sold in all amateur radio stores
Dmitry aka 3DiMaN took part in the creation of this article
,
Alexander aka Baskin
,
Mikhail aka Maroder
.
Photographed by Pavel Yakovlev
.
User comments
Res
Help me, kind people, to carve the same part in Moscow!
Such registration does not oblige you to anything at all, but it provides a number of additional opportunities. You can .
Pay attention to the rusty screws! The mirror was on the neighbor's car for about 2 years. I have them in the same condition, however, in the summer I sealed them with 3M electrical tape. 1500 km in heat and rain - there is not even a hint of peeling off. I'll see what happens after winter.
So let's get started.
Push the top of the mirror (remember that in the photo it is upside down) with your finger until it stops.
We wedge the resulting gap on the other side (And again with your finger). We see a white plate in the center of the mirror. At its ends, closer to the edges (marked by an arrow), there are bevels the width of a screwdriver. We insert the screwdriver there and turn it 90 degrees. A click is heard and this edge of the mirror gains some freedom. We repeat the operation from the other edge.
What do we see?
№1
– latches holding the bottom of the platform (we just snapped them off).
No. 2
– L-shaped brackets holding the top of the mirror.
They are clearly visible in the next photo. Simply by pulling the mirror towards us from this position, we will completely free it. No. 3
– blade contacts used to heat the mirror. They just flinch. On the right, next to the white platform (I forgot to mark it), a spring strut is visible (it can also be seen in the next photo). When assembled, it rests against the mirror body. IMHO, it is needed to eliminate all kinds of backlash and rattling of the mirror.
By unscrewing the central screw and pulling towards yourself, remove the white part from the gearmotor. At the same time, 3 more parts will be removed (the cuffs do not count: one was removed, and the second remained, covering the gear).
№№1,2
- sophisticated axles, one end of which (not visible to us) ends in a ball, rather tightly pressed into a white plate.
Quite mobile. The second end of each axis ends in a cup of five round posts along a smaller radius, and one post at a larger radius. This stand is higher than the others, i.e. fits deeper into the gear slot. When assembled, the high stand fits into the groove of the gear (4), and the other five rest against the ends of the oblique teeth on the gear. Thus, if, for example, the top gear is rotated at a certain angle clockwise, then the five racks will rise along the helical tooth, thereby pushing the axle upward. And vice versa. It turns out that axis No. 1
moves the mirror in azimuth, and axis
No. 2
in elevation.
Part No. 3
is a hemisphere on which the mirror plane rests, i.e. rotation point.
By unscrewing the three screws, we free the gear motor itself.
The halves of its body are held on by 4 latches.
Having squeezed out the petals, we open it.
We see two electric motors and two gears. The gears have teeth on the bottom. The gears themselves have a slight backlash. IMHO, thanks to this play, we hear a characteristic crack when we try to “press” the mirror in extreme positions, or we try to move the mirror, but it is frozen to the body: the worm pushes the gear to the side and jumps over its fixed teeth. Gee! I've been looking for an electric motor for my wife's hair dryer for a long time. In my opinion, that's exactly it!
Mirror
for Toyota Corolla:
rear
and side
The process of operating a car involves the appearance of various kinds of defects, ranging from engine breakdowns to a scratch on the hood of the vehicle. One of the most frequently at risk parts is the rear view
located along the edges of the machine.
They “suffer” in dense traffic or over time they become cloudy and lose their information content (the same applies to the interior reflective element). Toyota Corolla Auto Club dismantling the mirror I would be grateful if you could advise me how. on the Toyota Corolla
, but to increase the reflection area, many drivers equip their vehicles with larger “reflectors”.
Removing and replacing side parts
To replace side mirrors on a Corolla 120 and 150 body you will need:
- A flathead screwdriver with a wrapped tip (can be wrapped with tape or tape) - this step will prevent mechanical damage to many parts of the car.
- New reflective elements.
In order to complete the dismantling process, a number of steps must be performed. First remove the holder for the inside handle of the front doors. To do this, use a screwdriver (which was wrapped in tape or tape) to release the three fasteners. Next, using the same screwdriver, you should remove the upper panel of the armrest and disconnect the connector for the heating wires located under it. It's worth seeing that everything should be filmed quite well.
The next step is to disassemble the facing panel. The replacement process can take place either on a removed hub or a Toyota Corolla stud. To do this, you will need to use a screwdriver to remove the door armrest cover, unscrew two screws, remove 9 clamps and release 5 more clamps. How to disassemble a side mirror? Only after these steps can you remove the panel located on the inner glass seal. After which, having released two more grips, you should dismantle the door handle located inside the vehicle interior.
The lower frame bracket trim is removed differently on cars with 4 and 6 speakers. For vehicles with 4 speakers, simply release the retainer and clip and remove the part. For cars with 6 speakers, do the same, also disconnect the wire connector.
The next step is to remove
Toyota
side mirror .
hello! we tore off the mirror on a toyota vitz car - does anyone know how to disassemble the side electronic mirror - you need to pull the mirror itself out. It is necessary to release the latch, disconnect the connector, and also unscrew the 3 bolts that hold the rear view mirror
. It is dismantled along with the cover.
MIRROR FOR GAZ-3302
Side rear view mirror
for Gas-3302 right ( new model
)
To view the rear and sides of the Gas-3302 vehicle, use the new rear-view side mirrors,
.
located on the left and right. how to disassemble a Kia side mirror, installing repeaters in the side mirror. We offer a side mirror for a gazelle, how to disassemble a mirror, video on how to disassemble it. Both side mirrors on the Gaz-3302
have spherical optical elements and, due to the asymmetrical location of the axis, they are divided into right and left.
The side mirrors consist of an optical element housing with a gasket (acting as anti-fragmentation protection), an axle, an axle spring, a washer and a nut. The side mirror of the new rear-view model for Gas-3302
is a non-repairable unit and if it is damaged, the entire product must be replaced.
To do this, you need to unscrew the screw securing it to the stand (hexagon socket screw), remove the bushing and mirror . Install in reverse order.
To correctly install the left side mirror, you need to turn the stand forward, and then, loosening the screw securing it to the stand, turn it in a horizontal plane to the required angle and secure it. However, first you need to disassemble the mirror. How is this Skoda Octavia side mirror?. In the vertical plane, the mirror is also adjustable within the required limits. For correct installation of the right side mirror of the new model on Gas-3302
it is necessary to rotate the rack backwards in relation to the support.
Read more: Starline e91 how to register a key fob
ATTENTION! We strongly advise you, before going to the warehouse, to call MTS: 8-916-119-99-08 and check the availability of the goods you are interested in in the warehouse, and then familiarize yourself with the directions.
How to remove a TOYOTA side mirror
Karina, Corona, Kaldina Yes, and a lot of things like that.
It is important to remember that fasteners should be removed fairly easily.
Next, you need to remove the mirror cloth. It should be noted that the canvas is removed differently on cars with and without heated mirrors. For models that do not have heating, the following scheme is relevant: the lower part of the visor is sealed with protective tape, then you should tilt the part down, by pressing on it from above, unhook the two grips, disconnect the two guides located in the upper part, remove the mirror
.
On models with heating, the circuit is similar, but the connectors must be disconnected. And only after these manipulations can you disassemble the mirror
on a Toyota Corolla. The new part must be installed in the reverse order.
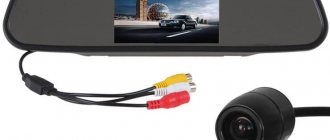
How to select a rear view element?
As noted earlier,
rear view
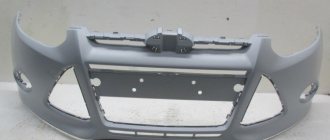
mirror is the most susceptible to damage. How to disassemble it yourself, now pull the mirror in direction 2 from the Ford Focus fender 3. Sometimes there are cases when it is possible to repair the part, but the most common times are when the only solution is to replace the mirror. Currently, you can purchase both the original part and a high-quality replica. Replacing the battery in a Toyota Corolla key is shown in this photo report. How to change the battery in a 2010 Corolla key and the part number for the correct battery. Reliability and 100% “compatibility” with the car speak for the original. But the advantages of a replica include its relatively low cost and availability.
So, how to choose a new mirror
for
Toyota Corolla
120 and 150 body?
Before choosing a new mirror
, you need to decide whether it will be from an official dealer or purchased externally.
Rear view mirrors are an integral attribute of any car. They may vary in size, shape and functionality, but they are all designed for one thing - to allow the driver to control the situation around his car.
A fairly common problem is the breakdown of side rear view mirrors. This often happens in a parking lot. When the driver is not nearby, the parking “neighbor” may accidentally knock over the rear-view mirror, which, if damaged, will require it to be removed and a new one installed in its place. But this is not the only situation where you may need to remove your car's side mirror. For example, such work will have to be done if you want to repaint it or simply replace it.
In this article, we will consider how to remove and replace the side rear view mirror on a car.
Table of Contents: Please note: The instructions below will provide general tips for removing a mirror. Depending on the car model and mirror design, the instructions may vary slightly.
Removing the mirror
| We disassemble the Hyundai Solaris exterior rear view mirror to replace the reflective element of the mirror with a heating element, gear motor unit, and side turn signal. |
| The work is shown on the left mirror, on the right mirror the operations are performed similarly. |
| For clarity, we carry out disassembly on the removed mirror. |
| 1. To replace the reflective element of the mirror with the heating element, turn the reflective element all the way to the right or left. |
| 2. Having lifted it with your hand, pull it towards you and use a screwdriver to press it out (insert the screwdriver in the direction of the arrow). |
| 3. Two latches of the reflective element. |
| 4. Move the reflective element to the side. |
| 5. Disconnect the two wire terminals from the contacts of the heating element. |
| 6. To replace the gearmotor unit, use a Phillips screwdriver to unscrew the three self-tapping screws securing the unit to the mirror body. |
| 7. Move the gearmotor block to the side. |
| 8. Using a slotted screwdriver, press the two clamps of the wire block. |
| 9. Disconnect it from the connector of the gearmotor unit. |
| 10. To replace the side turn signal, use a slotted screwdriver to pry up the plastic frame of the mirror housing. |
| 11. and remove it. |
| 12. Use a slotted screwdriver to press the lock of the upper mirror trim. |
| 13. and remove it. |
| 14. Using a Phillips screwdriver, unscrew the self-tapping screw securing the side turn signal housing. |
| 15. and take him aside. |
| 16. Disconnect the wiring block from the side turn signal housing connector. |
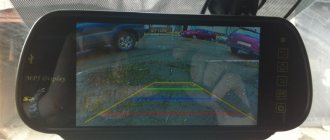
How to remove the side rear view mirror
The side rear view mirror in a modern car is a real “gadget” with various additional accessories built into it. Among them: turn signals, LEDs, heating elements, etc. Accordingly, before proceeding to removing the mirror, it is necessary to minimize the risk of a short circuit during operation.
After this, proceed directly to dismantling the mirror according to the following scheme:
Important: If the position of the side mirrors is electrically adjusted, you will also need to disconnect the corresponding wires.
We disassemble the Mirror on GAZelle Business
Disassembled the mirror
with heating, electric drive and repeater! Channel sponsor: 1xbet channel: .
We offer side
on a Gazelle with electric heating, which will help you see the road in the most difficult weather conditions. Indeed, at low temperatures or during heavy rainfall, in the absence of electrical heating, rear view visibility becomes difficult. Turn signal repeaters will be equally important. The electric drive makes controlling the mirrors much more convenient. How to disassemble a side mirror? Its presence greatly simplifies visibility settings. How to disassemble the side mirror of a gazelle, sable. Replacement. Each car owner, when buying accessories for a Gazelle, can independently select the necessary equipment, on which the total price of the products depends.
How to disassemble a car's side mirror
Disassembling the side mirror involves removing the mirror element itself, which is located in a plastic case. This is necessary if the mirror element is broken, you need to repaint the plastic element or perform some other manipulations with these parts separately from each other.
The mirror element is secured in the mirror body using several plastic latches, which are located on its reverse side. Most often there are about 8 such latches, 2-3 on each side. We recommend proceeding as follows to remove the mirror from the housing without damaging any of the elements:
Depending on the car model and the mirror used, the space under the mirror element may be empty or filled with various components. Their dismantling, if necessary, should not cause difficulties.
The process of operating a car involves the occurrence of various types of malfunctions, ranging from engine breakdowns to scratches on the hood of the vehicle. One of the most commonly at risk parts is the rear view mirrors located on the sides of the car. They “suffer” in dense traffic or over time they become cloudy and lose their information content (the same applies to the interior reflective element). Toyota Corolla is equipped with fairly informative mirror elements, but to increase the reflection area, many drivers equip their vehicle with larger “reflectors”.
How to remove the mirror plate
The need to remove just the “glass” itself can arise due to many reasons, including:
- replacement of failed heating elements;
- replacing LEDs;
- Replacing the turn signal lamp.
For this procedure you may need the following tools and devices:
- one or two flat screwdrivers;
- plastic or wooden wide spatula;
- a piece of soft fabric or electrical tape;
- hairdryer
It is clear that the main task when performing such a manipulation is to preserve the mirror plate in an undamaged state, so you need to work carefully and slowly. In most modern models, the glass part is attached to the body using several plastic latches, of which there can be from 4 to 8. The work will consist of gradually “tearing” the reflective plate from the mounts.
So where do we start? To make the plastic fasteners softer and more pliable, they can be heated. To do this, you will need a hair dryer, but not a construction hair dryer (it’s too hot), but an ordinary household one. You need to warm it up for 2-5 minutes (depending on the ambient temperature), directing a stream of hot air onto the glass. After warming up, you can try to disconnect the mirror from the body.
Mounting the mirror plate
To do this we do the following:
- The reflective glass needs to be pulled down and slightly towards the door, which will increase the upper gap between the mirror and the body;
- Now spatulas or screwdrivers will come in handy if the former are not available. To make the metal tips of screwdrivers softer, wrap electrical tape around them. Under the plastic edge of the case, in order not to damage it, a soft fabric (fleece, flannel) is placed;
- Spatulas or screwdrivers are inserted behind the mirror at the locations of the upper latches (after the glass is pulled down, the fasteners become visible). Now you need to carefully pull the levers towards your own belt;
- After the mirror plate is freed from the upper fastenings, it will move much more freely, which will make it possible to place your fingers behind its upper edge and, with their help, release the lower latches and remove the reflective plate;
- After removing the glass plate, access to the optical elements to be replaced, as well as to the heated rear view mirror system, becomes available. Further actions directly depend on the car model, since the devices hidden behind the reflective plate can have a variety of design features.
Putting a mirror in place is always much easier. There is no need to heat anything here. It is necessary to correctly align the latches, which is usually not difficult, and press firmly on the reflective plate.
So we figured out how, using simple tools, you can remove the mirror plate, as well as separate the entire device assembly from the door. As you can see, there is nothing complicated, although if you have no experience, you will have to tinker a little.
Read also: How to change rights when changing your last name
Hello. Today we will figure out how to replace the side view mirror of the first generation Renault Logan.
Tools:
- Torx T20 bit
- bit adapter
- knob
Removing and replacing side parts
To replace side mirrors on a Corolla 120 and 150 body you will need:
- A flathead screwdriver with a wrapped tip (you can wrap it with tape or tape) - this step will prevent mechanical damage to many parts of the car.
- New reflective elements.
In order to carry out the dismantling process, a number of actions must be performed. First remove the holder for the inside handle of the front doors. To do this, use a screwdriver (which was wrapped in tape or tape) to release three fasteners. Next, using the same screwdriver, you should remove the upper panel of the armrest and disconnect the connector for the heating wires located under it. It is worth noting that everything should be filmed quite well.
The next step is to disassemble the facing panel. To do this, you will need to use a screwdriver to remove the door armrest cover, unscrew two screws, remove 9 clamps and release five more clamps. Only after these steps can you remove the panel located on the inner glass seal. After this, having released two more grips, you should dismantle the door handle located inside the vehicle interior.
The lower frame bracket trim is removed differently on cars with 4 and 6 speakers. For vehicles with 4 speakers, simply release the retainer and clip and remove the part. For cars with 6 speakers, do the same, and also disconnect the wire connector.
The next step is to remove the Toyota side mirror. It is necessary to release the latch, disconnect the connector, and also unscrew the 3 bolts that hold the rear view mirror. It is dismantled along with the cover.
It is important to remember that fasteners should be removed fairly easily.
Next, you need to remove the mirror cloth. It should be noted that the canvas is removed differently on cars with and without heated mirrors. For models that do not have heating, the following scheme is relevant: the lower part of the visor is sealed with protective tape, then you should tilt the part down, by pressing on it from above, unhook the two grips, disconnect the two guides located in the upper part, and remove the mirror. On models with heating, the circuit is similar, but the connectors must be disconnected. And only after these manipulations can you disassemble the mirror on a Toyota Corolla. The new part must be installed in the reverse order.
Replacing a side view mirror — Chrysler 300C, 5.7 l., 2005 on DRIVE2
Hello everyone)) Since buying the car, the right side view mirror was a little tired, the old owner had clearly driven it somewhere and the shell of the mirror was broken a little + a crack ran along the bottom and it also rattled when listening to music or closing the door + created noise on the paving stones! Well, over time, the chrome became completely cloudy (((In general, none of this caught my eye, but I knew that there was a problem and decided to replace it with a more recent one)))
found from restyl.
In general, it went away)))
To change the mirror, you need to remove the door trim! The process is not complicated, but it will take time)) I started with the so-called bugs in the cards)) You need to press in the center of the clip, but not very hard, so that the rod does not fall inside the door! The rod should go in about 5mm
it will be like this
Then you need to unscrew two hidden screws, one in the door handle
Full size
The other one is under the closure handle
Full size
Then, unscrew four more screws!
three at the very bottom and one on the side, near the canopy!
Full size
After this, the card can be removed! There are two ways: First, we simply lift the card to the top, it is held on by 3 clips at the very top, then the clips will remain in the door, and the card will be in your hands! Second, just pull strongly, then the clips will come out of the door and remain in the card!
I chose the first method, but still then I will need to pull the clips out of the door and insert them into the card to put everything back together!
These are the 3 clips
Full size
Now, in order to have access to replacing the side view mirror, you need to remove the edge of the elastic
Full size
And protrude the corner of the plastic cover, then you can unscrew the 3 nuts that hold the mirror!
Full size
Then, you need to disconnect the electrical connection plug and the mirror is free)
True, I had a fair amount of sex trying to get it out)) It sits there tightly and it feels like you haven’t unscrewed something yet))) But no, I puffed for about 5 minutes and took it out of its place))
Full size
Then I inserted a new one and began to assemble it in reverse order)))
There is one caveat! If you removed the card and the clips remained in the door, you need to remove them and insert them into the card! I just took them out with a screwdriver, like that! (need to be careful so as not to break)
Full size
after the 3 clips have been inserted back into the card, you simply place it against the door and simply press it, everything is put on at once and we put everything back together as we took it apart)))
Here's my old mirror
Full size
Here's something new))
Full size
Full size
www.drive2.ru
How to select a rear view element?
As noted earlier, the rear view mirror is the most susceptible to damage. Sometimes there are cases when it is possible to repair a part, but the most common times are when the only solution is to replace the mirror. Currently, you can purchase both the original part and a high-quality replica. Reliability and 100% “compatibility” with the car speak for the original. But the advantages of a replica include its relatively low cost and availability.
So, how to choose a new mirror for a Toyota Corolla 120 and 150 body? Before choosing a new side mirror, you need to decide whether it will be from an official dealer or purchased externally.
Of course, it is better to choose from a dealer, but if this is not possible, then you can turn your attention to “car cambers”.
During the purchasing process, you must adhere to a number of recommendations: you need to decide which drive: mechanical or electric? For example, even if the “original” parts have an electric drive, then it is worth remembering that the control unit on the 2008 and 2012 models is different, and the reflectors from the 2008 model may not fit the 2012 model. When installing the side left and right products, all fasteners should be easy to screw in. The left and right mirrors must be symmetrical. If they have a turn signal, then you should check it before purchasing. The installed element should look like a single whole: there should be no backlash.