The air preheating system in diesel engines is quite simple. It consists of glow plugs and a control unit that regulates the order in which they are turned on. In modern cars, the heating of the combustion chambers is not turned on unless necessary, whereas in older cars, the glow plugs are activated every time the engine is started. A special light on the dashboard informs the driver of a diesel engine that the glow plugs have come into operation.
In the warm season, the driver may not notice that one or more glow plugs have failed, since without their participation the car starts perfectly. In winter, the problem will affect itself when difficulties arise with starting the diesel engine. You can make sure that the engine does not start precisely because of faulty spark plugs by testing them. In this article, we will look at 3 ways to check the glow plugs of a diesel engine yourself.
Checking glow plugs with a multimeter
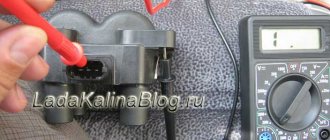
A multimeter is a universal tool that should be in the arsenal of every car enthusiast. With its help, you can check the heating elements without removing them from the diesel block head. To verify the serviceability of the glow plugs using a multimeter, you must:
- Disconnect the wire from the spark plugs that supplies current to the central electrode. Depending on the design of the system, a separate wire may be connected to each spark plug, or they will all be connected by a bus to which the wire fits;
- Next, the multimeter will need to be switched to resistance measurement mode (Ohm);
- The positive probe of the device is connected to the central electrode of the spark plug being tested, and the negative probe must touch the body of the spark plug;
- If, as a result of testing, the resistance value remains at zero, this indicates a breakdown in the glow plug.
It is worth noting that this method allows you to determine only the breakdown of a glow plug. If the spark plug does not heat the combustion chamber sufficiently, it will not be possible to determine this when testing it with a multimeter.
Self-identification of problems
The procedure is not difficult. The easiest way is visual. The most difficult one involves a detailed study of the engine’s performance.
One of the obvious signs of these breakdowns is a malfunction in the engine. For example, it may be difficult to start, or it may have an idle speed.
Other signs are:
- The first is related to the rotation of the crankshaft. If it rotates at the required frequency, but the engine itself does not start, this is a sign of lack of ignition. In other words, the air mixture does not ignite.
- If a mixture of fuel and air flares up in the cylinders, the engine may operate extremely unstable.
- When starting the engine, the starter does not function. As a result, the engine also fades out.
- Very high fuel costs. If the composition of fuel and air does not ignite, then the power of the power unit is reduced or drops to zero. Power losses can be compensated by supplying an increased dose of fuel to the cylinders. And the result is an impressive waste of fuel.
- The catalyst is not working. If there is no ignition in the technology, there is no combustion of the air-fuel composition. And the fuel that does not ignite ends up in the catalyst. And there it oxidizes. And the catalyst stops functioning.
- A cold engine does not start well. When turning the ignition, cold ones accumulate condensation. And it is considered an excellent conductor of electricity. If the distance between the electrodes increases, then the degree of breakdown voltage should develop. It cannot be developed independently, because the energy will be eliminated through the indicated electrodes, as well as through a ceramic cone.
- There are traces of mechanical defects on the surface. This is a sign of either complete breakdown or malfunction.
- There are carbon deposits and deposits on the electrodes. The candles themselves smell like fuel. This is evidence that the system itself, and every single one of them, is faulty.
- A damaged cable carrying high voltage can seriously impair normal operation.
This is interesting: Mazda 6 fuse diagram: location and replacement methods
Checking the glow plugs with a battery
A reliable way to check a spark plug, which allows you not only to verify its serviceability, but also to determine a sufficient degree of heating, involves using a car battery. To begin testing, you will first need to remove the heating elements from the diesel unit. Next, to check the glow plug you need to:
- Get an insulated wire about 50 cm long;
- Take a glow plug and install it with the central electrode on the positive terminal of the car battery. Accordingly, the heating element will face upward;
- Next, one part of the insulated wire is connected to the spark plug body, and the other to the negative terminal of the battery;
- At this point, the glow plug should begin to heat up. If it manages to heat up by 50-60% in less than 2-3 seconds, this indicates its serviceability. If the spark plug does not heat up well, it will need to be replaced.
Important: When testing a glow plug with a battery, safety precautions must be observed. Do not touch a hot glow plug with your bare hands and use only a properly insulated wire to connect the glow plug body to the negative terminal.
Design and types of glow plugs
Structurally, these candles consist of: a body, a heating element and a power connection terminal.
There is a thread in the upper part of the housing that allows you to fix the heater to the engine. The heating element consists of a spiral with a protective shell, which can be made of metal or ceramic. Previously, designs with an open spiral were used, which today can be found in older car models. This system was not durable.
Glow plug device
In a metal-clad design, the heater tip is made of an iron, chromium, and nickel alloy that is resistant to high temperatures. Inside it there are heating and adjustment coils.
The heating coil heats the air, and its resistance does not depend on temperature. The adjusting spiral, by increasing the resistance, regulates the intensity of the incandescence, preventing overheating. The internal space of the tip is filled with a magnesium oxide insulator.
Ceramic glow plugs have a similar design, but instead of metal, both the protective shell and the heating element are made of ceramic.
Read more: Description of the Lada Kalina instrument panel
The spiral in the heater can be integral (monospiral) or double. In the first case, it simultaneously performs the functions of incandescence, and at the same time is independently regulated, preventing heating to critical temperatures. Double helix designs have been used relatively recently. They allow you to more accurately regulate the temperature of the heating element in all engine operating modes.
Outwardly, they are similar to those installed in a gasoline engine, but the design is somewhat more complex. Glow plugs do not produce a spark; they are based on a heating element in the form of a spiral, which can be metal or enclosed in a ceramic “case”. In the first case, we are talking about two “curls”, one of which serves for heating, the second protects against overheating.
The next type of product is a spiral placed in a ceramic shell, due to which heating occurs faster. The tip of the candle heats up to 1350 degrees. The design also includes an incandescent filament consisting of a pair of resistors. The first of them has a constant resistance.
Ceramic products are considered more promising: such spark plugs not only quickly heat up the tip, which allows you to easily start a diesel power unit at low temperatures, they also have other advantages: these spare parts are suitable for Euro 5 and 6 standards. This is due to the fact that the products with a ceramic shell guarantee an intermediate glow mode.
Control
The operation of glow plugs is controlled by the ECU, a separate unit or a special relay. Their work is related to data received from sensors that determine the crankshaft speed and coolant temperature. Many car models have a function to maintain heat after starting to reduce the noise level from an unheated engine (Land Rover Freelanders, and not only them, are guilty of this). When are glow plugs replaced and why do they fail?
Checking glow plugs for spark
Another well-proven method for diagnosing a heating element is to check it for a spark. It is performed as follows:
It is necessary to take an insulated wire about 60-90 cm long and strip the insulation along the edges by 2-3 centimeters;
- Next, the tire and power are removed from the glow plugs;
- One end of the prepared wire is attached to the positive terminal of the battery, and the other must touch the central electrode of the glow plug.
- Depending on the reaction of the heating element, the following can be set:
- Nothing happens. This spark plug is faulty and needs to be replaced;
- A small spark occurs. This indicates a weak glow of the candle;
- A strong spark is produced, which means there are no problems.
Important: It is worth checking the glow plug for a spark on older cars where spark plugs are installed without a separate control unit. If you diagnose a heating element in this way when the system has “brains,” they may fail.
( 408 votes, average: 4.56 out of 5)
Spark plug gap: what it should be, how to measure and adjust
How to clean spark plugs from carbon deposits at home
Related Posts
Without a relay, nowhere
As you know, diesel fuel ignites under pressure as a result of strong compression in the combustion chamber. The relay supplies the required current, which heats the tip. The resulting heat heats the intake manifold, engine cylinders and working mixture to the desired temperature. Now it is easier for the fuel to ignite when under high pressure.
But before moving on to the question of how to check the glow plugs on a Nissan Pathfinder (diesel) or any other brand, it’s worth considering one more point. Often the mixture ignites before it even enters the cylinder. The result of this is that the efficiency of the engine decreases or it refuses to start at all. In order to ensure the required heating mode, a glow plug relay is used. Thanks to it, the electrical circuit closes and opens as needed. This ensures the optimal degree of heating of the working mixture.
The relay itself, of course, does not regulate the heating operation, since this is the prerogative of the ECU, which relies on the readings of the OX and crankshaft sensors. Thanks to commands from the block, the circuit is closed and opened.
Modern diesel engines have the option of additional heating when the engine is already running. This allows you to reduce the noise level during operation of the power unit, as well as minimize the amount of harmful emissions into the environment.
How to replace spark plugs yourself: algorithm
Do not forget that when making a replacement, you need to replace all glow plugs, regardless of how they look (even if they do not seem to have the slightest defect); visual condition is not a quality criterion. The selection of spark plugs takes into account the specific type of diesel engine.
The glow plugs are located in the upper part of the cylindrical block head (not far from the diesel injectors). Sometimes they cannot be seen right away, because the engine is covered with a special cover (made of plastic) or a casing. In order to gain access to the area of interest, these protective elements must be dismantled.
Disconnect the terminals
In fact, the first step in the replacement itself assumes that you disconnect the negative terminal from the battery. This will require unscrewing several small nuts that secure the tips of the high-voltage wires to the contact rods of the glow plugs. The wire is connected to the spark plug from above. The nut unscrews instantly: all you need is a wrench; It is recommended to move the wire itself a little, since otherwise it will interfere with further work.
Having completed all the procedures described above, you can begin dismantling the glow plugs. Here you will need a ratchet wrench with which you can unscrew them; the main thing is caution: you can easily destroy the thread or break the candle itself (the difficulties with the need to drill out broken candles were discussed in the text above).
Cleaning contacts
The next step is to clean the dirt from the contacts, and you need to do it on each of the glow plug wires. This will ensure efficient and uninterrupted operation of the entire system when the elements are installed in the engine. If the contact is stuck, you can remove it using a flat-head screwdriver.
Cleaning holes
The intermediate stage is cleaning the holes in which the spark plugs are installed. Here you will need a special layout, the length of which makes it possible to effectively clean the “wells” for installation. Before screwing into the reaming, you need to apply a special lubricant. Next, the layout is screwed into each of the “wells”. A caveat: it is advisable to use a standard (rather than universal) layout. It is also recommended to clear deposits in the channels using compressed air.
Installation and testing
The last stage is the actual installation of new glow plugs on the diesel engine. This is not difficult to do, but there are certain nuances regarding fixation: you need to tighten it until you feel slight resistance. The tightening torque can be adjusted using a torque wrench; it is 15 newtons per meter. If you overtighten, then the next time you replace it you will be faced with the possibility of breaking the spark plug in the hole.
After completing the procedure, the cleaned wire tips are installed back into their seats and secured with nuts. It is important to make sure that they are securely fixed, and also to ensure that the spark plug contacts are completely closed. After this, the negative terminal is connected back and the functionality of the system is checked. To do this, you need to turn the ignition key, start the engine and see how correctly it works in warm-up mode.
Read more: Front shock absorber VAZ 2107 which is the best mount replacement instructions with photos and videos
Despite the relative ease of replacing diesel spark plugs and the modest set of necessary tools, many car owners are faced with difficulties in carrying out the work on their own, with spark plugs breaking during dismantling and damage to threaded connections. Our specialists will help you quickly and efficiently replace spark plugs. To do this, simply fill out the form below.


