Do-it-yourself Chery Fora (A21) repair
You can find a large number of articles on various topics, photos and video materials on the website etlib.ru. Recommendations and advice from professional car mechanics are presented in a language understandable to the amateur.
Today, the topic of DIY Cherie Fora repair is raised quite often on large auto forums and special websites for motorists.
We decided not to lag behind, and provided recommendations for correcting the most common problems and malfunctions that this car “suffers from.”
In skillful hands, the most complex, at first glance, malfunction or procedure turns out to be much simpler.
Procedures such as changing the engine oil and gearbox of a Chinese car, replacing a stove radiator or replacing a thermostat require knowledge of specific nuances. Our experts write about this.
Also learn how to replace a timing belt, replace an alternator, and replace a hub on this vehicle.
Modifications
Chery Fora in the A21 body is a C-class sedan. The equipment of this “Chinese” could be the envy of cars of higher classes.
In terms of operation, despite its Chinese origin, the sedan is also in perfect order.
The collection of manuals published on our website, no worse than the Cherie Fora repair book, will give owners valuable information about the features and common “sores” of the model .
The Chery Fora model is produced by the famous Chinese automobile corporation Chery Automobile, founded back in 1997:
- In 2007, a modification of the front-wheel drive Fora sedan with a 2-liter power unit was released. The car was equipped with a 5-speed manual transmission.
- In 2009, the Chinese began to produce another modification of the 4-door sedan with a 1.8-liter engine.
- Since 2008, Cherie Fora has been going to TAGAZ under the name Vortex Estina . Front-wheel drive, 2.0-liter power plant with a capacity of 130 horses, manual transmission are standard equipment of the model.
Body
Cherie Fora's car, the repair and operation of which will not cost a large sum if you do a lot of it yourself, is equipped with a good body .
Its length is 4552 mm, which is already not bad for a sedan. The height and width, respectively, are 1483 mm and 1750 mm.
As for the chassis, the car has a MacPherson strut suspension at the front, and an independent multi-link at the rear.
Are you the owner of Chery Fora (A21)? We recommend taking a look at the Cherie Fora repair manual. Here is the most valuable information on setting up and restoring various faults and defects of the Chinese sedan.
More details
Easy timing belt replacement on Vortex Estina with 2.0 Acteco engine
So, finally, the brainchild of the Russian-Chinese automobile industry came to us. We meet Vortex Estina with a 2.0 Acteco engine, timing belt replacement at 120,000 kilometers. In general, the car is interesting not only for its origin, since it is a Chery Fora, also known as Chery A5, produced at TAGAZ, but also for its engine. Although it has the Chery logo on it and is called Acteco SQR484F, this is a long-known engine from the Mitsubishi concern of the 4G6 series.
There is an official procedure for replacing the timing belt on this engine, in which it is necessary to remove the valve cover, then changing its gasket accordingly, set TDC, block the camshafts, and so on, if you are interested, you can read the article about Tingo. We will follow a simple, long-proven path. Let's apply a few marks and use a little trick that you will learn about later.
The tool for replacing the timing belt is standard here, a set of keys and hexagons, and we also need a bison, a cup of coffee and an hour of free time.
We remove the decorative plastic along with the throttle valve pipe.
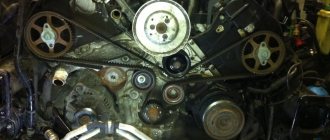
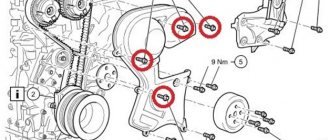
Remove the front timing belt protective cover by unscrewing the five hexagons by five.
For clarity, we will show it with the cover removed.
Using a 16mm wrench, turn the service belt tension roller counterclockwise until it is completely loosened. Then remove the generator belt.
We unscrew the six bolts by thirteen and remove the crankshaft pulley. We do not unscrew the central bolt.
We see a mark on the crankshaft. We turn the crankshaft by the bolt, clockwise, so that the mark faces down.
Using a plank, we jack up the engine and unscrew the engine mount from the cushion and cylinder block.
We dismantle the idler roller of the service belt.
We unscrew the six ten bolts of the lower timing belt protective cover and remove it last.
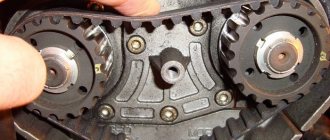
Mark the location of the camshafts.
As well as the position of the crankshaft, for reliability we will put two marks.
After this, we use a little trick: we lock the camshafts by their sprockets using a bison. Just be careful not to damage the sprockets; we adjust the bison in such a way that it snaps into place with one hand and place it in the place where both camshaft sprockets are closest.
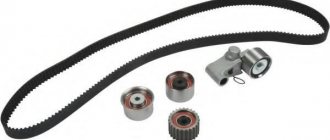
We unscrew the tension roller and two bypass rollers or, as they are called in everyday life, parasitic rollers. Remove the old timing belt.
How to replace or repair the stove on a Cherie Fora car
A little less than ten years ago, another Chinese “handsome” appeared on the domestic car market - Chery Fora.
The Chinese manufacturer continues to actively surprise Russian car enthusiasts, presenting cars that very quickly become incredibly popular and become loved by Russians. The vehicle satisfies the desire of those who love high speeds.
This car can accelerate to a speed of 185 km/h in just eleven seconds. Inside the cabin, the driver and passengers feel surprisingly comfortable, so long trips are not at all tiring.
Of course, such characteristics of the Chery Fora could not go unnoticed by those who are looking forward to purchasing a new vehicle, so it is not at all surprising that the choice is made on this particular car.
However, even such a wonderful vehicle can sometimes present problems that the owner must solve. Many people complain that after a short operating period there is a deterioration in the performance of the stove on the Cheri Fora. Why such a problem arises and how to solve it, of course, not all owners of Chinese cars know.
It is for this reason that we decided to provide you with useful information so that you do not feel like a person who is at a dead end.
Heater performance deterioration
Each car has its own weak points, which are useful for the owner to know about, since then a problem can be prevented. If you are the owner of Chery Fora, then you need to take into account that some of these weak points are:
- thermostat;
- water pump;
- cabin filter;
- radiator;
- stove.
All of these devices are part of a heating and cooling system. For this reason, when noticing a deterioration in the performance of the heater, it is useful to check the functionality of each of the listed devices. If problems are identified, it is necessary to carry out repair work or replace the failed device.
Discounts on new cars! Advantageous loan from 9.9% Installment plan 0%
Dismantling the stove
If you are convinced that the heater of your Chery Flora is out of order or needs repairs, you will have to dismantle it and install a new one in its place or the same one, but after repair.
For this reason, it will be useful for you to know how to remove the heater in such a car.
We immediately warn you that you need to be patient, since this process is quite lengthy and causes some suffering for most owners.
First, find the place where the heater valve that supplies coolant to the radiator is located, turn it off. After this, slightly loosen the clamps and remove the pipes.
We warn you that at this moment about one and a half liters of coolant will pour out of them.
Accordingly, provide for this moment, think about where you will drain this liquid so as not to get dirty yourself and not to splash the entire space around.
Now go into the interior, unscrew the glove compartment, remove it to provide access to the stove. Please note that the heater is secured with several bolts. Arm yourself with a screwdriver and unscrew all these bolts. Carefully remove the stove along with the radiator.
Now we suggest you visually inspect the heater housing. If it does not have any mechanical damage, then we leave it, but replacing the radiator of the Cherie Fora stove will still be mandatory for you.
Take care of purchasing a new radiator and install it instead of the one you just got rid of.
Next, you will need to return everything to its place, act consistently, but only in the opposite direction. Do not forget to add one and a half liters of coolant that were lost during dismantling. After installing the stove with a new radiator, check the result to make sure that the heater begins to heat the interior space faster.
Fan problem
It doesn’t hurt you to prepare yourself for the fact that one day you will discover confirming facts that the stove fan on your Cherie Fora is not working. In this case, it will also be useful for you to roll up your sleeves, arm yourself with useful information and begin repair work.
A common reason for fan inactivity is brushes that wear out during active use. Of course, you will have to purchase new brushes and install them in place of the worn ones.
It is important to note that purchasing a new fan will be easy, but you will need to spend a lot of money. But purchasing just brushes is quite problematic. However, purchasing an expensive fan just because it is difficult to find original brushes is very stupid.
Experienced craftsmen recommend working a little creatively and replacing the original brushes with those borrowed from the domestic G8.
Of course, you will have to work a little with a file to grind them down to the required size, but such actions will allow you to restore the fan’s functionality, and you will spend small amounts of money that will not put a heavy burden on the family budget.
By the way, if you want to make sure in advance that the problem lies specifically in the brushes, we recommend that you turn on the ignition, select the maximum operating mode for the fan, and then move the connector as far as possible to the side. If at this moment the fan shows “signs of life,” then the problem is definitely in worn brushes. If, however, the fan continues to be “silent,” then the reason should be sought elsewhere.
In addition, it is very important to pay attention to how each damper works. It is important to take into account that the Cheri Fora has not one, but several valves, thanks to which it is regulated:
- temperature of the air flowing from the stove to the cabin;
- air flow direction.
If one of the dampers does not close completely, cold air will enter the cabin, preventing normal heating of the interior space. Unfortunately, if the fact is confirmed that it is a poorly functioning damper that provokes poor operation of the stove, you will have to disassemble the torpedo, otherwise you simply will not be able to adjust the operation of the problematic damper.
Don't forget to clean the pipes connected to the radiator. They very often become clogged, and for this reason the heating process deteriorates. The fine filter located under the glove compartment also gets dirty very quickly.
No matter how hard you try to carefully examine everything around you, but before this filter, unlike other vehicles, you will not find any other filters.
For this reason, it becomes dirty so quickly, since it takes the brunt of the influx of external “garbage” onto itself.
So, do not be afraid to solve on your own the problems that your new friend Chery Fora has to face.
The devil is not as scary as those around us describe him, and repair work is not as scary and difficult as we imagine. You just need to be patient and act according to the instructions.
After completing such work, the inside of your car will again be hot and comfortable for you and your passengers.
When to change the belt
The main purpose of the timing drive is to synchronize the actions of the shafts that take part in the operation of the propulsion system - the crankshaft and camshaft. The belt transmits torque from the crankshaft to the camshafts. This way the exhaust gas is removed and the cylinders are supplied with air. The belt ensures that the valves and pistons operate synchronously, so they do not collide during movement.
If the belt is not given due attention, it will definitely break, and this will happen before the time regulated by the manufacturer. It is believed that the belt on a Cheri Fora must be replaced after 60,000 km. But this can happen much earlier if diagnostics are not carried out.
The timing belt drives the water pump, causing it to receive additional stress. It is recommended to carry out diagnostic procedures on the belt every 25,000 km. Here are some signs that indicate that it’s time to replace the consumable with a new one:
- the car began to consume more fuel than before;
- malfunctions in the operation of the engine began to be often noticed;
- the car's power began to decrease;
- the engine began to overheat quickly.
If you notice one of these signs, you should think about it and look under the hood to check the condition of the belt drive. During a visual inspection of the timing belt assembly, you can independently detect defects indicating that it is time to replace the drive. Here is a list of these defects:
- the surface of the belt looks worn;
- chips and gouges are visible on the teeth;
- the surface is covered with cracks;
- the ends are torn and individual threads are visible;
- the structure began to delaminate;
- the surface is covered with oil stains.
If oil smudges are found on the belt, this means that the seals will also have to be changed. If this is not done, oil will continue to drip onto the new consumable, which will very quickly damage it, since machine oil strongly corrodes rubber. If you decide that you will make the replacement yourself, then prepare all the necessary tools, namely:
- spanners;
- set of heads;
- torque wrench;
- screwdrivers with different blades;
- jack;
- a support that can be placed under the motor.
Buy only original consumables, as fakes will fail much earlier, and you will end up wasting your money.
Test drive Chery Fora 2007. Cherry handicap 21
HomeMiscellaneousCherry handicap 21
Everyone is already accustomed to the fact that Chinese cars are usually, to one degree or another, copied from models from other manufacturers. It looks like Chery Fora A21 is an exception to the rule? The sleek sedan with a chrome grille is attractive: the body panels are well stamped, neatly fitted and painted.
The calm lines of the two-tone light interior, quite appropriate “metal-like” inserts, and decent quality of materials place the Chery Fora A21 car above its well-known compatriots in Russia. The only criticism I can make is the excessive modesty of the instrument panel and the design of the radio (its remote control on the steering wheel is unsuccessful - small buttons are bunched together).
The basic configuration of the Chery Fora A21 (there is no other version yet) includes leather seats. The rear sofa is designed for three adults.
Cherie Fora's car is Chinese, and therefore it is not surprising that the large range of adjustments for the driver's seat is shifted to the “small-sized” zone. The height limit for a relatively comfortable fit is 185–190 cm.
Against this background, the pedal assembly is puzzling: a spacious niche with widely spaced and high-hanging pedals is convenient for owners of shoes of size 43 and above.
The taut gear lever with a comfortable handle can be compared to the bolt of a Kalashnikov assault rifle. Switching on is clear, with a slight clatter, selectivity is excellent, but the strokes are so large that you don’t want to switch again. The 2 liter engine comes to the rescue! Elasticity and torque are especially good in the very running range of 1500–3000 rpm.
Visibility in the Chery Fora is good: the pillars do not create large blind spots. And reversing is facilitated by fairly accurate standard parking sensors. Although the exterior mirrors are small, they do their job well.
Chery Fora A21 rolls easily and cheerfully at 90–110 km/h - no body sway on longitudinal waves, rolls when cornering are small and not tiring. At lower speeds, the suspension may seem stiff - it repeats asphalt defects, transferring them not only to the body, but also to the steering wheel.
The operation of the air conditioning system, to put it mildly, is “not very good” - it certainly cannot automatically maintain the set temperature level... and the fan is very noisy. The second source of noise is the engine, quiet only up to 3000 rpm, but along with the roar there is also a noticeable pickup .
The purpose of the Chery Fora is a long trip on the highway at a reasonable speed. A moderately sharp steering wheel, an engine with a good power reserve, informative and tenacious brakes, and intelligent ABS operation cannot but be liked.
At the same time, noise and poor heating spoil the impression.
But remember that today few people can offer a 2-liter engine, four airbags, ABS, EBD and leather seats for less than 15 thousand dollars - that’s how much the Chery Fora A21 costs.
Main characteristics of Chery Fora A21:
- Engine: 2.0 l (95 kW/129 hp)
- Transmission: 5-speed manual
- Equipment: A21-III
- Price: $14,499.
Summary: Chery Fora A21 is a powerful, roomy and richly equipped car. But the original design is not without problems, like many other Chinese cars.
Advantages of Chery Fora: powerful flexible engine, informative brakes, the presence of standard safety systems, good visibility, low price. Disadvantages of Chery Fora: inefficient heater, uncomfortable suspension, noisy engine, “Chinese” ergonomics, lack of configuration options, low ground clearance, lack of protection crankcase
Reviews
auto.ironhorse.ru
Chery Fora a21 price, technical specifications, photos, video test drive
A sedan of a Chinese company, which is a budget car released in 2006, but before that this model was shown in 2005 at the Shanghai Auto Show in order to find out the audience's opinion about the design and then understand that everything is fine and put the car into production, which in fact, this was done with Chery Fora a21.
I built this model on the basis of a car from another manufacturer, and more specifically on the basis of the SEAT Toledo. In terms of design, the model can hardly be called attractive, it is simple and does not have something to attract the buyer first with the design, some may like it.
Interior
Inside, the cabin is spacious, but its design is not modern, it is simple and only performs the usual functions. The Chinese like to put low-quality wood in their cars, but this is not the case here; there is quite a lot of polished aluminum, which makes the interior visually more expensive.
The driver can customize the seat to suit himself, the car does not look like a premium one, but the seat can be adjusted using a servo drive and can be adjusted in 8 directions. The steering wheel is 3-spoke and has buttons with which you can control the radio, by the way, with a CD changer, into which a maximum of 6 discs can be inserted.
The rear passengers of the Cherie Fora will feel comfortable, but not on a long trip, as the comfort is acceptable, but not ideal. 3 people can stay there.
Specifications
Type Volume Power Torque Acceleration Maximum speed Number of cylinders
Gasoline 1.6 l 119 hp 144 H*m 14 sec. 185 km/h 4
Gasoline 2.0 l 129 hp 180 H*m 11 sec. 185 km/h 4
More details
At the time of sale, the buyer had a choice of only two types of power units whose characteristics were similar. Both engines were created by the company in Australia.
The engines have a variable valve timing system and are 4-cylinder engines with 16 cylinders. The buyer could choose either a 1.6-liter or a 2.0-liter engine.
The manufacturer had plans to create an 8-valve engine, but for some reason this idea was not implemented.
https://www.youtube.com/watch?v=n8VMu1SJN9M
The power unit of the Chery Fora A21 is paired with a 5-speed manual transmission, which has stretched gear ratios, allowing you to move around the city in a car calmly. This gearbox will not allow you to drive a car dynamically, but it allows you to ensure relatively low fuel consumption, which in the urban cycle, according to the manufacturer, is 10 liters.
The engine can also be paired with a CVT gearbox; it was produced by a company that also produced gearboxes for MINI cars. This gearbox has not gained much popularity, since people are more accustomed to manual transmissions.
Chery Fora a21 suspension
The model's suspension is completely independent, there is a MacPherson strut suspension with a stabilizer at the front, and a simple multi-link suspension with a stabilizer at the rear, all this provides good comfort while driving. The hydraulic booster is responsible for steering, and only disc brakes are used for braking, but the front ones are ventilated.
For safety, the suspension has an anti-slip system.
The model is presented as a business class, but it is not one, although it is quite comfortable. If you need a comfortable car and have a small budget, but this car is no longer produced and you can only buy used, then it is a very good option to buy, but it’s better to look at other options.
Video
About the car
The first mention of this car appeared in 2005 after the Shanghai Auto Show. It was given the index A21, and in 2006 the car went into production as Chery A5. For consumers in Russia it is known as Fora. This model is assembled in Kaliningrad, again using the Seat Toledo as a basis. The car received its original appearance, which looks organically on the road with other cars representing global automotive trends.
The power unit is a motor that the Austrian company AVL helped develop. It has four cylinders, 16 valves, variable valve timing. Gasoline with an octane number of at least 92 is used as fuel. The engine displacement is 2 thousand cm 3 with a power of 130 hp. Today, cars with a slightly reduced displacement to 1600 cm 3 have appeared on the roads. Power also dropped to 109 hp. The engine valve mechanism drove the timing belt.
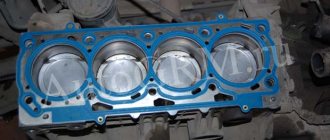
Are the valves bending?
The timing mechanism drive and hydraulic valve lifters require special attention and maintenance. Neglecting this leads to significant damage to the power unit of this car. When a toothed belt breaks in the timing mechanism drive, the pistons meet the valves. Not only valves are damaged, but also pistons and connecting rods. Repairing the engine after such damage will require large financial investments. To avoid this, it is necessary to monitor the condition of this mechanism during each vehicle maintenance.
This operation can be carried out by any car owner. The vehicle manufacturer recommends replacing the belt at a mileage of no more than 60 thousand km. This figure may be different depending on the operating conditions of the machine, the quality of consumables used, and maintenance. There are known cases when the drive belt broke after a mileage of only about 20 thousand km, and this entailed additional costs for major engine repairs.
Chery Fora operation and repair
The experimental vehicle is equipped with the most popular engine – a two-liter SQR484F. To change the spark plugs, you need to remove the plastic engine cover - it is also part of the air duct.
Access to the spark plug tips is limited by the crankcase ventilation hose: squeezing the clamp, pull it off the valve cover pipe and move it to the side. Now you can take out the tips and unscrew the spark plugs (they are 16" key), but first we close the hole in the throttle assembly so as not to accidentally mess it up there.
The air filter is easy to change. We unscrew a couple of self-tapping screws “crosswise”, lift the back part of the cover and, sliding it off the hooks, remove it. When installing a new filter element, make sure that the rubber seal does not move out - it is better to moisten it with soapy water.
If it becomes warped or wrinkled, unpurified air will enter the motor. At the same time, it is advisable to carry out wet cleaning in the body cavity, removing the dirt accumulated at the bottom.
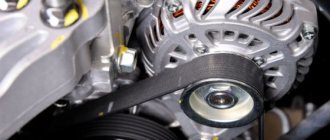
The poly V-belt is equipped with an automatic tensioner, but its design is, to put it mildly, stupid. It’s not easy to take the machine gun away: there’s nothing to grab onto. Maybe for the roller bolt, but it can turn away because, contrary to the logic of the diagram, it has a right-hand rather than a left-handed thread. If it’s a shame to cut an old belt, which can always come in handy, remove the running roller, and then the belt with tensioner.
Having brought the sectors of the machine together in a vice, insert a 5-mm pin into the provided holes and install the tensioner and rolling roller in place. After installing the belt, you can remove the pin.
Note that the force of the tension spring is quite high and bites the pin in the holes. It is more convenient to act together: one tightens the lower branch of the belt with a mounting tool, resting against the oil pan, and the other, meanwhile, removes the pin with pliers.
If you also need to change the timing belt (according to the regulations - every 40 thousand km), then we start with it.
This drive has a semi-automatic tensioner, and this is its advantage. The downside is that you need to dismantle the support when hanging the power unit, otherwise the casing cover cannot be removed. Access to one of the bottom cover bolts is blocked by the running roller of the poly V-belt - we also remove it.
For convenience, we also dismantle the expansion tank - down with two bolts.
After fiddling with the Chinese pistons (their threaded core for a Phillips screwdriver skids helplessly in place) and unscrewing several bolts, we remove the right mudguard of the engine compartment.
The central bolt of the crankshaft, which usually cannot be turned, does not need to be unscrewed - the pulley here is on six peripheral bolts, and this is another plus.
The marks on the camshaft pulleys should be located opposite each other, while there is no corresponding mark on the crankshaft. Let's mark its position relative to the engine crankcase with a marker.
After removing the old belt, be sure to check the condition of the pump: there should be no hint of leakage or biting of the bearings! Without hesitation, we install new rollers, even if it seems that the old ones can still serve. Believe me, such savings are inappropriate.
When assembling, do not mix up the fasteners: the central bolt of the upper casing cover is longer than the others!
To change the engine oil, you need to go below ground level. Even if you have an installation for pumping waste through the oil dipstick hole, you still cannot get to the oil filter from above. The drain plug on the engine is turnkey “17”.
The drain for the MCP is “at 24”, and the fill (also known as control) is “at 17”. When changing antifreeze, remember that it is poisonous, so try not to breathe in the fumes. It is better to drain hot liquid (if the thermostat valve is open, more of it will flow out), but do not get scalded while doing this.
The drain plug is located at the bottom of the right radiator tank.
To replace the left fog lamp, you need to lie on your back and, putting your hand into the gap between the plastic protection and the bumper skirt, turn the socket on the headlight. It is better to work with glasses, because in the work area, as a rule, a lot of dirt accumulates. The right light bulb is more difficult: the path is blocked by the washer reservoir. To enter from the rear, we remove the mudguard by removing 13 pistons - it’s terribly inconvenient!
But it is much more difficult to change the lamps in the headlights. Access to the right is limited by the neck of the washer reservoir, as well as the power steering and coolant reservoirs. For convenience, it is better to remove them: simply pull out the filler neck by pulling it up, and remove the tanks by unscrewing a couple of bolts and move them aside.
Removing the plugs on the housing is half the battle; many will probably be puzzled by the unusual mounting of the lamps.
To remove the low beam stub (it’s more convenient to work with a mirror), you need to turn the block with the fixing steel plate mounted on it, and then, without touching the latter, remove the lamp itself from the block.
With the main beam it’s even worse: there seems to be a standard fastening with a U-shaped bracket, but getting its ends out of the hooks is not easy - the ends of the bracket stand at odds with the headlight body. In addition, the hole in this section is smaller than that of the low beam, which is strange, because a clearance was also placed here.
Moreover, each lamp is offset relative to the center, and the size turned out to be so far away that you can’t take it with anything other than “platypus” pliers. When assembling, do not confuse the plugs, which are almost the same in diameter from each other. The problems with the left headlight are the same, the only difference is that to access you need to remove the battery.
And before that there is a power fuse block located on top of the battery. Moreover, for some reason the left headlight has a different design from the right one: instead of rubber plugs, there are plastic ones that can be removed by turning (similar to the Lada). After the ordeal with the headlights, changing the lamps in the rear lights is a pleasure - you don’t even need a tool.
To replace the front pads, use a 13mm wrench to unscrew the bolt of the lower guide pin and turn the bracket relative to the upper pin. The original inner pads are equipped with an electrical wear limit sensor. If you install a non-original one with a tweeter bracket instead, you need to cut off the wiring from the old pads to close the connectors from dirt.
The tweeter bracket should be on the inner block from below. The rear pads have two plates, which are important not to confuse: first we install a perforated plate on the pad, and a solid one on top of it. The caliper pin is on a 17mm turnkey. To access the handbrake brake pads, remove the caliper assembly (two 14mm bolts), and then the disc-drum. Overall it's not difficult.
All that remains is to turn off the service indicator on the instrument panel: press and hold the right button on the instrument panel for five seconds, then, without releasing it, turn on the ignition, release the button and immediately, after half a second, press it again simultaneously with the left button. After waiting a couple of seconds, the indicator will go out.
Do-it-yourself timing belt replacement
1. First of all, take a jack, use it to lift the car and remove the right wheel. After this, the car needs to be placed on a support, which should be prepared in advance. 2. For our safety, the car must be de-energized. To do this, be sure to disconnect the left terminal from the battery. 3. We remove the air filter housing and other equipment that may interfere with our work. 4. Unscrew the bolts securing the expansion barrel. It is not necessary to completely remove the barrel itself, just move it to the side.
5. After this, we have to dismantle the drive of the attachment. 6. Now you can remove the top cover of the casing covering the timing mechanism. 7. Now we remove the right support. To do this you will have to raise the engine a little. 8. Remove the crankshaft pulley. To do this, you need to fix the crankshaft so that it does not rotate and unscrew the fastening bolts. 9. Now you can remove the lower timing case cover. 10. Remove the valve cover. To do this you will have to unscrew 12 bolts. The cover should be removed with the gasket. Disconnect all wiring from the gas distribution mechanism. 11. Please note that the mark located on the crankshaft must be in a horizontal position.
12. Unscrew the plug near the fourth cylinder and screw a special bolt into the resulting hole. 13. We install all the shafts exactly according to the marks. We fix the camshafts. This can be done using a special plate, which... Pay special attention to the correct installation of the shafts according to the marks. 14. Loosen the tension roller. After this, remove the belt drive. 15. We also shoot videos. Be sure to inspect them for defects. If any are found, the rollers must also be replaced along with the belt. 16. We put on new videos. We check the marks again and tighten the new belt. 17. We combine the risks by turning the tension roller. Then tighten the fastening roller and bolt. 18. Remove the lock and turn the crankshaft to the right 2 turns. Let's check the marks again.
We carry out the rest of the assembly in reverse order. Be sure to check the vehicle's operation after completing the repair process. If unnatural noises are heard when the engine is turned on, the procedure will have to be repeated.
It is quite possible to replace the belt yourself. Be sure to check its condition from time to time. This will help prevent the belt from breaking.
Replacement procedure
Carrying out such an operation does not require high qualifications from the driver, the presence of special equipment or tools. In addition to purchasing new spare parts, the driver should prepare:
- A set of wrenches, open-end wrenches, and spanners.
- Screwdrivers with slotted, cross-shaped blade.
- Car jack.
- Body stand.
- Anti-recoil shoes.
- Support for the power unit.
- Crankshaft and camshaft stoppers.
And it is also advisable to have a torque wrench to correctly tighten the bolts when assembling the engine, a support for installing the motor on it when replacing the belt. Replacing the timing belt of a Cherie Fora can be done something like this:
- Open the hood of the engine compartment, disconnect the battery terminals, this will prevent accidental damage to the electrical equipment of the car.
- The work will be interfered with by the air filter housing, expansion tank, and other elements of attachments. They are dismantled; the expansion tank of the cooling system does not need to be completely removed, it is simply moved to the side.
- Use a wheel wrench to remove the wheel bolts of the right front wheel.
- Wheel chocks are installed under the rear wheels, and then the car body is jacked up.
- Place a stand under the car and remove the right front wheel.
- The belt of the auxiliary units of the machine interferes with the removal of the timing belt protective cover; it is removed after first loosening the tension. And they also dismantle the tension and bypass rollers.
- After this, you can remove the upper timing cover; to do this, use a hexagon number 5 to unscrew the five bolts securing it.
- The next step is to unscrew the bolts of the power unit cushion on the right side in the direction of travel of the car. The engine is jacked up through the gasket, three bolts are turned out with a 15mm head, and they are removed from the spar.
- Next, use a 22mm spanner to hold the crankshaft pulley from possible rotation, unscrew the 6 bolts securing it, and remove the pulley.
- Now you can dismantle the lower protective cover of the timing mechanism; just unscrew the six bolts with a 10mm wrench.
- The valve mechanism cover must be removed; before doing this, disconnect the connector from the camshaft sensor.
- To replace a worn belt, you need to set the alignment marks.
- You can remove the timing belt by loosening its tension. Unscrew the bolts securing the tension and idler rollers and remove them from the cylinder block.
The timing drive mechanism is assembled in the reverse order. Before this, the installation marks are checked, and a thread locking agent is first applied to the roller mounting bolts.
Alignment marks
Correctly setting the installation marks means ensuring efficient operation of the power unit, this is done in this way:
- On the crankshaft pulley, the threaded hole has a slot that should be installed so that it points towards 15 o'clock. To do this, turn the crankshaft with a key.
- Using a 22 key, unscrew the plug, which is located in the area of cylinder 4. In its place, screw the crankshaft stopper, turn the crankshaft until it stops against the stopper.
- The camshafts have cutouts, they should be directed horizontally. If they are in this position, they are secured with a locking bar.
If the belt has been broken, the camshafts are set to the desired position by turning the key to 32, after which they must be fixed.