When to change the timing belt?
To prevent this from happening, experts recommend diagnosing the condition of the belt drive after 25,000 km. The service life of the belt is also regulated - this is 50,000 km. Monitor the condition of the timing belt and the entire assembly, and nothing bad will happen. But what symptoms will indicate the need to replace the timing belt consumable:
- chips or cracks were found on the surface of the belt;
- the teeth are ground down;
- there has been a delamination of the structure;
- the sides are frayed;
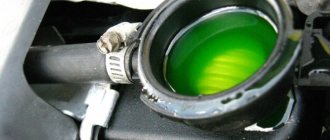
- Oil stains appeared on the belt.
The presence of oil smudges indicates that the oil seal is leaking oil, which means that it must also be replaced. In general, the belt is far from the only consumable material present in the timing system. In addition to the belt and oil seals, it is strongly recommended that you also pay attention to the tension roller. If it has any play, it must also be replaced with a new one. The pump may also need to be replaced. If you yourself do not dare to assess the condition of consumables, invite a specialist. he will do it professionally, because you don’t want to pay extra money for materials that may still serve you well.
Buy consumables only from trusted retail outlets. Don’t go for cheap materials, because they won’t last long. By the way, there is a special device for car diagnostics. This is a scanner that shows faulty components. It costs about four thousand, but it's worth it. The most popular of these devices is the Scan Tool.
Replacing the belt yourself
So, diagnostics have determined that the belt is worn out and it’s time to replace it. Now you need to prepare everything you need and begin the repairs. What do we need for this? Of course, you will have to go to the store and buy all the necessary consumables there. You will also need to prepare keys, screwdrivers, a pry bar and a jack. The car is placed on a level surface. Repairs should only begin when the engine is cool. For safety reasons, the left terminal of the battery should be disconnected.
- Remove the casing from the air filter.
- We remove all interfering pipes.
- Remove the housing from the air filter.
- We remove the wheel on the right, and with it the motor protection.
- Drain the coolant and install a jack under the engine.
- Unscrew the right mudguard. A 10mm socket should be used for this purpose.
- Remove the engine mount located on the right. To do this you will have to unscrew several bolts and nuts.
- After we remove the pillow, we can already get to the tension roller
- Remove the timing belt protective cover.
- We set the top dead center.
- Turn the crankshaft to the right. After this, the marks on the camshaft gears should align.
- Remove the crankshaft pulley.
- After this we need to fix the crankshaft. Here's how to achieve this. In fifth gear, insert a screwdriver into the brake disc. It should jam the disc against the caliper. It should be placed slightly below the caliper, since the disc will rotate clockwise.
- After blocking the crankshaft, remove the bolt.
- At this point we set all the necessary marks. And the mark located on the crankshaft should align with the mark on the body.
- Loosen the fastening that secures the pump. To do this, use a 5mm hex key.
- Remove the motor support bracket.
- We turn the pump clockwise, thereby loosening the tension of the belt drive. To do this we use the key at 41.
- After removing the parasitic roller, we remove the timing belt itself.
Installation
- We fix the camshafts and remove the gears from them. We use the key at 17.
- Remove the tension roller and plastic protection.
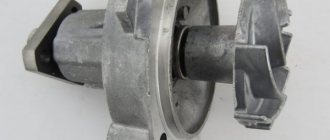
- We remove the pump and immediately install a new one in its place (if required).
- We put the plastic protection, camshaft gears and rollers in place. We tighten all the bolts.
- Installing a new transmission. This must be done in the direction of the arrows marked on it. An incorrectly installed belt will also work, but its teeth will wear out very quickly.
- The new belt is first put on the camshaft gear, then on the idler roller, on the belt tension roller and on the pump.
- Make sure the belt tension is correct. After tensioning it, turn the pump clockwise until the marks are completely aligned.
- We tighten the water supply pump and once again make sure that all the marks match.
- Now let's install all the other parts.
Installing the piston of the first cylinder to the TDC position Chevrolet Aveo T300
The piston of the 1st cylinder is set to the TDC (top dead center) position of the compression stroke so that when carrying out work related to removing the camshaft drive belt, the valve timing is not disturbed. If the valve timing is incorrect, the engine will not operate normally. Set TDC according to the marks on the mechanisms for changing the valve timing of the intake and exhaust shafts (when setting according to the mark on the crankshaft pulley, the piston of either the 1st or 4th cylinder may be in this position). After this, be sure to ensure that the marks on the crankshaft pulley and the lower timing belt cover match. If the mark on the crankshaft pulley does not coincide with the mark on the cover, it means that the valve timing is incorrect (the piston of the 1st cylinder is not installed at TDC). In this case, it is necessary to remove the timing belt and rotate the crankshaft until the marks align.
The marks on the mechanisms for changing the valve timing of the intake and exhaust shafts must be located in a horizontal plane and directed towards each other, as shown in the photo...
...and the mark on the crankshaft timing belt should be aligned with the mark on the oil pump housing. The mark becomes visible after removing the crankshaft pulley. The rectangular mark on the oil pump housing should align with the mark on the crankshaft timing pulley.
In addition, a mark (cut) is placed on the edge of the crankshaft pulley groove for driving auxiliary units and on the lower cover of the timing belt.
Video about “Installing the piston of the first cylinder to the TDC position” for Chevrolet Aveo
ICE theory: How to set the timing belt without marks? (example on an 8 cl engine)
Chevrolet Lacetti Checking timing marks through piston TDC.
ICE theory: How to set the timing belt on a 16 cl engine WITHOUT marks? Service instructions for Chevrolet Aveo T300
Chevrolet Aveo (Chevrolet Aveo) 1.4 F14D4 timing belt replacement. Photo and video instructions
We have a Chevrolet Aveo car under repair, on which the timing belt needs to be replaced, on a 1.4 F14D4 engine. We will show you clear photos and video instructions, after watching which you can do everything yourself.
To work with a non-standard tool, we will need this plate, 160 - 165 mm long, to fix the camshafts.
And here is a plate with a tendril that you can easily make with your own hands:
Its thickness is about 2 mm, we will need it to fix the crankshaft. Its thinnest strip is about 7 mm wide. and 50-60 mm long.
We will carry out repairs by removing the valve cover in order to check the position of the camshafts. Let's get to work, open the hood and first remove the air filter housing. We disconnect the connector from the mass air flow sensor; to do this, remove the locking tab from below and pull it towards you. Loosen the clamp securing the air pipe. Disconnect the pipe from the housing. Raise the air filter housing.
Since we will need to hang the engine, we remove the protection of the engine compartment, for this we use a 13 socket:
The next step is to remove the plastic casing in order to then get to the tension roller of the accessory belt. In our case, the fasteners are not original everywhere; in some places there are Torx, Shlis, etc.
Using a 19mm socket, loosen the tension roller of the drive belt:
To do this, turn the key counterclockwise. After this, remove the drive belt. We removed one belt, now we need to remove the power steering pump belt, it does not have a tensioner. We remove it by turning the pulley clockwise or counterclockwise (whichever is more convenient for you), tighten the belt with your other hand and pull it to the side:
It is gradually slipping away for us.
Let's move on to the valve cover. We move the overlay with our hands according to the arrow:
And lift it up. There is an ignition coil under it; unfasten the connector lock and remove the connector from the coil. Use a T40 Torx socket to unscrew the ignition coil mountings:
Turning slightly from side to side, we remove the coil from its seat. Further removal of the valve cover is prevented by a protective plastic casing. It is very rigid, it is extremely inconvenient to remove it, but you have to. For this we use a metal hook:
We do this on both sides and remove the top plastic cover. Then press the tongue inside with a screwdriver and lift the casing. We now have access to the crankcase ventilation hose that goes to the valve cover. We remove it, press a flat screwdriver onto its mounting bracket.
Take a wrench with an E11 head and unscrew the valve cover bolts:
There are 11 of them in total. After this, rock the valve cover from side to side with your hands and pull it up. Turn the crankshaft pulley clockwise until the marks on the pulley and the casing align:
And we control the location of the grooves on the camshafts. We see that they are in the upper part as expected, we insert a bar into them:
Now you can fix the crankshaft and remove the timing belt, but first we naturally remove the bar. We fix the crankshaft using a bar with a tendril, which we wrote about earlier. We insert it into the gap between the engine pan and the cylinder block:
Unscrew the pulley mounting bolt:
At the same time, hold the pulley with your hands so that it does not fall to the floor. Using the E16 head, we unscrew the bolt securing the belt tensioner of the auxiliary units, since it blocks access to the belt casing. Using the E10 head, unscrew the lower cover of the belt casing:
Two bolts on the bottom and two on top. Remove the cover. Access to the belt housing cover mounting bolt is blocked by the power steering tube; you need to unscrew the bracket that is screwed to the upper engine mount:
Use the E10 head to unscrew the timing belt cover:
Only two bolts (left and right). Let's jack up the engine a little from below and place the jack under the pallet. And now we can unscrew the upper engine mount:
6 attachment points. We remove the support, we have only an aluminum bracket as an obstacle to access to the timing belt, it is secured with 3 15mm wrench bolts:
We insert our bar again. Use a 6mm hex to turn the tension roller clockwise:
After this, the belt tension is weakened and we remove it. Using a T50 Torx wrench, unscrew the tension roller fastening:
We take an L-shaped Torx T50 wrench, since the head cannot be reached here, and unscrew it:
We change the rollers we need, to make sure that you have installed them correctly, you can take a mirror and place it down to see how the “tendril” fits into the groove. We check the location of the marks both on the crankshaft and on the camshafts. We put the belt on, first put it on the lower pulley, put it on the roller, then on the camshaft pulleys. We release the tensioner, the timing belt is tensioned.
It is necessary to check the correct settings of the marks, for this we turn the crankshaft two turns and again control the position of the marks, if everything matches, then we finish the work and assemble the engine back, if not, then we again remove the belt and adjust the position of the gears.
Video of replacing the timing belt in a Chevrolet Aveo:
Backup video on how to replace the timing belt in a Chevrolet Aveo:
Read times: 5,875; Today: 15
Do-it-yourself timing belt replacement - logbook of the 2009 Chevrolet Aveo Sedan T250 (f14d4) on DRIVE2
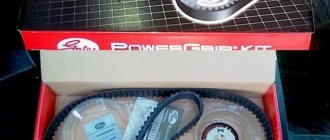
Hi all! Finally freed the shelf from the box with the INA timing belt replacement kit. A month earlier, I replaced the accessory belts when replacing a leaking pump, so I had already done half of the operations and knew what and how to do. Inspired by this video, I decided to replace everything myself.
For those who don’t want to give money to mechanics for this work, or just want to learn for general development how this is done, I’ll tell you how I did it. So, in order: Remove the air filter (socket head 10)
And we see the engine mount
Loosen the nuts and bolt (heads 14 and 17)
Then we hang the engine, placing bricks under it.
And remove the support
Next you need to remove the alternator belt, for this you need a key 17 by 19
Key
We remove the right wheel and use a key to press the belt tensioner out of the wheel arch using a special sprocket on the tensioner body.
Generator belt
You can also rest this key against the crankshaft pulley and calmly work from above with the belt. When the belt is removed you need to unscrew the tensioner, there is a tricky bolt somewhere in Torx E12 or E14 x.z. The 11 socket socket fits me perfectly.
Yes, in my story I omitted the dismantling of the mudguard of the belts behind the fender liner; I had it removed since last time. Filming it is still SEX.
Therefore, please be patient and have some free time - just removing and installing it can easily kill 3 hours. So let's continue.
We remove the remains of the support and plastic timing belt covers
To remove the bottom one we need to remove the crankshaft pulley. Therefore, we set the marks on the sprockets by rotating the crankshaft by the crankshaft pulley bolt with the head at 17, some have an E18 Torex head. Rotate clockwise.
To unscrew it we need extensions with a total length of about 50 cm and a knob on which to put a pipe. Oh, I forgot, partner! We call our neighbor in the garage and ask him to turn on 4th or 5th gear and press the brake, while we unscrew this bolt ourselves. The thread is right-hand, unscrew counterclockwise.
If a partner is a bore, then we send him away; we don’t need him anymore.
Now your marks will most likely get lost - you can correct them by rotating the wheel in 1st gear.
Now we fix the camshaft sprockets by clamping them with a bolt and wide washers.
And to accurately install the new belt, we draw our marks with a marker
Full size
2 or 3 at the top and 1 at the bottom on the crankshaft sprocket.
Using a hexagon, press the timing belt tensioner and remove it to the ground
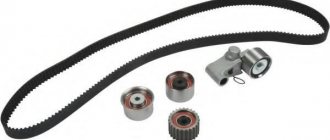
Timing belt diagram
We change the rollers and transfer the marks from the old belt to the new one, then we put the belt according to its marks. Everything can be put back together.
What I want to say about the old belt, after 86,733 km and 8 years of service, it was as vigorous and fresh as a new belt, the rollers were also in good condition.
The only thing in previous entries I wrote about the knocking of the tension roller, I thought the belt was stretched and it was beating against the extreme limit, it turned out on the contrary, the tensioner was beating against the maximum belt tension limit