Let's consider the main points when replacing a manual transmission, what you should not do when removing the gearbox and how to break it in after installation.
Sooner or later there comes a time when it is worth looking at the gearbox. There may be several reasons, driver errors while driving or long service life, wear and tear of parts. Any driver knows that the gearbox is one of the important components of the car, which drives the drive wheels.
Types and design of manual transmission
The manual transmission
can be made according to one of two common concepts:
three-shaft
or
two-shaft
.
Boxes of the first type are installed mainly on rear-wheel drive cars, while the latter are used on rear-engine and front-wheel drive cars. design
of each type has its own fundamental differences, so they should be considered separately.
Manual transmission diagram.
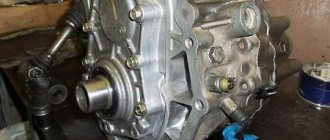
Three-shaft gearbox
The gearbox design of this type assumes the presence of three shafts, called driven, intermediate and driving. The drive shaft is connected to the clutch through splines. Intermediate shaft located in parallel. The moment is transmitted to it by a rigidly fixed gear.
The driven shaft with a number of gears rotates independently of the drive shaft. The gears of this shaft are not attached rigidly. Rigidly fixed synchronizer couplings are installed between them, allowing only longitudinal sliding along the shaft.
Mechanical transmission operation
In any modern manual transmission, all three shafts are constantly in contact through gears. When the neutral gear is engaged, the driven shaft is not fixed by anything and rotates freely. Engaging the gear leads to longitudinal movement of the synchronizer until it docks with the gear, which ensures a rigid connection of the driven shaft and the entire gearbox with the engine. This allows you to begin transmitting the selected torque directly to the wheels. To engage reverse gear, a separate shaft with its own gear is used.
Typically a three-shaft manual gearbox
has helical gears, which guarantees their strength, noiselessness and wear resistance.
Twin-shaft gearbox
Here, on the drive shaft connected to the clutch, there are gears that are stationary relative to it. The main difference with the previous design is the absence of an intermediate shaft, since here the driven one immediately runs parallel to the drive one, also equipped with movable gears that are constantly in contact with the elements of the drive shaft.
The principle of operation here is the same as in 3-shaft boxes, with the exception of the absence of direct transmission. Such boxes are distinguished by greater reliability and service life with good efficiency, but less variability in gear ratios, which is due to the fact that the 2-shaft manual gearbox is used exclusively in passenger cars.
How to use a manual transmission
Disassembling and repairing a gearbox
Operating a car with such a gearbox requires certain skills and abilities, so many, especially women, find it difficult to change gears on a manual transmission.
How to change gears
Gear shift
The first thing you need to remember is the position of the gearshift lever for each gear. Secondly, learn to choose the speed mode and operating range of each gear.
Speed modes:
- In 1st gear 15-20 km/h;
- In 2nd gear 30-40 km/h;
- In 3rd gear 50-60 km/h;
- At 4th up to 80 km/h;
- 5th for speeds over 80 km/h.
But it’s best to focus on the tachometer when changing gear. You can switch to higher speed by spinning the engine speed to 1500 - 2000 rpm for a diesel engine, or if it is a gasoline engine, then up to 2000 - 2500 thousand.
Before starting to drive, always make sure that the shift lever is in the neutral position. Then depress the clutch with your left foot and move the gearshift knobs to the position corresponding to first gear. In order to start moving without jerking and roaring of the engine, you need to smoothly release the clutch and also lightly press the accelerator (gas) pedal. Next, upon reaching the speed threshold, we switch to second gear, again squeezing the clutch and releasing the gas pedal, then smoothly repeat everything.
When switching on speeds, they cannot be skipped, only switched one by one.
When slowing down by pressing the “brake” pedal or when braking the engine, the gears are lowered in the same way, only engage not the next one down in order, but select the most appropriate one according to the speed limit.
3 tips for proper manual transmission operation
Despite the fact that a manual transmission is a reliable unit, if it is not used correctly, the transmission can very quickly fail. Therefore, it is recommended to follow these tips:
Shift gears smoothly and carefully; more than half of manual transmission failures are associated with failure of gears and synchronizers due to careless gear shifting.
Monitor the oil level in the box. The quantity and replacement lines are regulated in the repair manual
Protect the gearbox housing. The sump is very fragile and can be accidentally damaged by getting caught on some obstacle, therefore, as a rule, I protect the engine crankcase and gearbox from mechanical damage with an additional screen.
Related terms
- Cardan shaft (cardan)
- Backstage
- Axle shaft (drive shaft)
- Speed sensor
- Rear axle
- Automatic transmission (automatic transmission)
Malfunctions
Every car owner with experience begins to feel a malfunction in the car’s gearbox based on characteristic signs. Most gearbox breakdowns are associated with wear of rubbing parts, because they experience constant significant load while driving. However, such wear rarely reaches a critical state immediately. This is usually a gradual process, which is why a novice driver is always advised to learn to “listen” to the car. The sooner you notice a problem, diagnose it accurately and fix it, the less repair work will need to be done and the less it will cost.
You can classify signs that indicate breakdowns as follows:
- Noise in manual transmission. This may be a crackling, knocking, rustling, grinding, as well as beating of the gear shift lever. Knocking can occur during different phases of the box's operation. An experienced motorist can even determine from such a rustle which parts are at risk. For example, noise when a car turns into a turn indicates wear on the differential gears.
- Gears are hard to engage. In addition to the wear of parts of the gearbox itself, the malfunction may also lie in the clutch. In addition, there is a risk of deformation of the gearshift control rods. Remember that plastic parts break much more easily than metal parts.
- Spontaneous “dropping out” of the gear while driving. Over time, gear teeth become chipped and worn down, becoming shorter. The slightest vibration disengages them and the transmission “flies out”. In this case, it is also necessary to check the engine mounting.
- A sharp click and loss of smoothness when changing gears. If the clutch is working properly, then the cause of such a problem is most often the failure of the synchronizer blocking ring of the desired gear.
- The box “eats” a lot of oil. Increased oil consumption is primarily a leak. It can occur through a depressurized crankcase, as well as worn oil seals, which are located on almost any hole in the box body.
Most of these faults cannot be solved in any other way than by replacing worn parts. The gearbox is close to the center of mass of the car and breaks down much less often than the engine or suspension.
Such gear failures cannot be eliminated in any way except by replacing the unit
Therefore, if something happens to it, repairs will definitely be required. In order to find out which wear parts cause noise or interfere with the smooth movement of the lever, you need to remove and disassemble the gearbox.
Reasons why VAZ gearbox repair may be required
How to repair the starline a91 key fob display at low cost
The five-speed gearbox on a VAZ car needs intervention in the following situations:
- When the operating noise of the VAZ gearbox increases. This problem can be caused by various circumstances: wear of teeth on gears, teeth on a synchronizing mechanism, increased movement of shafts along the axis. Bearings also wear out a lot, which can cause noise.
- If you have difficulty changing gears. This situation is observed due to: wear of the hinge located inside the control lever, lack of lubricant in the box, due to a change in the shape of the selector for switching, the appearance of burrs, deformation of individual elements, dirt particles getting on the rods, coupling or hub splines, jamming VAZ gearbox cushions, distortion of the fork configuration for switching from one gear to another.
- Spontaneous deactivation during movement. Sometimes this is due to wear of the grooves for the balls on the rods, or malfunction of the springs in various locking mechanisms. wear of the teeth located on the synchronizer clutch, problems with the cam (meaning the cam system).
- Unclear activation of gears, due to which the device turns off without outside intervention. In such a situation, you will need to figure out how to remove the box on a VAZ.
- Oil leak from manual transmission. Most often this is caused by loosening of the connection point of the clutch housing and the gearbox housing itself, wear of the oil seals in the VAZ gearbox, or loosening of the crankcase covers.
The box is in its original place. What's next?
We found out how to install a gearbox
, now for the finishing touches.
- We carry out adjustment work in accordance with the operating instructions.
- Fill the oil to the required level, start the engine, turn it off, add oil. We make the first drive for a few kilometers, let the car cool down and again check the transmission fluid level. Top up if necessary. Thus, we fill all the cavities and voids of the hydraulics.
The VAZ 2114 and other models of the LADA SAMARA family range are equipped with a five-speed gearbox combined with a differential and final drive. In principle, the box from the VAZ 2114 is no different from the VAZ 2108. The only thing is that the VAZ 2108 does not have a dipstick, and acceleration on it will be faster.
You will need to remove it to replace the clutch, clutch bearings, and repair the gearbox.
VAZ gearbox malfunctions
Gearboxes
On VAZ classics and front-wheel drive VAZ models, the gearbox may fail for various reasons:
- There is not enough oil in the crankcase, or there is no oil at all (it has leaked);
- the car is operated in violation of the operating rules (for example, the driver switched from fourth gear directly to first gear);
- transmission parts have exhausted their service life;
- The gearbox repair was carried out in violation of technology and was performed poorly;
- The box was repaired using defective, low-quality spare parts.
There are signs that indicate that the manual transmission is faulty:
- under load one of the gears slips out (in some cases several gears can slip out);
- noise appeared in the gearbox (crunching, howling);
- speeds (one or more) have become difficult to switch, in some cases one of the gears does not engage at all;
- transmission oil is leaking (the gearbox housing has burst, increased pressure is created in the crankcase, the gasket in the connection has broken).
If the defect is not related to the gearshift lever or linkage, repair of the VAZ manual transmission is carried out with the removal and installation of the unit. To determine the cause of the malfunction, after disassembly, troubleshooting is carried out - by external inspection and measurements, the parts to be replaced are determined.
Possible reasons for replacement
One of the main goals of apartment renovation is to get smooth walls covered with beautiful wallpaper or decorated in some other way. The fact that there is wiring and distribution boxes in the wall should not be noticeable. Therefore, if there is a need to replace the junction box and wiring, then only occasionally and for some significant reason:
- Over time, the range of relevant accessories on the market has changed and there is nothing to replace the damaged lid;
- New ideas for room design have appeared that require the installation of new lamps;
- The repairs have been made, but the old box does not fit into it and ruins the whole look. Patience is over.
And then there will be the troublesome task of removing the old and installing a new box, along with installation manipulations with the wires hidden in it. And before you do this, you need to unscrew the plug responsible for supplying electricity to this room. And then, just in case, check with an indicator screwdriver that there is no voltage in this room with the dismantled junction box.
Traditional gearbox malfunctions
The main malfunctions that require major and prompt repairs in a manual variable gearbox are: spontaneous shutdown of the gear; Difficulty shifting gears; oil leak; noise in the gearbox; gearbox overheating. Now it is necessary to analyze the causes of the above malfunctions.
Reasons for spontaneous gear shutdown:
1. The balls or sockets of the rods are worn out; 2. The clutch teeth or synchronizer blocking rings are worn out; 3. The elasticity of the clamp springs has decreased significantly.
The reasons for difficulty engaging the gear may be:
1. Sticking of the spherical joint; 2. The gearshift lever or forks have become deformed, as a result of which the shape has changed and the shifting jumps; 3. The rod sockets are clogged. This can cause the rod to move stiffly, causing the locking blocks to jam.
In addition to these problems, less “scary” ones are: noise, oil leakage and overheating of the gearbox.
Causes of gearbox noise may include:
1. Wear of bearings, gears or synchronizers; 2. Oil contamination or low level in the box itself; 3. The backlash of the shafts along the axis also causes noise in the gearbox.
There can also be many reasons for oil leakage from the variable gearbox:
1. The crankcase cover may be held on a very weak fastening, and oil will spill out into this gap; 2. The fastening, which is located at the junction of the clutch and gearbox, may have become loose; 3. Shaft seals have become unusable and are out of service;
4. The gaskets are worn out, and oil will leak through the cracks.
The “weakest” malfunction of all that exists in automotive nature is overheating of the gearbox. The main reason, or rather the only one, is insufficient oil level. This breakdown is considered the simplest malfunction due to the fact that its solution is very simple.
Almost all of the listed cases of repair of manual transmissions, in addition to overheating of the gearbox, are carried out using special repair kits or simply replacing damaged gearbox parts. Thus, the total cost of repairing a variable gearbox depends entirely on the degree of breakdown and malfunction in each individual case.
Removing the gearbox
The most common is a manual transmission, in this article we will look at the principle of replacing mechanics. Most often, the gearbox is removed when replacing, eliminating leaking seals or gaskets, or repairing the gearbox itself.
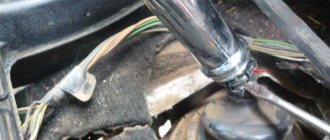
The first thing we'll start with is safety precautions; work should only be carried out on a cold engine and gearbox, since the gearbox also contains oil; when driving for a long time, it will heat up and then it will be difficult to drain it without causing injury. If everything has cooled down, then disconnect the battery terminals, since some cars have different sensors on the gearbox, then remove the engine protection.
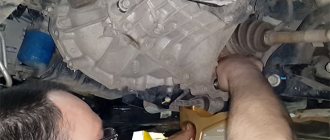
It is best to remove the box with an assistant; it is not heavy, but it is not so easy to grasp and hold it.
It is best to remove the box in an inspection room, as it will be convenient to lower it under the car. After preparation, drain the oil from the box and let it stand for a while so that the oil completely drains, then we tear off the nuts of the drives and wheels. If you decide to shoot in a pit, then you need to jack up the car from the front and hold the front part of the box to avoid the box and its other components falling when unscrewing all the bolts.
Now you have to remove the clutch and disconnect the speedometer cable, since it is often located in the area of the gearbox. Let's move on to the ball joints, do not forget that the car must be lifted from the front; without doing this, it may simply collapse to the ground. After the ball joints, we remove the longitudinal brace; if there are several of them, then we remove everything so that it does not interfere with disconnecting the box from the chassis. If the car is rear-wheel drive, then do not forget to disconnect the driveshaft.
The most important point is to disconnect the drive from the box; it is best to do this with a partner, since you will have to pull out both drives. Using a pry bar, one pulls off the internal grenade, and the second at that moment pulls the wheel to pull the drive out of the box.
When you have pulled out the inner grenade, you need to carefully and without knocking on the box insert a special plug (stopper) or the same old grenade. This is done so that the gearbox does not turn or the differential does not fall apart. Otherwise, then 100% you will need to completely disassemble the box and put everything in its original position.
Next, we remove everything that will interfere with the lowering of the box from the body, this could be the starter and the air conditioning compressor in some SUVs. Often there is a ground wire in this place; we also remove it. Disconnect the reverse gear sensor, remove the casing and flywheel, and the gearshift gates (don’t forget to mark the position in advance).
The most important point is to unscrew the bolts that secure the box to the engine. Don't forget about the engine, you will need to secure it with a hydraulic jack so that it does not fall to the ground, or by placing emphasis on the spar cups using a jumper above the engine.
Holding the gearbox together, unscrew and remove all the mounting pads to the body. Slightly shaking the box, try to move it away from the engine, this is about 10 cm, so that the input shaft comes out of the disk and basket. When removing, do not damage the petals on the clutch basket. Now you can safely lower the box under the car; if the car remains in this condition for a long time, we advise you to preserve open areas to avoid dust and dirt.
How to disassemble the device
Regardless of what the problem is, you need to get a set of tools, which includes, first of all, a variety of screwdrivers and a special extension, which is necessary to gain access to some nuts.
When performing the work, the VAZ gearbox diagram and the instructions provided will help:
- Disassemble the mechanical device: remove the box and the release bearing, which is located on the input shaft of the VAZ gearbox. Sometimes removing the box is not necessary. In this case, you can simply skip this step. Check for oil: if it is present inside, it must be removed.
- Using a screwdriver, pry up the fork cover and move it to the side; it remains hanging on the fork. After this, turn the fork at a right angle. You need to dismantle it along with the cover. Unscrew all the nuts located on the inside, remove them, and then remove the spring washers located behind them. Place all removed items aside.
- Pull the clutch housing, separating it from the other elements. Immediately behind this device you can find a sealing gasket, which also needs to be removed. Don't forget to remove the spring washer. It is easy to detect, because a special arrow points to this element.
- Using a suitable wrench, remove the nuts securing the bottom cover to the crankcase. Remove the nuts and washers behind them. Once this procedure has been completed, remove the lid. Using a screwdriver, pry up the crankcase lining and remove it. Then remove the nuts securing the engine mount mount and remove the mount from the crankcase (it is included in the kit with the cross member).
- Using special tools, unscrew the fastener securing the drive from the speed measuring device. Once you have done this, remove the drive from the crankcase. Place the box on the other side and use a wrench to unscrew the rear light activator. After this, remove the bolt securing the shift fork.
- Pull the mechanism connecting the handle and the rod (it’s called the VAZ gearbox linkage) and go into first gear. In some cases, dismantling requires activation of two gears. Thanks to this action, the rollers located inside the housing do not rotate. Pry the secondary shaft ring with a special tool to remove it. Unscrew the nut securing the coupling flange a few turns, move the ring to the side and screw the nut back on.
Use the instructions to disassemble the device yourself and discover where the problem lies. Different products differ in their design, therefore, the Lada gearbox bulkhead is carried out according to a different scheme than the gearbox of a VAZ car. The Lada gearbox requires a special approach during the repair process. If you are still in doubt, ask for help from someone who has already disassembled a device such as a sequential gearbox.
Carrying out the procedure for dismantling and replacing a faulty part
Disassembly and dismantling of a manual transmission must be carried out in compliance with certain mandatory safety regulations and rules for dismantling complex units (which include the gearbox):
- Since the transmission is a fairly heavy unit (especially on cars with powerful engines and large sizes), you need to be careful when removing it. It is better if an assistant supports the owner when disassembling and removing it from its regular place. Beams with a chain thrown over them are often used, since when dismantling in this case, following the rules of levers, the work is much easier. To do this, drive the car with the engine compartment under the beam and use a chain to lift the manual transmission. A thick chain is thrown over the beam, and the box is removed from the standard mounts (to do this you often have to move the engine from its mountings) and raised to the required level using steel hooks. Due to the optimal weight distribution of the unit, work is greatly facilitated.
- Since the transmission consists of many parts, it is easy to get confused when disassembling it. Therefore, when repairs are carried out, one of the important rules is to optimally store and lay out the components of the gearbox in the correct order. When disassembling it, you should lay out the components and parts in the order of reassembly to avoid confusion. This will help with future installation of the transmission and installation of the gearbox in its original location.
- Manual transmission repair involves replacing only the inoperative element and no others. Since the unit is quite complex, and diagnosing it is a labor-intensive task, it is first necessary to eliminate the identified fault and only after the next assembly look for a new one (if it appears).
Gearbox selection
The gearboxes present on the car set the optimal power and influence the efficiency of fuel consumption. Each box has its own strengths and weaknesses:
- Manual transmission. This version is the most popular. It is in demand among drivers who have decent driving experience. On passenger cars this gearbox can have 5,6 or 7 speeds, and on heavy vehicles 8, 16 speeds. It should be noted that of all types of boxes, mechanics have a low price and can be repaired. Diagnosis of a manual transmission must be systematic;
- Automatic transmission. It is often chosen by novice car enthusiasts. All thanks to the fact that the car owner does not need to be distracted by manually changing gears. This circumstance allows you to achieve maximum concentration. However, cars with this gearbox are demanding on the quality of the oil they fill. Not every motorist decides to tow this vehicle. In addition, the machine has a complex structure. Considering this, gearbox repairs should be trusted to professionals;
- RKPP. This option has a long service life and helps save fuel per kilometer. The robotic gearbox is subject to repair. One of the minuses is a delay of several seconds in switching speeds. It is recommended to switch to semi-automatic mode if the car is stopped at a traffic light.
How to replace a gearbox on a Gazelle
How to remove the box? Replacement of the gearbox is carried out on an overpass or inspection pit. First, drain the oil from the crankcase. Now we remove the cardan. To do this, arm yourself with a file and put a notch on the connecting unit and the continuation of the gearbox on the gazelle. Now remove the support fasteners using keys thirteen and twelve. Using keys seventeen and fourteen, remove the fixation of the cardan to the flange of the main gear gear. We remove the shank and insert a rag into the hole. Now we need to get the lever to install the gearbox. To do this, we get rid of the cover and the top of the lever inside the cabin, unclench the bushing, remove the rubber cushion, floor seal and cover, cap and the lever itself.
Device diagrams:
Next, disconnect the speedometer from the transmission along with the rear light switch. Now you can remove the transfer case. How to disassemble the gearbox housing? To do this, get rid of the fixation of the exhaust pipes and bracket, disconnect the transmission from the clutch housing, and create protection from a wooden block for the cylinder head. We proceed to removing the transverse fixation of the transfer case and remove the device. Be careful as its weight can reach 30 kg. Install a new element. Be careful not to damage or miss the stepped transfer case.
Now we begin assembling the Gazelle gearbox. Reassembling the box is done in reverse order
Please note that the shafts must be installed at the same time; to do this, tie them up in advance. Inspect the input shaft, shank, bushing, crankcase, output shaft and all gears
Wash them in kerosene or diesel fuel. If there are signs of rust, sand it down. The fasteners are coated with sealant, and the elements are coated with transmission oil.
Removing the gearbox: manual and automatic
So, for quality maintenance, troubleshooting of the unit and troubleshooting, it may be necessary to remove the gearbox. As a rule, a mechanic needs to remove the gearbox if the following manual transmission malfunctions occur:
- difficulty moving the gear lever;
- increased noise in the transmission when switching from a lower gear to a higher gear and vice versa;
- clutch replacement required;
- the flywheel needs to be repaired or replaced;
- the rear crankshaft oil seal of the internal combustion engine needs to be replaced;
- oil leaks from the gearbox through seals and gaskets.
In the case of an automatic transmission, dismantling the automatic transmission is required:
- in situations where the automatic transmission kicks, gears are not engaged;
- transmission fluid leaks through seals and gaskets;
- extraneous sounds, noise and grinding were noted in the automatic transmission when switching the automatic transmission selector;
- Replacement of the rear crankshaft oil seal of the internal combustion engine is required;
- repair/replacement of torque converter, etc. is required;
Removal and installation of manual transmissions and automatic transmissions are practically the same, with the exception of certain design features of the control drive for these boxes. For example, to remove an automatic transmission, it is necessary to unscrew the torque converter mounting nuts and disconnect the hydraulic system pipelines connecting the box to the cooling radiator.
If you need to remove the transmission, but it is not possible to lift the car on a lift, then an inspection hole or overpass is required. To dismantle the box, it is necessary to separately consider how it will be fixed and lowered, since the unit is heavy.
As practice shows, it is better to invite an assistant. Special devices and various tools are also required, such as: transmission jack, socket wrenches, sockets, mounting blade, etc.
How to remove an automatic transmission
When dismantling an automatic transmission, it is necessary to take into account some points determined by the design features of the automatic transmission, namely the presence of a torque converter, which is removed along with the gearbox.
Features of automatic transmission dismantling and installation:
- it is necessary to remove the battery and mounting shelf;
- remove the air intake of the air filter and disconnect the tip of the transmission control cable from the control mechanism lever;
- when removing the end of the cable sheath from the bracket on the automatic transmission, move it to the side (disconnecting the hoses from the radiator fittings, pinch the hoses to avoid leakage of the working fluid);
- disconnect the connectors of the automatic transmission control electrical cables;
- disconnect all mechanical control drives (rods, cables);
- disconnect the vacuum lines leading to the vacuum corrector (if any) and other parts of the box;
- disconnect the starter;
- Having installed the car on an inspection hole, overpass or car lift, remove the protective mud flaps of the internal combustion engine;
- remove the front suspension cross member and front wheel drives;
- drain part of the transmission fluid into an empty container (unscrew the drain plug in the transmission pan);
- remove the hydrodynamic transformer (GDT) by unscrewing the bolts securing it to the engine flywheel membrane (through a special hatch in the flywheel housing or through windows located on the box body where the torque converter is installed);
- remove the left engine support;
- unscrew all bolts securing the automatic transmission;
- Using a mounting spatula, disconnect the automatic transmission from the internal combustion engine;
Installation of the automatic transmission is carried out in the reverse order (an important point during installation is the need for two centering pins on the engine crankcase flange, without which mounting the transmission is impossible). After the box is completely installed, through the dipstick tube or control plug, you need to pour the required amount of transmission fluid into it.
How to remove a manual transmission
Removing a manual transmission or installing it is no less time-consuming process, as in the case of an automatic transmission. To dismantle and install a manual transmission, you will need keys (10, 12, 14, 17, etc.), a flat-blade screwdriver, pliers, a lift or an inspection hole.
Features of manual transmission dismantling and installation:
- it is necessary to install the car on a lift, overpass or inspection hole;
- you will need to remove the battery, air filter, engine mudguards located in the engine compartment at the bottom, in the center and on the sides;
- you also need to remove the front suspension cross member and front wheel drives;
- it is necessary to drain the working fluid from the manual transmission;
- disconnect the speed sensor (pry it up with a screwdriver and remove the spring clip) and the vehicle reverse switch;
- remove the engine harness holder;
- Unscrew the mounting bolts: to the gearbox, the hydraulic clutch release bracket, the slave cylinder to the clutch housing, the clutch housing amplifier to the gearbox, the front lower cover of the clutch housing;
It is also worth highlighting the need to replace the retaining rings on the splined shanks of the internal hinges. After the gearbox is completely installed, the required amount of transmission oil should be poured into it through the dipstick tube or control plug.
Repair of VAZ 2109 gearbox
Four-speed gearboxes VAZ 2108-09 were installed only on the first models of eights and nines; these cars were mainly equipped with five-speed gearboxes. A common problem with the 2109 manual transmission is noise at various speeds; quite often it occurs at idle, without pressing the clutch. If the noise disappears when you press the clutch pedal, the cause of the problem is the input shaft bearing. The boxes are noisy due to the wrong oil chosen for filling. Many car owners fill the gearbox with engine oil, but it is too liquid and has insufficient lubricating properties for gearbox parts. However, even with motor oil the MPP may not make noise - this is a matter of chance. Still, it is recommended to use special gear oil for front-wheel drive cars, this way there will be fewer problems with the transmission.
Repair of the VAZ 2109 gearbox is also carried out with the removal of the unit; after removing the box, we disassemble it:
- First of all, we dismantle the bracket on which the clutch cable is attached;
- remove the back cover;
- unscrew the nuts holding the 5th gear (32 mm wrench or socket), the fastenings are located on the shaft shanks (2 pcs.);
- unscrew the bolt of the 5th gear fork, dismantle the fork at the same time as the clutch;
- from the other shaft we remove the fifth gear itself with the synchronizer;
- Unscrew the four screws and remove the fixing plate;
- from the side of the body, remove three rod clamps (balls and springs);
- Using spreaders, we dismantle the retaining rings of the bearings;
- unscrew the nuts securing the housing to the “bell” (13 nuts), halve the housing;
- unscrew the bolts of the gear forks, pull out the rods, and then the forks;
- dismantle the industrial reverse gear;
- Now we take out both shafts at once;
- the differential with a large gear can also be easily removed by hand;
- dismantle the gear shift mechanism;
- Now all that remains is to disassemble the shafts themselves, carry out troubleshooting, put new spare parts in place and assemble the box.
Diagnosis and troubleshooting
In order to effectively repair a manual transmission, it is necessary to find out the cause of the malfunction. (unlike automatic ones, where several design principles are used) on most modern cars is identical, and therefore the diagnostic process is almost the same for both domestic models and foreign cars. Failures can be of various types, directly affecting the performance of the mechanism.
Gear shifts are difficult
If the movement of the gear shift lever is significantly difficult, extraneous sounds appear when shifting (grinding, howling coming from the engine compartment), there is an obvious malfunction of the gear shift mechanisms. During long-term operation and high mileage of the car, the moving parts of the box are subject to significant mechanical stress (working under load is its natural state). Therefore, over time, the moving parts of the mechanism wear out, resulting in the failure of individual elements (clutches, gear shift synchronizers).
The appearance of extraneous noise both at idle and under engine load
If uncharacteristic sounds occur (grinding or noisy operation of the unit), it is necessary to urgently inspect the motor, as this is one of the most common signs of breakdown. The source of noise may be faulty moving parts (bearings, gears). Unfortunately, this type of breakdown does not depend on mileage and can also occur on new units. Repairing a manual transmission in this case can entail significant financial expenses.
Oil leaks on the engine crankcase
They may be the direct culprit of direct breakdown of the unit. Oil starvation is one of the most common causes of manual transmission failure. Due to the presence of many moving parts, a special lubricant is used. Often, many car enthusiasts do not forget to change the oil in the car engine, but do not pay attention to the level in the gearbox. This can ultimately lead to box failure and costly repairs.
Switching off gears
This reason is called the working gear shifting to neutral. This is caused by additional wear and tear on the working elements in the box and the vehicle. Such a breakdown threatens not only the lack of comfort when driving a car, but also the safety of movement.
Diagnosing problems consists not only of external inspection, but also of disassembling some elements. In most cases, an external examination is sufficient when the listed typical problems occur. Only in rare cases does it require disassembling and dismantling the unit to diagnose and identify a malfunction.
Possible gearbox malfunctions
Cases in which repair of the Gazelle gearbox is necessary may be as follows:
- Changing gears is difficult. In this case, the repair will include the following operations:
- The cause of this malfunction may be: air in the clutch hydraulic drive, lack of fluid in the master cylinder. To solve the problem, you will need to add fluid to the master cylinder reservoir until it reaches the required level, after which you need to bleed the hydraulic drive system,
- the locking bolts may have become loose - they need to be tightened,
- Burrs formed on the gear clutch teeth on the inside can also interfere with the normal operation of the unit - accordingly, they need to be cleaned,
- If the holes for the pins are broken in the shift lever housing, the lever must be replaced or the stepped pins must be pressed in.
- In addition, repair of the gearbox on the Gazelle is also necessary in the case when the gearbox is engaged with a bang, that is, there is a violation in the synchronization of gear engagement. The following points can contribute to this:
- wear of the synchronizer blocking ring (or rather, its thread). The problem is solved by replacing the spare part with a new one and grinding the new ring into the corresponding gear. Lapping must be carried out in such a way that the contact surface is eighty percent of the total area,
- deformation of the same ring also indicates the need to replace it. For lapping in this case, you can use a special lapping paste.
- Also, box repair is necessary if the gears turn off spontaneously. This malfunction requires the following corrective actions:
- in case of loosening of the nuts securing the box to the clutch housing, it is necessary to restore their tightening,
- it is necessary to replace worn parts, including couplings, if their teeth are worn out,
- It may also be necessary to replace the retainer springs if they have become loose.
- We can completely eliminate the noise in the Gazelle gearbox with our own hands. To do this you need:
- replace worn bearings,
- replace damaged gears in case of breakage of their teeth or wear of their working surface,
- add oil in the crankcase to the normal level,
- restore the alignment of the clutch housing and crankshaft.
- When carrying out such operations, you will definitely need knowledge of such an issue as the design of a gearbox. Otherwise, it is not possible to determine the cause of the malfunction (meaning, on your own).
- Among other things, manual transmission repair will also be required if an oil leak is detected. The reason for this may be worn oil seals or steel-babbit bushings, or damage to the breather or gaskets, as well as a violation of the tightness of plugs and plugs. In this case, you will also most likely need to change the oil in the gearbox or at least top it up. In any case, repair work must be started by first stocking up with the required amount of liquid.
When carrying out all repair operations, special control is required for the assembly of the gearbox. This problem “disappears” by itself if you contact a car service. By the way, replacing the pins on a Gazelle can be done there.
Gearbox installation
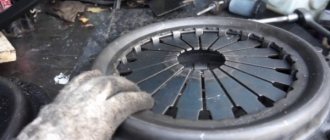
Having removed the box, this is only 50% of the work; you still need to install everything back correctly. We will not consider the repair of the box itself, since there is a whole dilemma and each breakdown has its own approach to repair, a typical breakdown is a delayed shift for automatic transmissions or a crunching noise when switching for manual transmissions. Do not forget to check whether all clutch components are in good working order, since often when repairing a gearbox, the clutch disc, basket and release bearing are replaced.
Before installation, it is worth lubricating the spline connection of the input shaft and the release bearing flange. It will also take two people to install. To do this, lower the engine a little using a jack, insert the box all the way, under no circumstances should you do this using tightening bolts, only manually, achieving a tight fit close to the engine.
Now it’s time to tighten the main bolts securing the gearbox to the engine, and install the support for the box. We put it on and adjust it, for this the pedal should be about 1 centimeter higher than the brake pedal. We install the rear motion sensor, starter, connect and adjust the gear shift mechanism (that’s why we made marks on the lever, so that we knew the position exactly and simplified the adjustment).
After installing the gearbox, we proceed to assembling the chassis, inserting the drives, remember that they also need to be inserted carefully without knocking, so as not to damage the differential, otherwise you will have to remove the box again. Next we screw on the ball joints and braces. After tightening all the nuts and mounting bolts, lower the car. The last step is to fill the box with oil to the level, the level is individual for each car, it is best to look at it in the service book.
In principle, this is where the installation of a manual transmission ends; first, try changing gears when the car is not running; there should be no crunching and all gears from first to last will shift easily. Drive a 1 kilometer circle in low gears to get a feel for the car. After the oil has passed through the entire box, you can shift into higher gears 4th, 5th, 6th if there is one available.
Video on how to properly remove the gearbox on a VAZ 2110: