A new door is great. But time passes and minor problems begin, either it sags or begins to creak. In most cases, it's all about failed door hinges. Of course, the easiest way is to call a specialist who will repair or replace it. But you can, following simple advice, try to do everything yourself. And how much joy and pride there will be from the realization that everything worked out! In addition, this will save the family budget.
Door hinges are a small but very important detail. Without them, the door leaf would simply be attached. And so, the process of opening and closing the door is very fast, elementary and easy. In addition, the canvas is attached to the box using hinges. They are practically invisible, but if they fail, then the whole structure is at fault.
How to get rid of squeaking door hinges?
You can get rid of the squeak by choosing one of the options:
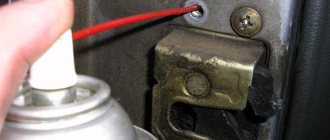
- Lubricate the hinges with machine oil where they are connected. Then open and close the door several times so that the lubricant is evenly distributed, and remove any remaining oil with a napkin.
- Lift the door and insert a small piece of graphite into the hinge gap, which, under the weight of the blade, will be crushed into powder and act as a lubricant.
- Place a polyethylene washer on the hinge pin when hanging the door leaf.
How to disassemble a door hinge yourself
Almost all types of hinges can be disassembled only after removing the axial pin from them. But most canopies are structures whose malfunction can only be eliminated by completely reinstalling them with new ones. Replacement of individual parts of mechanisms, with the exception of products in metal entrance doors, is not provided.
In hinges mounted in iron sheets, you can replace bearings, bent canopy wings or original self-tapping screws. It is not necessary to completely disassemble the entire mechanism. Elimination of other faults, for example, sagging doors, loose door openings or similar damage, occurs by adjusting the bolts of the awnings.
To prevent malfunctions, it is best to lubricate the canopies with a special lubricant, which can be purchased at any specialized store. You can eliminate squeaking with a few drops of universal WD-40 fluid.
Owners of apartments and private houses often have a question: how to disassemble the most popular types of hinged joints - universal canopies? The answer from door installation specialists is unanimous: such structures cannot be disassembled, because this action makes no sense. If any part of such a product breaks, it can only be replaced.
Important! All-metal garage door or gate awnings can only be removed using a welding machine.
Door hinge repair
Loose hinges must be tightened immediately with a screwdriver, without leaving them for later. This will prevent their premature failure. If, when tightening a screw, you find that it does not lock, but simply rotates, most likely the hole under them has increased in diameter. There are two options here: either reduce the diameter size or replace the screw with a thicker one.
There are situations when it is more advisable to replace hinges than to repair them. Here are some recommendations:
- Remove the door from its hinges; if this is not possible, then unscrew the screws from the door leaf without touching them on the door frame.
- If necessary, level the door first. To do this, make sure that when the door is closed, the gaps at the top and bottom are the same. Next, mark the new position of the loops with a pencil.
- Install the new hinges directly on the door frame and then on the door leaf.
- Now you have to hang the canvas on the jamb; here you may need the help of a second person.
- Adjust the hinges.
The company DM-Service LLC offers components from leading manufacturers. The quality is time-tested. Our specialists will help you select the necessary fittings and, if necessary, quickly and efficiently install door hinges or repair them.
Causes of sagging car doors
You can determine sagging car doors using the following factors:
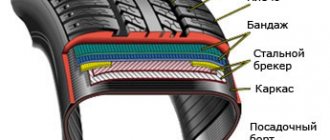
• when opening and closing doors, serious efforts must be made; • when driving on an uneven road, there is a characteristic rattling and knocking sound in the doors; • water seeps into the interior through the seal; • there are scratches on the sills.
There may be several reasons for sagging doors:
• skewed door hinges; • weakening of door hinges; • wear of hinges and axles.
Determining the cause of a sagging door is quite simple. It is necessary to open the door, grasp its lower part and, shaking it a little, determine the presence of play in the hinges and fastenings. If there is no play, then everything is fine with the door. In addition, it is necessary to carefully inspect the places where the hinges are attached to the car body for the presence of deformations, which can also cause sagging.
If the front door hinge fails...
Except for the most hopeless cases, when even a non-specialist understands that it is impossible to restore the main function of the front door, it is too early to give up on it. Often the whole point is that the hinge of the front door is simply broken.
But the loops are different. Today, card, pendulum, welded and cap hinges are widely used. But the result of their malfunction is the same: natural wear and tear due to friction of surfaces, as a result the door touches the threshold, door locks are difficult to close, ricochet on the tightness of the closure, the door warps, begins to pull, or flies off its hinges. Then we are not talking about replacing the front door itself - it is enough to correctly identify the breakdown and just as competently fix it. And this must be done quickly.
The entrance metal door is the entry point into an apartment or house. This means you can’t leave it wide open. On the contrary, it is necessary to equip the front door as much as possible so that it reliably protects both the apartment itself and its residents. As soon as the malfunction makes itself felt, take immediate action: seek help from a specialist.
Here, amateur performance is more likely to do harm. The master must make his verdict. It will be more reliable if a real professional undertakes the repair of the front door hinges...
Repairing a rotten door with your own hands (photo report)
Hello everyone, it’s no secret that there has been a problem with the doors on Ksyukhas and most likely will always be, and I also encountered this problem. My car is already 12 years old, the doors began to rot about 4-5 years ago, but everything was tolerable for the time being before the time, cleaned, tinted and so on every year. But a year ago, through holes began to appear, then pieces of metal simply began to fall off in the corners of the doors, initially I wanted to cut off the bottom of the door and just weld new iron, but I broke off with the welding one and had to go a different way, in this topic I will show and tell you what and how I did. By the way, regarding the purchase of a new or used door, for some reason this turned out to be problematic, it’s not available anywhere, and the price of a new door will be somewhere around 5-6 thousand rubles. and I spent about 700-800 rubles and one day of work on 2 doors. So let’s start. PS I apologize for the quality of the photo, I took it on my phone.
1. We clean out the rust spots (I used a grinder) in some places I even just cut off the metal.
2. since the bottom was rotten, the outer sheet of the door simply tore off from the door itself (from below), it was necessary to connect these two halves, for this I used automotive plasticine (as a sealant, I covered the joint from the inside, removing the trim), I also I covered metal plates (you can use steel wire) to make the bottom edge of the door, which I simply inserted between the “halves” so that they would not fall out during operation, it looks something like this:
3. Then we apply putty with fiberglass to this whole story
4. Clean up (since this putty is not very easy to work with, I used a grinder again)
5. Then we apply putty, but this is the finishing one
6. Clean it with sandpaper 7. Paint it. I didn’t paint it with paint, but decided not to bother and just bought a can of anti-gravel and painted everything below the molding with it, it turned out pretty nice.
The last two photos were taken after the rain, and visually it seems that there are jambs, but in fact the door turned out to be perfectly smooth and with normal gaps.
1. Putty with fiberglass approximately 240 rubles. (I still have more than half of it left) 2. Finishing putty is also about 240 rubles (there is also more than half left) 3. A set of rubber spatulas is 40 rubles. 4. Anti-gravel about 250 rubles (all gone) 5. If desired, rust converter about 300 rubles. 6. Sandpaper (freebie) ;D
If I help someone, I will be glad, write if anyone understands anything.
The doors of any vehicle are one of the most heavily loaded components. Repeated daily opening and closing, constant exposure to precipitation over time leads to the need for their repair . It is well known that body repair, including doors, is one of the most technically complex and expensive.
Car doors can sag over time and become difficult to open.
We make loops with our own hands
The process of making loops is simple. In order for the fittings to turn out to be of high quality, you must be able to perform various types of work on your own.
Preparing tools and materials
To make high-quality accessories at home, prepare the appropriate tools, materials and equipment. You must have the following tools and equipment:
- Tape measure or other measuring tool. Sometimes you can get by with a regular ruler, but in this case it must fully meet regulatory requirements;
- A marker that writes on metal. Instead of a marker, you can use chalk;
- A hacksaw with a blade for metal. Those who know how to use a grinder can use this equipment if it is available;
- File;
- Hammer;
- A welding machine with suitable technical characteristics, as well as personal protective equipment necessary for welding work.
Preparing the tool
Also prepare:
- Metal plate 2-3 mm thick;
- Pipe section;
- Steel rod. Its diameter is consistent with the internal diameter of the pipe section. Select a rod so that it fits inside the pipe with a slight interference fit. It is better to discard a rod whose size is smaller than the internal dimensions of the pipe.
When choosing a material, pay attention to its characteristics. The plate, pipes and rod must withstand the applied operating load.
Manufacturing sequence
Initially, two sections of pipe are sawed off. The total length depends on the size of the door leaf. So if it is 11 cm, you need to prepare the first piece of pipe 5 cm long. Before cutting the pipe of the required size, carefully apply markings. You will also need a piece of pipe whose length is 1 cm longer, i.e. - 6 cm. As a result, the total length is 11 cm.
After sawing, burrs often form on the metal surface, which can cause injury during installation work. To prevent this from happening, remove defects with a file. Wear gloves to avoid damaging your hands. Perform processing on both sides.
Once the tubes are ready, the rod is prepared. Its length is equal to the total length of the pipes, that is, 11 cm. To do this, markings are applied to the surface of the rod and a saw is made. The cutting line must be perpendicular to the nominal axis of the rod.
After cutting the rod and pipes to size, they are connected together. To do this, a rod is pressed into the sleeve. Once the sleeves are in place, the plates are prepared. Their size is consistent with the dimensions of the door and the dimensions of the manufactured hinges. There should be two such plates, and they have the same length. This concludes the preparatory stage. Moving on to welding work.
After making sure that the rod has taken the desired position inside the sleeve, the ends of both tubes are welded. This prevents the rod from moving inside the pipe during operation.
The plates are then welded to the sleeves. They are positioned perpendicular to the conventional axis of the sleeves. To do this, the plates are first grabbed, and then, after making sure of their correct spatial arrangement, they are finally welded.
Decoration
To make the manufactured hinges look beautiful, they are painted or galvanized. Both of these options allow you to give the surface a beautiful appearance, as well as protect it from external negative influences. To do this, the thickness of the applied coating must be sufficient for specific operating conditions.
After decoration, the fittings look almost the same as those sold by official manufacturers. In this case, you can always choose the color of the product that you require. So, if you can find fittings on sale, as a rule, black, then hinges made in-house can be painted in any suitable color.
Ready-made accessories
Installation of hinges
After the fittings are completely ready, they are installed. To do this, one plate is screwed to the sash, the second to the door leaf. The fastening is done so that the plate with the upper sleeve is screwed to the door, and the second part to the vertical post of the box. During the installation process, the manufactured loop is assembled into a complete product.
Installation of hinges
To prevent jamming during operation, lubricant is added between the mating surfaces. The amount of lubricant should be sufficient so that the pin rotates easily inside the sleeves.
Installed fittings
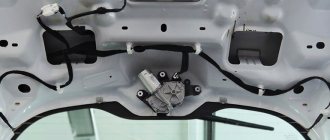
The main symptoms of a faulty door lock actuator
If your driver's door lock does not open after pressing the alarm button, the reason may be simple - a faulty key fob. Try replacing the batteries or opening the doors mechanically first. If after this the central locking from the key fob does not work, most likely the cause of the breakdown lies in the central locking itself.
Car owners often encounter this after 10 years of their production and operation. In this article we will tell you how to open the door if the lock is jammed, without resorting to the help of specialized centers. However, please note that independent intervention can lead to even more serious damage. For example, in Kharkov you can get professional help and support in the Duplicator workshop.
The following signs may indicate that your central locking on one door is not working:
- after pressing the unlock button and the “click” sound, the door remains locked;
- The remote control lock does not work;
- you can lock, but cannot unlock the door with the remote control.
What are the loops for?
One of the most important parts of door hardware is the hinges. Without them, the door cannot be installed, since with their help it is attached to the frame. How to choose not only inexpensive, but also high-quality ones that are most suitable in all respects? - a question that worries many who are closely involved in solving it. The correct choice of these elements means ease of installation, reliability and durability of the door. In addition, reasonable price is also an important factor.
Basics of making the right choice
According to their configuration, hinges are divided into detachable and universal. The latter are suitable for all types of doors, regardless of where they open. Detachable ones must be selected depending on the option of closing and opening the door. The door can be removed from the detachable hinges without dismantling them; the door should only be lifted a little. When choosing these important fittings, you should pay attention to the composition from which they are made. Brass hinges are beautiful, practical and easy to use. However, they are inferior in strength to steel ones. Outwardly, they are not so attractive, but they are stronger and more durable. An important factor is the weight of the door leaf. Entrance doors are secured using special strong steel hinges. Interior ones can be installed on hinges made of brass or made of an alloy of zinc and steel.
Possible breakdowns
Reliable and long-term operation of the loop depends not only on the correct choice, but also on proper installation. When purchasing this hardware, you should stock up on a few extra items. Firstly, when repairing door hinges in the future, you won’t have to run around looking for exactly the same ones, and secondly, in bulk, everything, as you know, costs less. Many of us have experienced the fact that each time a door becomes more and more difficult to open or close. This occurs due to its subsidence due to loose door hinges. Over time, many hinges begin to creak unpleasantly. In some cases, heavy steel doors sag and won't close at all.
Troubleshooting
Repairing door hinges doesn't always mean oiling them. Of course, after such a procedure the creaking will disappear, but the reason for its appearance is the friction of the parts, which gradually destroys them. Therefore, sooner or later the loops will have to be changed. A small graphite rod placed in the hinge slot will also help get rid of squeaking. If the doors move very slowly, then the door hinges most likely need repair. It consists in more carefully consolidating the latter. To do this, in most cases it is enough to replace ordinary screws with long ones. You can remove sagging from metal doors by reinstalling the hinges using welding equipment. Most often, only the top one changes.
There is a rule according to which a heavier door is secured more strongly. Therefore, both the choice of hinges and the choice of specialists involved in installation and repair work should be taken very seriously.
Repair and restoration of door seal
The car door seal has many protective functions: heat, noise, waterproofing, and also protects against drafts.
Under the influence of changes in temperature and humidity, the door seal may dry out . Also, mechanical impact causes abrasion and crushing of the material.
Restoration and repair of the seal can be done independently in the following ways:
- Using a soft silicone tube, restore the original volume.
- Partially replace the damaged area.
- Replace the seal with a new one.
Tip: To make the seal last longer, lubricate it regularly with silicone grease.
Restoring the volume of the seal
For repairs you will need the following materials:
- Silicone or rubber tube with a diameter of 7-8 mm. It must be soft so as not to tan in the cold. Experienced car enthusiasts use a silicone tube from a construction hydraulic level of 15 m - this is enough for 4 doors.
- Silicone grease or oil.
- Remove the protection from the car sills to get to the seal.
- Carefully pry off the seal.
- Gradually remove it along the contour of the doorway, pulling it towards you. If the seal is solid (closed in a ring), you will have to cut it.
- Pour or spray a little lubricant inside the seal.
- Insert the tube into the hole.
- After completing the repair, install the seal in place.