Winter came unexpectedly. And I realized once again that the stove heats not like a stove, but like something incomprehensible. Of course the air is warm, but not like Tashkent. I decided that this problem needs to be solved, but there are only 2 solutions: 1. Replacing the stove. 2. Flushing the stove. Changing a stove is very difficult, and you have to buy it first, and cleaning the stove at a service station costs from 1,500 rubles and more. It was decided to try to wash it myself. And so, we needed: 1. an electric pump from Gazelle (it was already there. You can use any similar pump) 2. a 3-4 meter hose for antifreeze - (300 rubles) 3. a bucket or pan. 4. electric stove (boiler or something else for heating water). 5. various anti-scale agents, for flushing, etc.: - Felix - means for flushing cooling systems - 65 rubles. — citric acid 100g — 49 rub. — descaler 400g — 49 rub. — pipe cleaner Mole (in powder form) — 10 rub.
To measure the effect of the work done, I bought myself an electronic thermometer for 195 rubles (a box and a sensor on a wire), put the sensor in the central air duct and turned the heater on full blast so that it blew into the cabin. At idle, the maximum temperature of the air from the stove rose to 37 degrees; after driving for about an hour, the maximum temperature while driving was recorded at 50 degrees.
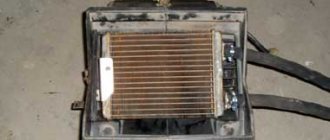
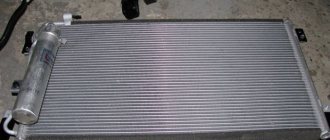
Arriving at work at night, I started the job by draining the antifreeze from the stove, connecting hoses (1.5-2 m each) to the inlet and outlet of the stove. I put the bucket on the electric stove, lowered the hose from the stove outlet into the bucket, connected the pump to the hose going to the stove inlet (of course it needs to be connected to the battery, you can do it via a button, I just disconnected one of the wires when I needed to turn it off ), and a piece of hose connected to the pump to collect liquid from the bucket. The result is this design:
There is enough water in the bucket to be a liter and a half, pour water through the funnel into the hose going to the pump from the bucket, the main thing is that there is no air in the pump and the hose sucking from the bucket, otherwise it will not pump. We turn on the stove so that the water is heated and fill in the rinsing agent, I first decided to rinse with Felix - I filled the entire bottle:
and turning on the pump, began to monitor the result, after 15 minutes of rinsing, I decided to add another 100g of citric acid, and after half an hour I got this result:
Any car enthusiast who has been using one car for 3–5 years has probably noticed a deterioration in the performance of the cabin heater. The traditional repair method is to dismantle the internal heat exchanger and then clean the channels. A common problem arises here: removing the element can be difficult; on some cars you have to disassemble half of the front panel. Therefore, many drivers practice an alternative option - liquid flushing of the heater radiator without removing it from the car.
Heater maintenance intervals
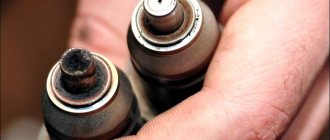
Most of the time, the antifreeze in the cooling system operates at a temperature of 80–95 degrees. Deposits gradually accumulate on the internal surfaces of metal tubes in contact with outside air. The cross-section of the pipes for the flow of coolant decreases, and the intensity of heat exchange decreases.
Reasons for the formation of sediment that interferes with the normal heat transfer of radiators:
- untimely replacement of old antifreeze, whose additives have lost their working properties and have begun to precipitate;
- the use of tap and distilled water instead of antifreeze leads to increased deposition of salts (scale);
- filling with fake coolant;
- Small particles travel through the system, clogging the stove tubes - metal shavings, rust, pieces of sealant and rubber.
The optimal interval for flushing the stove radiator is once every 2–3 years. The operation is carried out simultaneously with the replacement of antifreeze - the system is emptied, filled with distilled water with a special cleaning agent and warmed up with the engine to operating temperature. Then the solution is removed and new antifreeze is poured through the expansion tank.
If the above-described preventive flushing has not been carried out for many years, to restore normal heat exchange, the heater radiator will have to be cleaned of scale and debris. To avoid having to disassemble the interior, wash the stove without removing it from the car using one of the two methods described below.
How to deal with it
The easiest way to get rid of this problem is to flush the stove radiator. Its essence is to drive a special agent through it that can dissolve and wash away all the scale and dirt. There are two cleaning methods: flushing the heater radiator without removing it from the car and with removal.
Read more: What to do if a car license plate is stolen and instructions on how to attach the license plate to a car, where to make a duplicate for car photos and videos
The first method does not involve dismantling the heater. It is enough to simply disconnect it from the cooling system. In the second case, the heat exchanger is dismantled, and the entire procedure can be successfully carried out even in the bathroom. We will focus on the first option, since flushing the stove radiator without removing it is much easier. And considering that in some cars it is not so easy to get to the heater, it is also faster.
On-the-go preventative cleaning
This method is recommended to be implemented in the absence of frost - in summer, early spring or late autumn. The reason is to fill the cooling system of the power unit with distilled water for several days. Due to night frosts, heat exchanger tubes may crack due to ice expansion. It is permissible to carry out flushing activities in winter if the vehicle is stored in a warm garage and does not remain outside for a long time.
How to do this cleaning:
- Completely drain the engine cooling system.
- Take the required amount of distillate corresponding to the volume of the system. Heat the water and dissolve 100–150 grams of citric acid in it.
- Pour the product into the antifreeze area and make sure there are no air pockets.
- Ride in water with citric acid for 4-5 days, then drain the solution. Fill the engine cooling jacket and pipeline network with new antifreeze of a suitable brand.
Note. A food acid concentration of 100 grams per 10 liters of water is considered quite weak - the solution is unable to damage any parts or honeycombs of radiators.
Washing “on the go” is a preventative measure. A heat exchanger heavily clogged with scale cannot be cleaned using this method; a higher concentration of acid and backwashing are required.
Preparation for major flushing
To clean the interior heater radiator directly on the car you will need:
- There are two types of detergent – alkaline and acidic;
- standard set of keys, screwdrivers and pliers, funnel;
- a low-power water pump (a household circulation unit for heating and an electric pump from a Gazelle truck are also suitable);
- two hoses 2 meters long with tightening clamps;
- distilled water in an amount of 3 volumes of the cooling system of your car;
- boiler and bucket;
- old nylon tights or gauze folded in three.
Also prepare a container for draining old antifreeze and the required volume of fresh coolant. Often, car enthusiasts wash the heat exchanger of the stove without completely emptying the pipelines and engine jacket, but then all the debris contained in the old antifreeze will again flow into the clean radiator.
It is more convenient to carry out work in a garage equipped with an inspection ditch. To remove deposits without removing the heater from the car, completely drain the antifreeze from the engine in the following order:
- Allow the engine to cool to room temperature and place a container underneath for antifreeze.
- Unscrew the plug on the cylinder block with a wrench, then open the cap of the expansion tank.
- When all the antifreeze has flowed out, screw the plug back into place. If the main radiator has a second drain, repeat the operation.
- Disconnect the pipe at the highest point of the system - on the throttle valve or carburetor heating unit.
On some cars, emptying is prevented by covers that protect the engine compartment from dust from entering from below. There are 2 options to solve the problem: remove the protection or use a long hose attached to the neck after unscrewing the plug.
Waste oil stove made of cast iron radiator
When problems arise with the heating system, drivers ask the question: “How to remove the heater radiator?” Before the dismantling process, you must prepare the following tools:
- set of wrenches;
- a Phillips screwdriver, preferably a short one;
- tweezers, with which you can easily remove and install latches;
- Clamps will not be superfluous; you need to prepare at least 5 pieces.
Most of the work on dismantling the heater radiator with your own hands should be done on the top of the engine compartment, as well as from inside the car itself. In this case, neither a hole nor a jack will be needed. But you need to take into account that access to the engine compartment is extremely difficult.
Before removing the heater radiator, it is recommended to warm up the engine a little. After this, you need to remove the engine protection. Before you begin the process of replacing the radiator itself, you must drain the coolant from the system. The drain plug is located on the radiator. You need to place a container next to it, and then unscrew it. After draining the liquid, the plug must be tightened. After this, you can begin to remove the heater radiator.
This process is quite complex. To do this, you usually need to remove the entire instrument panel. Let's consider the sequence of actions aimed at changing the stove radiator:
- Remove the car radio in the cabin;
- Remove the plug, then unscrew the screws of the instrument mounting frame;
- Remove the cover of the diagnostic connector, which is located under the cigarette lighter, unscrew the screws securing the connector itself;
- Disconnect the plugs located on the center console;
- Remove the glove compartment, first unscrewing the screws that hold it in place;
- Unscrew the fasteners on the sides of the panel;
- Remove the plastic trim of the front upper body pillars, which are attached with self-tapping screws;
- Loosen the clamps on the heater radiator. Pull out the pipes, first placing a rag under them so that it absorbs the remaining flowing liquid;
- Unscrew the screws that hold the heater radiator in place, and then remove it.
The actions described above, in some cases, can last for quite a long amount of time, so this spurred car enthusiasts who invented their own, simpler, but at the same time less accurate ways to remove the heater radiator. Among the large number of alternative methods, the following method has deserved widespread use. Its advantage is that it takes much less time. To remove the heater radiator you need to do the following:
- Disconnect the gas pedal cable;
- Remove the pedal;
- Remove the sensor for turning on the rear side lights;
- Remove the steering column;
- Remove the trim on the left side of the torpedo.
After completing all the steps, all that remains is to repair the radiator (if it is made of copper) or install a new one. All steps for assembling it are performed in reverse order. To keep the interior warmer, it is recommended to cover its surface with a layer of foam rubber measuring 1.5 mm. Before assembling the instrument panel, it is recommended to check the functionality of the heating system. If it functions normally and antifreeze does not leak, it means that all actions were performed correctly and all parts can be installed in place.
We invite you to familiarize yourself with the Hydraulic heating calculation. How to make a hydraulic calculation of a heating system
It is recommended to coat the connection points of the radiator connection hoses with sealant, which can increase the service life of the heater radiator. To prevent the shut-off valve from souring, in the summer it is recommended to open it at least once a month so that coolant flows into the radiator. To increase the life of your car, you need to clean the heater radiator.
As practice shows, most motorists replace the heater radiator without removing the dashboard or dashboard. This process is quite complex and requires a considerable amount of time. To increase the service life, it is recommended to flush the stove radiator with a special liquid.
To remove deposits and dirt from the interior heater radiator, the following chemical compounds can be used:
- car detergent sold in specialized stores (for example, from the Mannol brand);
- food grade citric acid;
- household reagents intended for cleaning sewer pipes;
- caustic soda solution.
A radiator made of copper can be washed with all of the above means. The only caution: carefully read the instructions for the household reagent and make sure that the liquid will not damage rubber hoses and plastic parts. If the clog is severe, it is better to purchase two chemicals - acid-based and alkaline-based.
Since the aluminum stove radiator does not tolerate contact with alkali, it is worth purchasing citric acid or a factory-made automotive product designed for such heat exchangers. As a last resort, use weak alkaline solutions for a short time, followed by thorough rinsing with distillate.
This method is recommended to be implemented in the absence of frost - in summer, early spring or late autumn. The reason is to fill the cooling system of the power unit with distilled water for several days. Due to night frosts, heat exchanger tubes may crack due to ice expansion. It is permissible to carry out flushing activities in winter if the vehicle is stored in a warm garage and does not remain outside for a long time.
How to do this cleaning:
- Completely drain the engine cooling system.
- Take the required amount of distillate corresponding to the volume of the system. Heat the water and dissolve 100–150 grams of citric acid in it.
- Pour the product into the antifreeze area and make sure there are no air pockets.
- Ride in water with citric acid for 4-5 days, then drain the solution. Fill the engine cooling jacket and pipeline network with new antifreeze of a suitable brand.
Washing “on the go” is a preventative measure. A heat exchanger heavily clogged with scale cannot be cleaned using this method; a higher concentration of acid and backwashing are required.
To clean the interior heater radiator directly on the car you will need:
- There are two types of detergent – alkaline and acidic;
- standard set of keys, screwdrivers and pliers, funnel;
- a low-power water pump (a household circulation unit for heating and an electric pump from a Gazelle truck are also suitable);
- two hoses 2 meters long with tightening clamps;
- distilled water in an amount of 3 volumes of the cooling system of your car;
- boiler and bucket;
- old nylon tights or gauze folded in three.
Also prepare a container for draining old antifreeze and the required volume of fresh coolant. Often, car enthusiasts wash the heat exchanger of the stove without completely emptying the pipelines and engine jacket, but then all the debris contained in the old antifreeze will again flow into the clean radiator.
It is more convenient to carry out work in a garage equipped with an inspection ditch. To remove deposits without removing the heater from the car, completely drain the antifreeze from the engine in the following order:
- Allow the engine to cool to room temperature and place a container underneath for antifreeze.
- Unscrew the plug on the cylinder block with a wrench, then open the cap of the expansion tank.
- When all the antifreeze has flowed out, screw the plug back into place. If the main radiator has a second drain, repeat the operation.
- Disconnect the pipe at the highest point of the system - on the throttle valve or carburetor heating unit.
On some cars, emptying is prevented by covers that protect the engine compartment from dust from entering from below. There are 2 options to solve the problem: remove the protection or use a long hose attached to the neck after unscrewing the plug.
To clean the stove with your own hands, you need to find and disconnect 2 pipes leading from the engine compartment into the cabin. Point two: make sure that the heater valve located inside the cabin is open. Next, assemble a washing installation that includes the following elements:
- 2 hoses;
- water pump;
- pantyhose filter.
The purpose of the filter is to prevent dirt and scale particles from getting inside the pump unit, so it must be installed at the end of the hose coming from the heat exchanger. Connect the other pipe to a pump submerged in a bucket of washing solution. If you use a Gazelle pump or a circulation pump, you will have to install a short hose on the suction side to supply water from a bucket.
Before flushing the car heater radiator, connect the hoses of your homemade installation to the heat exchanger pipes. Then proceed according to the instructions:
- Using a boiler, heat the water in a bucket to a temperature of 70–85 °C.
- Turn on the pump by lowering the return hose into a bucket. When a steady flow comes out of it, add a “Mole” type drain cleaner or similar to the hot water (amount - at least 1 liter).
- Rinse the stove for 30 minutes, periodically turning on the boiler. Do not allow the solution to cool or boil.
- After half an hour, stop pumping and remove dirt from the filter. Then swap the suction and return hoses in any convenient way - switch the pipes on the machine or pump unit.
- Start pumping again. Reverse cleaning of the stove radiator is mandatory and lasts 30 minutes.
We invite you to familiarize yourself with Automation for an electric boiler with your own hands
Work order
To clean the stove with your own hands, you need to find and disconnect 2 pipes leading from the engine compartment into the cabin. Point two: make sure that the heater valve located inside the cabin is open. Next, assemble a washing installation that includes the following elements:
- 2 hoses;
- water pump;
- pantyhose filter.
The purpose of the filter is to prevent dirt and scale particles from getting inside the pump unit, so it must be installed at the end of the hose coming from the heat exchanger. Connect the other pipe to a pump submerged in a bucket of washing solution. If you use a Gazelle pump or a circulation pump, you will have to install a short hose on the suction side to supply water from a bucket.
Before flushing the car heater radiator, connect the hoses of your homemade installation to the heat exchanger pipes. Then proceed according to the instructions:
- Using a boiler, heat the water in a bucket to a temperature of 70–85 °C.
- Turn on the pump by lowering the return hose into a bucket. When a steady flow comes out of it, add a “Mole” type drain cleaner or similar to the hot water (amount - at least 1 liter).
- Rinse the stove for 30 minutes, periodically turning on the boiler. Do not allow the solution to cool or boil.
- After half an hour, stop pumping and remove dirt from the filter. Then swap the suction and return hoses in any convenient way - switch the pipes on the machine or pump unit.
- Start pumping again. Reverse cleaning of the stove radiator is mandatory and lasts 30 minutes.
Symptoms of malfunction
Cold air from the deflectors when the coolant is at operating temperature and the heating is on indicates that the heating system is operating in emergency mode. Determining the cause of the malfunction is easy. There can only be two options here: either the heater tap is broken, or its radiator is clogged. In both cases the symptoms are the same. The incoming radiator pipe will be hot, the outgoing pipe will be cold. But how can you accurately identify the problem?
And there is nothing complicated here. If the faucet drive cable is intact, but the faucet itself works normally and does not leak, then the problem is in the radiator. You can, of course, go to a service station and have it replaced. This option is much simpler than flushing the car heater radiator yourself, but it is more expensive. But why waste money if the situation can be corrected without buying a new spare part.
Causes of clogged stove radiator
Many novice motorists do not know that it is possible to flush the heater on a car without removing and dismantling the heater itself. And the main thing is that you can do it yourself. The main reason for clogging of the stove radiator is the use of coolants of different compositions. As a result of the interaction of such formulas mixed in composition, solid particles are formed, which settle on the walls of the equipment. This is a consequence of the coagulation of incompatible chemical compounds.
The liquid, together with solid particles, constantly circulates in the cooling system and, at first glance, it may seem that this does not harm the system as a whole. At the moment when you turn on the interior airflow, setting the parameters to heating, due to the temperature difference between the incoming cold air and the heater of the stove with hot liquid, the process of solid particles sticking to the walls of the heating equipment occurs.
The heater stove is designed in the form of a honeycomb, which promotes faster coking. This happens all the time and there comes a time when the heating power stops heating the car interior. At such moments, you think about how to clean the stove radiator without removing the equipment itself. The service station will definitely say that cleaning your car’s heater at home is simply impossible, because you can damage the tightness of the connections, and finally break the connecting parts of the equipment. And such actions will only lead to breakdown. But this is far from true. If the operating rules are not followed, the operation of your car's heater will become absolutely impossible, and you will have no other option but to replace it.
Radiator material
Be that as it may, the choice will always be yours, but you should remember that before you wash the stove radiator, you need to know exactly what material it is made of. The bottom line is that you should never pour an alkaline soda solution into an aluminum heater. Only acid is needed here. Otherwise, the aluminum will oxidize and the situation will get even worse. About the same thing will happen if you pour acid into a copper radiator. For copper, the use of alkali is much preferable.
As for kitchen products and Coca-Cola, their effect on metal can be different. Whey is considered the most gentle cleaner for both copper and aluminum. Therefore, of the available means, it is best to use it.
Is it possible to clean the heater without removing
It is no secret that many vehicle owners are panicky about the process of removing the heater radiator, because this can lead to unwanted deformation of many fasteners. Such actions usually lead to a violation of the hull integrity of the product due to ignorance of the sequence of the disassembly process. You should know that the procedure for flushing the stove radiator without removing it yourself is quite doable, without removing the heating unit itself and without the need to go to a service station.
What can be done in this case? Everything is much simpler than you might imagine. You can cope with this problem, you just need to know what and how to flush the radiator of your car’s heater without damaging the equipment itself.
If the pump is in working order, the thermostat is working properly, the heater fan has not stopped, the air ducts are clean, the coolant level is normal, and the cooling system is not air-filled, then the heater radiator may be the cause of poor interior heating. The reasons for what is happening are clear - all the dirt that circulates in the system ends up remaining inside the heater. This causes a decrease in the temperature of the air entering the car interior.
Car heating system
Heating any car is simply called a stove. The principle of operation is the same for all. The coolant circulates in the engine cooling system, heated to a high temperature. One of the points where coolant is located is the heater core. This is a small radiator with a special electric motor located next to it to pump hot air through the radiator honeycombs into the cabin.
Stove contamination
Over time, plaque forms on the inner walls of the heater radiator tubes. It's like limescale in a kettle. The thermal conductivity of the heater decreases and, consequently, the heating of the interior deteriorates. How to clean a car heater radiator? And more importantly, how to wash the stove in a car without removing it? It all depends on the type of heater heater installed and the liquid used for the cooling system.
Nowadays, almost no one pours ordinary water into the cooling system. As prescribed, most drivers use antifreeze and antifreeze. However, you should be aware that two types of contamination form in the cooling system: scale and grease deposits from antifreeze. They are washed with various cleaners. Alkaline and acidic. There are also neutral washes.
Types of stove radiators
Stove radiators differ mainly in terms of cleaning material and are made of materials. Most modern radiators are made of plastic and aluminum. That is, the side tanks of the container are made of plastic, and the honeycombs are made of thin aluminum tubes.
However, sometimes you can still find old-style radiators made of copper. Copper oxides are much more difficult to wash off than regular plaque. Therefore, flushing a copper radiator is a separate issue.
Cleaning the radiator is quite possible
Flushing the stove radiator with citric acid is more of a so-called traditional method that won’t hurt your pocket. The procedure for flushing the heater radiator without removing it is simple even for an inexperienced car owner. It is necessary to clearly and correctly understand the entire sequence of actions, and the operation of your stove will no longer bother you. You have noticed that over time your heating system is working worse and worse. This is especially noticeable on cold winter days, when the ambient temperature drops below -15/-20 0 C, and warm air barely blows in the cabin.
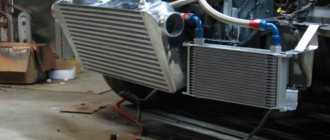
Diagram of an engine cooling system that uses a flushable radiator.
“Folk” means for flushing radiators
Folk remedies for flushing the stove radiator
Flushing a stove radiator with your own hands used to turn into a creative task. Before there was an abundance of auto chemicals on display, car enthusiasts tried to solve the problem on their own. Some methods have stood the test of time. Considering that the composition of store-bought and “folk” remedies is based on similar components, “homemade recipes” are often as effective as store-bought ones. Let's look at some.
How to wash the stove in a car without removing it?
Flushing the stove radiator is quite economical and does not take much time. It makes it possible to restore the functionality of the stove by flushing the heater radiator without removing it. We will consider this approach step by step:
- Citric acid, which cleans well and removes scale.
- Container for liquid.
- 2 hoses at least 2 meters long.
- Of course, it is advisable to change the antifreeze; this will save you from such actions in the near future.
- The required amount of water in which we will dissolve citric acid.
- Vibrating pump for pumping liquid. It is especially useful when flushing thin radiator tubes.
To clean the stove radiator without removing it, the sequence of your actions is important.
- After all preparatory work has been carried out, it is necessary to drain all liquid from the cooling system. Place a container of the required volume directly under the radiator and open the special tap from below.
- Once all the antifreeze has drained, place another container under the engine. Unscrew the drain bolt to drain the fluid from the cylinder block.
- Do not mix these liquids under any circumstances if you use them in the future.
- Next, find 2 pipes that directly lead to the heater radiator into the cabin. Usually they are located in the engine compartment, and it is not difficult to find two tubes that come out from the passenger compartment. Loosen the clamps and remove them. In this case, it is possible to drain some of the antifreeze from the radiator and pipes. To avoid loss of antifreeze, place the container directly under the work site.
- Connect prepared hoses to each heater radiator pipe. Don’t forget to secure it with clamps, because the pump will create pressure in the system. Connect the inlet hose to the pump. The pumped liquid must be filtered, so install a filter in the form of ordinary gauze at the pump inlet. Lower the pump into a container (you can use a regular metal bucket). Lower the outlet hose into the same container.
- Citric acid is an excellent tool for removing scale from internal surfaces. For 10 liters of water we use 300 grams of acid.
- Prepare the flushing liquid and pour it into the bucket where the pump is installed. Definitely needs to be reheated.
- Turn on the pump, the process should last 10–15 minutes. Next, you need to turn off the pump and swap the hoses. This will ensure flushing in the reverse cycle. Circulation in both directions is necessary.
- Repeat the process several times, after which it is necessary to rinse with clean water and dry with warm air. This procedure removes moisture and oxidation from the tubes.
So, cleaning the heater radiator without removing it is completed. Cleaning the radiator turned out to be not at all difficult. Reassemble the entire cooling system and fill with all necessary fluids. Start the car to check the operation of the heater. If warm air comes from the dampers, it means you did everything right. It must be taken into account that the reason for the lack of warm air may not only be due to a clogged heater radiator. Almost any motorist can flush his heater radiator without having any special knowledge to do so. We hope that you have received the answer to the question - how to flush the stove radiator at home.
Flushing the heater radiator without removing it. How to flush the stove radiator without removing it?
With the onset of cold weather, car owners often find that their car's interior heating system is not working efficiently. Everything seems to be fine, but the air coming from the deflectors is not warm enough.
Such a problem may be evidence that the car’s heater radiator is clogged and cannot pass the required amount of heated coolant through it. What to do in such a situation: replace the heater or try to repair it?
Do not rush to resort to radical measures. If the heat exchanger does not flow, it can be restored. In this article we will talk about how the heater is installed without removing it from the car.
In addition, we will discuss which products are best suited for this procedure. In modern cars, two types of heater radiators are used: copper-brass and aluminum.
Summary
Washing a car heater without removing it is one of the simple and easily accessible methods that does not require disassembly work. Once you have done this work, you will be disappointed if the fluid leak is due to a small hole in the hose itself. Therefore, after cleaning the stove, it is recommended to replace the hoses, the appearance of which no longer inspires confidence, and install fresh clamps. Make sure that air ducts, which can reduce the quality of heating, are clean. Be sure to use only high-quality coolant, as this will protect your heating system from impurities and scale. From time to time we recommend turning on the fan at the maximum permissible speed in order to blow air over all elements of the heater radiator.
Preparing the tool
Cleaning the stove often involves removing dirt from the radiator and heating the heating fluid. To carry out this operation without dismantling it, you will need to purchase several tools and tools:
- First of all, you need to find a compressor. If it is not available, you can use a pump.
- Connecting hoses. You will also need special clamps and electrical tape to form a high-quality connection. To avoid draining the coolant on the ground, you need to stock up on containers to collect it.
- Special means for flushing the radiator. Their number is quite varied, so you can choose the best option in any car store.