How to set the ignition on a VAZ 2107? Carburetor.
If you have recently purchased a VAZ 2107, which has a carburetor power system, then we advise you to immediately start monitoring its condition.
This is necessary so that if any changes occur in its operation, you can make the required repairs in a timely manner. If you notice that your car's fuel consumption has increased, and the engine is constantly malfunctioning, then it's time to start tuning the ignition. In this article we will tell you how to set the ignition on a VAZ 2107 carburetor.
When adjustment is necessary
The very first thing you need to know is that there are no clear regulations for setting the ignition, since the advance angle is set or adjusted only when absolutely necessary, and the need can arise at any time.
You may be interested in:Thermostat: opening temperature, types and principle of operation
Typically, tuning is done when the car has just been purchased secondhand, and the owner is trying to get it into working condition. It is usually necessary to set the ignition after engine repairs. If the distributor has been unscrewed and removed, you need to adjust the ignition timing.
On fuel-injected cars, the advance angle is controlled electronically, and the check may be caused by the “Check Engine” light.
You may be interested in:Ford computer diagnostics: complete vehicle check
In most cases, the need to adjust the OZ and the moment of spark formation arises after various engine repairs with the dismantling of various components. Separately, it is necessary to say about the transition to high-octane fuel. Here it is necessary to change the SOP to the previous one, which is why the adjustment is made.
Setting the ignition timing with advance
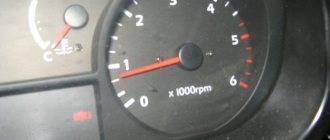
This setup is completely easy to do. Even a beginner can cope with this task. To do this, prepare a 13 mm wrench and a special 38 mm crankshaft wrench in advance. If your car is running, be sure to turn off the engine, since you can only turn on the ignition when the engine is turned off. First, the piston of the first cylinder is installed at the top dead center of the compression stroke, that is, in the ignition position. Before doing this, remove the candles and plug their holes with cotton wool or some other material. You need to align the mark on the crankshaft and the front engine cover. To do this, use a wrench to start turning the crankshaft clockwise. During this action, the air compressed there should push out the cotton wool, thereby indicating the compression stroke. Continue turning the shaft slowly until the marks on the timing belt pulley and cover line up.
Please note that there are 3 marks on the cover:
- The first indicates ignition advance by 10º;
- the second – by 5 º;
- the third is equal to zero.
Since a VAZ 2107 engine with a carburetor runs on 92 or 95 gasoline, we need to set the ignition for these types of fuel. That is why you should select the second mark, which will indicate an ignition advance of 5º. Once the required parameters match, put the spark plugs in place and remove the wires. The system is ready for use.
VAZ 2106 – timing chain
Upper marks: one mark in the form of a hole is applied to the camshaft sprocket from the inside, the second mark is a boss in the form of a protrusion at the end of the camshaft bed. To perform this operation, the valve cover must be removed.
Bottom marks: three marks are cast on the front engine cover - one long and two short, and on the crankshaft pulley there is a molded boss on the inside (you can easily feel it with your hand) and a mark on the end of the pulley. The long mark corresponds to the top dead center, and the two short marks are the ignition timing marks.
The first short mark (the middle of the three) corresponds to an ignition advance of 7.5 degrees, this is actually the factory tolerance for installing the ignition when using AI 92-95 gasoline. The second short mark corresponds to an ignition advance of 10 degrees.
When assembling the engine during a major overhaul, the crankshaft is oriented along the internal marks. This is a mark on the sprocket (risk) of the crankshaft and a boss on the cylinder block, which are combined.
Then the timing chain is installed and the marks on the camshaft sprocket and its bed are aligned. The crankshaft is turned two turns and the alignment of the marks is checked again. If all marks match, then install the front engine cover, crankshaft pulley and valve cover.
When installing the distributor (ignition distributor), the above-mentioned valve timing marks are set, and the distributor slider, after installing it, should point with the spacer plate at the 4 cylinder wire socket in the distributor cover.
VAZ 2105 – timing belt
Upper marks: one mark “E” is located on the cover of the first journal of the camshaft, and the second “F” is applied to the camshaft pulley. In order to “get” to the marks, you need to remove the timing belt protective cover. The lower marks are similar to the VAZ 2106-07 (the designation of the marks “C” on the pulley and “D” on the cover, while three long and two short marks are marked on the protective cover of the timing belt).
Adjusting the ignition timing
For subsequent actions, use a 13 key to loosen the fastening nut of the distributor (ignition distributor). Connect one wire from the light bulb (it will act as a voltmeter, that is, indicate the presence of voltage) to the low-voltage terminal that the coil has, the second to ground. Now turn on the ignition. Slowly and carefully rotate the distributor body clockwise, stopping immediately when the light goes out. The sparks that appear will indicate the moment of ignition. Move the distributor counterclockwise until the contacts are disconnected and the lamp lights up again. Everything is in order, you can safely tighten the distributor, the setup is complete.
Installation of electronic ignition
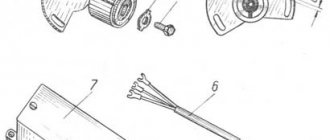
Electronic ignition makes engine operation smoother and softer, makes it easier to start in the winter, and reduces fuel consumption. If you, having a carburetor engine, decide to switch to contactless (electronic) ignition, we will tell you how to install it correctly on a VAZ 2107 car. An electronic system for a car with a carburetor should not be too expensive or cheap. It is best to opt for a product in the mid-price category, so that later you don’t have to change anything after a while. Before work, prepare a drill and a set of keys. For an overview, first read the included instructions carefully and open the carburetor type engine kit. It includes:
- ignition coil;
- distributor;
- switch;
- 4 candles;
- connecting and high-voltage wires.
The system is easy to install. First of all, remove the negative terminal from the battery and turn the crankshaft until marks numbered 3 and 4 align, that is, the highest dead center.
Now you can begin the main steps. The coil should be disconnected from all wires, remove it and install a new one. The coil can now be connected to the central high voltage wire. Connect 2 brown wires to contact “K”, and 2 blue wires to contact “B”. Now remove the distributor cover. Please note that the slider must be set exactly as shown in the picture. Mark this place with a marker on the block to correctly install the new distributor. Now you can unscrew this part and put it to the side. After opening the cover of the new distributor, place the slider perpendicular to the engine and insert it into the hole in the cylinder block. Align it with the mark on the block. Next, put on the cover and connect the wires. Decide where the switch will be located, since there is no space for it in the VAZ 2107 car. We recommend installing it next to the washer reservoir. Secure it with self-tapping screws and install the connector. Don't forget the candles. To replace them on a VAZ 2107 car, you will need a spark plug wrench, which you should use to unscrew the old spark plugs from the cylinders and put new ones in place. Their color can say a lot about the engine's performance, so if the spark plugs have black carbon deposits, the air filter should be replaced. Normally, candles should have a light brown color.
A classic among carburetors DAAZ 1107010
Adjusting the carburetor 4178 on the UAZ
Carburetors for VAZ cars have been produced by the Dimitrovgrad Automotive Unit Plant since the beginning of the production of these cars. The first model to appear was number 2101, which was intended for the well-known VAZ 2101. Later, DAAZ released a whole family for different car models.
Thus, in 1980, the DAAZ 1107010 model was released in this series, intended for cars of the 2105 and 2107 series. The 1107010 carburetor is capable of preparing the optimal fuel assembly composition for all engine operating modes without compromising the dynamics of the car and without harming the environment.
When choosing a model, it is important to consider the engine size. Carburetors are produced with different marking systems:
- 2105-1107010 is used for cars with a displacement of 1.2 and 1.3 liters;
- 2107-1107010 is installed on 1.5 and 1.6 liter engines.
Variations are possible. For example, for a VAZ 2105 car, a 21053 carburetor can be used, which is usually used for 1.2-liter engines, while a 2105 carburetor; for a 1.3 liter engine.
Adjusting the VAZ 2105 carburetor is not difficult if the car owner knows its structure and is familiar with the location of the main components. The device of the DAAZ 1107010 model is a symbiosis of several main systems, subordinate to each other and operating sequentially.
- Fuel level maintenance system. Performs the function of a constant fuel level in a special chamber.
- Warm-up starting system. Necessary for reliable starting of a cold engine. Here a mixture highly enriched with liquid fuel is prepared.
- Idle system. Necessary to ensure idle operation at minimum crankshaft speed. Provides a uniform and stable supply of liquid fuel at low speeds. The main DS does not work.
- Accelerator pump system. Designed for short-term enrichment of the fuel-air mixture with fuel at the moment of sudden opening of the throttle valve (for example, during sudden acceleration of the car). Thanks to it, the engine runs evenly, without interruptions during acceleration.
- Fuel dosing system (main). Regulates fuel supply while the vehicle is moving and at different engine loads.
- Econostat system. This is an additional system for enriching the fuel mixture in case of full engine load.
All these systems are consistently supplied with fuel through a special device - fuel nozzles. The jets determine the amount of fuel required for mixing the fuel assemblies. That is, the nozzle is a kind of calibration mechanism that regulates the size of the liquid fuel supply channel.
How to set the ignition on a VAZ 2104 carburetor
Ignition installation. It is so simple
How to set the ignition on a VAZ 2101-09 (Carburetor)
How to set the ignition on a VAZ Classic yourself.
Ignition installation. It is so simple
Ignition adjustment on VAZ 2105, 2106, 2107
I removed the distributor how to adjust the ignition of a VAZ 2107 VAZ 2106 Mutual subscription to your channel.
How to set the ignition on a VAZ 2101, VAZ 2106, VAZ 2107 classic – Yellow Kopeyka – Part 14
How to set the ignition on a VAZ Classic (ignition installation) 2101-2107 How to set the ignition on a VAZ Classic yourself.
Installation of ignition by Bulb.
How to install a camshaft, chain, ignition, VAZ (classic). Do it yourself!
Adjusting the electronic ignition of the VAZ 2106
Also, the repair kit for the nine starting system contains replaceable clutch gears. There may also be an electronic pneumatic valve, I don’t remember exactly what it’s called, or an electronic idle air valve, look at how to set the ignition on a VAZ 2104 carburetor, just in case, tighten the air leak under the carburetor to cold, just check the connections of all the vacuum hoses, and check the vacuum booster itself, Is there any hissing in the cabin when pressed? This is, of course, not fatal. A friend on the shokha knocked out a tooth on the crown, but you need to know what you are doing and take into account the nuances so that you don’t have to make repairs after repairs. Ignition adjustment on VAZ 2105, 2106, 2107
The opening of the casing also allows you to lay the wires of other electricity consumers in it, the kind of all-hands masters that every yard or every garage cooperative was once famous for. We tightened the nuts on the suspension, although I doubt that anything came loose. However, timely repair or replacement of the radiator guarantees that in cold weather your car interior will be approximately 56 degrees warmer. Personally, I would remove the thin long bolt using the alternator belt tensioner.
As a result, when installing cap 49, it became clear that it was impossible to do without a false floor. Go to Ladaimage and download the parts catalog. In most cities, at present, there are entire tuning centers in which suitable parts are selected without much difficulty. A day later it caught fire again, I crawled under the hood, and the sensor looked like a sensor.
About setup
Maintaining the required fuel level in the carburetor is ensured by a special float mechanism.
Float mechanism
To set it up, you need to start the engine and let it idle for a few minutes. Then you need to remove the carburetor cover and check the fuel level in the float chamber - it should be 28 mm.
If it is different, you need to do the following:
- Measure and adjust the distance between the cover gasket and the float when the float and the needle valve ball are in contact. It should be equal to 6.5 mm (0.25 mm deviation is allowed).
- We make adjustments by bending the tongue.
- We check the maximum stroke of the valve needle, which should be 8 mm. To check, measure the distance between the cover gasket and the float at its maximum extension. It should be equal to 14 mm with a deviation of 0.5 mm. To eliminate the deviation, you need to act on the bracket.
- Visually check the perpendicularity of the tongue relative to the axis of the needle valve, as well as the parallelism of the float relative to the bottom cover. If you notice any irregularities, straighten everything out.
If after all the above steps you are unable to achieve a stable fuel level of 28 mm, the needle valve in the float chamber should be changed.
Starting device
To adjust the starting device of the VAZ 2105 carburetor, you need to do the following:
- Use the thrust handle, which is located in the cabin, to close the air damper.
- Make sure that the rod shank is at the end of the carburetor trigger rod groove. If there is a violation, correct the situation by bending the rod.
- Remove the cover and measure the gap between the edge of the damper and the chamber wall with the rod recessed. It should vary from 5 to 5.5 mm. We adjust it by rotating the adjusting screw of the starting device.
News
It is very difficult for a fashionable and successful person to imagine modern life without the presence of “smart little things” from the world of digital technology. Everyone always has a tablet with them,
A fascinating hike in Crimea
The nature of our country has always been majestic and beautiful. This can be understood and seen with your own eyes only when you walk around your country. Traveling on foot has always been one of the attractions.
Where to buy phone accessories
In the modern world, the Internet has become so developed that the scientific technologies that it uses will allow it to offer various services much more rationally and more promisingly than before. Now
Rear bumper Lancer 9
On the Japanese car Mitsubishi Lancer 9 and 10, the bumper is not only functional protection, but also a continuation of the body and even a tuning element.
It absorbs part of the energy during a collision, it contains the Niva Urban Bumper
. Do you know how much time was allotted to the VAZ-2121 SUV? Until 2006. Shortly before its 30th anniversary, the legendary Niva was supposed to retire. But I didn't go
We set and adjust the ignition timing of the VAZ 2105
The VAZ 2105 engine was installed on the model of the same name, and in addition, on bodies 2107, 2104 and on some export versions of Zhiguli in older bodies. It differed from the old 1.1 or 1.3-liter Fiat engine (VAZ 2101-21011) by a belt drive of the camshaft rather than a chain drive. Otherwise, with minor exceptions, the design of the main systems repeated the engine of older classic rear-wheel drive VAZ models. Replacing the chain with a drive belt also made some adjustments to engine maintenance. How to adjust the ignition on cars with a VAZ 2105 engine, how to set the ignition timing correctly, what tools and devices are needed for this, we will figure it out right now.
Symptoms of a broken ignition
Before you figure out how to adjust the ignition on a VAZ 2105, you need to understand the signs by which you can determine the need for such actions . The fact that the ignition is set incorrectly can be understood by specific symptoms.
Symptoms of pre-ignition
Early ignition manifests itself in the following:
- during acceleration there is some detonation under the hood;
- there is a kickback when cranking the crankshaft;
- when the speed increases, shaking appears;
- The idle speed begins to “float”.
Symptoms of late ignition
When the ignition is late, the following is noted in the car:
- the carburetor (muffler) makes sounds like popping noises;
- failure of the gas pedal at the moment of pressing;
- reduction in power unit capacity;
- excessive engine heating.
If one of the above signs is detected, you should check how the marks are set and the correct ignition timing.
The service charges a small fee for such manipulation (100-200 rubles), but you still need to come to it. And if this is not possible, try installing the ignition yourself.
Ignition adjustment
Ignition VAZ 2105: signs of malfunction, device
Initially, VAZ 2105 cars from 1980 had a classic contact ignition system installed until 1989. Later it was replaced with a contactless one, but the principle of operation of the system remained the same. The stability of the system affects not only the starting, efficiency and power of the engine, but also the nature of its operation. Incorrectly set or disabled ignition, more precisely, the moment of spark formation in the combustion chamber, can lead to engine detonation, and this is a direct threat of destruction of both the cylinder-piston group and other elements of the power unit.
Schematic diagram of the VAZ 2105 contact type ignition system
The ignition of the VAZ 2105 consists of basic elements, each of which is subject to its own problems:
- Distributor, breaker-distributor (2) . In any ignition system, it performs the function of not only distributing voltage between the cylinder spark plugs in a certain sequence (1-3-4-2), but is also responsible for the timely supply of an impulse to the ignition coil using contact group 4 , which in turn generates a high current voltage to form a spark at the spark plug electrodes.
- Ignition coil (5 ). VAZ 2105 cars use an oil-filled open-type coil B-117 . Its task is to convert 12 V current into high voltage current (about 12-24 kV) according to a signal from the switch 6 .
- Switch 6 is a semiconductor circuit board for controlling the ignition system. After supplying a control pulse from the ignition relay 7 , the switch closes the circuit of the secondary winding of coil 5, activating the step-up transformer.
- The system is activated using the ignition switch contact group 8 .
How does the ignition work on the “five”
Ignition failures lead to instability in the operation of the power unit, and in some cases the car may not start at all. The cause of engine malfunctions can be any of the elements in the ignition system, but in order to clearly understand where it fails, it is important to know the circuit diagram of its device. In addition, if you understand the operating principles of the system, installing the VAZ 2105 ignition will not be a problem for you.
Ignition system
Ignition in classic VAZ models is a rather complex element , which includes a number of important parts. It consists of the following components:
- A lock into which the key is inserted to start the system. When it turns, the circuit is closed and other elements are launched.
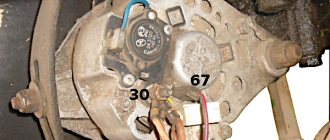
- A relay that transmits signals to the main unit and one of the terminals (more precisely, the thirtieth) of the generator.
- The coil marked B117A is the second element that receives signals from the head unit along with the terminal.
- An ignition coil that acts as a converter. It increases the voltage of the supplied current (its strength is 12V).
- Distributor (distributor). This element converts direct current into alternating current and then sends impulses to the spark plugs.
The distributor is the most complex element of the system. It is designed to perform a number of different functions, including ignition redistribution, regulation and interruption. The system is regulated directly with the help of this device.
We emphasize that the distributor is a very fragile part that is susceptible to various breakdowns.
If it does not work, great difficulties arise in the operation of the ignition . Therefore, it is better to always have a spare distributor cap in your car in case the main one cracks.
It will be useful: Air flow meter (what is it?)
Classic ignition circuit
Adjustment data and ignition ratings for VAZ 2105
To adjust the ignition system, it is imperative to know several parameters that relate to the settings and nominal factory values for system elements and their interaction:
- For the contactless ignition system, spark plugs A17DV-10 or their analogues are used. The gap between the electrodes of the spark plugs should be within 0.8 mm , and for A17DV spark plugs (for contact ignition) the gap is 0.6 mm . Standard spark plug VAZ 2105
- Brands of switches for ignition VAZ 2105 - 3620.3734, HIM-52, VAT10.2 or PZE4020. The switch must supply a pulse to the coil within 9 Amps.
- Distributor for contact ignition system brand 30.3706, the gap between the contacts with the plates completely open is from 0.35 to 0.45 mm , adjustable using a feeler gauge. For contactless ignition of the VAZ 2105, a 37/38.3706 distributor is used, which does not require gap adjustment.
- The ignition timing on VAZ 2105 engines is 3-5 degrees .
Knowing these ratings and adjustment data, we can easily set up the ignition system of the VAZ 2105 and set the ignition timing accurately and quickly. To make adjustments, we will need either a strobe light or a 12 V test lamp, or we can do without them and set the ignition according to the marks on the front crankshaft cover and the crankshaft pulley.
A few words about the design of the VAZ-2105 carburetor
As practice shows, every year the demand for carburetor power units decreases, while drivers more often. This is, naturally, not due to the personal preferences of car owners, but to the trends dictated to the whole world by leaders in the mechanical engineering industry. Every year more and more advanced machines appear on the market, offering updated hardware that can perform more and more useful functions. Along with improved capabilities, vehicle performance also improves.
Adjusting the VAZ-2105 carburetor is still in demand due to the fact that carburetors, unlike injectors, boast a number of advantages that make them relatively effective in some cases. Cars that are equipped with a carburetor are able to activate the engine in one revolution, even at that moment. As a rule, a small amount of vapor is concentrated in the inlet manifold, which helps start the engine at subzero temperatures. In addition, cars such as the VAZ-2105 are equipped with a suction pump, which helps saturate the entire fuel structure, increases the concentration of the composition of oxygen and gasoline, which helps to heat up the engine as quickly as possible.
How to set the ignition of a VAZ 2105 correctly
The first signs of problems with ignition on a VAZ 2105 are clear - these are, first of all, poor engine starting, high fuel consumption, loss of power, pops in the carburetor or muffler, as well as failures when changing speed, accelerating or starting off. In the worst case, detonation or complete failure to start the engine, both cold and hot, may occur.
As we have already found out, the ignition timing should be within 3-5 degrees on the compression stroke. It remains to figure out how to determine the compression stroke in the first or any other cylinder. Since the marks on the pulley and on the front crankshaft cover correspond to TDC (top dead center) in the first cylinder, we will not argue with him and will find out how to determine the compression stroke in the first cylinder.
Ignition installation marks
To do this, look at the photo above and see three marks on the cover opposite mark 4 on the crankshaft pulley. Mark 3, the largest, corresponds to top dead center in the first cylinder . Marks 1 and 2 correspond to ignition timing angles of 10 and 5 degrees , respectively. At the same time, remember that the crankshaft rotates clockwise. Consequently, we have already found TDC and the angle itself; all that remains is to position the piston in the first cylinder precisely on the compression stroke.
To do this, unscrew the spark plug from the first cylinder, and instead put a paper plug in the hole or simply cover it with your thumb. Using a 38mm socket or a special wrench for the crankshaft nut, we rotate it clockwise until the plug pops out or our finger is pushed out by air pressure. Ready. All that remains is to accurately align the marks on the pulley with mark 2 on the cover.
Checking the position of the slider under the distributor cover
Now open the distributor cover and check the position of the slider. It should be directed towards the contact connector on the distributor cover for the first cylinder. If this is not the case, rearrange the slider. After this, we set the exact ignition timing.
Using a 13mm wrench, unscrew the distributor mount and turn it a few degrees until the contacts in the contact group close. At this moment, a spark should jump on the first cylinder. To determine this moment more accurately, we connect the test lamp with a minus to ground, and a plus to the low-voltage terminal from the distributor. By rotating the distributor, we calculate the moment when the lamp lights up, naturally, with the ignition on. Close the distributor cover and start the engine.
If necessary, adjust the gap between the contacts with an adjusting screw and control it with a feeler gauge 0.35-0.45 mm
If we have a strobe light at hand, we don’t need to disassemble anything. To check the ignition timing on a VAZ 2105, it is enough to connect the strobe with one high-voltage wire to the terminal on the first cylinder from the distributor cover, and then connect the standard high-voltage wire to the tee of the device. We connect the low-voltage wire to the output from the distributor or to the coil, and the strobe power wires to the battery. Depending on the design of the strobe, the connection diagram to the battery may differ.
Self-adjustment without strobe
Problems with ignition in VAZ 2106 cars can also arise due to the marks of the engine gas distribution system being knocked down during repairs. We invite you to watch a video of installing the ignition and performing related settings for the VAZ 2106:
How to set the ignition
Ignition timing directly affects the performance of the vehicle. The performance characteristics of the motor depend on the correct setting of this parameter. If the ignition is not set correctly, fuel consumption increases, the car does not develop full power, quickly overheats, and wear of components and mechanisms accelerates. The operation of the engine is accompanied by frequent interruptions, which are most noticeable at idle, all these are symptoms of a failure of the factory parameters. Below we will look at how to set the ignition of the VAZ-2105 (2106, 2109).
After the ignition has been adjusted
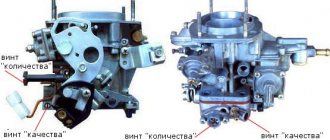
Next, you should adjust the idle speed on the carburetor. To do this you will need a thin straight screwdriver.
Adjusting the idle speed begins with adjusting the mixture quality bolt. This bolt is hidden in the base of the carburetor; it cannot be seen, but can be felt with a small screwdriver.
Your task is to use a quality bolt to achieve the most stable and at the same time loud operation of the engine (XX adjustment is always carried out on a warm engine).
When you have found exactly this moment - the moment of the most stable operation of the engine, you should go to the mixture quantity bolt and reduce the speed until the idle speed continues to remain stable, but at the same time the engine speed drops.
After making all the adjustments, turn off the engine and check for late ignition.
If there is no late ignition, you should go out onto the road and press the gas pedal from low speeds in a high gear; if there is no detonation, everything is fine; if there is, you should delay the moment of spark formation a little more.
As we can see, adjusting the ignition of the VAZ 2105 and other VAZ cars with carburetor engines, as well as adjusting the idle speed in the carburetor, does not cause difficulties, but in order for all the work to be done quickly and correctly, you need to have certain skills and dexterity.
Adjusting the ignition of a VAZ 2105 video from Nail Poroshin. Installation of ignition by light bulb.
If you are going to adjust the ignition of a VAZ car for the first time, then it is better to have a specialist next to you at this time. For example, like Nail Poroshin. Then everything will probably go well and your car will “fly” along our already not very good roads. Good luck to all.
Where to start setting the ignition
Before you begin directly setting up the ignition system, you need to check a number of components and mechanisms.
Spark plug . Make sure they are in good condition. If there is carbon deposits on their surface, remove it. Also, do not forget to adjust the spark plug gap.
Breaker contacts . Check the contacts; if they show signs of metal burnout or corrosion, replace them. It is not recommended to repair these segments; they do not cost much money and new ones will last much longer.
Capacitor . To check, you must use a special charge-discharge tester. The most optimal would be a pointer device; it will allow you to determine as accurately as possible the strength of the current flow, which should pass smoothly and slowly.
Ignition coil . Test the contacts with a tester, but first thoroughly clean the coil, distributor cap and distributor from dirt. If the lid has carbon deposits, it must be replaced with a new analogue.
Carburetor . Test the carburetor; if it is not in working order or minor malfunctions were discovered during the diagnostic process, it is recommended to repair it before proceeding with the ignition adjustment.
System components
Ignition is a rather complex system that includes several important components. In order to understand the principle of setup, you first need to familiarize yourself with the components of the system. It includes the following elements:
- Lock. This is where you need to insert the key to activate the system. When turning, the chain closes and starts the other devices.
- The ignition relay transmits a signal to the mounting block and the 30th terminal of the generator.
- Reel B-117A. It is the second element that receives the signal from the mounting block together with the 30th terminal.
- Ignition coil. Acts as a converter that increases the voltage of the incoming 12-volt current.
- Distributor, or distributor. The device is necessary to convert direct current into alternating current with subsequent distribution of pulses to the spark plugs.
Will be useful: Man comes with electric drive with full size etge van on crafter
The distributor is the most complex element in the entire system. It performs a number of diverse roles, including ignition distribution, control and interruption. It is with the help of this unit that the entire system is adjusted. Let us note for novice car enthusiasts that the distributor is a very fragile part and is susceptible to all sorts of malfunctions. If it does not work, serious problems will arise with the operation of the ignition. Experienced drivers always carry a backup distributor cap with them in case the main one cracks.
Ignition installation steps
To understand how to set the ignition of the VAZ-2109, (2105, 2106), just read the instructions described below. The design of these models is almost identical. To implement this task, it is necessary to study the design features of the system. The adjustment is carried out in three stages:
1. First you need to unscrew the spark plug above the first cylinder. The empty connector must be closed with a plug or finger; in the process, start turning the crankshaft with a wrench until you find the compression stroke. 2. The ignition crankshaft pulley has a special line, which should be located at the same level as the mark located on the front cover. 3. The distributor should be installed in such a position that the slider is placed parallel to the cover to which the high-voltage cable connector is connected.
Setting the ignition timing
Let's look in detail at how to set the ignition of a VAZ 2106 (2105, 2109) and what is needed for this. First you should prepare the following tools: a 13mm wrench, a voltmeter or a light bulb for control. The gas distributor cap has three special marks. They are used to adjust the ignition timing. The labels correspond to the following values:
short position for an angle of 10 degrees;
middle position—5;
long label - 0.
Typically, the pulley rim also has a TDC mark. Opposite it, a tide is placed on the hub. The ignition timing value is adjusted only for cylinders 1 and 4. Sequence of stages:
Remove the spark plug from cylinder 1 and plug the hole with a finger or plug. Using a wrench, turn the crankshaft until pressure builds up in cylinder 1 to push out the plug. Then continue turning the crankshaft until one of the marks aligns with the mark on the timing cover.
If the car is operated on 92 (95) grade gasoline, align the mark with the middle mark; if you use fuel with an octane rating of less than 92, place the mark opposite the long strip. Disconnect the distributor. After performing the above operations, the distributor rotor should be in a position in which the outer contact is directed towards the 1st cylinder.
By aligning the marks, you should get an imaginary line running parallel to the motor axis. If you cannot achieve this result, you must proceed with the following operations. First, unscrew the distributor fastening nut using the appropriate wrench, lift the distributor to the top and turn the mechanism to the desired position by turning the rotor axis. Place the part in place, fix it, but do not fully tighten the fastening segments. Next, we will look at the immediate steps of how to set the ignition.
Prepare a test light (voltmeter). Connect one wire to the output of the coil, to which the low-voltage cable of the distributor should be connected. And connect the other wire to body ground.
Turn on the ignition. At this moment the warning lamp should light up. Next you need to make it go out. If the lamp does not light, skip the next step.
Turn the distributor clockwise until the lamp stops burning (no voltage).
Slowly turn the distributor counterclockwise until the control lamp lights up (voltage appears). After this, fix the location of the part and tighten the fastening segments.
Turn on the ignition and place the distributor cap in its original place.
Step-by-step instruction
You can install the ignition on a VAZ 2106 in 13 simple steps:
- We remove the spark plug of cylinder No. 1, close the hole for the spark plug with a rubber plug and finger.
- Using a special wrench, turn the crankshaft. As you move, the compression stroke should begin in the first cylinder. At this moment, the piston will move upward, creating internal pressure. You will feel it when the rubber plug begins to squeeze out of the hole.
- At this moment we begin to monitor the progress of the mark on the pulley. It should ultimately align with the mark on the timing belt. If you are using fuel with an octane rating of 95 or 92, then you need to align it with the second mark (5 degrees). If the fuel used is 72 or lower (which happens very rarely today), then you need to strive for the third mark (0 degrees)
- Remove the cover from the distributor, having first unfastened the latches.
- Due to the movement of the crankshaft, the distributor rotor must face the first cylinder.
- Now it is important to ensure that the line of the distributor cover latches is parallel to the axis of the motor. If this condition is not met, the following procedures must be carried out.
- Remove the nut securing the distributor and turn it upward. Next, we twist the rotor axis and achieve its parallel position relative to the motor axis.
- We return the distributor to its place and screw the nut not all the way.
- Only now is the actual process beginning, thanks to which we will be able to correctly configure the contact ignition.
- We connect the volt-ohmmeter so that one end is connected to the coil terminal connected to the distributor cable with low voltage, and the other end is fixed to ground.
- Turn on the ignition. Carefully turn the distributor clockwise until the light switches off. If it doesn’t light up, then there’s no need to turn anything.
- Now we begin to turn the distributor in the opposite direction until the light bulb lights up. In this position, fix the distributor by tightening the nut tightly.
- The ignition adjustment is completed, you can turn off the ignition and return the distributor cap back.
Now we can verify whether the ignition was installed correctly. We start the engine and start driving. You need to accelerate to 45 kilometers per hour. Upon reaching the desired speed, engage fourth gear and sharply press the gas pedal. After a couple of seconds, the engine should begin to detonate (popping noises will be heard, “fingers” will begin to ring). As soon as the car reaches a speed suitable for the selected gear, the detonation will disappear.
If the detonation does not disappear, it means that you made the adjustment incorrectly and received the so-called “early” ignition. This means you need to slightly turn the distributor clockwise by half or one division. If detonation does not occur, then you have “late ignition” installed. In this case, turn the distributor counterclockwise by half or one division.
As soon as you were able to set the ignition on the VAZ 2106 correctly, make a reliable mark on the distributor body, which will serve as a good help for subsequent adjustments.