DIY shock absorber repair
Almost every car enthusiast can repair shock absorber struts if he is not afraid of dirty work under the car.
At the same time, you will also be able to save a good amount of money. After all, as soon as dull knocks begin to appear in the car’s suspension when driving over holes and potholes, then it’s time to get serious about repairing the shock absorbers. Each automaker uses its own design developments to dampen vibrations when the vehicle is moving. But shock absorbers are present in almost all modern passenger cars.
The lifespan of a shock absorber is determined by the driving style of the car and the quality of the roads. For example, many 10-year-old cars from Europe with mileage of more than 200 thousand km come to us with “original” shock absorbers. And in our road conditions, a rare suspension part survives up to 100 thousand km.
At the end of this article you will find a visual video tutorial on how to repair the shock absorber strut of a VAZ 2110 car.
Below we will talk about what the main malfunctions of shock absorbers are, and how you can fix them yourself, if you have certain skills, tools and the desire to do this.
Main malfunctions of shock absorber struts
The main malfunctions of shock absorber struts are:
- Free movement of the rod in the cylinder,
- The presence of knocking noises when compressed or stretched,
- Oil leaks.
It is quite easy to detect all these problems without even removing the shock absorbers from the car.
To determine the performance of the shock absorbers, it is necessary to press firmly with your entire body weight several times on the fender or bumper of the car directly above each shock absorber in turn. If, after the car stops rocking, further vertical vibrations occur, then the shock absorber is faulty. Typically, a serviceable unit stops swinging immediately after the impact on it ceases.
Knocks in the shock absorber strut are detected in the same way. To do this, you should rest your palm on the top attachment point of the stand and swing it up and down with sharp rhythmic pressures. Impacts will be clearly felt upon contact.
To detect leaks in shock absorbers, just look between the wheel and the arch of the car. Turning the wheel to one side will help improve visibility. It is even more convenient for these purposes to use an inspection hole, overpass or lift.
Read more about methods for checking the serviceability of car shock absorbers in our article on how to check shock absorbers on a car.
How to disassemble the front strut
Dismantling and assembling the telescopic stand
Before further disassembling the rack, check its condition. With the rack in a vertical position (rod up), perform several full stretch-compression strokes, after which the rod should move without dips or jams and there should be no knocks or extraneous noise. Liquid leakage, deformation and destruction of the rack body, support cup, brackets and rack swing arm are also not allowed. Slight sweating in the upper part of the strut housing is not a sign of a malfunction and does not serve as a reason to replace or repair the VAZ 2114 suspension strut.
Front suspension assembly
Assemble the front suspension strut of the VAZ 2114, VAZ 2115, VAZ 2113 in the reverse order of disassembly, taking into account the following: – ensure the cleanliness of the work area and all parts of the strut; – make sure that there are no foreign impurities in the liquid, filter it if necessary; – make sure that the threads of the recoil valve nut are not damaged when unscrewing it with an open rod; – inspect the rod at the core location; if the deformation of the thread is large and does not allow screwing on the recoil valve nut without damaging its thread, upset the rod thread at the core location; – the throttle disc of the front strut recoil valve has three grooves along the outer diameter, and the throttle disc of the rear shock absorber has four; – the throttle disk of the front suspension strut compression valve has three grooves along the inner diameter, and the throttle disk of the rear shock absorber has two; – tighten the recoil valve nut to a torque of 12.7–17.5 N m (1.3–1.8 kgf m), then lock it by opening the threaded end of the rod in previously undeformed areas; the moment of unscrewing the nut after opening must be at least 19.6 N m (2 kgf m); – it is recommended to replace the oil seal and O-ring of the strut housing with new ones during repairs; – fill the working surface of the oil seal (between the sealing edges) with CV joint grease-4 in an amount of 0.3–0.4 g; – fill the strut body and cylinder with (320±5) cm3 of liquid for shock absorbers, and fill the rear shock absorber with (250±5) cm3; – tighten the strut housing nut with the rod fully extended using the wrench 67.7811.9510/11, the tightening torque is 117–147 N m (12–15 kgf m) (for the rear shock absorber the tightening torque is 69–88 N m (7–9 kgf m) m); – after tightening the nut, caulk the strut body. The torque for loosening the nut after caulking must be at least 294 N m (30 kgf m); – after assembling the compression valve, make sure there is free movement of the valve disc and discs; – press the compression valve into the cylinder with a special mandrel from the kit 67.7824.9518, then once again make sure that there is free movement of the plate and disks; – to install and press the rod guide bushing into the cylinder, use a special mandrel from the kit 67.7824.9518; – install springs of the same class on the suspension. NOTE Springs according to their length under the control load are divided into two classes: A and B. Class A springs are marked with yellow (white)* paint on the outside of the middle coils, and class B springs are marked with green (blue)* In exceptional cases, if they are installed on the front suspension class A springs, but there are no springs of this class for the rear suspension; it is allowed to install class B springs on the rear suspension. But if class B springs are installed on the front suspension, then install only class B springs on the rear suspension.
Removing shock absorbers
Repair of shock absorber struts begins with their dismantling. Removing shock absorbers usually does not cause problems. Unless the fasteners force the motorist to swear loudly and resort to drastic measures (“grinder” or gas “cutter”).
But most often it is enough to clean the nuts and bolts of sand and dirt, and then treat them with WD-40. After 20-30 minutes you can begin dismantling.
Here are a few points to consider when removing shock absorbers for subsequent repair or replacement:
- Often, the part of the car where the shock absorber is removed has to be lifted using a jack. Be sure to install stops under the threshold or bottom so that the car does not accidentally move during repairs.
- For better access to the lower fastening elements of the shock absorber, you need to remove the corresponding wheel.
- The upper mounting points for the struts in most cars are usually located under the hood and in the trunk.
In front-wheel drive vehicles, removing the strut will require more work. The complexity of the work depends on the type of shock absorber strut.
- Collapsible shock absorber designs are more difficult to dismantle the strut. To remove such a unit, you will have to unscrew the hub nut and remove the strut along with the hub.
- Non-separable shock absorbers have a simpler strut design. At the lowest point, the shock absorber is inserted into the cup, where it is secured with one or two bolts.
The upper mount for both types of struts is usually located under the hood (for front shock absorbers) and in the trunk (for rear shock absorbers). Here you only need to tighten two nuts.
Shock absorber struts on front-wheel drive vehicles are usually removed along with the springs.
Renault Duster. Removing the front shock absorber strut and disassembling it
Renault Duster. Removing the front shock absorber strut and disassembling itWe remove and disassemble the shock absorber strut when it is necessary to replace its spring, upper support, support bearing, compression stroke buffer with a protective cover, or telescopic strut (shock absorber).
Remove the shock absorber strut on a level surface.
If the telescopic strut or spring is faulty, both struts or springs must be replaced so that the characteristics of the shock absorber struts on both sides of the vehicle are the same.
In the engine compartment...
...using a high 21-point socket with an external hexagon (or grabbing the outer surface of the head with a pipe wrench), loosen the tightening of the nut of the upper fastening of the shock absorber strut, holding the shock absorber rod from turning with a 6-point hexagon. We remove the wheel and securely fix the car on a factory-made stand.
Using a 10mm socket, unscrew the bolt securing the wheel speed sensor wiring harness holder.
We remove the holder with the wiring harness from the rack.
We disconnect the stabilizer link from the shock absorber strut bracket (see Removing the stabilizer bar link).
Using an 18mm socket, unscrew the nut of the bolt for the upper fastening of the strut to the steering knuckle, holding the bolt with a wrench of the same size. Similarly, unscrew the nut of the lower rack mounting bolt. We take out the bolts or knock them out with a soft metal drift.
Move the strut away from the steering knuckle. While holding the stand from falling, we finally unscrew the nut of its upper fastening.
Remove the shock absorber strut.
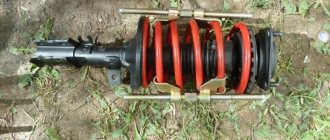
Remove the rubber-metal support washer of the upper shock absorber strut mount. To disassemble the rack, install two spring ties diametrically opposite each other so that they engage four coils of the spring.
By evenly rotating the tie screws, we compress the spring.
Be careful when working with a compressed spring.
After the spring stops pressing on the support cups...
...with a 27mm spanner, unscrew the nut securing the upper support, holding the rod from turning with a 6mm hexagon.
Remove the strut support...
...upper support bearing...
...and the upper spring cup. We remove the spring with ties...
...and a compression stroke buffer with a protective cover.
Remove the vibration- and noise-absorbing spring cover. We assemble and install the shock absorber strut in the reverse order. We install the spring like this...
...so that its lower coil rests against the protrusion of the lower spring cup welded to the strut body...
...and the upper coil rested against the stamping of the upper spring cup. Tighten the nut securing the upper support of the strut and the nuts of the bolts securing the strut to the steering knuckle to the prescribed torques.
CancelAdd comment
DIY shock absorber repair
To determine the cause of a malfunction of the shock absorber strut on a front-wheel drive vehicle, most likely it will have to be completely disassembled. For more information on disassembling, reassembling and repairing the shock absorber, see the video tutorial at the end of this article.
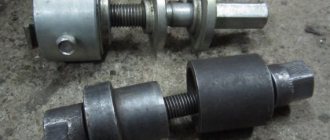
An indispensable device for disassembling the shock absorber will be zip ties. This device for compressing springs is a powerful pin, on one end of which a left-hand thread is cut, and on the other, a right-hand thread. There is a hex key at the end of the stud. Clamps (with left and right threads, respectively) are screwed onto the ends of the stud, which will securely cling to the coils of the shock absorber spring when it is compressed.
- To compress the spring, two such tension devices are required. They are installed on opposite sides of the spring. Tightening is done by alternating rotation of the pins.
- When the spring is compressed enough that it can “move” freely in the strut, you can unscrew the top nut, remove the support bearing with the rubber bumper, and carefully remove the spring.
After a careful inspection, it may turn out that the cause of the knocking noise lies in a worn rubber bumper. A tight rotation with a squeak is observed when the support bearing fails.
- The collapsible shock absorber is unscrewed from the body using a special key. Some motorists have successfully completed this job using a hammer and a suitable steel bar.
- After replacing defective parts, reassemble the shock absorber strut in the reverse order.
- When the top nut is securely tightened, the spring must be slowly released to working condition. It is important that the first turns fall into their sockets, which prevent it from moving.
After this, all that remains is to install the shock absorber strut in place, tighten the wheel and lower the car.
Repair of shock absorber struts should be carried out without haste and in compliance with safety regulations. It is necessary to compress and release the springs especially carefully and carefully. Then the repair will take place without damage to the vehicle or human injury. And after repairing the shock absorber struts, the car will drive smoothly and quietly.
Replacing front struts
Replacing the front struts yourself is not difficult, even without a garage, but it is advisable to buy spring clamps and a steering rod puller before replacing; this tool will greatly facilitate the process of replacing the struts.
The entire process of replacing the racks is below in the photo report.
Photo. Removing the front wheel.
First you need to remove the front wheel, but to avoid an accident, always place a stump or bricks under the car for insurance, as the jack may simply jump out from under the car.
Photo. Remove the shock absorber nut.
There is a special wrench to unscrew the support cup, but if you don’t have it, you can rip off the nut with a 22mm socket directly on the machine.
Photo. The arrows show which nuts need to be unscrewed in order to disconnect the strut from the hub and steering rod; arrow 2 shows the bolt that is used to adjust the wheel camber.
After the support cup nut has been removed, unscrew the strut from the hub and steering rod.
Photo. The steering linkage puller is shown, the arrow shows where you can hit it with a hammer if the linkage does not come out of place.
Photo. The stand is unscrewed from the hub and steering rod.
Photo. The arrow shows which nuts need to be unscrewed to remove the strut, but do not unscrew the central 22mm nut.
Photo. The strut assembly has been removed and the spring clamps have been installed.
All that remains is to unscrew the three 13mm nuts that hold the stand and pull the stand down. I also recommend using WD-40; this liquid makes it easier to loosen the nuts.
Photo. It shows where you can grab the rod with a gas wrench to unscrew the strut support.
The strut has been removed, all that remains is to tighten the springs and unscrew the nut from the rod. If you don’t have a special wrench, you can carefully clamp the rod as high as possible with a gas wrench and unscrew the nut. Be sure to place the gas wrench as high as possible; if you accidentally make burrs on the rod, then at the top they will not harm since they do not reach the shock absorber seal. But usually the nut is easily unscrewed without forcefully clamping the rod, which does not harm it at all.
Assembling the rack is in the reverse order, but the wheel alignment will be incorrect, if you cannot adjust the wheel alignment yourself, then you can safely drive to the technical station.
Why do you need shock absorbers in a car, how they work
Front and rear shock absorbers are damping elements in a car's suspension. Paired with an elastic suspension part, which is a spring or torsion bar, the shock absorber performs several main functions:
- Damping vibrations of wheels and body;
- Maintaining wheel traction with asphalt;
- Ensuring a smooth ride.
To understand how a shock absorber works, you need to understand how it interacts with other suspension components. So, shock absorbers are necessary to reduce the amplitude of body vibrations, which appears as a result of the operation of elastic elements.
The elastic element is a spring, which is attached to the shock absorber. This design is called a rack.
The operating principle is based on hydraulic or gas resistance. Oil is most often used as the working fluid.
The shock absorber consists of two elements – a piston and a cylinder. The cylinder contains chambers filled with gas, oil, or oil and air. The piston moves inside the cylinder - it can rise or fall.
In the case of oil, the piston experiences resistance when moving, created by the flow of oil through special valves into another chamber. If the damper is gas, then the piston resists the pressure exerted by the compressing gas - gases are poorly compressed and also poorly decompressed.
Due to this resistance, the piston can move smoothly and steadily, which leads to a shock dampening effect.
What is the difference between a strut and a shock absorber?
If we highlight the main differences between struts and shock absorbers in a list, it will look like this:
- A shock absorber can perform the functions of an element of a strut and not vice versa, since the strut functions as a shock absorber with a support spring and a steering rod;
- The stand has a reinforced body and rod;
- The stand has a higher price;
- While the strut is subject to lateral loads, the shock absorber only dampens vibrations;
- If you compare a strut with a simple shock absorber, then the strut gives the car reliability;
- A faulty shock absorber will cause some inconvenience to the driver, and a faulty strut will mean an uncontrollable car.
The most common faults
Among the most popular malfunctions are:
- Fluid leaks;
- Deformations and mechanical damage to the housing;
- Damage to the rod or piston;
- The oil is inappropriate or of poor quality.
Leaks can occur due to wear of oil seals or other seals. Oil seals also wear out naturally - the rod is constantly moving, so the edge of the oil seal wears out after some time. However, most often the oil seal gets damaged due to corrosion, scuffing and dust, sand on the rod.
Deformation of the housing is usually caused by impacts on the housing of the damping device. Dents do not allow the rod to move normally to its full height and in the place where there is deformation, the piston can rest.
The piston can be damaged only in one case - if the car falls into a hole at speed. The damper cannot withstand it and breaks through. At the moment of breakdown, the piston collides with the bottom of the chamber, which causes damage to the piston. As a result, the valves are also damaged, and the processes of oil flow from chamber to chamber are seriously disrupted.
Oil is the working fluid in a car shock absorber. The operation of the damper depends entirely on its characteristics and quality. If the oil has a low viscosity, then there will not be the required resistance to the movement of the piston - the damper will “break through” even on small bumps. In winter, oil with a higher viscosity will create too much resistance.
How to properly check shock absorbers on and off the road
You can determine whether the damper is working properly by its appearance. If traces of oil are visible on the body, this indicates a violation of the tightness of the chambers due to wear of the oil seals or seals. The properties of such a damper will be below normal or will not exist at all.
The body is also inspected for deformations - even a slight dent can lead to difficulty moving the piston and to complete jamming.
Fasteners must be intact and not damaged by corrosion. The rubber bushings installed in the lower hinge must also be intact and have no signs of destruction.
The damper rod must have a perfect mirror surface. If there is no mirror, then the piston has no movement and the shock absorber does not perform its function.
If the shock absorber has already been removed, then to check it, install it vertically. The bottom bracket is fixed with your feet, and the rod is pulled out with your hands and released. If the shock absorber is working properly, then the resistance to the upward movement of the rod should be much greater than the resistance when the rod moves down.
If the rod moves both down and up with the same force, then there is little or no oil in the cylinders. If the resistance decreases in the extreme positions of the rod, then this indicates air in the chamber cylinder.
You can check the operation of the shock absorbers on the car. To do this, swing the car by the front and then by the back. If the damper is working properly, the car will swing once. If the rack is jammed, you won't be able to rock the car.
Replacement or repair? What you can do yourself
Deciding what to do is not easy. First of all, you need to find out whether the stand can be disassembled or whether it has a non-demountable design. If the case is monolithic, then repairs are unacceptable - if you open the case, the part will not work.
If a nut or retaining ring is installed in the place where the rod enters the pipe, then the rack can be serviced and repaired.
How to restore gas
First of all, the part is clamped in a vice in a vertical position. Next, it is very important to clean the element well, and also to thoroughly blow out the place where the rod goes with air from the compressor. Then the assembly is disassembled - the protective cap on the rod is removed.
Next, a special fitting is put on the rod, allowing gas to be pumped in. Gas is pumped until the required pressure is reached - when performing this operation, you need to remember about safety. The procedure is carried out several times until the desired pressure is achieved. To control the pressure you need a pressure gauge.
How to disassemble the front shock absorber of a bicycle?
You will need:
- Special tool set
- Detergent and sponge
- Determine the front shock absorber strut
- Basin and warm water
- Small container for oil
#1
Very often, lovers of high-speed mountain biking are faced with an urgent task - they need to repair the front shock absorber strut. To do this you will need to disassemble it. Before starting repair work, you need to determine the type of depreciation system used.
#2
Typically, modern bicycles are equipped with the following types of road roughness mitigation systems: - Spring; — Spring-elastomer; — Air; — Oil-air; — Oil-spring.
#3
The most commonly used, but also the most expensive, are oil-spring shock absorber struts. They are used in most modern bicycles, so let's look at the process of dismantling and disassembling using the example of one of these racks - Rock Shox Dart 2.
#4
Before disassembling the bicycle shock absorber, you need to remove it from the fork, and the fork, in turn, must be removed from the frame. First of all, remove the wheel, and then tediously remove the bicycle handlebars. To do this, use a universal tool to loosen the side mounting bolts, and then unscrew the bolt that holds the steering wheel in a vertical position.
#5
After the handlebars are removed, you need to remove the front fork from the frame. Immediately before disassembling the front fork shock absorber strut, it must be thoroughly cleaned of all contaminants to prevent them from getting inside the shock absorber. To do this, pour warm water into a small basin, take a sponge and detergent, and then carefully remove all existing dirt.
#6
Before disassembling the front shock absorber of the bicycle, it is necessary to unscrew the nuts located at the top of the fork. After unscrewing them, you need to lower the movable part of the fork down, this will allow you to gain access to the “insides” of the shock absorber. After this, the shock absorber spring is removed from the leg of the strut.
#7
When disassembling the second leg of the fork, you need to be careful, as it contains oil that serves as a damper (a device or material designed to dampen the amplitude of vibrations). After the second leg is untwisted, you need to drain the oil into a small container, while making sure that no contaminants get into it. That's all, after the repair the rack is assembled in the reverse order.
uznay-kak.ru
How to extend the life of car struts
To extend the service life of the racks, it is recommended to regularly treat the underbody of the car with anti-corrosion compounds. In the cold season, immediately after starting the car, you should not perform any sudden maneuvers or actions.
Sudden acceleration and braking with cold oil in the rack will significantly reduce the service life of parts. Well, one more tip - overcome serious obstacles at low speed.
Step-by-step instructions for replacing front shock absorbers
Convenience and comfort while driving a car are ensured by the proper functioning of shock absorbers.
It is also a guarantee of safety. Suspension failure significantly accelerates steering wear. In this case, the suspension needs immediate repair and replacement of spare parts that have failed. Any motorist who has some experience in independently repairing his car can replace shock absorbers on his own. In this case, you will be able to save on a visit to the service station. All you need is desire, time and the ability to use simple tools. What you need to know for this and how to replace shock absorbers yourself - we will consider further.
What tools are needed
- Set of wrenches.
- Jack.
- Balloon key.
- A device for removing suspension springs.
- Screwdriver set.
- Wheel stoppers (prevent removing the car from the jack).
List of malfunctions for which shock absorbers require replacement:
Oil leakage from shock absorber.
Traces of rust on the shock absorber mounts. There is a risk of the spring plate coming off when the car is moving. Rust on the piston rod. There is a risk of oil seal failure and oil leakage. Curvature of the shock absorber body. The piston is likely to be blocked or slow down. Knocking while turning indicates a decrease in the stability of the car.
It is necessary to carefully inspect the car to decide what to do - repair the shock absorber struts yourself or replace the shock absorbers. But you should always take into account that after repair or replacement it is necessary to bleed the shock absorbers.
When replacing both pairs of shock absorbers, you should take from the set wrenches that match the parameters of your car. You also need a jack and sawhorses. Wheels are often used instead, but for your own safety you should use goats. After all, the risk of injury during repairs is quite high. You should take care of yourself.
Removal and installation of shock absorbers are performed in pairs. It is unacceptable to apply notches to the strut to save wheel alignment settings. It won't do anything. After completing the repair, you should come to the service station to get the wheel alignment done.
How to replace the front shock absorber
To replace the front shock absorber, follow these steps:
- Hang the wheel that is intended for repair and install stops. Remove the 2 bolts that connect the shock absorber strut to the steering knuckle. The steering tip is detached using a puller; a pry bar can be used.
- If the car is front-wheel drive, disconnect the brake system hose and unscrew the nuts that secure the upper shock-absorbing cushion.
- Remove the shock absorber strut from the arch.
- Tighten the spring until the support cup is free.
- Unscrew the central nut of the shock absorber, remove the dust protector and the shock absorber strut with the spring, as well as the bump stop.
- Inspect the shock absorber struts and make a decision: either perform routine repairs or replace the shock absorbers. By replacing the seals or adding fluid, you can only delay the moment when replacing the shock absorbers will be absolutely necessary. Shock absorbers are installed after repair or replacement; the installation procedure is reverse.
AUTOFIZIK.RU / auto repair
Front suspension parts
1 – lower spring support cup;
2 – lower lever; 3 – axis of the lower arm; 4 – rubber-metal hinge of the lower arm; 5 – spring; 6 – upper support cup; 7 – spring insulating gasket; 8 – compression buffer; 9 – compression stroke limiter; 10 – suspension cross member; 11 – cross member bracket bushing; 12 – cross member bracket; 13 – engine mounting bracket; 14 – upper spring support; 15 – adjusting washer; 16 – axis of the upper arm; 17 – upper lever; 18 – rebound buffer bracket; 19 – rebound buffer; 20 – rubber-metal hinge of the upper arm; 21 – ball joint; 22 – protective cover of the ball joint; 23 – bracket for fastening the rod to the body; 24 – stabilizer bar; 25 – shock absorber; 26 – cushion clip; 27 – pillow Disassembly ORDER OF EXECUTION 1. If when repairing the suspension it is necessary to completely disassemble its components, then it is more convenient to start directly on the car, after removing the crankcase protective plate and the mudguard. 2. Unscrew the nut of the upper ball joint pin 41 and free the hoses from the brackets (see Fig. Front suspension). 3. Having bent the petals of the protective casing, unscrew the bolts securing the caliper guide and move it together with the caliper to the side. Warning To protect the hoses from damage, do not allow the caliper to hang on the hoses. 4. Using mandrel 67.7823.9514, remove the hub cap and unscrew the wheel hub bearing nut. 5. Remove the front wheel hub assembly with the brake disc using ejector 67.7823.9516. 6. Remove the front brake guard. 7. Remove the front suspension shock absorber. 8. Compress the suspension spring until the lower arm is completely unloaded, lowering the lower suspension arm onto the stand. 9. Disconnect the ball joint housing from the lower and upper suspension arms and remove the steering knuckle. 10. Smoothly unload the suspension spring and remove it. 11. Using a pusher 67.7823.9515, knock out the axle and disconnect the lower suspension arm from the cross member. 12. Disconnect the upper arm axle from the cross member and remove the axle and arm assembly. Warning Before removing the upper and lower arm axles, count the number of washers at each end of the lower arm axle and on the upper arm axle bolts so that when installing the arm axles, they will be put in their original places. 13. Remove the rebound buffer bracket and cross member. 14. Use puller 67.7824.9516 to press the ball joint pins out of the steering knuckle holes. Assembly PERFORMANCE ORDER 1. Assembly of suspension units is carried out in the reverse order of disassembly. 2. When assembling the wheel hub, place a layer of Litol-24 lubricant in the bearing separators and apply it evenly into the cavity of the steering knuckle between the bearings in the amount of 40 g per fist. 3. When installing the crossmember braces, tighten the inner nut until the gap between the washer and bracket 3 is selected (see Fig. Front suspension installed on the car (rear view)), and the outer nut - torque. 4. To prevent improper distribution of forces in rubber-metal joints, tighten the nuts of the lever axles under a static vehicle load of 3140 N (320 kgf). 5. Then check and adjust the wheel alignment and toe angles.