Let's look at how to properly connect the wires to each of these generators (features and connection order). Let's look at the purpose of each wire. The need to connect them correctly arises after removing and installing the generator from the engine, or after repairing the electrical wiring.
Connecting wires to generator 37.3701 of VAZ 2108, 2109, 21099 cars. Purpose of wires.
Connecting wires to generator 9402.3701 of VAZ 21083, 21093, 21099 cars. Purpose of wires.
Notes and additions
— Complete connection diagrams are available at the following links:
More articles on generators of VAZ 2108, 2109, 21099 cars and their modifications
Please tell me what is the difference between a generator for an injection engine and a carburetor, and is it possible to install a generator from an injector on a carburetor, and what modifications does the generator require, besides replacing the pulley? PS Auto VAZ 2109 carb, generator VAZ 2110 injector! Full tanks and smooth roads to everyone))). Generator from an injection VAZ 2107 to a carburetor.
Similar articles
4 comments on “Generator from an injection VAZ 2107 to a carburetor. Between the generator for an injection engine and a carburetor”
The difference is in the belt, fastening and power. If you have a pulley, all that remains is the fastening and the belt
A carburetor generator has a current of 50+ amperes, and an injection generator has 80+ amperes. To install, you need to replace the pulley with a damper from an injection engine. Fastening and belt. There is no need to modify anything else.
Yes, you can, you just need to change the corresponding pulleys and the belt, otherwise it’s identical. The damper from 10 is no longer needed.
There seems to be a canoe with wires, thick pluses from the Akuma, on the carb 2 on the engineer 3, I don’t remember honestly, the fastening needs to be different, on the engineer there is a cockerel belt tensioner, it just messes me up!
Every year more and more VAZ-2109 owners want to convert the carburetor to an injector. Such modernization will require a considerable number of new components. But if you follow the step-by-step instructions and take the work seriously, you can get more economical and stable engine operation in all modes.
Pros of switching to an injector
There are quite a lot of positive aspects when switching from a carburetor to an injector. The main reasons are the following:
- Saves fuel by supplying it directly to the engine cylinder.
- Engine power increases, especially at low speeds.
- Increases stability at idle speed.
- Carbon dioxide emissions into the atmosphere are reduced by using 90% of the total potential of the fuel mixture.
The injection system is considered more modern and environmentally friendly. It ensures compliance with Euro-2 standards, which a carburetor engine cannot boast of. Due to the presence of a special controller, even when running cold, the car will start easily and operate stably.
It is worth noting that the injector also has its drawbacks. Among them:
- demands for good fuel;
- more complex diagnostics and maintenance;
- high cost of repairs.
How to remake: step-by-step instructions
Before starting work, wash the car thoroughly and remove dust and dirt from around the engine.
- In the rear of the car we remove the old carburetor fuel system.
- Pull out the gas tank and fuel pipes.
- We screw on the new bracket and use it to secure the new injection lines.
We install the bracket in its original place and secure the lines - We install the fuel filter along with hoses. We fix the fuel filter with hoses
- We attach the fuel pump to the injection gas tank.
- We go into the engine compartment and remove the ignition.
- We disconnect the wires that go from the sensors to the ignition braid.
- We pull out the old ignition tee and install an injection tee in its place. Before doing this, completely drain the antifreeze from the system.
We install the injection ignition tee in place of the carburetor - In place of the distributor, we make a plug with a seal and treat it with sealant.
- Remove the carburetor along with the intake manifold.
We dismantle the old carburetor along with the manifold - We replace the gasket and install a new injection manifold.
We install the injection manifold in place of the carburetor - We install the injectors on the ramp and secure it to the manifold.
- We connect the hoses and install the receiver.
We install the injection receiver and connect the hoses to it - If your model has an oil pump without a casting, then it also needs to be replaced.
- The generator on the nine must be replaced, but the pulley itself is suitable for the new system and can be left.
- Instead of a carburetor ignition cable, we install an ECU wiring cable.
- We connect the wiring to the controller and the motor.
- In our case, the fuel sensor will remain the same; you just need to connect it to the new pump.
- Turn on the ignition and check the operation of the fuel pump. The entire fuel system must be sealed and leak-free.
- We replace the carburetor module with an injection one.
We remove the carburetor ignition module and install the injection module in its place - We install a new ignition system (spark plugs and module).
- We install the air filter.
- Drill a hole for the knock sensor (depth 16 mm).
- We start the engine and check its operation.
Difficulties in reworking
Since the work is quite labor-intensive and takes a lot of time, we recommend performing the steps in stages. The quality of components and their assembly play an important role during work. Beginners may have difficulty securing some elements, so it is better to call for help from a familiar car service specialist or a person who has replaced a carburetor with an injector before.
Replacing a carburetor with an injector will require you to be careful and careful. You will need to replace a lot of parts, and this is quite difficult for a beginner to do. But if you wish and strictly follow the instructions, you can perform a really serious modernization of your car and save a lot on car service costs.
Welcome! A generator is an integral part of any car, the generator supplies current to the on-board network, which is generated when the generator pulley rotates. Thanks to this, the battery does not have to work constantly and after starting the engine, it stops supplying current to the on-board network of the car, and only one starts supplying it. generator, but there are cases when it fails (Over time, this usually happens because sand and other types of dirt get into the generator, or the generator can simply burn out due to a short circuit) and it becomes impossible to drive a car, since One battery turns on, and when it is completely discharged, the car will stall and simply won’t go anywhere, so the generator needs to be changed when it becomes unusable or repaired (we will still touch on the topic of repairing the generator in this article).
Note! To change the generator, you don’t need a lot of time and tools, it will be enough to stock up on: Several keys, one of which should be “17” and the other about “19” and a pry bar or something like it (A stick, for example)!
Summary:
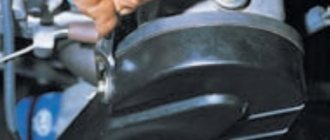
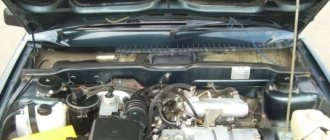
Where is the generator located? It is located between the TV and between the engine, when you open the hood you will immediately see it, but it will only be attached a little differently, not as shown in the photo, but the location will be exactly the same, for clarity it is indicated in the photo below with a red arrow.
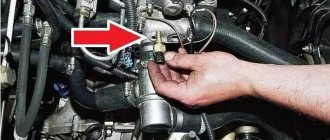
When should the generator be replaced? 1. You can understand whether it provides charging or not at all in two ways, which one you choose is up to you, we usually recommend the first method to all those people who ask us a question about how to check the generator for serviceability, and it is as follows: You can buy a multi-meter at any auto store (It is available almost everywhere), the Chinese ones are quite cheap (About 300 rubles), You do not work at the station and are not an electrician, so this multi-meter will be quite enough (If you want, of course , you can get it for more expensive), in general, you buy this device and turn on the Voltmeter function on it, after which the leads coming from the multi-meter are connected to the battery (see photo below) and pay attention to the device (If the battery is working and charged, then it will have to give out at least 12.5 Volts, if it gives out less than 12, then it needs to be charged), now the next step is to start the car and the wires coming from the multi-meter are connected in exactly the same way as before (the function should still be turned on on the device Voltmeter) and the device is looked at again, the readings of the device will definitely increase, but if they fall, then the generator is not working properly and does not charge the battery (Also look at the charge lamp, see the small photo, if it is on and the readings of the device with the engine running gradually fall, then the generator is 100% faulty).
2. Now let’s talk about the second method, let us immediately warn you that it is free, but it can have a very bad effect on the generator, this is how it is done, start the car and the choke is pulled out (it is generally not recommended to do this on an injector), so after the choke is pulled out ( Halfway somewhere, so that the engine runs at 1500 rpm) and the car works for a while (A minute is enough, even less), the minus terminal is removed from the battery, and after removal the car will definitely have to continue its work (This indicates that the on-board network the car, and the ignition is powered from the generator and not from the battery), but if it stalls immediately, then the generator does not work (The brushes are worn out or the diode bridge is burned out), in general, such a generator will have to be removed and checked for serviceability (By the way, about how repair the generator, read the article: “Repairing the generator on a VAZ”) but there is one big minus, if the generator is not working correctly (This happens because of the brushes) but it still works, then the car will not stall and because of this, it will always the car's battery is discharged and therefore, to find out more accurately whether it provides charging and whether it gives it as it should, you can only find out with a multi-meter and by the way, if you buy this device, you will not regret it, since it will be very useful to you in the future .
Engine characteristics
| Supply system | Carburetor | Carburetor after modification |
| cylinders – diameter in mm | 76 | 82 |
| pistons – stroke in mm | 71 | 71 |
| compression ratio | 9,9 | 9,9 |
| engine volume, working, cm3 | 1288 | 1499 |
| power, maximum, kW/rev. min. | 64/5600 | 68/5600 |
| torque, maximum, Nm at rpm. | 95/3400 | 100/3400 |
| fuel | AI-92 | AI-92 |
| fuel consumption in the city, l/100 km | – | 8,7 |
| speed, maximum, km/h | 148 | 154 |
| acceleration to 100 km/h, s | 16 | 14 |
Like all other mechanisms in the automotive system, the engine can also break down. This depends on many factors, most of which are not at all obvious and are discovered only by a specialist after diagnosis, based on the “symptoms” described by the owner of the car.
We will look at the most common problems with an engine operating with a carburetor system below.
How to replace the generator on a VAZ 2108-VAZ 21099?
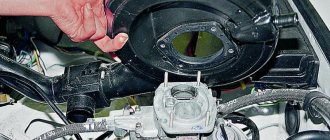
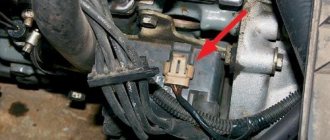
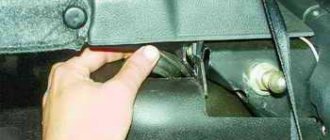
Removal: You will need to remove the generator from the bottom of the car, but there is usually a crankcase protection at the bottom, so you will definitely need to remove it, as soon as the bolts securing the protection are unscrewed and it is removed, remove the minus terminal from the battery (How to do this, read “here in this article”, in paragraph 1) and first of all, disconnect the wiring from the generator (two terminals are attached to it and a block of wires is connected in addition, to disconnect the terminals, you will need to unscrew the nut that secures them, see the large photo, but you are near the block you will find it, you just need to pull it out by hand), immediately after which loosen the upper nut of the adjusting bar, and then the lower one a little (see small photo) and as soon as this is done, move the generator by hand closer to the engine and remove it from it the belt that is put on it, but that’s not all, and until the generator is removed, all that remains is to completely unscrew only three bolts, one is the one that secures the adjustment bar (Indicated by a blue arrow, you will have to completely unscrew it), and the other two are located at the bottom ( More on them a little later, namely in paragraph 2).
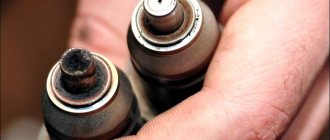
Note! When the belt is removed, take it out and inspect it, under no circumstances should there be traces of oil or other types of liquids on it, and it should not be cracked or have any obvious defects, otherwise the belt will need to be replaced with new!
2) At the very bottom of the generator (You will have to crawl under the car), you will find two bolts, but remember, one of them is long and the other is short, remember where each one is wrapped, so that later you do not match them with each other, but immediately wrap them on those places where needed, well, both bolts must be unscrewed, and when they are completely unscrewed, carefully remove the generator and place it on the ground or wherever you need it.
Installation: The new generator is installed in place of the old one in exactly the same way, but just don’t forget to unscrew the nut that secures the adjusting bar on the generator and move this bar to another one, and that’s all in essence, the replacement of the generator on the car has been completed successfully.
Additional video clip: To see in more detail the process of how the generator is checked for serviceability using a device such as a multi-meter, you can watch the video clip located just below:
As you know, the generator device acts as a power supply for all electrical devices of the car when the engine is running. So the failure of this unit can lead to serious consequences. In this article we will talk about how the generator of the domestic VAZ 2109 car is diagnosed and repaired and what is needed for this.
How else can you modify the VAZ-2109
Look at the interior of a domestic car from the outside - the interior and instrument panel leave much to be desired, which is where high-quality do-it-yourself tuning is really necessary. When updating the dashboard, remember that correct installation can correct the correct operation of the furnace device and heater components.
The seat upholstery of the VAZ-2109 also looks unimportant; moreover, it quickly deteriorates, wears out and gets dirty. It is better to choose the color and material of the new upholstery together with a specialist; immediately decide which product will easily clean the new fabric from dirt.
To securely fix the material, use regular textile adhesive or DoneDeal aerosol adhesive. It is possible to fix the plastic parts well using sealant. To achieve an even layer without creases or folds in the fabric, use a steam generator. This device gives a good tightening of the material. First, the carpet is fixed along the edges along the skin, and then the material is given the desired shape using a steam generator. Pasting of the entire canvas is carried out only after drying.
Be prepared for the fact that after several years the carpet will roll away, so experts recommend taking a closer look at other, more expensive and modern canvases. Instructions on how to independently improve the appearance of the VAZ-2109 interior ceiling consist of the following steps:
- Tear off the old ceiling covering by first removing the plastic attachments on the stands, handles, visors and light bulbs.
- Partially coat the ceiling with 88 adhesive, set the work aside for 5 minutes, and then apply another layer of adhesive. Now press the carpet on the side where the visors are placed.
- Fix the structure following the perimeter, then leave it to dry, and secure it with clothespins for a tight fit.
And finally, you can make the necessary holes within a day.
Features of work
What might a faulty unit look like, how to remove and disassemble the generator, how is it rebuilt? If the device does not charge the injector or carburetor of a VAZ 21099 or 2109, first of all, let's look at the features of its functioning, namely the power circuit.
Generator power circuit
Node power circuit
So, what does the scheme include:
- The VAZ 2109 generator itself.
- Negative diode.
- Additional element.
- Positive diode.
- The warning light also informs the driver that the battery is low.
- Vehicle dashboard.
- Voltmeter.
- The fuse box is installed in the engine compartment under the windshield opposite the driver's seat.
- Resistor elements installed in the same block.
- Ignition relay "nine".
- The castle itself.
- Battery
- Capacitor device.
- Winding.
- Generator voltage regulator relay installed in the engine compartment.
It should be noted that the connection diagram for the VAZ 2109 generator is relevant for all cars with front-wheel drive of the eighth line - both 2108 and 21099 (the author of the video is Semyon Pedan).
Conversion of carburetor to injector VAZ 2109
First you need to choose a good injection system for the VAZ 2109. Bosch M 1.5.4 is perfect for installation due to its reasonable cost. We installed the injection system without additional upgrades or improvements. This is better than installing an external fuel pump and purchasing additional parts from General Motors.
It is more correct to buy parts that have already been time-tested and are used on production cars, including:
Various bolts, clamps and other consumables are not a problem to purchase at any store.
Checking for serviceability
Repair of the VAZ 2109 or VAZ 21099 generator is carried out in case of failures in the operation of the unit. There are several ways to determine generator malfunctions. The most optimal of these is diagnostics using a multimeter, but you will also need an assistant to carry it out. We will tell you further about how to check the generator on a VAZ 21099 or 2109 using a tester.
So, to determine generator faults with a multimeter, follow these steps:
- First of all, it is necessary to diagnose the VAZ voltage regulator. As practice shows, if the generator on a VAZ 2109 or VAZ 21099 does not work correctly, the problem may lie in the functionality of the three-level voltage regulator. This is especially facilitated by overvoltage in the electrical circuit. To check, you need to set the voltage measurement mode on the tester. So, start the engine and measure the voltage at the battery terminals or at the terminals of the generator unit itself. If everything is normal, then this parameter will fluctuate around 14-14.2 volts. Then press the gas and check the parameter again - it should increase, but no more than 0.5 volts. If the indicators on a VAZ 2109 carburetor or VAZ 21099 injector are different, this indicates that the element is not functioning correctly. Most likely, the VAZ 2109 voltage relay will have to be replaced.
- Next, the diode bridge of the generator is diagnosed. The bridge itself consists of six elements, three of which are considered positive and the remaining three are considered negative. Some diodes have mass at the anode, and the other part at the cathode. To check the diode bridge of the VAZ generator, the tester is switched to sound mode, that is, when the probe outputs are shorted, you can hear a characteristic sound. You are required to test each diode in different directions, and the sound should be heard in only one of them. If during testing the sound is heard in both directions, this indicates that the diode is broken. The best option would be to replace the diode bridge.
- Before disassembling the unit and repairing it, check the functionality of the stator; it is a steel cylinder, inside of which the winding of the mechanism is located. For diagnostics, you need to disconnect the stator leads from the diode bridge. First, inspect the element visually - there should be no signs of damage or burning. The multimeter is set to resistance measurement mode. First, measure the resistance parameter between the winding terminal and the housing (any terminal can be used). The obtained indicators should be high and tend to infinity. If the readings are 50 kOhm, this indicates the need to replace the generator.
- Using a multimeter, you can also check the performance of the rotor - it is a steel rod with a wound winding. At one end of the rod there are rings through which the brushes of the VAZ generator pass. You need to dismantle the rotor and visually inspect the condition of the generator winding and bearing. The integrity of the winding can be checked using a multimeter, after which the resistance parameter between the rings is measured. The results obtained should be no more than a few ohms. Replacing the VAZ 2109 generator brushes is required if they are worn out.
Converting a carburetor to an injector on a VAZ 2109
Carburetor engines have been obsolete for quite some time.
But today on our roads it is not difficult to find cars equipped with this type of engine. The VAZ 2109 model is no exception. Having a nine carburetor at your disposal, you can even convert it into an injection car on your own.
Before you decide to take such a step, be sure to study the strengths and weaknesses of each engine type, and also determine in which mode you use your car most actively. Your final decision largely depends on this.
Possible faults
Before removing the generator and repairing the disassembled device, we will consider the main malfunctions characteristic of this unit:
- When the ignition is turned on, the mechanism light does not light up. As a rule, this problem is associated with a broken ignition switch, possible breaks in the wire, or a broken fuse. First of all, it is necessary to diagnose the fuses and wiring; the electrical circuit is checked using a tester.
- The unit light does not light up, and the battery is greatly discharged, but the control devices function normally. Usually the cause of the breakdown in this case lies in the performance of the generator. We are talking about a possible short circuit of the diodes, poor contact of the excitation winding connection, failure of the relay or inoperability of the brush holders. In addition, in some cases, the problem may lie in a break in the wiring that goes from the generator unit to the control panel. Perhaps the reason is simply poor contact of the light bulb itself or its failure. In order for the unit to supply current and operate normally, all its elements must be operational. If the problem is with the brushes, then they need to be replaced with similar ones of the same size.
- The unit light works when the engine is on, and the battery can be recharged. First of all, pay attention to the performance of the regulator.
- When the engine is running, the light on the dashboard lights up very brightly or only at 50%. In this case, it is necessary to diagnose the VAZ alternator belt - perhaps it is worn out or simply weakened. Replacing the strap or tightening it can solve the problem. In some cases, the cause of the malfunction lies in a short-circuit of the stator winding to ground or an open circuit. The problem may also be the inoperability of the diodes or the rotor outputs being unsoldered from the slip rings. You can try to solve the problem by soldering the leads.
- If the unit is very noisy, first you should check the bearing device. In addition, the appearance of noise may be caused by a short circuit of the stator winding to ground or a short circuit of one of the diode components (video author - Vyacheslav Lyakhov).
DIY replacement and removal
So, how to disassemble a VAZ generator:
- First, disconnect the battery by removing the terminals from it, this way you can turn off the power to the on-board network.
- Remove the cap from the terminal and unscrew the corresponding nut, after which you can remove the wiring from the stud.
- Disconnect the wiring block that goes to the node connector.
- Now you need to slightly loosen the tightening of the assembly to the adjustment bar. Having done this, you can lift the assembly up until it rests against the head of the BC. The generator pulley can then be freed from the belt.
- After these steps, you can completely unscrew the screw securing the bar to the BC. Then crawl under the car and remove the screws that secure the bracket to the engine. The unit can be dismantled by removing it from the engine compartment. The failed elements are disassembled and replaced with new ones, after which the generator is reassembled.