Cars admin26.02.2020
Today, every driver knows how important it is to drive with “fresh” stabilizer struts. This can be useful both for the car and for the safety of the driver and his passengers. The problem with the Russian market is that all these racks are quite expensive. Their price is low, but they have to be changed constantly. The eternal costs of an easy-to-understand part, which ultimately becomes a consumable, makes the driver want to know how to repair a stabilizer bar so as not to buy a new one.
Stabilizer link components
Before talking about repairing struts, you need to fundamentally understand their structure so that the driver clearly understands how to deal with all this. It should be noted that this element is one of the simplest components of a car. It is enough just to understand the structure and structure of the part once, and in the future all the work will be done by itself.
Front stabilizer
Racks can be divided into three types based on fastening:
It should be noted that hinged struts are much more common. They are attached to the body and stabilizer of the car, allowing you to connect these two important parts of the car, forcing them to work synchronously. Hinged ones are very common; they are constantly purchased because they are easy to install. In addition, many note improved vehicle movement. But be that as it may, the racks do not last long.
Stabilizer link
The structure of the hinge elements is very simple - these racks consist of the same metal rod and hinges at the ends. The hinge itself is a supporting element with a boot and lubricant under it. This allows the part to work more gently with the suspension, which results in a lighter ride.
Stabilizer link with bushings
Also on the market you can also find racks with bushings, which differ in the same types of fasteners. Everything is much simpler here - no boots or grease, the stand works on its own. But it is difficult to deal with such an element in the future, but at least the bushings can be repaired, it is only important to understand how to do it.
Combined stabilizer link
Combination struts are the same joint supports and bushings, only presented on the same strut in opposite places from each other. If the driver plans to repair the stabilizer link after using it, it is better not to buy such complex elements, as they require a different approach. Sometimes it happens that the hinges cannot be repaired, but the bushing can, so the element will have to be thrown away in any case.
Replacement sequence for VAZ 2107
- The car is installed on the inspection hole, after which the crankcase protection (if installed) is removed using open-end wrenches. Then wheel chocks are placed under the rear wheels of the car, and the front wheels are jacked up.
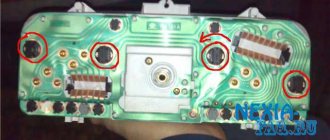
- Now, using a 12-mm open-end wrench, unscrew the nuts on the brackets, where they are attached to the lower suspension arm. This is done on both sides of the stabilizer bar. Under the nuts there are engraving washers. They are removed manually. Nuts are shown by arrows
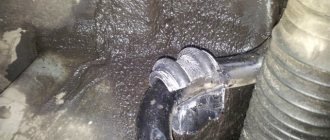
- Now you can remove the staples. After removing them, you can remove the bushings. To remove them, the stabilizer bar is bent using a crowbar. The rod is held with a crowbar, the bushing is removed manually. The sleeve on the other side is removed in the same way. A crowbar is used for this
- In addition to the two outer bushings, the VAZ 2107 has a pair of central stabilizer bushings. If you need to replace them, you will have to completely remove the stabilizer bar, which is mounted on two brackets. The nuts on the brackets are unscrewed with a 14mm open-end wrench.
- After removing the rod, the bracket is clamped in a vice, and the rod is carefully removed from the bushing, then the central bushing itself is removed. The bushing is located inside the bracket, clamped in a vice
- Worn bushings are replaced with new ones, after which the stabilizer bar and crankcase protection are installed in their original places.
Videos on works
Important points
- When unscrewing the nuts on the brackets, you should be careful: the studs on which the brackets are attached become brittle over time and are easily broken with an open-end wrench.
- It should be remembered: the brackets holding the outer bushings are different, although it is not always possible to see this with the naked eye. The distance between the holes for the studs in the left and right brackets differs by 3 mm. Therefore, before removing it, it makes sense to mark the staples with a marker or chalk so as not to confuse them when reassembling them.
- Removing the stabilizer bar from the bracket can be difficult, especially if it is heavily rusted. To make the task easier, the rod and bracket should be generously lubricated with WD-40. If liquid is not available, liquid dishwashing detergent or plain soapy water will do.
Repair of racks with hinged supports
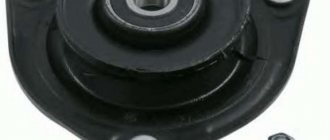
Repairing a stabilizer link with a hinged support is not as easy as it seems. Most likely the element will only serve once. I would like to note that the main reason for the failure of the element is that the lubricant under the hinges wears off over time or, worse, gets mixed with dirt. Anthers serve as a kind of barrier against this dirt, but over time they cannot withstand the mileage and cease to properly perform all their functions.
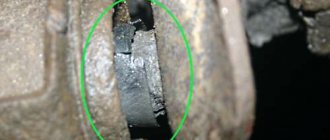
Anthers
When buying articulated struts, the driver should choose only high-quality boots, but not too rough ones. You need to pay attention to the integrity of the anthers, since in fakes, as a rule, they can often be torn. Unfortunately, not everyone attaches importance to this, which is why they buy a new part every few months.
Articulated struts
Repairing hinges is easy, but it is not always possible. After removing the stand, you should try to turn the hinge with your fingers. If it spins without problems, the rack can still be saved; if a crunching sound is heard, repair is impossible. When making repairs, use a wrench to unscrew the locking ring from the rack so that you can get to the boot. It is lifted up and completely cleaned of dust and dirt. Most likely there will be no lubricant there anymore, so it’s enough to buy a new one and apply it there yourself.
Important: This process is often performed immediately after purchasing the stand. The problem is that the manufacturer can deceive its customers by applying not a good lubricant under the boots, but simple technical Vaseline. This way the rack will last much longer and will not need to be repaired later.
In any case, even if you managed to lubricate the rack after using it for a long time, it can serve no more than five thousand kilometers. Typically, such manipulations are carried out if at this time it is not possible to buy a new rack. Articulated ones are inexpensive, so the driver usually buys a new one.
How to replace bushings front and rear + Video
Unlike the inspection, which must be performed only on a pit or overpass, replacing the bushings can also be carried out on a lift or jack and two stands. For more information on how to properly lift a car on jacks, read the article (safety precautions for car repair and maintenance). To replace the bushings you will need the following tools:
- a set of socket and open-end wrenches;
- metal brush;
- soap solution;
- graphite lubricant.
Preparation for replacing stabilizer bushings is the same on all machines. It is necessary to hang the front or rear of the machine, make sure that the machine will not fall, then remove the wheels and engine protection (if installed). After this, use a wire brush to clean all the bolts and nuts securing the bushings to the body or suspension. Often the bushings that secure the stabilizer to the suspension are made in the form of a part with two holes and silent blocks installed inside. It is much easier to change such bushings as a whole, rather than individual silent blocks. It will cost a little more, but you won’t have to worry about pressing out old silent blocks and pressing in new ones.
The only difficulty that arises in the process of replacing bushings is the difficulty in unscrewing the bolts securing the bushings and clamps to the body. It is especially difficult to do this work on a machine with a subframe, so you need to be prepared for hard work in difficult conditions.
- First of all, disconnect the stabilizer from the suspension;
- Then unscrew the bolts securing it to the body and pull the stabilizer out;
- The old bushings are removed from the stabilizer, cleaned of dust and dirt and washed with soap. This procedure allows you to remove dust from the surface of the stabilizer, because dust is a strong abrasive that can quickly render a new bushing unusable;
- Now the new bushings are smeared from the inside with soapy water and put on the stabilizer;
- After which the stabilizer is inserted into place and screwed to the body and suspension.
It is advisable to lubricate the threads of bolts and nuts with graphite lubricant, this will prevent them from sticking and will make the next replacement of bushings easier. Then they put on the engine protection, wheels, tighten the nuts or bolts and remove the car from the stands or lift.
The car should be comfortable and safe. Should move evenly. Be stable against rollovers and cornering. There are many different ways to achieve such indicators. Now we will talk about the anti-roll bar and its elements in the system
Surely, every driver has repeatedly noticed that the car tilts to the side when cornering. Another car, on the contrary, seems to cling to the road surface with its tires and passes the bend without unnecessary swaying.
Of course, a lot depends on the type and design of the suspension. And, by the way, it undergoes significant changes from series to series. It should be noted that for a comfortable ride the suspension must be soft. But there are many disadvantages to being soft. One of them is body sway. To prevent this phenomenon, designers can use various tricks. More on this later.
Installing a stabilizer allows the suspension to be a little stiffer, keeping the car from swaying excessively while maintaining comfortable driving characteristics. The stabilizer bushings actively help him with this.
The stabilizer is made in the form of a metal rod and has spring properties. The front stabilizer bushings are installed approximately in the middle (depending on the design) and are made of rubber.
The middle part of the stabilizer is attached to the body or beam. It has a U-shape. The ends, by means of articulated struts (popularly called bones), are attached to the suspension elements, most often to the levers.
Now let's look at what a bushing is. A bushing, in the context of a stabilizer, is a mating part. That is, it is put on the part with its internal hole (an example would be a hand grip), fasteners are placed on it from the outside and screwed to a rigid element (in our case, either a suspension beam). Result: the stabilizer is fixed rigidly, but thanks to the bushings it has the ability to “float”, performing its working functions.
When worn out, stabilizer bushings can cause an unpleasant knocking noise. How to avoid this?
The lateral stability of a vehicle is extremely important, especially when cornering. If, for example, you do not take into account the speed of entering a turn, the car can easily roll over. Of course, if a “daredevil” is driving, even the newest-fangled cars may not be able to save the car. When changing, the car tilts in the direction opposite to the turn. There is a risk of capsizing. In this case, one wheel is more loaded than the other. It follows from this that the more loaded wheel needs to be “supported”. This function is assigned to the stabilizer. The stabilizer bushings, in turn, provide it with “floating rotation” to prevent metal rupture from overload.
The stabilizer is a very reliable element in the car’s suspension. Since it takes variable loads, the parts associated with it wear out. It is advisable to replace faulty parts with new ones at the next time without waiting for their complete destruction. Stabilizer bushings, provided they are of proper quality, last quite a long time, about 10,000 km. But they can remind you of themselves earlier with a characteristic creaking and knocking sound. There is no need to be afraid of this! But you shouldn’t delay resolving the issue either. You can replace the stabilizer bushings yourself. This does not require high qualifications or extensive plumbing experience. But be sure to read the car repair manual. It is also equally important to find and purchase high-quality bushings, thereby minimizing the likelihood of their premature wear.
For the connection and normal operation of various automotive mechanisms, a large number of different bushings and rubber gaskets are installed on them. However, these elements have a very short service life, since under conditions of intensive use they wear out very quickly and backlashes form in them. As a result, the operation of the car becomes unsafe; after wear of the bushings, very serious damage can occur. All this applies to the rubber bushings that are installed on the stabilizer. Therefore, if during operation of the car you hear an elastic knock in the front part of it, you should know that you are in danger of replacing the stabilizer rubber bands. How to do this - read our article.
Where are the rubber bands or stabilizer bushings located?
If the stabilizer rubber bands are worn out and play has formed in them, you will be notified of this by a clearly defined sound that appears during operation of the car engine (or, to be more precise, with each revolution). It is especially noticeable when the car drives one wheel onto a small hill or accidentally falls into a hole. Then the driver can hear a very strong sound from the contact of metal parts, between which there is no rubber gasket.
A typical car stabilizer has four rubber bushings. Finding them on this mechanism is not difficult. Two of them can be found and removed very easily: they are located under the mounting brackets, which form something like a cover or “house” for them. Two more are worth looking for in metal holders.
The main function performed by the stabilizer rubber bands is to act as an elastic gasket between the bar and the stabilizer fastening elements. Thanks to them, the level of vibrations is reduced and vibrations that occur during movement are softened. In addition, the presence of bushings helps to extend the life of the stabilizer bar and also make it completely silent. It is for this reason that it is very important that all bushings are in good working order and can fully perform their “responsibilities”.
As a result of wear of the rubber bushings, the stabilizer parts are able to move almost freely. If the body bends a little while driving and there is a lateral displacement, the stabilizer begins to knock. In this case, you will most likely have to replace the easily removable bushings, which are located under the cover of the mounting brackets. These rubber bands most often wear out, which is why there is a need to replace them.
What is needed to replace worn car stabilizer bushings?
You will need very few tools to carry out such work, but you need to prepare them in advance so that they are all at hand during the work. So, you will need:
1. Socket wrench (10 and 13).
2. Socket heads (useful for 13 and 14, but it is best if the 13 head is elongated).
3. Ratchet key.
4. Extension cord.
5. Vernier calipers (you can use a regular ruler instead).
6. Cardan.
7. Jack.
But it’s worth noting right away that not in all cases it is possible to get by with only such a simple set of tools. The fact is that in the process of replacing the rubber bushings you will definitely have to unscrew the fixing nuts of the stabilizer struts. Here you may encounter one very unpleasant discovery: the nuts are stuck to the body of the part and cannot be removed with a regular wrench. In such a situation, it may come to the point that you have to use a grinder or a hacksaw. After this, along with replacing the stabilizer rubber bands, you will also need new struts for this part.
And more about why you need it. With its help, you will need to lift the car to remove the wheels from it and gain free access to the stabilizer and its bushings. It may also be needed if, during work, the stabilizer bar suddenly moves to the side, and you are unable to return it to the desired position using a crowbar. In such a situation, using a jack, you will only need to lift the rear of the car, after which the bar should fall into place.
And, of course, to replace the stabilizer rubber bands you will need the rubber bands themselves. You can buy them at any car market or auto store. However, do not forget that almost every car model needs its own bushings, which will be ideal for its stabilizer. Therefore, before you go shopping for new bushings, it is best to crawl under the car and remove the old ones. They are also worth going to the store with. This way, you minimize the likelihood of buying bushings that are too large or too small.
In addition, the quality of the rubber bands for the stabilizer is no less important. It is known that they can be made from both natural rubber and artificial rubber. Despite the fact that natural rubber has higher characteristics such as softness and elasticity, artificial rubber is still considered more durable.
How to change stabilizer rubber bands with your own hands?
Well, if everything is ready, we can proceed to the immediate implementation of our task - replacing the stabilizer rubber bands. This is very simple to do, but before starting work it is recommended to install the car so that all its wheels are at the same level. Thanks to this, the stabilizer bar will be in the desired position. We recommend that you perform all further actions according to the instructions below:
1.
We fix the car in a stationary position - raise the handbrake and block the movement of the wheels.
2.
We remove the front wheels from the car, having first raised the car with a jack. Under the right front wheel arch, you will also need to remove the rear shield designed to protect the engine. To perform this action, you will need a 10mm wrench, with which you can unscrew the two fastening screws.
3.
Using a special lubricant (it is better to take a special WD-40 aerosol), we treat the mounting bolts on the left and right sides, with which the stabilizer clamps are attached. It is also necessary to process its mounting posts.
4.
We are working on fastenings that secure the stabilizer struts. To do this, you will need to find four bolts and unscrew them using a suitable wrench. If you cannot reach the bolts, use socket heads. If they still do not give in, you will have to take up a grinder or a file. As a result, you must completely remove both stabilizer bars of the vehicle.
5.
A jack must be installed under the left side of the car subframe. The distance from the jack to its rear part should not exceed 20 cm. After this, we lift the car body with a jack. If a hydraulic jack is used, it is necessary to place a dense metal plate under its thrust part. This will prevent damage to the subframe.
6.
Using a wrench, unscrew the rear bolt that secures the subframe. Since the car is in a raised position, this will be very easy to do.
7.
We release the jack so that the car drops to the same level as if it were standing on a wheel. In this case, the subframe should lower to a distance of 1 cm from the body.
8.
In this space between the body and the subframe, you need to insert a piece of pipe, by pressing on which you can press the subframe away from the car body. When you manage to increase this clearance, insert a socket into it. But proceed very carefully, as the subframe can come off at any moment and literally cut off your fingers. Therefore, the head must be installed using pliers.
9.
We unscrew the bolts that secure the stabilizer clamp, after spraying the threads with WD-40 aerosol. You must unscrew the screws very carefully; in no case should you apply too much force to them so as not to damage other parts.
10.
After the mounting bolts are removed, you can remove the bushing clamp, and after that the bushing itself, which is in a condition unsuitable for further use.
11.
We install a new one in place of the old bushing, making sure that the cut on it is directed backwards. Very often, the process of installing a new bushing is associated with the fact that it does not fit onto completely dry parts. In such a situation, experienced car enthusiasts recommend using a warm soapy solution.
12.
Having installed the bushing, it must be moved to its regular place, that is, installed in the same way as the old one was installed.
13.
We put a clamp on the bushing; it should hold well even without fasteners.
14.
We take the bolts that secure the clamp and tighten them first with our fingers, and then tighten them all the way using a wrench.
Make sure that all bolts are tightened evenly.
15.
It often happens that the limiter on a car stabilizer breaks. In this case, it is necessary to install a metal clamp, pressing it tightly against the plastic ring. Otherwise, when tightening the fasteners, you risk damaging the clamp.
16.
Using pliers, you need to remove the head that you installed between the subframe and the car body. Put the subframe back on the bolts; you may no longer need the jack.
17.
We install the drains in their original place and screw them in with bolts. If during the dismantling process you had to cut off the nuts of the struts, then this part will also have to be replaced with a new one.
18.
All threaded parts must be treated with a special graphite lubricant. It is recommended to do this before installing the fasteners, which will prevent the possibility of “sticking” of the bolts.
19.
We complete the process by installing the wheel.
As you can see for yourself, you can replace the stabilizer rubber bands at home, even without the help of a partner. The only thing you should never forget about is safety. Do not forget that the weight of the car can cause very serious injuries to you, so check the functionality of the jack in advance and perform all operations with great care.
The bushing is considered one of the most important elements of the stabilizer design. There are two types of them - spherical and rubber bushings. The design of the first is somewhat similar to the structure of a ball joint. Like every part of the machine, the stabilizer bushing must be replaced if it malfunctions, otherwise the controllability and running of the machine will deteriorate significantly. If the stabilizer bushing is faulty, noise may appear in the suspension, especially at high speeds or when hitting an obstacle. It is these noises that indicate that there is a problem with the suspension. To determine whether the stabilizer bushings need to be replaced, try to regularly diagnose the suspension.
The process of replacing the rear or front stabilizer bushing is not complicated and consists of three stages:
- Removing the clamp mounting bolts.
- Move the stabilizer to the side. The procedure under consideration will make it possible to pay attention to the differences in the stabilizer struts and avoid incorrect installation of the parts in question.
- Removing the old stabilizer bushings and installing new ones in their place.
The procedure in question can be carried out independently, but you can also use the services of specialists from a car service center. Thanks to the new stabilizer bushings, the ride will be more comfortable, and obstacles on the road will be much easier to overcome. In addition, new bushings can reduce the likelihood of rapid wear of the struts.
If you don't know how to change stabilizer bushings, the following information will be extremely helpful.
Repair of racks with bushings
As already mentioned, bushings are much less common, most often on expensive cars from well-known brands. It has also been observed that bushing struts are an ideal option for an SUV. Unlike hinged ones, this type can be completely repaired, but only if the rack is not yet completely worn out. To do this, you need to check the base - that same metal rod. If everything is fine with it, remove the rack from the car.
Replacing the bushing and stabilizer link
Next you need to repair the stabilizer link. Ends with bushings are more expensive than articulated ones, but if the base is intact, then why buy the entire part? For this purpose, the bushings are sold separately from the base and the driver can freely buy them if necessary. Removing the bushing is easy, you just need to knock it out with a hammer; it is recommended to hold the rod itself in a vice so as not to miss.
Stabilizer bushing
Important: After dismantling the element, a new bushing is installed, which must first be lubricated with oil. The process does not take as long as it seems. Mechanics recommend checking struts every few thousand kilometers. As a rule, you can ride this way indefinitely until the rod itself is completely worn out.
Stabilizer bushings creaking
Causes of squeaks
Often, owners of passenger cars complain about creaking stabilizer bushings. It often occurs during frost or dry weather. However, the conditions of occurrence manifest themselves individually. The main reasons for this problem are:
- low quality of the material from which the stabilizer bushings are made;
- rubber hardening in the cold, causing it to become inelastic and squeak;
- significant wear of the bushing or its failure;
- design features of the car (for example, Lada Vesta).
Methods for solving the problem
Some car owners try to lubricate the bushings with various lubricants (including silicone grease). However, as practice shows, this gives only a temporary effect (and in some cases it does not help at all). Any lubricant attracts dirt and debris, thus forming an abrasive. And this leads to a decrease in the life of the bushing and the stabilizer itself. Therefore, we do not recommend that you use any lubricants .
In addition, it is not recommended to lubricate the bushings due to the fact that this violates the principle of their operation. After all, they are designed to tightly hold the stabilizer. Being essentially a torsion bar, it works in torsion, creating resistance to the car's roll when cornering. Therefore, it must be securely fastened in the sleeve. And if there is lubrication, this becomes impossible, since it can still turn, making a creaking noise again.
The recommendation of most automakers regarding this defect is to replace the bushings . So, general advice for car owners who are faced with the problem of squeaking from the stabilizer is to drive with the squeaking for a certain time (one or two weeks is enough). If the bushings do not “grind in” (especially for new bushings), they will need to be replaced.
In some cases, replacing rubber bushings with polyurethane ones . However, this depends on the machine and the bushing manufacturer. Therefore, responsibility for the decision to install polyurethane bushings lies solely with the car owner.
Recommendations for use
The driver is always interested in how to repair the stabilizer link, but if you think about it, you can drive competently and won’t have to repair it so often, right? Russian mechanics have prepared several tips for drivers on how to operate their car with minimal damage to the anti-roll bar struts:
- drive smoothly, avoid skidding;
- slow down when turning;
- avoid small obstacles;
- do not increase speed on uneven roads.
In order for the struts to last longer, you first need to think about the correctness of your driving style. If the stabilizer receives a signal of danger during drifts, it tries to smooth out this very movement, which is first felt by the struts. To prevent this from happening, it will be enough to brake when turning, then the racks will wear out much longer.
Braking on corners
The stabilizer deals not only with turns. Also, its synchronous operation with the car’s suspension can be affected by uneven roads, small holes, humps or speed bumps. In this case, it is better to go around the bumps, but if the whole road is breathing with difficulty, then it is better not to increase the speed.
Car suspension diagram
The anti-roll bar ensures the safety of the car and the driver when driving, but this cannot be done without struts, which need to be constantly changed or repaired. If you have enough experience in this area and can share it with us, write in the comments.
The suspension is a multi-component unit of the car. This element includes a stabilizer, which is responsible for reducing roll and skidding during turns and braking, as well as for vehicle stability in any situation on the road. The racks act as stabilizer elements and take a significant part of the loads, thanks to their wide functionality. The main task of these parts is to reduce the sway of the car while driving. The struts connect the suspension to the body, creating a single whole mechanism thanks to which the system functions.
Many car owners are interested in the issue of self-repair and replacement of stabilizer strut elements. The fact is that a full replacement of such elements costs a considerable amount, and repairs at a service station are also expensive. Independent high-quality repair of struts is an inexpensive and short process, and knowledge of the tricks and nuances will allow each driver to carry out a range of work without compromising the current condition of the car.
Stabilizer bushings
Special bushings are used to install the stabilizer. What is a bushing? These are elastic elements that provide the car with a smooth ride. These bushings also ensure the absence of noise and vibration from the operation of the stabilizer.
The bushing is created by casting from rubber or polyurethane. The shape is identical for most models. Additionally, it is equipped with grooves that protect against mechanical stress.
Signs of wear on stabilizer bushings
There are several signs:
- formation of steering wheel play during turns;
- shaking of the steering wheel;
- body roll with various knocking and clicking sounds;
- vibration and extraneous noise;
- “wobble” of the car to the side when driving straight;
- instability on the road.
Causes of bushing failure
Bushings most often fail due to poor road surfaces and the use of various reagents. Reagents used during icy conditions are no exception. An aggressive driving style with sharp braking and starting quickly leads to wear of most vehicle structures, including stabilizer bushings.
And finally, the most serious wear factor is time. The stabilizer bushing, like most car structural elements, is a spare part that has an expiration date. Any bushing sooner or later wears out and requires replacement.
Types of structures
The repair process differs in some features, depending on the type of fastening used in the car model. There are two types of parts:
- Ball joints are installed on a significant part of modern cars. They break due to insufficient production of lubricant and wear. Restoring such stabilizer elements can be problematic and sometimes impossible.
- Bushings - this type can be found much less frequently, however, there are not many problems during operation.
Let's consider all the stabilizer struts and the intricacies of their own repair.
Repair work
Ball elements
Restoring them, as already mentioned, is not easy. Typically, the restoration process involves replenishing the amount of lubricant in the boot. The following actions are envisaged:
- Removing the support. The stages depend on the specific make and model of the machine, as well as its technical features.
- Determination of wear. You need to move your finger and determine how easily its rotation is ensured. If there is a crunch, repair is impossible.
- Restoring the flare of the ring that secures the boot. To do this, take a tube and place it in a vertical position.
- With your finger down, the support is inserted into the tube. Next, the retaining ring is removed using pliers.
- Use a screwdriver to lift the boot, which is then folded up and filled with lithol using a brush.
- The boot that covers the hinge must be sealed using a thin wire wrapped around the boot.
- The retaining ring is placed in its original place, and the functionality of the hinge is checked. Movement and movement of the finger should be difficult.
Attention! A part that has been restored has a shorter service life compared to faulty elements, so during operation it is important to take into account that such supports can be driven after 1,000 km.
Repair of structures with bushings
Typically, such models are used on expensive machines and are easy to repair.
To repair the rack yourself, you will need to acquire bushings; it is better to give preference to polyurethane options. This approach will make the service life of the spare part longer.
The procedure for carrying out the work is quite simple:
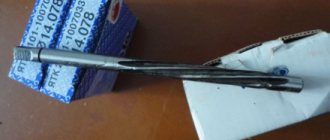
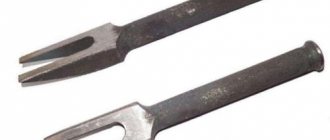
- The stabilizer links are removed using a special removal tool.
- The parts are inspected and the condition of the stabilizer tips is taken into account: if there is a noticeable increase in wear, the rod is completely replaced.
- The support to be removed is clamped in a vice. Using a hammer, knock out the bushing head. Usually this stage of repairing racks with your own hands goes without problems.
- The new bushing is lubricated with oil and placed in place of the old design, and clogged. The main thing is to secure the element correctly, since each model has a different method of fastening.
Such elements have a long service life because they are made of high-quality iron. However, their service life is shorter than that of ball elements. But they can be changed easily, so this factor is not considered a disadvantage.
List of required tools:
- To unscrew the subframe bolt you will need a 24 mm wrench.
- For the stabilizer bracket bolts, a 13mm wrench.
- Keys for 15 and 17.
- 10mm wrench for removing engine protection screws.
- Two stabilizer bushings.
- Two 20mm metal clamps that will be used for installation on the stabilizer.
- WD-40.
- Graphite grease.
- Screw jack.
- A piece of pipe with a diameter of 15 millimeters and a length of . The element in question will be used as a lever.
- Head 27 for placing between the subframe and the body.
Replacing stabilizer bushings - step by step:
- Secure the machine at a stationary position.
- Remove the wheels. In the right wheel arch, remove the rear engine protection shield; to do this, use a 10mm wrench and unscrew two self-tapping screws.
- Extend WD-40 – bolts of stabilizer clamps on the right and left, as well as attaching the stabilizer link to AMMO.
- Use the open end of a 17 wrench to find the grooves on the left upright pin. Fix the key in the grooves found.
- Unscrew the nut fastening to the AMMO with the socket part of the 15 wrench.
- At the next stage, it is necessary to disconnect both stabilizer struts from the AMMO.
- Place a jack under the left side of the subframe. The distance from its back should be no more than twenty centimeters. Raise the body using a jack. If you prefer a hydraulic jack, then you need to place a metal plate under the supporting part of the jack. This way the persistent part will not be pressed into the subframe and will not bend it.
- Next, you need to use a 24mm wrench to unscrew the rear subframe bolt. Using a jack you can unscrew the subframe bolt as efficiently as possible.
- The next stage involves lowering the jack. The subframe will lower to a distance of a centimeter from the body.
- Insert a piece of pipe between the subframe and the body. Press the subframe away from the body and insert a 27mm head between the subframe washer and the body in a lying position. It is best to insert the head using pliers so that the fingers remain intact in case the subframe falls off the stop.
- Unscrew the clamp bolts while pouring WD-40 onto the threads. If the process is too tight, do not put too much pressure on the bolts, unscrew them little by little.
- Remove the bushing clamp and then remove the old bushing.
- Install a new bushing in the vacant space, with the cut on the bushing itself facing backwards.
- Move the bushing back into place.
- Install its clamp on it.
- Next, tighten the clamp bolts with your fingers and tighten them with a wrench. Try to wrap all elements evenly.
- In some cases, stabilizers are found with broken stops. To avoid damage, install the metal clamp behind the ring, close to the plastic ring.
- Remove the 27 head between the subframe and the body, try not to forget about safety precautions. Bolt the subframe to the body; in this case, you don’t need to use a jack.
- Carry out similar operations in relation to the right clamp.
- Place both stands in place
- Lubricate threaded parts with graphite lubricant before installing fasteners to prevent sticking.
- Reassemble the structure in reverse order.
In general, the procedure in question is not as complicated as it seems, and replacing the bushings can be done independently, just like. In this case, it is important to familiarize yourself with the step-by-step instructions, especially if you are performing this operation for the first time. Also pay special attention to compliance with safety precautions, because the procedure in question implies the presence of ambiguous issues in which incorrect handling of the tool can lead to disastrous consequences. Be as careful as possible and strictly follow the instructions.
conclusions
Carrying out restoration and repair work independently will help reduce the costs of each driver associated with car repairs. The process of carrying out operations on your own is quite complicated, the main thing is that the racks are repaired in accordance with the recommendations of specialists. In the process of performing work, you need to take into account some features and nuances. Repair in the first case - with ball joints - is carried out for a short time.
Many car enthusiasts are interested in how to repair stabilizer struts with their own hands. After all, replacing these parts is quite expensive; it is much easier to repair this component of the suspension. Restoring racks will cost much less; in some cases, you won’t even need to buy consumables. Moreover, any driver can do this.
The work requires a minimum number of tools. Restoration methods depend on the features of the strut itself, or more precisely on the features of fastening this part to the stabilizer and body.
Types of racks
Do-it-yourself repair of stabilizer struts has its own characteristics. They depend on what type of fastening is used in your car model. In total, you can find 2 varieties of this part:
- Ball joints
are found on most modern cars. Their malfunctions occur due to the production of lubricant, as well as due to wear of the hinges themselves. Restoring such parts is quite difficult, in some cases, simply impossible; - Bushings
. This type of fastening is much less common. But with such stands there are much fewer problems.
Below we will look at both types of stabilizer struts.
Racks with ball joints
Restoring such parts is quite problematic. Moreover, it is not always possible to do this. If there is a lot of wear on the finger, nothing can be done. Typically, restoration consists of replenishing the required level of lubricant in the boot. This work is done in the following order:
- The support is removed from the car. This is done differently for each model; pay attention to the technical features of your car. After removal, determine the level of wear. To do this, move your finger and determine how easily it rotates. If a crunching sound is heard, then such a stand cannot be restored;
- The restoration work begins with flaring the retaining ring securing the boot. To do this, take a tube of suitable size. We place it vertically. The support is inserted into it with your finger down. Next, we take a head that is suitable in size, and through it with a hammer we apply several blows to the base of the ball joint;
- After such preparation, the retaining ring appears to be torn off; it is removed using pliers;
- Next, use a screwdriver to lift the boot; it needs to be screwed up. Next, lithol is taken and the boot is stuffed with it. To do this, you can use a sliver;
- It is necessary to seal the boot covering the hinge. To do this, take a thin, soft wire. Using pliers, it is twisted around the boot (top and bottom);
- Reinstall the retaining ring;
- We check the functionality of the hinge. To do this, take a support and move your finger with your hand. He should be able to move with difficulty.
The restored part has a shorter lifespan. Therefore, keep in mind that you can only drive on such supports for 1000-5000 kilometers. Many car enthusiasts prefer not to bother with such work, but simply purchase new spare parts.