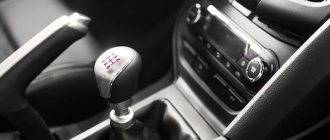
Replacing front shock absorbers VAZ 2107
The new “ seven
” holds the road tenaciously, rolls smoothly, and brakes smoothly even over uneven surfaces. One of the best VAZ models in no way rocks, chatters, or shakes its riders, but carries it as if in the palm of your hand - gently, evenly, carefully.
But it costs VAZ 2107 shock absorbers
wear out, the springs sag, the bushings become crushed, and the pleasure of moving comes to an end. Every road unevenness results in knocking, rumble, yaw and throwing. You have to talk about the braking distance with a faulty suspension in a chilling whisper - it grows so terribly.
It may seem that repairing a VAZ 2107
, which has lost reliable contact with the road, is impossibly complex and time-consuming.
However, struts on a VAZ 2107
are relatively inexpensive,
replacing shock absorber bushings
is not technically difficult, and
we’ll now tell you the shock absorbers themselves on a VAZ 2107
with your own hands
.
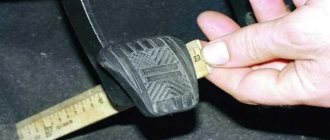
A common stereotype for diagnosing shock absorbers 2107
(and all other models of passenger cars) by periodically pressing with your hands on the corner of the body. The goal of the action is to achieve the frequency and amplitude of movements at which the insufficient performance of shock absorbers (as well as rubber bands and springs) will manifest itself with knocking, clanging, grinding and arbitrary swinging.
In fact, not every junk car exhibits the expected symptoms. Because only the complete destruction of the bushings causes the parts to knock, and the sound work of the front springs
(crunching, ringing, grinding, squeaking) is a sign of lethal damage to the suspension.
Visual inspection of suspension parts and constant monitoring of the car’s driving performance are truly effective tools for a competent driver. Even minimal oil leaks around the front shock absorber of the VAZ 2107
– a reason to replace the device; moreover, replacing the steam room on both sides.
Any uncharacteristic sounds in the suspension of the VAZ 2107
problems that arise when driving in a straight line or when turning a corner are a signal to inspect the condition of all components and parts. Not confident in your own insight? A visit to a vibration stand at a service station will help you save money and save your life!
Removing the front shock absorber 2107
So, replacing shock absorbers on a VAZ 2107
- the issue is resolved.
There will be repairs! Few tools are required. To replace the front shock absorbers
you will need a jack, thrust pads and a safety device (see https://www.autodela.ru/main/top/diy/lada_priora_ammort) - or a lift; as well as a special wrench for the shock absorber rod.
. or open-end wrench 6-8 mm; and also open-end wrenches for 13 and 17 mm.
Install chocks and a jack, but do not lift the car. The first step is to loosen the wheel bolts.
Raise the VAZ 2107
, install a safety device. Remove the wheel.
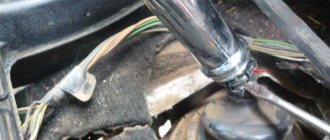
In the engine compartment, look for a window that provides access to the shock absorber fasteners. Holding the rod with a special wrench or a 6 mm open-end wrench, unscrew the rod securing nut with a 17 mm wrench.
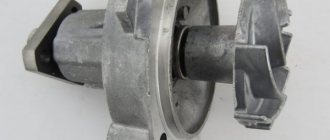
Under the engine compartment on the lower control arm, locate the bracket that secures the front shock absorber
. To dismantle it you will need a 13 mm wrench.
After unscrewing the nuts, carefully lower the bracket with the shock absorber. There is enough space to easily remove the device if the car is raised 30 cm or more.
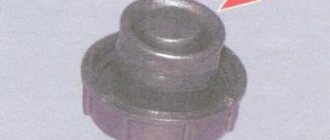
Unscrew the bolt securing the shock absorber to the bracket. Remove the metal washer and rubber bushings (cushions) from the rod - perhaps these parts will be useful to you when installing new shock absorbers on the VAZ 2107
.
Installation of front shock absorbers VAZ 2107
The age-old question of whether to repair old or buy new shock absorbers should be resolved ahead of time. Masters know: in many cases, the performance of shock absorbers is restored by replacing parts of the bypass valve, especially since a repair kit is ten times cheaper than a new shock absorber.
To easily disassemble the device with your own hands, you need a special key (a fork with spikes), oil, as well as dexterity and dexterity - that is, certain locksmith skills. And the price of shock absorbers for 2107
not that big.
In general, experienced car owners keep repaired used shock absorbers in their garages - just in case - and during the repair process of the 2107
they try to install new shock absorbers.
The process of installing new shock absorbers on a VAZ 2107
performed in the reverse order to that described during disassembly.
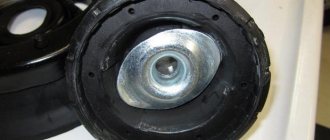
First, the support bracket is attached to the lower eye
2107
front shock absorber . Rubber-metal hinge.
. it is also a silent block, inserted into the eye and pierced by a fastening bolt, usually included in the kit of a new shock absorber. If necessary, the silent block and upper rubber cushions are purchased separately, in addition to the installed shock absorber.
The shock absorber with the bracket attached and the rod extended should be inserted into the appropriate opening. Screw the nuts onto the bracket mounting studs, but do not tighten them completely.
What is a shock absorber
A shock absorber is a component of the suspension that acts as a damper for vibration impulses. The scope of work tasks for shock absorbers includes the following:
- elimination of vertical swing;
- ensuring vehicle stability while driving;
- ensuring good grip on the road surface.
As you can see, this part is very significant, and when it fails, it has the most negative impact not only on driving comfort, but also on driving safety, because faulty shock absorbers invariably lead to an increase in braking distance and worsen traction, which becomes very dangerous along the way.
In addition, when worn out, they cause rapid wear of other parts and systems, in particular the brake system components.
That is why it is so important to carefully monitor the condition of the suspension, and, after the working period has expired or in the event of a malfunction, replace the defective part with a new one.
We'll talk about this later, but for now let's figure out what kind of shock absorbers there are, and, since we decided to talk about such a domestic model as the VAZ 2107, which of the existing components are suitable for this car.
Types of shock absorbers
Today, three types of shock absorbers are used for VAZ cars:
- Oily. This type of unit is suitable for calm, comfortable driving for drivers who primarily value order and regularity. They work well on city roads, where traffic speed is limited and there are no treacherous potholes or potholes. But, if you prefer speed or extreme driving on country roads, then you need to look for something else.
- Gas-oil classic option. This option is ideal for speed lovers. The design of the device itself provides better protection against impacts falling on the lower part of the car during high-speed driving. True, such units are thirty percent more expensive than just oil ones, but the quality is much higher.
- Gas-oil with variable hardness coefficient. When you want to drive on the roads of distant provinces without worrying that the road will turn into a nightmare, then you should give preference to a gas-oil shock absorber of increased rigidity.
It is also worth noting that both versions of gas-oil units guarantee better controllability and the ability to maneuver on sharp turns than oil units.
The quality of the components also depends on the manufacturer’s brand: each company tries to introduce technical innovations into one or another option that significantly improve the characteristics.
So, having decided to replace shock absorbers in order to improve the technical characteristics of the VAZ-2107 car, you can turn your attention to:
- Plaza gas-oil shock absorbers, costing about seven hundred rubles;
- oil Kayaba, which sell for 620 rubles.
- Finwhale are of better quality, also oil shock absorbers, but of higher quality, more durable and guaranteeing greater comfort. They cost about nine hundred rubles.
- the most popular option, suitable for all VAZ cars, are SAAZ units, which cost 500 rubles.
Shock absorber design
The design of shock absorbers for any car, including AvtoVAZ products, is quite simple and consists of a cylinder with a rod filled with oil. It is known from a physics course that the liquid compressed by the piston rod is capable of damping shock vibrations and loads, and it is this principle that forms the basis for the design of this unit. In the VAZ suspension design of the “classic” layout, the shock absorbers work in tandem with springs, providing additional damping of vertical vibrations.
In what cases is it necessary to replace racks?
Diagram of the structure of a classic shock absorber
A shock absorber, like any mechanical component, tends to wear out and its parts become unusable. This is due to a number of reasons, which include:
- Mechanical wear of sealing elements.
- Destruction of the mechanical structure.
- Oil leakage from shock absorber cylinder, etc.
Replacement frequency
The rear suspension consists of a small number of elements, the central place in it is occupied by struts. Their resource is approximately 3-4 times higher than that of the front ones. The slightest knocks coming from the rear wheels should alert the driver. This is a signal that indicates that it is necessary to inspect and repair one or more components of the vehicle's rear suspension.
Shock absorber struts can last 100,000 km, more or less. It all depends directly on the quality of the installed products, as well as on the driving style of the owner of the car. If you force the car to experience excessive loads, then the life of all suspension elements will be very short.
To change or not: how to check with your own hands
Shock absorber failures are quite easily diagnosed based on a number of signs, and the procedure for identifying the problem, as well as repairs, can be carried out by the car enthusiast himself. A malfunction may be indicated by:
- A specific knock that occurs when driving over uneven surfaces, as well as when loading the car (the car knocks especially clearly in the event of breakdowns of the rear shock absorbers of the VAZ 2107).
- Fluid leaks from the shock absorber on the body and rod, which can be easily detected by visual inspection.
- Body sway when driving in a turn, residual vibrations when the car sways in a parking lot.
- Increased vibrations while moving.
Rock the body with a couple of vigorous pushes and see how much vibration there is on each rack
The combination of these signs indicates that the shock absorber requires replacement. It should be said that it is recommended to change shock absorbers “in pairs” in order to avoid differences in characteristics between a new and worn shock absorber.
More information on how to check the performance of shock absorbers is described in this article.
Shock absorber malfunctions
Any car malfunction always manifests itself in the form of extraneous noise, unusual behavior of the vehicle or other signs. Problems with shock absorbers also have certain symptoms, and if they are detected, you should not delay replacing the dampers.
Oil leakage
The most common sign that a shock absorber has become unusable is a fluid leak. Leaks on the body indicate a loss of seal in the oil reservoir. As a result, not only leaks occur, but also air leaks. In this case, the damper rod has free movement, i.e. it moves without any effort, and the part loses its functionality. If signs of smudges have just appeared on the shock absorber, it will serve a little longer, but you should not leave it without attention and it is better to replace it in the near future.
Required tools for replacement
To replace shock absorbers on a VAZ 2107, complex and specific tools are not required. The work can be done using the following tools:
- A set of standard type wrenches.
- Jack (you can use the standard tool included with the VAZ, but it is better to get a trapezoid type jack). An ideal option would be a rolling jack, if available.
- Screwdrivers.
- A special puller for removing suspension springs (available at almost any auto parts store).
- Wheel chocks or simple bricks that should be placed under the rear wheels of the car for safety.
- Liquids such as WD-40 for treating nuts and bolts covered with a layer of rust.
Ties for removing springs can be replaced with clamps, essentially they are the same thing
Diagnostics
KYB gives recommendations for correct replacement of shock absorbers.
To check the wheel bearings, you need to put the car on the handbrake and place wheel chocks under the rear wheels. When it is securely fixed, you need to lift the front wheel using a jack and install a reliable stop under the lower arm. After this, the jack can be removed. To ensure complete safety, it is advisable to install a stop under the car body that will protect against accidental falling when the vehicle slips from the stop.
Safety precautions are often overlooked, but they are vital when diagnosing front hub problems. Next, holding the top and bottom of the wheel with your hands, you need to perform a reciprocating movement, while no knocking should be heard or play should be felt. You should also spin the wheel several times.
How to remove and install the front ones
VAZ 2107 front suspension diagram
When starting the replacement process, you must first remove the old shock absorbers, and then begin installing new ones. To do this, you must perform the following procedures:
- Prepare the car for lifting using a jack, placing stops under the rear wheels to prevent it from rolling away.
- Open the hood of the VAZ 2107 and use a special wrench or pliers to fix the shock absorber rod to prevent it from turning during the dismantling process. After this, you need to unscrew the nut and completely dismantle the upper shock absorber cushion.
- Raise the car on a jack and unscrew the two nuts securing the bracket to the lever, then remove the shock absorber downwards. If you have difficulty loosening the nuts, it is recommended to use WD-40 fluid. The procedure should be performed carefully due to the presence of spring washers.
- After removing the shock absorber, remove the bottom cushion from the rod.
- Upon completion of the procedure, you need to unscrew the nut securing the bracket directly to the shock absorber. It is easier to do this by holding the bolt from possible turning with a second wrench.
- Install the new shock absorber in reverse order.
Operation on domestic cars
So, let's see how the replacement of VAZ 2107 shock absorbers goes, no matter which side.
For repairs you will need the following things:
- set of wrenches;
- flat screwdriver;
- pliers.
We begin work in the inspection hole.
- Open the hood, then fix the bump stop rod with pliers. Use a wrench to unscrew the rod nut here. Next, remove the nut, two washers, and the top cushion.
- Below, from the inspection hole, unscrew the two nuts of the bracket, after which we remove the defective unit, and also remove another cushion from its rod.
- Unscrew the bracket with two keys.
- We install the new spare part in the reverse order.
It turns out that replacing the front shock absorbers of a VAZ 2107 is not such a difficult task; it is quite within the capabilities of a car enthusiast who is knowledgeable in technology. To supplement, you can also watch how to replace the front shock absorber of a VAZ 2107 in the video.
But this is a rear-wheel drive VAZ car, and if the drive wheels are in front, then everything is much more complicated. How difficult it is to carry out the procedure in question on a VAZ with front-wheel drive, let's see below. For this purpose, let’s study point by point how to replace shock absorbers on a VAZ 2110.
To implement the technological process we will need:
- set of wrenches;
- special key for holding the rod;
- puller;
- special ties for springs.
Well, let's get started.
- Open the hood, unscrew the top nut of the rod, holding the rod with a special wrench, and immediately unscrew the three nuts that support the strut. Then loosen the wheel bolts.
- Jack up the side to be repaired and remove the wheel.
- Having taken out the cotter pin, unscrew the nut securing the steering rod to the strut arm. Using a puller, press the pin out of the strut lever.
- We remove the brake hose from the mount by unscrewing two bolts, remove the caliper, and move it to the side.
- After unscrewing the two bolts, disconnect the ball joint.
- We unscrew the CV joint nut, remove the strut, while simultaneously pulling the CV joint out of the splines.
- We install special threaded ties on the spring, then compress the spring, and then unscrew the support bearing. By the way, at this stage the support bearings of the front shock absorbers are being replaced.
- Next, we dismantle the spring support and remove the spring without loosening the special ties.
- We remove the compression stroke bumper, as well as the casing.
- We install new parts in the reverse order.
The method we have presented allows you to maintain wheel camber. As you can see, in general, the process is quite labor-intensive, not like the “classic” one.
Also read about replacing the rear silent blocks of a Ford Focus 2 and replacing the front stabilizer struts.
However, as an addition, we will consider another car for which replacing struts can be a vital operation, because it is an SUV. In other words, let’s find out how to replace shock absorbers on a UAZ Patriot.
In this case, the wheel drive is of a different nature, so everything is much simpler. Let's prepare only a set of standard wrenches, and then we'll start.
- We turn on the parking brake, support the rear wheels, and use a jack to unload the front suspension without lifting the tires from the ground.
- Unscrew the nut of the lower strut mounting and remove the bolt.
- We unscrew the lock nut of the upper fastening, then, holding the rod from turning with a suitable wrench, unscrew the nut of the upper fastening, and finally, remove the rack.
- Remove the washer and bushing from the rod.
- We install the new unit in the reverse order.
That's all. Conclusion: with the Patriot, like the VAZ classic, the labor intensity of the operation is low. Their main difference from the “ten” is the absence of drive units and steering rods for dismantling.
In a foreign car
However, the procedure we are studying is no less relevant for a running foreign car, the owners of which may also sometimes be concerned about reinstalling the bump stop. So, to complete the picture, let’s determine how the shock absorbers are replaced in the Ford Focus 2.
The following must be prepared for repair:
- set of wrenches;
- screwdrivers, hexagons, asterisks;
- spring ties;
- chisel, hammer.
Let's move on to action.
- Loosen the wheel and lift the desired part of the car.
- Having opened the hood, disconnect the clips, then remove the air duct grille.
- Remove the protective panel by unscrewing two bolts and a star screw. All this is necessary to access the bump stop mount.
- From below, from the inspection hole, we unscrew the stabilizer strut from the bump stop.
- Disconnect the ABS connector and also remove the brake hose from the bracket.
- We unscrew the fastening of the front suspension knuckle, wedge the knuckle with a chisel, and remove the lower end of the strut.
- At the top, unscrew the three support bearing bolts.
- We remove the stand. We disassemble it in the same way as it was done in the instructions for the VAZ 2110 - using special spring ties.
- Assembly is done on the way back.
Replacing the bump stop on a 3rd generation Ford front shock absorber is done in a similar way.
Price issue
Although the instructions given are clearly no more complicated than for the VAZ 10, not everyone can do the described manipulations. For motorists who prefer not to get dirty and go to a car service center, we will provide a table of approximate prices for the procedure under study in cities of the Russian Federation.
How to replace the rear ones
Diagram of the rear suspension and components
Replacing rear shock absorbers is approximately similar in complexity to replacing front shock absorbers and includes the following operations:
- Raising the car using a jack (in this case, wheel chocks should be placed under the front wheels).
- Using two keys and holding the bolt from turning, the lower hinge fastening nut is unscrewed.
- After removing the bolt, pull out the spacer sleeve.
- The shock absorber should be slightly moved away from the bracket by hand, after which the spacer sleeve should be removed from the bolt.
- After performing these operations, you should unscrew the nut securing the upper hinge, remove the washer from the stud, as well as the outer hinge bushing. Dismantling the latter is not necessary.
- Then you should remove the inner sleeve from the stud, after which, holding the shock absorber by the body, you should remove the spacer sleeve, as well as the rubber seals in the hinge lugs.
- Upon completion of the work, the shock absorber is changed and assembly is performed in the reverse order.
Regardless of whether you are replacing struts at the front or rear, it is recommended to check and replace all rubber bands and seals after disassembling the shock absorber with new ones.
Important! Before installing a new shock absorber, it must be bled. Read more about pumping shock absorbers in this article.
How to change rear shock absorbers: video
How to choose shock absorbers
Choosing shock absorbers is not an easy task, since it is necessary to take into account a number of important factors that will subsequently affect the handling and service life of the car’s suspension. First of all, you need to pay attention to the following points:
- type of racks (gas or oil);
- length;
- permissible loads;
- compatibility with specific brands and models of cars.
The type of struts affects the stiffness of the suspension and its service life. Thus, gas struts are better suited for those drivers who prefer a more or less sporty ride and the most informative and “understandable” steering wheel. Installing oil-filled shock absorbers is more preferable for quiet motorists who use the car to perform everyday tasks.
Related works
It is recommended to replace shock absorbers on a VAZ 2107 in conjunction with other procedures for repair or preventative maintenance of the suspension. To do this, you should carefully inspect the parts and, if necessary, replace them. Most often, springs may require replacement. In addition, when replacing rear shock absorbers, it makes sense, if necessary, to install spacers to increase ground clearance. The procedure should be combined with the use of stiffer springs and shock absorbers.
Replacing the front and rear shock absorbers on a VAZ 2107 does not cause significant difficulties if you have auto repair skills. In total, the procedure takes about 3 hours for an unprepared car enthusiast and allows, in parallel, to perform other preventive and repair work.
Design Features
Before you start replacing faulty VAZ 2107 shock absorbers, you should briefly familiarize yourself with their design and purpose. This part converts mechanical energy into thermal energy and acts as a damper. Zhiguli front and rear suspensions are equipped with vibration damping devices of a similar design, but of different sizes and mounting methods.
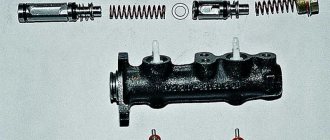
Main design details:
- working cylinder;
- tank with lug;
- compression valve;
- rod with piston;
- casing with eyelet.
The shock absorbers are located inside the springs and are secured by a rod through rubber cushions to the body, and by the eye of the body through a rubber-metal hinge to the lower arm.
Lada 2107 “There was a history” › Logbook › Replacing front shock absorbers
We open the magazine “Murzilka” or google “Replacing the front shock absorbers of a VAZ 2107” and read: “You will need two keys for 17, a key for 13 and a key for 6.” OK. You must understand that the literature on repairs at AvtoVAZ enterprises differs from “Murzilok” and “Funny Pictures”.
Therefore, we will need: *Ratchet wrench 1/2″ (large head); *Two extension cords or one large 1/2″; *Key for 17, Key for 6 (a good one for 7 or 5.5 will do); *Hex heads 13 and 17; *Bulgarian; *Candle/lighter; *Two bolts, two nuts, two bolts for the shock absorber bracket; *Hand clamp/long nose pliers or assistant. * For KYB Premium shock absorbers there is an additional 14 key!
By the way, the contents of the book “We Repair It Yourself” are mostly valid only for a new car!
Go. On the carburetor classic, I did the following sub-disassembly: *removed the carburetor pan; *removed the battery; *removed the wire from the ignition coil.
Next, we go through all threaded connections with a liquid wrench. According to the manual, using a 6 wrench to hold the shock absorber rod from turning, use a 13 wrench to unscrew the nut. You don’t need to keep the key on 6 all the time, just rip it off.
Sequence of action:
- we lift the VAZ 2107 car with a jack from the replacement side (we hang the rear wheel), not forgetting to tighten the hand brake;
- spray WD-40 on the mounting threads and go drink tea. After 15 minutes, the Teflon lubricant penetrates inside, which makes unscrewing easier.
- We begin to unscrew the bottom bolt, holding it on one side and using a ratchet on the other, and then knock the bolt out with a hammer through the plastic plate so as not to damage the thread.
- The bottom edge now dangles freely
- Now we calmly unscrew the upper fastening bolt with a wrench, and, using a pry bar, pry the cylinder to the side and remove it.
Now we move the jack to the second half and repeat the same steps. You can use whatever you want - oil or gas, but be sure to use the same ones in a pair. This is how the rear shock absorbers are replaced.
Front shock absorbers are replaced if the same symptoms occur: knocking and “breakdowns” when the front wheel gets into a hole, or the front suspension gets oily.
The tool you need are keys 6, 13, 17.
Shock absorber operation
The principle of operation of the shock absorber is based on creating increased resistance to body swaying due to the forced flow of fluid through small flow sections in the valves.
Compression stroke. During this stroke, when the wheels of the car move upward, the shock absorber is compressed, i.e., the piston goes down and displaces liquid from the bottom of the cylinder, part of which, overcoming the resistance of the flat spring of the bypass valve, flows from the sub-piston space to the supra-piston space. All the displaced liquid cannot pass in this way, since the pushed-in rod occupies part of the volume released by the piston, so part of the liquid, bending the inner edges of the compression valve disks, flows from the cylinder into the reservoir.
When the rod moves smoothly, the force from the liquid pressure will be insufficient to press the inner edges of the disks from the plate, and the liquid will flow into the reservoir through the cutout of the throttle disk 4.
Recoil stroke. During this stroke, the car's wheels, under the action of the elastic elements of the suspension, move down, and the shock absorber stretches, i.e., the piston moves up. In this case, liquid pressure is created above the piston, and a vacuum is created below the piston. Fluid from the space above the piston, overcoming the resistance of the spring, bends the outer edges of the recoil valve discs and flows into the lower part of the cylinder. In addition, due to rarefaction, part of the liquid from the reservoir, bending the outer edges of the compression valve disks from the valve body, fills the lower part of the cylinder.
At low piston speeds, when the fluid pressure is insufficient to press the recoil valve disks, the fluid will be throttled through the side cutouts of the throttle disk 15, creating resistance to the recoil stroke.
The condition of the shock absorbers affects not only the smoothness of the car, but also the safety of its movement and the condition of the load-bearing parts of the car (struts, mudguards, side members). If shock absorbers are faulty, suspension “breakdowns” occur, which leads to cracks in the body drains and to breakage of the shock absorber mounting pins, and body swaying tires the driver
Therefore, it is important to keep shock absorbers in working condition.
The condition of the shock absorbers can be checked in the following way:
— place the car on an overpass or inspection ditch and swing it by the front or rear bumper, applying a force of 400-500 N (40-50 kgf). With working shock absorbers, the number of body vibrations should not exceed three;
— disconnect the lower mounting point of the shock absorber and pump it by hand. A serviceable shock absorber pumps smoothly, without dips or jams, and with little resistance. In this case, the resistance during the rebound stroke should be greater than during the compression stroke. The maximum force during the compression stroke of the front shock absorbers is approximately the same, and during the recoil stroke, the front shock absorbers are 1.2 times greater than the rear shock absorbers.
Front steps:
We hang the wheel in front in the same way, then open the hood. There is access to the rod of the front shock absorbers of the VAZ 2107.
- Unscrew the nut using a 17 wrench and holding it with a 6 wrench.
- Then, from below, under the car, we turn out the bracket using a 13-mm open-end wrench and turn it out, and then remove it together with the shock absorber:
- Now we repeat all the steps on the other side, remove the second shock absorber, and then in the reverse order, just install new ones. For some car owners, on the contrary, it is easier to change one side first, so as not to jack the VAZ 2107 four times.
Replacement should ideally be carried out immediately at the front and rear to ensure maximum smoothness, but some “stingy” enthusiasts argue that such a replacement is more expensive.
Removal and replacement of front shock absorber strut A6 C5
- We put the car on the lift;
- Remove the left wheel;
- Release the shock absorber;
- Place it on a vice and remove the bracket;
- We tighten the spring and remove it;
- Replacing the stand.
1
We put the car on a lift and remove the front left wheel.
3
You need to release the upper shock absorber arms. We unscrew the steering knuckle bolt that holds the upper arm fastenings with a 16mm wrench, it is advisable to thoroughly fill it with WD-40 before starting, it often boils and complicates the disassembly process. In such situations, just drill out. To make it easier to release the bolt, jack it with a telescopic stand or a jack if the car is in a pit. We knock it out with a striking cue ball.
4
Now you need to pull the levers out of the support, use a special puller for pressing out, push the puller under your finger and press it out, or by lightly tapping the lever, it will come out.
6
Next, we proceed to the lower ear of the shock absorber, which is mounted at the lower arm.
7
I unscrew the bolt to 17, then to free the ear, you need to unscrew the stabilization lever.
8
After this, release the lever down and the shock absorber is free
10
All that remains is to unscrew the upper shock absorber mounts. We lower the car so that we can work under the hood, remove the decorative trim (rain cover) and find three fastening bolts on the left side; it’s not very convenient to reach the fastening bolts with a key, the expansion barrel is in the way
11
We take a 17mm head and the extension cord will help in such situations.
12
The other two are very easy to unscrew.
14
Before completely unscrewing the mount, you need the help of another person to hold the shock absorber and pull it out of the body, as it may simply fall out and damage something. When replacing the stand, use a vice, clamp it with the ear side down.
15
We unscrew the two 12mm bolts, the bracket on which the shock absorber arms are held.
17
It is important to remember the installation position of the bracket. This can be checked by placing the shock absorber ear lengthwise, and the mount where the bolts are located, the angle is shifted by 11″
And if you change the silent blocks on the lever, maintain an angle of 55 mm. Next, we install the ties and tighten the spring.
18
We unscrew the shock absorber cap that holds the bolt at 18, fix it with a hexagon at 10.
19
We unscrew the nut with a special puller and remove the boot.
20
We remove the spring, unscrew the old strut from the vice and install a new one; be sure to replace the shock absorber boot if it is not working properly. We install the spring on the new strut, put on the boot and tighten the nut, securing it with a hexagon. We install the bracket, tighten it to the 11″ angle with two 17-inch bolts. Next, we install it on the seat of the upper fastening at three points; help is needed, since it needs to match and it won’t be possible to tighten it alone. We also sequentially install the shock absorber in its place.