How to remove the transfer case from a Niva
There is nothing complicated in removing and repairing a range multiplier; anyone with the necessary tools can carry out this procedure.
The main difficulty of this car is that the transfer case is not attached directly to the gearbox itself, like in modern SUVs; in the Niva they are connected using intermediate shafts. Dismantling the unit itself is quite simple; to do this, the car is driven into an inspection hole. All levers in the cabin are set to the neutral position. Then the plastic casing is removed from the tunnel, and all covers and handles are removed. Then the hatch is unscrewed, which provides access to the transfer case. The speedometer sensor is also removed, after which the driveshafts are disconnected. In the end, all that remains is to unscrew a few fasteners of the box itself, and then remove it. After the mechanism is removed, you can begin to disassemble it for further replacement of worn parts
In general, installation occurs in the reverse order, but it is worth paying attention to the centering of the transfer case with the gearbox, that is, you need to ensure that the flange of the gearbox drive shaft is aligned with the intermediate shaft of the transfer case, after which you can tighten the mounting bolts of the range itself
Bottom line
The Niva has permanent all-wheel drive, and the car itself is inexpensive. And that is why, from the point of view of reliability and price, it is the best suited for outdoor enthusiasts. Servicing the all-wheel drive of this car will cost symbolic money, however, the design of the mechanism itself is quite reliable for such a price.
- Next The best new Russian crossovers and SUVs
- Back Sable 4x4 2020: all-wheel drive family updated
- Engine/Ratings
Aug 23, 2019
- Hyundai crossovers / News
Aug 23, 2019
- Aug 22, 2019
- Volkswagen crossovers / News
Aug 21, 2019
- Crossovers Ford / News
Aug 20, 2019
- Audi crossovers / News
Aug 20, 2019
- April 13, 2019
- March 12, 2019
- Feb 17, 2019
- April 11, 2019
- July 27, 2017
Popular crossovers
Acura crossovers Audi crossovers BMW crossovers Cadillac crossovers Chevrolet crossovers Chery crossovers Citroen crossovers Dodge crossovers Ford crossovers Honda crossovers Infiniti crossovers Jeep crossovers Hyundai crossovers Kia crossovers Lexus crossovers Lada crossovers Land Rover crossovers Mazda crossovers Mercedes crossovers Mini crossovers Mitsubishi crossovers Nissan crossovers Porshe crossovers Peugeot crossovers Crossovers Opel Crossovers Renault Crossovers Ssang Yong Crossovers Skoda Crossovers Subaru Crossovers Suzuki Crossovers Toyota Crossovers Volkswagen Crossovers Volvo Crossovers
Oil in transfer case Niva 21214: how much to pour and what kind
The Niva 21214 car is distinguished by its increased cross-country ability on roads. The car has an engine that has a volume of 1.7 liters, which complies with Euro-4 standards. The transmission system includes a transfer case with a crankcase ventilation system. All components on the VAZ 21214, just like on the VAZ 21213, are characterized by a long service life. It is important to take proper care of the automotive system and select high-quality oil for the Niva.
The Niva SUV (VAZ 2121), which has all-wheel drive and is equipped with a manual transmission, is capable of producing 75 horsepower.
How much oil to fill? Approximately 0.8 liters of oil must be added to the Niva distributor. 1.6 liters of transmission fluid is poured into its high-speed box.
Before choosing a transmission fluid, you should always carefully study its composition.
The need to change transmission oil
To change the oil on a Niva, the car must be warmed up (to ensure good fluid fluidity). The machine is placed on an inspection hole; a special container should be placed under the drain hole into which the waste liquid will drain. To open the drain and fill plug, you should use a hexagon. Also, as an additional tool, you will need a special syringe, which is used to fill the transfer case with fuel.
Changing the oil in the transfer case (Niva 21214 / 21213). Main stages:
- The drain plug is unscrewed.
- The remaining oil is poured into the container.
- Any contamination on the plug must be eliminated.
- The drain plug is screwed in.
- The top plug is unscrewed to fill in new oil using a syringe.
- The plug is screwed in.
The peculiarity of the gearbox is that it has a built-in magnet. Its function is to attract small metal debris that may be present in the fuel.
When replacing fuel, the crankcase must be flushed. This procedure helps to extend the operational life of the box. Flushing is required if the drained oil is heavily contaminated.
The frequency of changing fuel for the transmission is affected by the mileage of the Niva 21214 (21213) and the conditions under which it is used. When making frequent off-road trips, the need to change the oil for the transfer case and gearbox may arise up to 50,000 km.
The need to add a new lubricant to the box can be indicated by the fact that the gearbox began to overheat and characteristic noises appeared on its side during movement.
dorpex.ru
Overcoming a deep puddle
How ESP Works in a Car
Often a dispute arises between motorists about how best to cross a ford with a transfer case. Some people prefer to “fly” into a puddle from acceleration, others prefer to downshift. If you get into a mud pit, there is a high risk of water hammer - water enters the cylinders through the filter, and the engine “chokes.” To exclude this, many install a special snorkel. But you can do without it. A deep puddle should be overcome in second low gear. This is done so that in case of trouble (when the car starts to fail) you can switch to first gear in time and not stall. If you enter the water from acceleration (which is a better decision), remember that the wheels may get stuck in the middle of the journey. The engine power is not enough to turn the wheels - the car stalls, and the engine experiences a hydraulic shock.
Transfer case control
Pajero mini
The Niva 2121 transfer case has manual control with a lever-type mechanical drive. The shift lever swings in the longitudinal direction and is performed on an axis that is installed in the bracket eyes in front of the transfer case. Friction is reduced by pressed plastic bushings into the holes of the lever.
The lower part of the lever is inserted into a groove on the rod, and fixation occurs using a figured spring. The other end of the rod, in turn, is connected to a fork, which moves the shift clutch. The rigidity of this connection is ensured by the bolt. The rod at the outlet of the transfer case is sealed with an oil seal, and dirt and dust are protected with a rubber corrugation. The entire switching drive is fixed in the set position by a spring-loaded ball that fits into special grooves in the rod.
Transfer case alignment
Planetary gearbox: what is it and how does a planetary gearbox work?
Correct installation of the transfer case can be done in several ways. Most often in auto repair shops, repairmen use the following method:
- hang the car on a lift;
- loosen the transfer case;
- start the engine;
- engage the gear and accelerate the car according to the speedometer to the speed at which vibration occurs (often it occurs at speeds from 40 to 80 km/h);
- without using the brakes, reduce the engine speed, then turn off the ignition.
The transfer case itself is centered in place, all that remains is to tighten the fastenings of the supports.
You can also adjust the position of the RC using a wire; we do it as follows:
- loosen all four fastenings of the transfer case supports;
- fasten one end of the wire to the rubber coupling of the propeller shaft;
- we attach another piece of wire to the CV joint, bring the other ends of the wire to each other;
- rotate the shaft; if the transfer case is not centered, the ends of the wire will diverge during rotation;
- the task comes down to installing the transfer case using the selection method so that the ends of the wire practically do not diverge from each other in any position when turning the shaft.
Changing the oil in the transfer case
The 2121 transfer case, of course, requires regular maintenance. The main maintenance work for transfer case 2121 includes changing the oil according to the automaker's recommendations. It is recommended to change the oil every 45 thousand kilometers. To perform this procedure, you need to take a twelfth hexagon, a syringe for filling the oil, the oil itself and a container for processing. It is best to change the oil in an inspection pit or on a lift.
The order of work is as follows:
- We unscrew the drain plug above the waste oil container and wait until it all drains;
- Screw in the drain and unscrew the filler plug;
- Fill with oil using a syringe until it reaches the bottom edge of the filler hole;
- Screw the plug.
Do not forget that only transmission oil should be used, and it has different characteristics compared to conventional engine oil.
VAZ 2121 Niva has established itself as a reliable and versatile Soviet SUV. In 1977, the first domestic all-terrain vehicle rolled off the assembly line, which, unlike ordinary passenger cars, the VAZ 2121, had all-wheel drive and increased cross-country ability. The Niva transfer case design was developed by experienced AvtoVAZ designers in order to increase the functionality and versatility of the vehicle both when driving off-road and in city conditions.
In 1994, an updated version of the SUV was released, labeled Niva 21213, differing from the previous version in a more powerful power unit. Since 2006, this series of cars has been known as Niva 4x4.
Niva 2121 how much oil is in the box
Home » Articles » Niva 2121 how much oil is in the box
07.12.2017
The Niva 21214 car is distinguished by its increased cross-country ability on roads. The car has an engine that has a volume of 1.7 liters, which complies with Euro-4 standards. The transmission system includes a transfer case with a crankcase ventilation system. All components on the VAZ 21214, just like on the VAZ 21213, are characterized by a long service life. It is important to take proper care of the automotive system and select high-quality oil for the Niva.
The Niva SUV (VAZ 2121), which has all-wheel drive and is equipped with a manual transmission, is capable of producing 75 horsepower.
Selecting gearbox oil
Transmission fluid Lukoil GL4 75W-80
Which oil to choose? Transmission oils come in a wide range. You should pay attention to fuel that has the following viscosity: 75W-90, 85W-90. In particular, you can choose Lukoil 80W90 gear oil (GL5 class). When operating vehicles in winter, you should purchase 70W-90 oil, as it has a low viscosity. Semi-synthetic options are also suitable for refueling Niva 21213. It is better to carry out replacement at a specialized service center.
How much oil to fill? Approximately 0.8 liters of oil must be added to the Niva distributor. 1.6 liters of transmission fluid is poured into its high-speed box.
Before choosing a transmission fluid, you should always carefully study its composition.
The need to change transmission oil
To change the oil on a Niva, the car must be warmed up (to ensure good fluid fluidity). The machine is placed on an inspection hole; a special container should be placed under the drain hole into which the waste liquid will drain. To open the drain and fill plug, you should use a hexagon. Also, as an additional tool, you will need a special syringe, which is used to fill the transfer case with fuel.
Changing the oil in the transfer case (Niva 21214 / 21213). Main stages:
- The drain plug is unscrewed.
- The remaining oil is poured into the container.
- Any contamination on the plug must be eliminated.
- The drain plug is screwed in.
- The top plug is unscrewed to fill in new oil using a syringe.
- The plug is screwed in.
The peculiarity of the gearbox is that it has a built-in magnet. Its function is to attract small metal debris that may be present in the fuel.
When replacing fuel, the crankcase must be flushed. This procedure helps to extend the operational life of the box. Flushing is required if the drained oil is heavily contaminated.
The frequency of changing fuel for the transmission is affected by the mileage of the Niva 21214 (21213) and the conditions under which it is used. When making frequent off-road trips, the need to change the oil for the transfer case and gearbox may arise up to 50,000 km.
The need to add a new lubricant to the box can be indicated by the fact that the gearbox began to overheat and characteristic noises appeared on its side during movement.
prokpp.ru
Filling volumes for a VAZ 21214 car
It’s one thing to buy a car, and another to know and understand what to do with it: what to protect it from, when to “feed” it, how to operate it. No matter what kind of car you own, sooner or later you will need to refuel it. Today we will talk about the filling volumes of the VAZ 21214 and what to fill where.
First of all, let's talk about the fuel tank. Its volume in the VAZ 21214 is 42 liters (including reserve). Fill with gasoline with an octane rating of 91 to 93.
The fuel supply system is necessary to power the car engine, as well as its cleaning and storage.
The volume of the cooling system is 10.7 liters, which also includes the interior heating system. Fill in coolant whose freezing point is not higher than minus 40°C.
Cooling system - devices that provide supply of cooling medium to heated engine parts and removal of excess heat, i.e. maintaining the engine within the required thermal limits.
Engine lubrication system - 3.75 liters. It is necessary to select a specific oil, depending on the ambient temperature.
Temperature Oil
-20°С +40°С SAE 15W-40
-25°С +45°С SAE 10W-40
-30°С +45°С SAE 5W-40
-25°С +35°С SAE 10W-30
-30°С +35°С SAE 5W-30
The main task of the lubrication system is to reduce friction of mating parts. It also provides cooling of engine parts, protection against corrosion, removal of wear products and carbon deposits.
The filling volume of the gearbox housing is 1.35 liters, the transfer case housing is 0.75 liters, and the front axle housing is 1.15 liters. and rear axle housing 1.3 l. To fill these units, gear oils with a quality level corresponding to API GL-5 and a viscosity of 75W-90 are suitable.
The steering gear housing has a volume of 0.18 liters. You can add 75W-90 gear oil here.
The hydraulic brake system (0.515 liters) and clutch release system (0.2 liters) will require DOT-4, -3 brake fluid, respectively.
The volume of the windshield washer and rear door glass washer reservoir is 2 liters. You can fill it with either regular water or a mixture of water and windshield washer.
vaz-21214.ru
Changing the oil in the Niva 21213, 2121 gearbox
According to the recommendations of the VAZ manufacturer, the oil level should be checked after every forty to sixty thousand kilometers, but practice shows that it is better to do this at least twice as often. If, during inspection, you find that the oil is dirty and smells of burning, this means that it needs to be changed immediately. This procedure is easy to carry out yourself. Changing the oil in Niva 21213 is done in exactly the same way as in 2121.
Changing the oil in the gearbox.
The entire operation must be carried out in the inspection hole, and before the operation you need to drive eight to ten km so that the oil warms up.
If you are changing the oil for the first time, the first thing you need to do is find the filler neck. It is located on the left side and may not be immediately noticeable due to the gimbal. Do not confuse it with the technological plug, which is located on the right.
Having found the neck, take a 12mm hex and unscrew the drain plug. Place a container near the neck and let the oil drain. Next, clean the plug magnet from dirt and metal particles and screw the plug back on.
Now take the 17 key and unscrew the filler plug. Then, using a special syringe, fill the oil to the bottom edge of the hole and tighten the plug. All.
By the way, sometimes it happens that the box becomes clogged with metal shavings or the seals begin to leak. In such cases, you just need to add oil.
vazkorch.ru
Filling volumes, oils and liquids
FILLING CAPACITIES, OILS AND LIQUIDS.
| Refillable system | Volume, l | Oils and liquids | |
| Fuel tank (including reserve) | 42 (65*) | Motor gasoline with octane number 93, 95** | |
| Engine cooling system (including interior heating system) | 10,7 | Coolant with a freezing point no higher than –40°C Latest recommendation from AvtoVAZ Sintec Antifreeze Lux G12 | |
| Engine lubrication system (including oil filter) | 3,75 | Motor oils (with API quality level: SG, SH, SJ, SL,SM, SN) from –20° to +45°С | SAE 15W-40 |
| from –25° to +35°С | SAE 10W-30 | ||
| from –25° to +45°С | SAE 10W-40 | ||
| from –30° to +35°С | SAE 5W-30 | ||
| from –30° to +45°С | SAE 5W-40 |
**For vehicles with fuel injection system equipped with an exhaust gas converter
Date: Sunday, May 22, 2016
www.niva-lada4x4.ru
www.metlon.ru
Installation and Centering
- make sure that the engine mount mounts are installed correctly in the brackets (the centering washers of the front engine mount mounts must fit into the corresponding holes in the side brackets);
- install the transfer case on the car without fully tightening nuts 4 and 5 (Fig. 3-41) securing the transfer case suspension brackets;
- moving the transfer case along and across the body, as well as in the vertical direction, find its position in which the flanges of the drive shaft of the transfer case and the intermediate shaft of the driveline are at the same level, parallel and the gap between them is minimal; The transfer case shafts must be located parallel to the bottom of the body;
- Having installed the previously removed adjusting shims under the suspension brackets (supports), fully tighten the nuts securing the transfer case suspension brackets;
- attach the front and rear propeller shafts to the transfer case shafts; Connect the flexible shaft to the speedometer drive and the wires to the differential lock warning lamp sensor.
Rice.
3-41. Transfer case installation diagram: 1 - bolts for fastening the flanges of the intermediate propeller shaft and the transfer case drive shaft; 2 — transfer case; 3 — adjusting shims; 4 — nuts securing the transfer case to the body; 5 — nuts securing the transfer case suspension brackets to the axles
- make sure that the engine mounts are installed correctly in the mounts (see the chapter “Removing and installing the engine”);
- disconnect the flanges of the transfer case drive shaft and the intermediate driveshaft;
- loosen the nuts securing the transfer case supports to the body, remove the adjusting shims and, moving the transfer case along and across the body, as well as in the vertical direction, find its position in which the separated flanges are at the same level, parallel and the gap between them is minimal, and the transfer case shafts are located parallel to the bottom of the body;
- Fill the resulting gap between the body floor and the supports with the required number of gaskets,
- align the centering flanges without creating tension in the transfer case and engine supports and, holding the transfer case in this position, tighten the previously loosened nuts securing the transfer case supports;
- insert and secure the bolts securing the transfer case flanges and the intermediate shaft; if the bolts pass freely into the flange holes, then the alignment is carried out correctly, otherwise repeat the operations to align the flanges.
How to change oil in VAZ Niva axles
Serial production of the first Soviet SUV, belonging to the small class, started in 1977. Since then, the VAZ-2121 Niva and its numerous modifications have held the lead as the most widespread and popular representative of all-wheel drive vehicles. And for all such vehicles, it is necessary to promptly replace transmission fluids in the gearbox, transfer case and drive axles. How to change the oil in the front and rear axles of the Niva is the topic of this article.
How to change the oil in the front and rear axles of a VAZ Niva.
When to replace
All transmission units (manual transmission, transfer case, both axles) are serviced simultaneously. The first time, according to the service book, this must be done after driving 45 thousand kilometers, the next replacement of transmission fluids is carried out when the speedometer shows an indicator of 105 thousand kilometers, then every 60 thousand km. mileage Many owners of this car intentionally or out of ignorance ignore these recommendations, continuing to operate their car after driving one hundred or more thousand kilometers. And then, naturally, they complain about problems with the transmission.
To avoid them for as long as possible (driving 300,000 km on a Niva with regular scheduled maintenance is not a problem), it is recommended to change the oil in Niva axles 2121, 21213, 21214 and other modifications every 50 - 60 thousand kilometers, and when operating the car mainly in difficult conditions - after 30 - 40 thousand.
Choosing the right gear oil
All Niva transmission components are filled with the same mineral oil at the factory. During maintenance, they usually fill in the same oil, and not always of good quality. This fluid is really good, but only for the break-in period of a new car. When driving 10 - 15 thousand km. It is recommended to replace mineral water with semi-synthetic water, which has better performance characteristics. Synthetic lubricants for Niva axles are not the best choice, since in hot weather their viscosity is so low that the chances of oil seal leakage increase. In severe frosts, the mineral water thickens so much that both changing gears and moving the car becomes very difficult until it warms up.
The viscosity of transmission oil for Niva 2121, 21213, 21214 is 75W90. You can fill in any mineral or semi-synthetic transmission fluid with the appropriate characteristics. At the same time, 1.3 liters of oil is poured into the rear axle of the Niva of all modifications, and 1.15 liters into the front axle. The oil volume in the Niva's rear axle is slightly larger, since this is, by definition, the main drive axle, and the load on it is generally slightly higher.
Sequence of actions for changing the oil
Draining the old oil and filling in new oil in the front and rear axles of the Niva is a generally similar procedure, but differences still exist due to the design features of the domestic SUV. Changing the oil in the Niva's front axle is carried out simultaneously with changing the fluid in the gearbox; in any case, you will not need other tools and materials, including:
- a special technical syringe (or a funnel of suitable size and geometry);
- hex wrench 12;
- 17 mm spanner (working with a socket wrench will be extremely inconvenient and ineffective);
- rags, container for draining waste.
The drain hole can be found on the lower plane of the front axle, the filler hole is located on its side wall.
The procedure for changing the oil in the Niva's front gearbox:
- Place a container prepared in advance under the drain hole.
- When the filler plug is unscrewed, the draining process occurs noticeably faster, so first unscrew it.
- Unscrew the drain plug with a hexagon.
- We wait until the old lubricant flows out (this takes an average of 15 minutes).
- We screw the drain plug into place, having previously cleaned it and the seat from dirt and old oil.
- Fill in fresh transmission fluid in a volume equal to the amount of waste (this is a little more than a liter).
- We tighten the filler plug.
To change the oil in the rear axle of a Niva, you will need the same tool, since both the drain and filler plugs are the same. However, the procedure itself is practically no different, with the exception of the location of the gearboxes:
- place a suitable container under the drain hole;
- use a hexagon to unscrew the drain plug located at the bottom of the rear gearbox;
- drain the old lubricant (this will take a total of 10 - 15 minutes);
- thoroughly clean the plug itself and the area around the drain hole with a rag;
- we screw the plug into its regular place, but without fanaticism;
- Unscrew the filler plug located in the middle of the rear axle using a 12mm wrench;
- fill in fresh lubricant in a volume equal to the collected one, use for this either a technical syringe or a funnel with a connected hose;
- if the liquid does not reach the lower edge of the filler hole, add it until it begins to spill;
- clean the filler plug together with the seat from drips and dirt, tighten the plug;
- Usually, when changing the oil in the rear gearbox, they unscrew and clean the breather, put it in place, replacing the gasket if necessary.
As you can see, pouring new oil into both the front and rear axles of the Niva is a simple procedure. And, as already noted, it is carried out together with the replacement of lubricant in the gearbox and transfer case during TO-4, TO-8 and so on.
How to change the oil in VAZ Niva axlesLink to main publication
vibormasla.ru
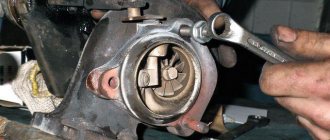
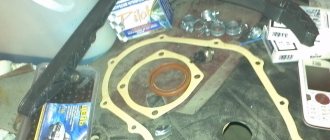
Disassembly
Rice. 3-42. Removing the front axle drive housing:
1 — front axle drive housing; 2 — crankcase cover; 3 — speedometer drive housing fig. 3-39fig. 3-38
rice. 3-38fig. 3-39
Rice. 3-43. Removing the front transfer case cover:
1- intermediate shaft; 2 - drive shaft; 3 — differential; 4 - front cover
Rice. 3-44. Details of the drive and intermediate shafts:
1 - flange; 2 — oil seal; 3 — thrust ring of the bearing, 4 — front bearing; 5 - drive shaft; 6—high gear; 7 — hub; 8 - coupling; 9 — low gear; 10 — bushing: 11 — rear bearing; 12 — bearing installation ring; 13 — intermediate shaft bearing; 14 - intermediate shaft
- remove the lock ring 1 (Fig. 3-45) and spring washer 2 of the front bearing;
- remove the rear and front bearings from the differential housing (Fig. 3-46), using a universal puller and stop 67.7853.9559;
- by turning the bolts of the differential housing, separate the housing;
- remove the differential driven gear;
- remove retaining rings 8 (Fig. 3-45) and spring washer 14, then press out the pinion axis and remove the satellites and drive axle drive gears with support washers.
Rice. 3-45. Transfer case differential parts:
1 - retaining ring; 2 - spring washer; 3 - bearing mounting ring; 4 — differential housing bearings; 5 — driven gear; 6 - front differential housing; 7 — front axle drive gear; 8 — retaining ring of the satellite axis; 9 — satellite; 10 — rear differential housing; 11, 15 — support washer; 12 — rear axle drive gear; 13 — satellite axis; 14 - spring washer
Rice. 3-46. Pressing the bearing from the differential housing:
1 — puller A.40005/1/6; 2 — stop 67.7853.9559; 3 - bearing
- the axial clearance of each axle drive gear should be 0-0.10 mm, and the moment of resistance to rotation of the gears should not exceed 14.7 N m (1.5 kgf m). If the gap is increased, replace the support washers with others of greater thickness; if the specified gap cannot be obtained when installing support washers of the greatest thickness, replace the gears with new ones due to their excessive wear;
- The drive and intermediate shafts are installed in the transfer case housing simultaneously (see Fig. 3-47);
- Press the bearings onto the differential housing using mandrel 67.7853.9558 (see Fig. 3-48);
- Before installation in covers and crankcases, lubricate the working surfaces of the oil seals with LITOL-24 grease;
- Tighten threaded connections to the torques specified in Appendix 2;
- when compressing the transfer case shaft nuts, use mandrel 67.7820.9520 (see Fig. 3-49).
Rice. 3-47. Installation of drive and intermediate shafts into the crankcase:
1 - intermediate shaft; 2 - drive shaft
Rice. 3-48. Pressing the bearing onto the differential housing:
1 — mandrel 67.7853.9558
Rice. 3-49. Compressing the rear axle drive shaft flange nut:
1 — mandrel 67.7820.9520; 2 - flange retainer
Principle of operation
Transfer case Niva Chevrolet:
1 – driven gear; 2 – differential bearings; 3 – spring washer; 4 – retaining ring; 5 – differential lock clutch; 6 – gear ring of the differential housing; 7 – gear ring of the front axle drive shaft; 8 – front axle drive shaft bearing; 9 – oil deflector; 10 – dirt deflector; 11 – front axle drive shaft; 12 – flange; 13 – oil seal; 14 – oil drain plug; 15 – driven gear of the speedometer drive; 16 – speedometer drive drive gear; 17 – hole plug for filling and checking the oil level; 18 – front cover of the transfer case; 19 – roller bearing of the intermediate shaft; 20 – transfer case suspension bracket; 21 – drive shaft bearing cover; 22 – thrust ring of the bearing; 23 – drive shaft bearings; 24 – overdrive gear; 25 – gearshift clutch hub; 26 – gear shift clutch; 27 – transfer case housing; 28 – reduction gear; 29 – low gear bushing; 30 – drive shaft; 31 – back cover; 32 – ball bearing of the intermediate shaft; 33 – intermediate shaft; 34 – differential housing; 35 – thrust washer of the rear axle drive gear; 36 – rear axle drive shaft bearing; 37 – rear axle drive gear; 38 – satellite; 39 – satellite axis; 40 – retaining ring of the satellite axis; 41 – transfer case suspension axis; 42 – spring washer; 43 – front axle drive gear.
Regardless of the modification of the Chevrolet Niva, the transfer case has the same design. In accordance with the functions performed, its elements can be divided into the following key nodes:
- drive shaft, which transmits force from the manual transmission to the mechanism;
- center differential, which allows the front and rear axles to rotate asynchronously, at different angular speeds;
- differential lock assembly. It, if necessary, connects the bridges, ensuring their synchronous rotation regardless of the load;
- reduction gear, which increases torque and reduces driving speed;
- the transfer case drive lever, through which the driver controls its operation.
The design of the transfer case includes the following parts:
- driven gear;
- intermediate shaft and its bearing;
- clutch with differential bearings;
- satellite axis;
- shafts, bearings and seals (oil seals) of axle drives;
- satellites with an axis;
- frame.
In normal mode, engine torque is transmitted through the shaft to the drive gear. The latter distributes it through satellites, which transmit force to the axle drive shafts.
When downshifting, power is transmitted through an additional gear, which slows down the speed and increases torque. This allows you to overcome steep climbs and difficult sections of the road.
Engaging the differential lock stops the rotation of the gears. As a result, the axle drives begin to rotate synchronously. This helps prevent slipping in mud or snow. The only exception is diagonal hanging. It will not be possible to move the car without outside help.
Important! Locking the differential increases the load on the transmission and accelerates tire wear.
Eliminating prerequisites
The misalignment of the transfer case occurs due to an undeveloped design. Therefore, many craftsmen strive to modify the fastening so as not to bother with alignment once a year. A special frame is used for this. In recent years, it can be purchased in stores, but you can also make it yourself.
The advantages of this modification are the following:
- The transfer case is mounted on the rigid base of the subframe. The attachment to the body is made through a subframe, this allows to reduce the level of vibration transmitted to the body;
- It plays the role of a kind of protection for the crankcase;
- Also worth mentioning is adding additional rigidity to the side members.
- Among the disadvantages, we can mention a slight decrease in clearance. Although, in light of the advantages, this does not play a special role.
To assemble the subframe you will need a square pipe. Some people use a corner, but in this case the structure will be less durable. The support plates are made of sheet steel.
Before assembly, you should cut off the old transfer case mounting bolts. Now it will be installed on the subframe. The pipe is cut to size and the frame is welded. After that, holes are drilled in the crossbars for fastening the transfer case.
It is important not to make a mistake with the sizes. The next step will be assembling the mount to the body
Sheet steel support plates are welded to the subframe. Holes are drilled in it. After fitting, you need to drill holes in the floor of the car.
M12 bolts should be used for fastening
, as well as thick washers. After installing the subframe, do not forget to treat it with an anti-corrosion compound. This will increase the service life of the part. This is how, through simple manipulations, you can get rid of one of Niva’s sores.
Conclusion
. Even great cars have flaws. The domestic SUV Niva is no exception. During active use, vibrations emanating from the transmission may occur. That’s when the question arises of how to center the transfer case on the Niva. In fact, this work is not difficult, but there are some nuances that are better to know before starting work. Some people, knowing this feature of this car, install a subframe, this can significantly reduce the noise of the transmission.
Transfer case design
All parts of the transfer case housing 2121 are cast and made of aluminum alloy, and are connected to each other using studs and nuts. The hatch, which is made in the upper part of the crankcase, is closed with a metal cover. To center the front cover, the crankcase has two alignment pins. Cardboard gaskets are used as a factory seal in the crankcase-cover connections, but during repairs, a special sealant can be used instead of them. Seals, as a seal, are installed on the shift forks and differential locks, as well as on absolutely all shafts. The oil filler and drain holes are located in the front cover.
The filler hole performs an additional function - monitoring the oil level in the crankcase. Two ball bearings installed in the crankcase and the front cover support the drive shaft. The absence of play in the bearings is ensured by the shaft flanges, on the one hand, as well as a flange thrust ring with a self-locking nut at the front and a thrust washer with a nut at the rear bearing, on the other hand. The installation ring is located in the groove of the outer ring of the rear bearing and is clamped by the crankcase and the rear cover, thereby preventing axial displacement of the drive shaft.
Drive shaft
The drive shaft 2121 has two gears. The front gear is larger and provides higher gears and is installed with the possibility of free rotation on the shaft journal, the hardness of which is ensured by heat treatment. The smaller rear gear is correspondingly responsible for the lowest stage and is already installed on a heat-treated bushing, tightly mounted on the shaft. Each gear has two ring teeth - helical and spur. The outer (larger) ring with oblique teeth is in a state of constant engagement with the counter gears of the intermediate shaft, the spur (smaller) ring engages with the clutch when changing gears. The coupling moves along the hub, which sits rigidly on the splined part of the shaft between the gears, and when engaged with the corresponding gear, it transmits torque to the required gear pair. If the clutch is located in the middle position, then no torque transmission occurs, and, therefore, no rotation will be transmitted from the engine to the wheels.
Intermediate shaft
On the intermediate shaft of transfer case 2121 there are two helical mating gears, which are in constant mesh with the corresponding drive gears. The front gear has another mesh with the differential gear. The nature of the load on the intermediate shaft is such that it must be installed in bearings of different types: the rear ball and the front roller. Fixation against axial displacement is carried out according to the same scheme as for the drive shaft. The speedometer takes data directly from the transfer case intermediate shaft. This is provided by a steel drive gear pressed into the end of the intermediate shaft, and a driven plastic gear mounted on the shaft of the speedometer drive housing.
Repair of transfer case VAZ 2123
To carry out the work, it is necessary to provide free access to the lower part of the car by placing the car on a pit or overpass.
To repair the transfer case you will need:
- a set of open-end and socket wrenches;
- mounting blade;
- circlip and bearing pullers;
- chisel;
- hammer;
- punch;
- tweezers;
- torque wrench;
- support for transfer case;
- a vice whose jaws are made of soft metal (metal spacers can be used).
Useful! You will also need a set of gaskets, graphite grease, sealant and new self-locking nuts.
Removal and installation
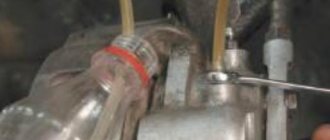
To remove the transfer case, you must perform the following steps:
- disconnect the ground wire from the battery;
- dismantle the floor tunnel lining and the gearshift knob;
- remove the upper sealing cover of the gearshift lever;
- unscrew three screws;
- remove the lever hatch cover;
- remove the bottom cover;
- disconnect the wires from the speed sensor;
- unscrew the nuts securing the cardan shaft flanges;
- disconnect the front and rear universal joints from the transfer case;
- place a stop under the transfer case;
- unscrew the nuts of the mounting brackets;
- slightly lower the transfer case;
- disconnect the wires from the switch sensor indicating a locked differential;
- remove the transfer case;
- Unscrew the fastener and disconnect the right and left suspension brackets.
Installation of the unit is performed in reverse order.
Disassembling the transfer case of the Niva Chevrolet
Before disassembling the transfer case, the transmission oil must be drained from it. The further procedure looks like this:
- disconnect the rod from the axis of the differential lock fork;
- unscrew the nuts holding the drive housing, which transmits torque to the front axle cardan flange;
- pry off the part with a screwdriver;
- remove the crankcase together with the drive shaft;
- pry with a screwdriver and remove the lock washer holding the axis of the lever that controls the differential lock;
- take a soft metal drift;
- knock the axle out of its seat;
- remove the lever that switches the lock;
- unscrew the warning light switch;
- remove the lever spring from the fork rod;
- unscrew the nuts securing the front axle cardan drive housing cover;
- remove the cover together with the gasket;
- remove the spring;
- remove the retainer ball from the groove in the crankcase;
- unscrew the locking bolt holding the locking clutch;
- remove it together with the spring washer;
- remove the fork rod cover;
- remove the coupling along with the plug;
- remove the flange;
- squeeze and pull out the retaining ring holding the bearing on which the front axle drive rotates;
- remove the shaft along with the bearing;
- Remove the oil seal and thrust ring from the dismantled part;
- use a puller to pull the bearing off the shaft;
- unscrew the nut;
- Remove the control lever shaft. Along with it, the traction is removed;
- remove the lever and spacer sleeve;
- press out the plastic petals with a screwdriver;
- remove the locking sleeve from the lever;
- pull out the rod;
- remove the rubber bushing and cushion using a screwdriver;
- Pull the spacer bush out of the lever. To do this, you need to first unclench its petals;
- remove the rubber and locking bushings;
- unscrew the nuts holding the control bracket and remove it together with the fork;
- Unscrew the fastening and remove the axle;
- unscrew the nut and remove the drive shaft flange;
- Unscrew the fastener and remove the bearing cover;
- unscrew the 8 fastening nuts;
- remove the rear cover of the transfer case together with the rear axle drive shaft;
- remove the gasket;
- remove the shaft from the cover and remove the bearing from it;
- unscrew the nuts and dismantle the hatch along with the gasket;
- unscrew the bolt securing the rod fork;
- move the cover using a screwdriver;
- cover the hole with your finger, holding the spring with the ball;
- remove the ball;
- remove the spring with tweezers;
- remove the clutch fork that changes gears;
- dismantle the spacer sleeve made of plastic;
- pull out the rod;
- using a screwdriver, remove the rubber sealing rings;
- loosen the nuts holding the rear bearings of the intermediate and drive shafts. To do this you will need two 27mm wrenches, an impact screwdriver and a hammer;
- remove the nuts;
- remove the washers;
- unscrew the nuts from the shafts, remove them together with the washers;
- remove the drive shaft flange;
- remove the thrust ring securing the bearing;
- unscrew the 3 fastening nuts. They cannot be unscrewed without removing the flange;
- remove the front transfer case cover along with the differential and gasket;
- Remove the mounting ring holding the bearing from the differential mechanism housing. This is best done with pliers;
- separate the front cover of the box and the differential mechanism;
- take a soft metal drift;
- knock out the outer ring holding the bearing;
- Remove the bearing from the differential housing. To do this, you need to remove the retaining ring and pull out the part with a puller;
- remove the rear bearing in the same way;
- We make marks on both differential housings with a white marker so that during assembly we do not disturb the balancing of the mechanism;
- clamp the differential housing in a vice, the jaws of which are made of soft material;
- unscrew the bolts;
- separate the front and rear differential housings;
- knock down and pull out the driven gear;
- Unclench and remove the retaining ring;
- pull out the spring washer;
- dismantle the satellite axis;
- pull out the gears;
- remove the mounting rings;
- dismantle the axles of the axle drives;
- pull out the drive shaft and flush housing from the crankcase;
- securely clamp the shaft in a vice with soft jaws;
- Use a puller to pull off the bearing along with the gear, coupling and bushing. This must be done with the low and high gear parts;
- remove the drive shaft bearing;
- take the wash pit;
- pull out the separator and remove the rollers from its front bearing;
- remove the inner ring;
- disassemble and dismantle the rear bearing of the shaft, which is removed in the same way as the front bearing.
Reassembling the transfer case is done in reverse order. The tightness of the flange nuts must be checked using a torque wrench.
Parts must be checked before installation. They should not have burrs, wear or other defects.
Important! Damage or deformation of the covers causes misalignment of the shafts, so special attention must be paid to this.
Alignment
To adjust the transfer case, you must raise the car on a lift so that all four wheels do not touch the ground. The operation is performed by two people. The driver sits behind the wheel, and the assistant does the alignment. This is done like this:
- lift the car;
- slightly loosen the transfer case fastenings so that it can move;
- start the engine, engage 4th gear and spin the wheels to a speed of 60-90 km/h;
- tighten the transfer case fastening.
If everything is done correctly, the transfer case will take the optimal position and will not vibrate while driving.
Transfer case Niva 21213
Model VAZ-21213 is an all-terrain passenger car with permanent all-wheel drive and differential lock. Brand 21213 is a restyled version of the first VAZ SUV, VAZ-2121. RK Niva 21213 has three gears:
- the first - with a gear ratio of 1.2;
- the second, lowered – with the number 2.135;
- neutral
21213 is equipped with 4-speed and 5-speed gearboxes, and when the first speed of the transfer case is turned on, the car operates in standard mode, the gear ratios in the transmission are from 5-speed. The checkpoints are as follows:
When you turn on the second position of the transfer case lever (reverse position), the gear ratios change (lower):
On ordinary roads, the transfer case is always in first gear, the transfer case control lever (reduction gear) is pushed forward. The neutral gear of the RK disconnects the transmission, and in this position the car does not drive; there is also a neutral in the gearbox.
Motorists often ask the question: why is neutral gear needed in a transfer case? The neutral is used when connecting additional units to the transmission, for example, a mechanical winch; in this case, a power take-off must also be installed.
Transfer case Chevrolet Niva
/ Chevrolet/ chevrolet-niva/ Transmission/ Transfer case
Design Features
| Rice. 5.5. Transfer case: 1 – driven gear; 2 – differential bearings; 3 – spring washer; 4 – retaining ring; 5 – differential lock clutch; 6 – gear ring of the differential housing; 7 – gear ring of the front axle drive shaft; 8 – front axle drive shaft bearing; 9 – oil deflector; 10 – dirt deflector; 11 – front axle drive shaft; 12 – flange; 13 – oil seal; 14 – oil drain plug; 15 – driven gear of the speedometer drive; 16 – speedometer drive drive gear; 17 – hole plug for filling and checking the oil level; 18 – front cover of the transfer case; 19 – roller bearing of the intermediate shaft; 20 – transfer case suspension bracket; 21 – drive shaft bearing cover; 22 – thrust ring of the bearing; 23 – drive shaft bearings; 24 – overdrive gear; 25 – gearshift clutch hub; 26 – gear shift clutch; 27 – transfer case housing; 28 – reduction gear; 29 – low gear bushing; 30 – drive shaft; 31 – back cover; 32 – ball bearing of the intermediate shaft; 33 – intermediate shaft; 34 – differential housing; 35 – thrust washer of the rear axle drive gear; 36 – rear axle drive shaft bearing; 37 – rear axle drive gear; 38 – satellite; 39 – satellite axis; 40 – retaining ring of the satellite axis; 41 – transfer case suspension axis; 42 – spring washer; 43 – front axle drive gear |
| Rice. 5.6. Transfer case drive: 1 – differential lock clutch fork; 2 – coupling differential locks; 3 – fork locking bolt; 4 – rod protective cover; 5 – spring chaga; 6 – differential lock fork rod; 7 – front axle drive housing cover; 8 – lock washer; 9 – bushing of the lever axis; 10 – lever axis; 11 – differential lock lever la; 12 – gear shift fork rod; 13 – control lever fork; 14 – control lever; 15 – differential lock lever rod; 16 – gear shift clutch; 17 – coupling fork gear shifting; 18 – spacer sleeve; 19 – locking ball; 20 – spring bushing fic Satora; 21 – clamp spring; 22 – switch for the differential lock warning lamp; 23 – axis of the control lever fork; 24 – fork mounting bolt |
The transfer case is designed to vary the torque in magnitude and distribute it between the front and rear drive axles. The car is equipped with a two-speed transfer case with a center differential lock. The transfer case is controlled (selecting a higher or lower gear, turning on/off the differential lock) with one lever through a mechanical lever drive.
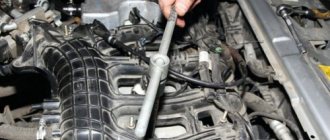
Changing the oil in the transfer case
According to the service book, the oil in the transfer case must be replaced every 45,000 km.
You will need: a 12mm hexagon, a syringe for filling transmission units, a container for used oil.
| HELPFUL ADVICE It is more convenient to perform this operation on an inspection ditch or on a lift. It is recommended to drain the oil immediately after a trip, while |
| 1. Remove the drain plug and drain the oil. | 2. Screw in the drain plug and turn out the filler plug. |
| 3. Using a syringe, fill in fresh oil to the level of the lower edge of the filler hole. |
| 4. Close the filler plug. |
Replacing transfer case shaft seals
You will need: a 24mm wrench, a 12mm hexagon, a syringe for filling transmission units, a container for used oil.
| 1. Drain the oil from the transfer case (see “Changing the oil in the transfer case”). |
| 2. Disconnect the corresponding driveshaft from the transfer case (see “Removing and installing the driveshaft”). |
| 3. Unscrew the self-locking flange nut, having previously locked the transfer case differential and engaged the gear. |
| WARNING Self-locking nuts must not be reused; replace them with new ones! |
| 4. Remove the nut and washer. | 5. Remove the flange from the shaft. |
| 6. Remove the oil seal using a screwdriver. | 7. Apply sealant to the seating surface of the seat in the crankcase under the oil seal, lubricate the working edge of the oil seal with oil and press in the oil seal using a suitable mandrel. |
| USEFUL ADVICE You can use an old oil seal as a mandrel. |
| WARNING The transfer case shaft seals have the same mounting dimensions, but have oppositely directed oil removal grooves. When installing, follow the direction of shaft rotation indicated on the oil seal. |
| 8. Install the removed parts in the reverse order of removal. |
Replacing the speed sensor drive
You will need a key "13".
| 1. Unscrew the three nuts of the speed sensor drive housing and... | 2. ...remove the housing. |
| WARNING A cardboard gasket may be installed under the drive housing. Replace a badly compressed or damaged gasket. |
| 3. Remove the drive shaft assembly with gear and oil seal from the housing. |
| 4. Replace faulty parts and install the drive in the reverse order of removal. |
| USEFUL ADVICE To better seal the mating of the body parts, lubricate them, as well as the sealing gasket (if any), with sealant. |
Replacing transfer case suspension cushions
You will need: keys “13”, “17”.
| 1. Place a support under the transfer case. |
| 2. Unscrew the nuts securing the cross member of the transfer case rear support to the body. | 3. Unscrew the nut... |
| 4. ...remove the bolt and... | 5. ...remove the cross member assembled with the support pad. |
| 6. To replace the pillow, unscrew the two nuts that secure it. | 7. If necessary, also replace the rubber bushings of the cross member. |
| 8. To replace the transfer case side mounting cushion, unscrew the nut of the box mounting axis,... | 9. ...two nuts securing the airbag to the body and... |
| 10. ...remove the pillow. The second pillow is removed in the same way. |
| 11. Install the parts in the reverse order of removal. |
Replacing the differential lock warning lamp switch
You will need a key "27".
| WARNING The differential lock warning light switch can only be replaced with the transfer case removed from the vehicle, since there is not enough space on the vehicle itself to use the key. |
| 1. Remove the transfer case (see “Removing and installing the transfer case”). |
| 2. Loosen the switch and... | 3. ...turn it out of the box housing. |
| 4. Install the switch in the reverse order of removal. |
Removing and installing the transfer case
You will need: keys “13”, “17”.
| 1. Disconnect all propeller shafts from the transfer case (see “Removing and installing the driveshaft” and “Removing and installing the intermediate shaft”). |
| 2. Inside the car, disconnect the transfer case lever cover from the floor tunnel casing and... | 3. ...remove the cover together with the lever handle. |
| 4. Remove the rubber cover of the lever. | 5. Unscrew the nuts securing the left side cushion of the box suspension to the body and loosen the nuts securing the remaining cushions. |
| 6. Disconnect the wires from the differential lock warning lamp switch. | 7. Place a support under the transfer case, unscrew the remaining nuts securing the cushions and... |
| 8. ...remove the transfer case. |
| 9. Install the transfer case in the reverse order of removal. |
Disassembling and assembling the transfer case
You will need: keys “10”, “13”, “17”, “24”, “27”, screwdriver, snap ring puller, bearing puller, tweezers, drift, chisel, vice with soft metal jaws .
| 1. Drain the oil from the transfer case (see “Changing the oil in the transfer case”) and remove it from the vehicle (see “Removing and installing the transfer case”). |
| 2. Use a screwdriver to pry up the locking sleeve and remove the gearbox control lever rod. | 3. If the spacer sleeve and rubber ring are worn out, then remove them from the lever by releasing the tabs of the spacer sleeve. |
| 4. To reinstall the lever rod, install the spacer, locking bushings and rubber ring into the lever rod in the reverse order of their removal. | 5. Remove the retaining ring and remove the control lever shaft. |
| 6. Unscrew the fork axle bolt and... | 7. ...remove the control mechanism. |
| 8. Check and, if necessary, replace the plastic bushings of the lever, clean and lubricate all hinges of the mechanism with grease. | 9. Unscrew the differential lock warning lamp switch from the transfer case housing. |
| 10. Unscrew the nuts securing the control lever bracket and... | 11. ...remove it. |
| 12. Unscrew the nut securing the fork in the bracket and... | 13. ...disassemble the bracket. Replace worn or damaged parts. |
| 14. Unscrew the nuts securing the side cover... | 15. ...remove the cover and the gasket installed under it. |
| NOTE Replace a badly compressed or torn gasket by lubricating it with a thin layer of sealant on both sides before installation. |
| 16. Loosen the nut securing the gear shift fork. | 17. Using a screwdriver, remove the plug for the hole for the gear shift rod from the gearbox housing. |
| 18. Turn the rod around its axis and smoothly push it out of the crankcase until the locking ball appears. Use tweezers to remove the ball and... |
| WARNING Pull out the rod very carefully, since the locking ball is spring-loaded and can suddenly fly out of the rod socket. |
| 19. ...clamp spring. | 20. Remove the rod from the crankcase, alternately removing the fork and... |
| 21. ...plastic bushing. | 22. Completely remove the rod. |
| 23. If necessary, replace the rod O-ring. | 24. Unscrew the nuts of the front axle drive housing cover and remove it. |
| 25. Remove the differential lock rod retainer spring. | 26. Remove the differential lock fork mounting bolt. |
| 27. Move the rod protective cover away from the crankcase and... | 28. ... while extending the rod, tilt the transfer case forward so that the retainer ball rolls into the front axle drive housing. Having finally removed the rod, remove the plug from it, and then remove the ball from the crankcase. |
| 29. If necessary, replace the rod o-ring. | 30. Unscrew the five nuts securing the front axle drive housing,... |
| 31. ...use a screwdriver to separate it from the transfer case housing and... | 32. ...remove the crankcase. |
| 33. Remove the differential lock clutch. | 34. Remove the gasket or remove any remaining gasket. |
| 35. Disassemble the front axle drive, to do this, fix the shaft in a vice with soft jaws, unscrew the self-locking nut of the front axle drive flange and remove the washer installed under it. |
| WARNING Self-locking nuts must not be reused; replace them with new ones! |
| 36. Remove the flange. | 37. Using a puller, remove the retaining ring and... |
| 38. ... remove the shaft from the crankcase complete with bearing. | 39. Remove the oil slinger and thrust rings from the shaft. Further disassembly of the shaft is described below. |
| 40. Unscrew the nuts securing the bracket to the transfer case body, and then the remaining nuts securing the rear cover of the box. | 41. Use a screwdriver to separate the rear cover from the box housing and... |
| 42. ...remove the cover along with the rear axle drive shaft. | 43. To disassemble the back cover, fix the shaft in a vice with soft jaws and unscrew the self-locking flange nut. |
| WARNING Self-locking nuts must not be reused; replace them with new ones! |
| 44. Remove the nut, washer and flange. | 45. Remove the retaining ring from the inside of the cover and... |
| 46. ...remove the shaft assembly with bearing from the cover. | 47. Remove the oil slinger and thrust rings from the shaft. |
| 48. Remove the speed sensor drive (see “Replacing the speed sensor drive”). | 49. Unscrew the self-locking nut of the intermediate shaft mounting flange. |
| WARNING Self-locking nuts must not be reused; replace them with new ones! |
| 50. Remove the nut, washer and flange. | 51. Using a puller, remove the drive shaft rear bearing retaining retaining ring. |
| 52. Unscrew the nuts securing the front drive shaft bearing cover and... | 53. ...remove the cover. |
| 54. Unscrew the remaining nuts securing the rear cover of the transfer case housing and... | 55. ...remove the cover. |
| 56. Remove the differential from the gearbox housing. | 57. Remove the retaining rings of the drive and… |
| 58. ...intermediate shaft. | 59. Remove the intermediate and... |
| 60. ...drive shafts. | 61. To disassemble the differential, remove the retaining ring from the differential shaft. |
| 62. Remove the thrust washer. | 63. Press the bearings from the differential housing journals using a puller. |
| 64. Place marks on the separated parts of the differential housing so as not to disturb their mutual balancing and alignment. | 65. Remove the differential housing pinch bolts. |
| 66. Using a puller... | 67. ...remove the driven gear. |
| 68. Using a chisel... | 69. ...separate the front and rear differential housings. |
| 70. Remove the axle gear from the front housing. | 71. Remove the retaining ring of the pinion axle,... |
| 72. ...puck and... | 73. ...remove the satellite axis from the holes in the rear housing. |
| 74. Remove the satellites from the rear housing and... | 75. ...the second gear of the axle shaft. |
| 76. Install the removed parts and reassemble the differential in reverse order. |
| 77. If necessary, disassemble the intermediate shaft. Remove the front intermediate shaft bearing outer race. | 78. Using a screwdriver, carefully, without damaging the separator, press the rollers out of the separator and... |
| 79. ...remove the separator. | 80. Using a spacer (socket head) of a suitable diameter, install the puller so as not to damage the speedometer drive gear, press the inner bearing ring off the shaft and... |
| 81. ...remove the ring. | 82. To remove the rear bearing, unscrew the nut, remove it along with the washer and... |
| 83. ...press the bearing with a puller. | 84. Assemble the intermediate shaft in the reverse order of removal. After tightening the bearing fastening nut to the required torque, lock it using a bit, pressing the shoulder of the nut into the groove of the shaft. |
| 85. To disassemble the drive shaft, unscrew the bearing mounting nut and remove it. | 86. Remove the thrust washer. |
| 87. Using a puller, remove the bearing from the shaft,... | 88. ...thrust ring and low gear. |
| 89. Remove the gear clutch together with the hub and... | 90. ...high gear. |
| 91. Using a puller, remove the bearing from the shaft. |
| 92. Assemble the drive shaft in the reverse order of removal. After tightening to the required torque (see appendix 1), secure the bearing fastening nut using a bit. |
| 93. Assemble the transfer case in the reverse order of disassembly. |
| NOTE Press the bearings onto the shafts using a mandrel, applying force only to the inner race of the bearing. When pressing the bearing into the housing (crankcase), apply force only to the outer race. |
| WARNING Self-locking nuts must not be reused; replace them with new ones! Replace all removed gaskets with new ones. |
| USEFUL ADVICE: Install even new gaskets using sealant. |
Comments
No comments yet
Leave a comment Cancel reply
Vibration
Vibration in the body is the main “disease” of the Niva; it often occurs due to improper alignment of the transfer case. Most often, vibration occurs on VAZ 21213/21214 cars, since the transfer case is mounted only on two supports on the sides of the body; on the Chevrolet Niva, the transfer case is already installed on three supports. But before you start adjusting the position of the transfer case, you should check the condition of other parts of the chassis - vibration can occur for other reasons:
- driveshafts are poorly secured;
- wheels are not balanced;
- there is play in the cardan crosspieces (vibration is especially affected by play in the rear driveshaft crosspieces);
- The vibration comes from the engine itself.
Vibration when starting off on a Niva can also occur for the following reasons:
- the mounting supports of the transfer case have become loose;
- The rubber on the RK supports themselves broke.
The main stages of replacing fluid on a Chevrolet Niva:
- We substitute a prepared special container under the place where there is a special hole through which waste is drained from the gearbox housing itself.
- To drain easily, remove the plug from the holes that are responsible for filling and draining the oil, and drain it.
- After the oil has been drained, the drain plug must be cleaned of various contaminants and inserted into place. If the oil that you drained contains a lot of contaminants or contains a lot of impurities, then the gearbox is washed, after which about nine liters of special flushing oil is poured into the crankcase itself, and the plug is screwed back into the oil filling hole.
- We hang up all the rear wheels or one, engage first gear and start the engine, it should run for about three minutes.
- After the engine has been running, drain the flushing oil, wipe the oil drain plug and install it in place.
- Using a special device or a regular syringe, pour new oil into the crankcase. Fill in 1.6 liters. After the entire procedure is completed, we put the plug in place.
At this point, the process of replacing the fluid in the box can be considered complete.
Razdatka on Niva 21213 main faults and their elimination
The Niva has excellent off-road potential, and that is why it becomes an indispensable assistant when foraying into the wilderness. But, as with any car, problems can also occur with a domestic SUV.
Like any mechanism, the transfer case also fails, and this can be easily determined by the following symptoms:
- Delays when turning on the front axle, its abrupt shutdown. This situation can only happen in the case of early modifications with a demultiplier. All Niva cars have permanent all-wheel drive, but many craftsmen upgrade their cars, after which they have the ability to disable the front axle.
- Constant overheating under load. A possible reason will be a low oil level, if this is the reason, then the oil needs to be added, if not, then it is caused by increased friction of the parts.
- Increased gearbox oil consumption. The reason is any leak due to wear of the seals, poorly tightened crankcase bolts, or simply a drain plug that is not fully tightened.
- Loosening of the transfer case and gearbox. Leads to strong vibrations in the cabin. It may be related to the fastening of mechanisms or the alignment of the transfer case.
- Vibrations can also be caused by damaged transmission mounts; this issue can be resolved by simply replacing broken parts.
- Loosening of the flange bolts, as well as its wear. It can be solved by replacing or tightening the bolts, or in the worst case, by purchasing an intermediate shaft. This breakdown leads to noise and vibration, initially only when the car starts from a standstill, later it turns into a constant hum at speeds over 80 kilometers per hour.
- Jamming of the propeller shaft joints. Breakage occurs due to drying out of the elements; to fix it, you will have to renew the lubricant using a syringe. If re-syringing does not help, then you will have to replace the entire part.
- Similarly, the CV joint can jam, this happens either due to lack of lubrication or due to deformation. In case of severe wear, you will have to buy the entire intermediate shaft; if the problem was only with lubricant, you can simply replace it.
- Cardan play can be resolved by replacement.
- Wear of the differential can lead to noise and crackling when cornering; only replacing the differential will correct this reason.
- Also, a possible cause of noise when cornering is often the satellites and their difficult movement. This is due to burrs, which can be removed with a needle file.
- Often it is not the transfer case itself that fails, but the lever, rod and fork, which prevent full control of the unit. Also, these parts can simply jam; to do this, they must be cleaned of dirt or, in case of severe wear, replaced.
Filling volumes for a VAZ 21214 car
It’s one thing to buy a car, and another to know and understand what to do with it: what to protect it from, when to “feed” it, how to operate it. No matter what kind of car you own, sooner or later you will need to refuel it. Today we will talk about the filling volumes of the VAZ 21214 and what to fill where.
First of all, let's talk about the fuel tank. Its volume in the VAZ 21214 is 42 liters (including reserve). Fill with gasoline with an octane rating of 91 to 93.
The fuel supply system is necessary to power the car engine, as well as its cleaning and storage.
The volume of the cooling system is 10.7 liters, which also includes the interior heating system. Fill in coolant whose freezing point is not higher than minus 40°C.
Cooling system - devices that provide supply of cooling medium to heated engine parts and removal of excess heat, i.e. maintaining the engine within the required thermal limits.
Engine lubrication system - 3.75 liters. It is necessary to select a specific oil, depending on the ambient temperature.
Temperature Oil
-20°С +40°С SAE 15W-40
-25°С +45°С SAE 10W-40
-30°С +45°С SAE 5W-40
-25°С +35°С SAE 10W-30
-30°С +35°С SAE 5W-30
The main task of the lubrication system is to reduce friction of mating parts. It also provides cooling of engine parts, protection against corrosion, removal of wear products and carbon deposits.
The filling volume of the gearbox housing is 1.35 liters, the transfer case housing is 0.75 liters, and the front axle housing is 1.15 liters. and rear axle housing 1.3 l. To fill these units, gear oils with a quality level corresponding to API GL-5 and a viscosity of 75W-90 are suitable.
The steering gear housing has a volume of 0.18 liters. You can add 75W-90 gear oil here.
The hydraulic brake system (0.515 liters) and clutch release system (0.2 liters) will require DOT-4, -3 brake fluid, respectively.
The volume of the windshield washer and rear door glass washer reservoir is 2 liters. You can fill it with either regular water or a mixture of water and windshield washer.
https://www.youtube.com/watch?v=M4OqWDFaqHM
How to use it correctly
There is a diagram on the shift lever. To turn it on, you need to move the lever to the right, up. To lock the differential, pull it all the way to the left. There are also Latin letters on the lever. So, L is a low gear, N is neutral, and H is high. Now let's find out how to use all this so that we don't have to repair the mechanism and change the transfer case bearings. The Chevrolet Niva is a universal-purpose vehicle that is actively used not only on asphalt surfaces, but also off-road. So, if you have to overcome a ford or a puddle, you should stop completely and turn on a lower set of steps
Please note: it should only be turned on after a complete stop. Even at 5 kilometers per hour you will have problems with the transfer case
But you can lock the differential even while driving. This won't bring any surprises. Unless due to the constantly working two axles and axle shafts. In what cases is it necessary to turn it on on a Chevrolet Niva? Its work will be needed when crossing “diagonals”, fords and during a long climb, which you climb slowly. Motorists often ask: is it possible to drive for a long time with a lock? Please note that it should only be enabled when absolutely necessary. Otherwise, the load on the teeth and shafts increases. If you drive like this on the asphalt at high speed, you will soon need to replace the transfer case on your Chevrolet Niva.
Centering method
To carry out this work you will need a lift, although with some skill you can get by with simple supports. First you need to prepare the car. If there is a lift, it is raised up. If supports are used, the corners of the machine are jacked up one by one and it is placed on them
Please note that all supports must be stable, otherwise the work will be unsafe. You should also prepare the tool in advance
If there are no plans to simultaneously replace other parts, then it is quite possible to get by with a ratchet and a “13” head. During operation, an assistant must be in the cabin.
Adjustments are made in the following order:
- To begin with, you should evaluate the condition of the splines on the cardans. If they are very worn, then most likely you will not be able to perform the alignment correctly. In case of significant wear, parts should be replaced;
- The transfer case mount is inspected. Often the displacement can be seen with the naked eye;
- Next, loosen the transfer case mount. Just don’t unscrew it completely;
- After this, start the engine and “accelerate” the car to a speed of 80-90 km/h. In this case, the transfer case will fall into place on its own;
- The crucial point is to consolidate the result obtained. This can be achieved in 2 ways. Mechanics argue which one is better, but both are used in everyday life. Most often, the engine is turned off, and with its help the transfer case and cardan shafts are stopped.
- All that remains is to quickly tighten the nuts. Disadvantage here 2. Stopping the box in this way can have a negative impact on its condition.
- Also, you need to tighten the fastener as quickly as possible, otherwise it will be of no use. A more reliable, but technically complex method is to tighten with the engine running;
- The car is lowered to the ground and testing is performed.
If the vibration persists, the procedure should be repeated.
VAZ 21213 Checking the oil level of a manual transmission
Checking the manual transmission oil level
Left: The inspection screw plug (1) of the manual transmission is located in the direction of travel on the right at half the height of the transmission housing. The drain plug (2) is located at the bottom of the gearbox.
Right: The fluid level in the power steering reservoir (2) must be checked with the engine running. If the tank marks are not visible, unscrew the tank cap (1) and check with a dipstick. Arrows point to marks.
A gearbox does not use oil as much as an engine and can only leak through defective seals. If no oil-soaked dirty spots are visible on the outside of the gearbox housing, then this inspection item is complete. Otherwise, you need to check the oil level. The filler (and inspection) plug is located on the left in the direction of travel at half the height of the gearbox housing next to the drive shaft.
|
| To check the atf level, pull the dipstick out of the guide tube (3) located at the rear left in the engine compartment. With warm atf, the fluid level should be in the normal range (1) between the two marks. You can check the level on the extension cord (2) even when the atf is cold. |
| Hint: manually filling with very viscous gear oil using a funnel and a long hose, even when the oil is heated, is a considerable test of your patience and for this reason is not recommended. It is better to use special canisters or a syringe with a built-in hose to add oil. |
The right grade of gear oil
You don't have to think about changing your transmission oil anymore. The transmission mechanism is equipped with a reservoir from which possible impurities are caught using a magnet.
However, gear oil must meet certain requirements. Audi prescribes the use of oil of viscosity class sae 75 w-90 with specification g 50. This is a synthetic oil.
Forced unlock
Sometimes it happens that the lock jams - it cannot be turned off even when the car is completely stopped. The situation is quite common for the Chevrolet Niva. How to solve it? There is a sure way. To do this, turn on reverse gear, accelerate a little, and turn it off while driving. At a certain speed, you can easily “knock it out.” But if a similar lamp continues to light on your instrument panel, as in the photo below, the lock has not been turned off.
What to do in such a situation? It is necessary to turn on the first speed and try to turn off the unit again. Moving back and forth will solve the problem of a stuck differential. In general, it is recommended to turn on the center lock only in serious off-road conditions. At the intersection of dirt roads and sand dunes, a downshift is sufficient.