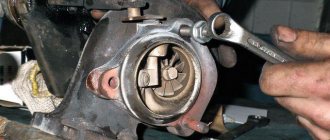
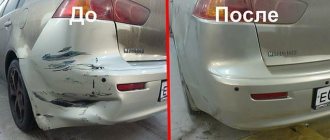
Almost every car owner has been involved in an accident at least once and suffered damage to his car. The most vulnerable to external influences is the bumper, which in most modern cars is made of plastic. Sometimes scratches, cracks, chips and other damage simply occur due to unsuccessful parking. Repairing a plastic bumper yourself is not that difficult. Let's get started!
repaired plastic bumper
Of course, you can simply replace it, but this will be quite expensive. If you're on a budget, it's worth trying to repair the bumper yourself.
Some car owners do not consider it necessary to make minor repairs to bumpers, ignoring cracks and chips. But this not only looks unaesthetic, but also reduces safety, since the protective functions of the bumper are impaired.
What is required for repair and how to choose the right technology
In order to restore a plastic bumper, it is best to purchase a special kit, which includes the following materials:
- fiberglass;
- epoxy resin;
- hardener;
- sandpaper;
- putty for plastic;
- mixing container.
In addition, it is worth having the following tools and materials available:
- varnish, paint of any color;
- wire;
- metal reinforcing mesh;
- electrodes;
- electric soldering iron
So, you decided to repair the plastic bumper yourself. Where to begin? First of all, you must first determine the need to prime the plastic. There are several ways to do this:
Setting fire to plastic. To do this, take a small piece of the bumper, clean it of any remaining paint and dirt, and set it on fire. In this case, you need to carefully monitor the combustion behavior of the material. If the material burns and produces black smoke, there is no need for a primer. If the material burns like a candle, then before the main priming you need to apply primer for plastic.
Buoyancy check. The plastic is dipped into water. If it sinks or goes completely under water, the part does not need to be primed first. When the plastic remains afloat, it means that before applying acrylic primer, there is a need to use a special primer for plastic.
Leveling the surface
After all surfaces have cooled, we sand the seam using a grinder. You shouldn’t rush to remove all the burrs; it’s enough to prepare the surface in a rough form, removing as many irregularities as possible and smoothing out the protrusions. The soldering iron can penetrate deeply into the body of the bumper; there is no need to get carried away and reduce the thickness too much, since the bumper must be repaired carefully, leaving it with the maximum possible strength characteristics.
Step 1. Clean using OSHM
Step 2. Visually check the surface
Step 3. Rub the seams after cooling
Step 4. Sand the seams using a machine
Step 5. Visual inspection
Step 6. Blow with compressed air
Step 7. Shape using an industrial hair dryer
Bumper Dent Repair
Small dents on the bumper can usually be repaired using a hair dryer. The concave surface of the plastic is heated until it softens, after which the dent is leveled until the original appearance of the part is restored.
But there are also more complex cases, when the dent is significant in depth, and the plastic not only bent, but also stretched. Sometimes these dents are called dents, as is the process of fixing them. Extracting a bumper usually requires more complex manipulations, which are discussed in a separate detailed video:
Main defects of the bumper
There are three unspoken classifications of damage to bumpers:
- A network of scratches. The option is considered the easiest, as it requires the least amount of time and other resources. Often the work consists of sanding the damaged surface, treating it with a specialized spray to improve adhesive properties, and then applying a coat of paint.
- Chips, dents and cracks. Leveling is carried out using liquid plastic. Irregularities can also be smoothed out using putty. To eliminate such defects, additional tools will be needed.
- Bumper split. This problem is resolved on an individual basis. Repair of a car bumper in case of splits is carried out based on the degree of damage to the product.
Repairing scratches on the bumper
If there are minor scratches, repairing the bumper is as follows:
- Cleaning the damage with sandpaper and sanding. This must be done so that there are no deep scratches left. Sand until the surface is smooth.
- For deep scratches, apply putty. Then sand the area again using an abrasive material or a sander. In this case, the grinding machine is turned on at minimum speed.
- Degrease the surface to remove dust and grease. The next stage is applying a primer, then painting and varnishing.
- Drying with a special lamp. The temperature of such drying should not be more than 60 degrees, which is recommended for such material.
An important point when carrying out such an operation as repairing scratches on a bumper with your own hands is polishing the scratches. This is done using products for painted surfaces and plastic:
- A small amount of the product is applied to the circular attachment of a polishing machine or drill and rubbed in by hand for some time.
- The machine is turned on as soon as the polish can be evenly distributed over the surface.
This operation takes about 20 minutes. The result will be the removal of irregularities and various roughnesses.
Preparatory stage
It is recommended to start work by removing the bumper. It is very difficult to repair it on site. Restoring a dismantled element by removing it is much more convenient - you can gain access to hidden areas.
Next, be sure to clean the part from dust and dirt. The element is thoroughly washed. At the next stage, they determine what material the element is made of - manufacturers often make marks on the inside using stamping or melting technology. On the reverse side you can see the following symbols:
- PP or PPVT – polypropylene.
- PUR – polyurethane.
- PAG6, GF15, GF30, ABS are hard plastics that melt at very high temperatures.
Fiberglass products are not marked in any way. Professionals recommend removing paintwork and primer in the area where the plastic bumper will be restored. And not only from the outside, but also from the inside. The paint is also removed around the defect - 10-15 centimeters from the edges. When repairing cracks, experts recommend drilling out their ends to prevent future damage to the plastic.
In the case of cracks near the connecting elements, V-shaped grooves are made with a grinder or using emery, where then, in the process of repairing a plastic bumper with your own hands, you will need to apply a special repair compound.
These are general preparatory procedures. Basic repairs depend on what material the part is made of. A bumper made of thermoactive materials is sealed using a hair dryer. You can also solder with a household device. Thermosetting parts are repaired by applying special reinforcing restoration materials with gluing.
Repairing cracks and chips in the bumper
When carrying out a more serious repair of a plastic bumper with your own hands, you must first dismantle this component of the car and carefully treat the entire surface with a degreaser for plastic.
fix cracks on bumper
After this, you can see the actual extent of the damage, because sometimes small cracks are not immediately noticeable due to dirt . Then the sequence of actions is as follows:
- As usual, the damaged area is treated with sandpaper. Using a drill, make a recess in the shape of the Latin letter V.
- Adhesive tape is applied to the damaged area. Then you need to prepare liquid plastic from an adhesive mass and a thickener. Moreover, the liquid plastic must exactly match the type of plastic of the bumper being processed. The mixture is applied behind the tape glued to the bumper.
- When the plastic has hardened, we grind the surface until the defective surface does not stand out and becomes even and smooth to the touch.
- Surface painting and varnishing.
Thus, the question of how to repair a crack in the bumper is resolved.
Finish soldering
After training and honing the skill of repairing a plastic bumper with your own hands on the back side, you should move on to the front side. After melting the plastic on both sides, proceed to leveling the surface.
An eccentric sander and a P240 wheel are suitable for this. When processing a seam, there is no need to try to immediately obtain a perfect and even surface. If you overdo it, you can make the material very thin. Small holes are filled with plastic putties.
Heat sealing repair
Repair of plastic bumpers can be done by heat welding. This is convenient when eliminating torn parts and large cracks. The algorithm of actions will be as follows:
- The tear seam must be softened with a hairdryer.
- The edges of the crack are connected and welded, simultaneously leveling them.
- A reinforcing mesh is laid over the seam and around it, soldering it to the bumper.
- Putty is applied to the surface to be repaired and sanded.
- Apply several layers of paint, then varnish. Dry the surface.
If you need to restore a surface with a destroyed piece of plastic, take a fragment of the same material and solder it together with a reinforcing mesh. Next, primer, putty and paint the bumper.
Bumpers are made from all kinds of plastic. Polyurethane, for example, has a fairly low melting point, so it should be welded carefully without overheating.
gluing the bumper at the crack site
You can also use a heat gun as a welding tool, which has a special operating mode regulator and is therefore more convenient to use. In general, you must always remember that heating should not cause deformation. If the temperature is too high, the plastic softens and returns to its previous position. The heated deformed surface is given its original shape, fixed and cooled.
It is better to start restoring the bumper from the inside, while simultaneously studying the properties of the material, and then weld from the outside.
Sometimes it is easier to fasten the fallen pieces with glue or tape with wire, drilling holes and installing brackets.
What should a car owner do if the bumper is damaged?
What should a car owner do if the bumper is damaged?
Of course, the first thing that comes to mind is to buy a new bumper. When the bumper is very badly damaged, this is the easiest way out of this situation. If the bumper has only minor cracks or scratches, then you can simply repair the plastic bumper at a car repair shop or do it yourself. After all, buying a new bumper is a very expensive pleasure and it is unlikely that every motorist will be able to afford it.
But besides everything else, before purchasing this car part, repair has many advantages:
- This is many times cheaper than purchasing a new bumper;
- This is faster, because often a new bumper needs to be ordered and this can take almost a week, and repairs take from two hours to two days.
– we cannot exclude the fact that when ordering a new bumper from a dubious company, you can get a fake or previously restored bumper at the price of a new one.
Repair of a plastic bumper can be carried out both locally and comprehensively. During local repairs, the damaged part is restored without the need to remove it from the car. But an integrated approach, on the contrary, involves dismantling the bumper, and after completing the repair work, installing it in its original place.
Other methods for repairing plastic bumpers
If professional tools and equipment are not available, repairing plastic car parts can be done in another way.
To join the edges of the cracks, a clamp or clamp is usually used on the removed bumper. It happens that it is not possible to achieve the desired result with one clamp, then two or three pieces are used.
The seam is closed from the inside with staples. They are soldered at a distance of several millimeters from each other, and the seam is melted.
The outside paint is cleaned with a sanding machine. Then, along the cleaned surface, the outer seam is sealed. After cleaning, it is advisable to blow the seam with compressed air.
When applying putty, you must use a special compound for plastic and a rubber spatula. Then the seam is blown again, dried and primed in two layers. Before applying the next layer, the previous one should be allowed to dry for 15 minutes. Minor defects can be eliminated by applying nitro putty. The surface is sanded again with P1000 sandpaper and degreased before applying paints and varnishes.
Repairing a plastic bumper can be done using epoxy resin and fiberglass. This option is carried out if the plastic is split into several small parts and some of them are missing. The broken parts are glued together with superglue. Epoxy resin is applied to the inside, fiberglass is glued onto it and coated with epoxy resin again.
With this method, the surface can easily be puttied and painted. However, drying takes a long time after treatment with epoxy resin.
What is a bumper?
The bumper, as noted above, is an element of the car that is designed to absorb energy and soften the impact of a collision. However, we should not forget about its aesthetic function - it gives not only a finished, but also an exclusive look to the entire car.
At one time, bumper repairs were carried out using a sledgehammer, a jack, a crowbar and a blowtorch. But today, everything happens differently: first, the material from which the bumper is made is studied (depending on the material of the bumper, the appropriate repair method is determined) and the final stage of repair is sanding and painting.
I would like to note that the bumpers of modern cars are most often equipped with a variety of sensors, for example, alarms, airbags, parking sensors (parking radar), and the rear bumpers are also equipped with long-range cameras. This also affects the choice of method for carrying out repair work.
It is worth considering that the following types of plastics are used in the manufacture of car bumpers: polypropylene, polycarbonate, polyurethane, fiberglass. Therefore, if the bumper repair is carried out independently, then, first of all, it is necessary to have an idea of what specific material this element of the car was made of in order to carry out the work correctly and efficiently.
Bumper protection
Getting on a steep descent or climb can seriously damage the bumper. Protecting the bumper yourself will reduce the likelihood of defects in this part of the car.
Such protection can be made industrially or with your own hands. With some skill and the availability of tools, it is possible to make yourself a so-called power bumper, which perfectly protects the car from all possible consequences of road accidents.
clean and putty the bumper
Before starting to manufacture the protection, you need to think about what the new part will look like: establish where the attachment points will be, whether arches are needed. It is worth constructing a protection drawing and calculating everything in such a way that changes are not considered a serious structural modification of the car. Attention is also paid to analyzing the weight of the bumper and its maximum load.
It is better to have a specialist weld the bumper frame and do the installation yourself. Reinforced bumpers are attached to the frame or side members. To protect the power bumper, a guard is used.
Making bumper protection with your own hands can have unexpected and not very pleasant consequences, because it is not known how such a part will cope with its task in the event of a car accident.
Restoring shape
Soldering of fragments is carried out from the inside of the bumper. It is not visible from the outside, so you can conduct training on pairing the elements. Significant shortcomings will be hidden from outsiders. During work, you can feel the material from the back, its reaction to a heated soldering iron and its behavior in a softened state.
Step 1. Fold the bumper parts and fix them
Step 2. Connect the gap using staples
Step 3. Fix with soldering
Step 4. Solder along the entire length
Step 5. Protect the staples from further oxidation
Restoration of fiberglass bumper
There is always a risk of causing damage to the bumper by suddenly running into something. In such cases, a rupture of the lower shelf occurs with the loss of part of it. The first thing you need to do when starting to repair a fiberglass bumper yourself is to measure the gap between the corners. The measurements taken will definitely be needed towards the end of the repair in order to maintain the distance.
First we dismantle the bumper. The part will sag a little at the break point. It is impossible to connect the damaged edges of the bumper, because part of the shelf is missing altogether. We need to glue in this missing link.
To process the destroyed part of the part, an angle grinder is usually used. Having finished sanding the edges, the edges of the gaps are combined, and the bumper is placed on a flat surface to adjust the dimensions.
After cleaning the surface, polyester resin is applied, which is covered with fragments of grade 300 glass material.
Cracks are repaired on the outer surface of the car. To do this, clean the area towards the formed defect, at a distance of five centimeters from it. Sand until the inner layer appears.
Next, lubricate this part with polyester resin, apply glass material and glue the edges. The top layer of material must coincide with the surface of the bumper being repaired.
When the plastic has hardened, it must be sanded and polyester putty applied. Before this, the part is sanded with P80 sandpaper, but no coarser, otherwise the scratches will appear through the putty on the paint.
It is also necessary to repair corner breaks from the outside. The crack is cleaned and the fiberglass that has undergone delamination is removed. Then a patch of glass material is applied. The larger grade of material is much thicker and bubbles may form when applied. The corners are reinforced from the inside by laying glass material grade 300 in four layers.
The patch is sanded flush with the surface using a coarse P40 abrasive. Then another layer of fiberglass is applied if it is necessary to close the cracks.
Then the bumper is painted and installed in place.
Repairing a fiberglass bumper is not the most trivial task, but it is still doable with due diligence. Therefore, before taking action, we recommend that you carefully read our special article: DIY fiberglass bumper repair.
Defects that spoil the appearance
Cars are operated in very unfavorable conditions. The bumper is affected by a lot of different factors every minute. This is sand (when driving on rough terrain), road dust, gravel from under the wheels of other cars, and so on.
These, as well as other factors, lead to loss of integrity of the paintwork. Auto body repair specialists distinguish several types of bumper damage depending on the extent of the damage. The most common damage is scratches (local). These are small defects on the outer surface of the product. In turn, scratches are divided into deep and shallow. In the first case, this is a defect that has reached the plastic directly. The shallow one reaches the base or soil. Next, dents or cavities are identified. What it is? These are locally deformed areas on the surface of the part. The reasons may be various mechanical or chemical influences.
Among the defects, cracks are also distinguished. These are through holes. They can have different character and configuration. Cracks tend to grow due to vibration effects. In addition to reducing aesthetic characteristics, the strength of the part also decreases.
Breaks also often occur with the bumper. These are through holes on the walls of the bumper with individual pieces breaking off.
Each of these damages requires restoration work. Scratches and shallow dents can be removed by sanding, then puttying and priming, followed by painting. Defects such as cracks require a special approach and study of restoration technology. Repairing it at a service center is expensive, but repairing a plastic bumper with your own hands will be much cheaper and you can gain useful experience.
Plastic bumper repair technology
- Welding. To repair a bumper yourself by welding, you first need to prepare electrodes from raw materials similar to the material from which the damaged element is made.
Clean the seam from paint and dirt. Using a soldering iron, carefully process the edges of the tear. Sharpen the electrode along the width and length of the seam so that its cross-section has the shape of a triangle. Place the electrode in the gap groove and weld the seam with a heated soldering iron. Clean the protruding parts with a grinder and a grinder.
- Gluing. Finish the edges of the parts so that they fit together well. If a piece of the bumper is missing, prepare an element of a similar shape and thickness from fiberglass and glue. Make holes and grooves between them for the thread along the edges of the parts to be glued. After this, pull the parts together and degrease the surface.
Cut the fiberglass to the required size and prepare the glue. Apply a layer of adhesive to the seam and saturate the fabric. Place the patch over the gluing area and cover it with glue on top. To speed up the curing process, you can use an ultrasonic lamp.
After drying, remove any uneven surfaces with a sander.
We paint the bumper with our own hands
Perhaps one of the most crucial moments is the final stage of repair - painting. Since you have to paint, without painting you can only straighten dents on the body. Small chips and barely noticeable scratches can be restored using kits sold in stores. They contain a tinting pencil and polishes with a color-enriching effect. True, their scope of applicability is quite narrow, i.e. It will not be possible to repair the damage we discussed earlier. In these cases, you will have to use local painting.
When the defect in area does not exceed a reasonable size, then you can use the search for paintwork materials by identification code. They cost reasonable money and are sold in a convenient container with a brush in the lid for instant painting.
If you compare it with something, then such a product will be most similar to women's nail polish. The repair technology also follows general rules: before applying the coating, the surface to be treated should be thoroughly sanded and degreased. You can compare the freshly painted area with the adjacent enamel immediately after it has dried using an abrasive polish.
And to work with more global problems, you will have to use serious equipment, namely a spray gun and a compressor. If you have a room and tools prepared for painting, then you can safely get to work. If you don’t have all this, then it’s faster and cheaper to use the services of professionals in a car service center.
To summarize, we can say that, having good experience in repairs and a desire to learn, it is very easy to save money on repairing a plastic bumper.
DIY tool for welding bumpers with electrodes
The technology of welding plastic parts currently makes it possible to achieve excellent quality repairs at home. For repairs you will need:
- soldering station or heat gun with a special nozzle for soldering car bumpers. A professional soldering station complete with a soldering iron will cost about $100, but a soldering iron can be purchased separately. The only drawback of construction hair dryers is that the soldering attachments lead to overheating of the heating element and rapid failure of the hair dryer. If you plan to repair bumpers and other plastic elements, then purchasing a soldering station will be the best solution.
- Electrodes. Unfortunately, the cost of ready-made twigs for soldering is quite high. Therefore, it is better to make them yourself from available materials. Only compatible types of plastic can be used as electrodes. Most car bumpers are made of polypropylene alloys (PP, PP-EDM) or ABS. Without much difficulty, a similar type of plastic can be found among headlight housings and fender liners, of which there are a great many in the landfills of garage cooperatives and body repair stations. It is most convenient to use an engraving machine to sand and clean the repair area.
Repair technology
Each type of plastic has a threshold melting temperature, significantly exceeding which leads to loss of elasticity and strength. How to weld a bumper yourself:
- sand the old paintwork at the repair point with P80-P120 abrasive;
- to form a strong Y-shaped seam, the crack walls need to be slightly expanded;
- Observing the temperature regime, first heat the plastic and then the electrode itself. When laid correctly, the descending rod should be preceded by a ball of molten plastic.
- For reliable welding, it is important that the area where the electrode is placed is also heated.
- Following the technology, place the electrodes not only along the crack, but also at several points across the fault line.