What does the set consist of?
The Done Deal Tubeless Tire Repair Kit includes:
- cutter;
- tourniquet;
- tube of glue;
- two piercing instruments with a straight and twisted tip.
Having an additional professional set of tubeless tire repair harnesses on hand will ensure that you will never be stopped on the road because of a trivial nail, and you will never have to spend money on a tow truck.
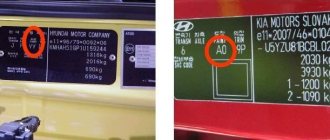
What to look for when purchasing. The kit comes in a package, and you need to make sure that it is intact and has not been opened. Make sure that the expiration date has not expired. It is five years from the date of issue. Please note that you will have to use the repair kit for more than one month, and there should be some time left. Check it out. So that the packaging contains all the necessary attributes so as not to run into a fake.
Done Deal Set
Determining the tire type
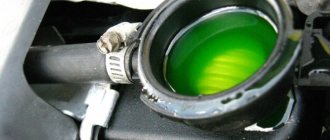
Before carrying out repairs, you must definitely determine the type of tires that are installed on the car. The difference between tubed and tubeless wheels is that the latter do not have an additional element - a rubber chamber filled with air. Instead, there is a thin, no more than 3 mm thick, airtight layer inside the tire.
This is what the pump or compressor fills when inflating the tire. Restoring the tightness of this cavity is the main task of the process. This usually takes about half an hour, and the cost of resuscitation practically does not exceed 200-400 rubles.
Tubeless tires can be of two types:
- self-adhesive;
- standard type.
For the first option, a minimal amount of air is vented through the puncture. This type is the safest for driving on problematic roads. For the second type, it will be necessary to plug the hole using a self-tapping screw. This will allow you to get to the garage or the nearest repair shop.
If you have a repair kit, you can even repair the side cut of a tubeless tire. The advantages of using this rubber are in the following positions:
- safety is higher than that of wheels with tubes;
- significantly less heating while driving;
- longer service life;
- less weight when compared with chamber analogues.
Almost all cars produced over the last 5-6 years are equipped with this type of wheel tires . Even in the behavior with a puncture, one can distinguish a tubeless wheel, which goes down much more slowly than tube-type ones.
Before you repair tubeless tires yourself, you need to make sure the type of wheel. It is customary to pay attention to the nipple. For tube wheels it will have a conical or cylindrical appearance, and for tubeless wheels a slight seal with a visible lip will be noticeable at its base. The latter is necessary to trap air inside the cavity.
How to use the professional Done Deal tubeless tire repair kit?
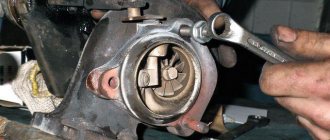
The professional Done Deal kit makes it possible to restore the tightness of a car or truck tire without removing the wheel and disassembling it. Brief instructions are available on the back of the kit packaging. If you don’t have it at hand, then to repair a tubeless tire on a car or truck, follow these steps:
- Before using the kit, make sure that the entire kit is present.
- Spin the tire and determine the location of the puncture.
- Remove the puncture from an object protruding in the tubeless tire.
- Take an awl with a corkscrew tip and apply some glue from a tube onto it.
- Use a twisted awl to create a hole in the tubeless tire.
- Pass the harness through the hole of the needle-type awl. The tourniquet should be half divided by the eye.
- Coat the tourniquet with glue.
- Insert the awl into the hole of the tubeless tire so that a quarter of the glue-coated strip remains outside.
- Remove the tool so that the harness remains in the hole of the tubeless tire.
- The repair can be considered complete. It is enough to cut off the protruding parts of the strip.
- Inflate the tubeless tire to the specified pressure.
- Close the tube with glue, clean the tools from any remaining adhesive mixture, and put the professional tubeless tire repair kit in the tool box.
Done Deal Set
To use the professional Done Deal tubeless tire repair kit, you do not need any special knowledge or skills. However, it makes sense to watch a video of how tire service workers do this.
How to use the set
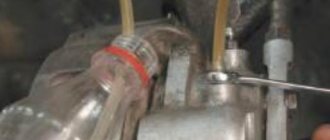
Repairing tubeless tires yourself will allow you to save on services. Removing a nail from a wheel and sealing the resulting fistula is not difficult. It is advisable to watch a video of the work being carried out, which will allow you to get an idea of all stages of the repair. What are the stages of self-repair of a tire?
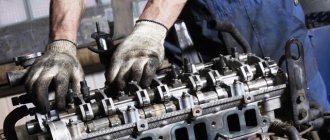
One of the first tasks is to completely remove the sharp object from the rubber of the wheel. This can be done using ordinary wire cutters. The repair kit does not have such a tool, but every driver can definitely find one in his garage. Why pull out the nail? Completing this stage of work will allow you to simplify subsequent repairs using a rasp and applying a tourniquet to the puncture site.
To eliminate the puncture site, you need to insert a tourniquet on which glue is applied. To do this, you need to prepare a hole in the rubber. Before removing a metal object from the tire, prepare a rasp. Apply glue from a tube to the metal pin of the tool. Only after this can you begin to remove the nail or screw.
One of the important points is the sequence of actions. As soon as you pull out the nail, you need to immediately insert the rasp, which is included in the repair kit, into the resulting hole. This is necessary for the tire to go flat.
After installing the tool on which the glue was applied, it is necessary to develop a hole. After watching a few videos, you will be able to understand the best way to do this. The ribbed surface of the metal base of the tool smoothes the edges of the hole in the rubber. How is tire integrity restored? The harness on which the glue is applied is securely fixed to the rubber of the wheel, which leads to sealing of the puncture. The videos will allow you to clearly see the process of sealing a tire puncture with a tourniquet.
To seal your tires you need:
- Pass the special harness included in the tool kit through the hole in the awl. This is easy to do because the material of the tourniquet is soft.
- Apply glue to the harness.
- After preparation, remove the rasp and insert a tourniquet into the puncture site. Pull the awl so that the material fills the entire volume of the hole.
- Pull the awl out of the tire slowly, while the tourniquet remains in place.
After completing all these steps, you will secure the special material to the tire. The tourniquet is securely fixed with glue to the inner cavity of the puncture. After this, you just need to cut off the excess material with a knife. In the video provided you will see how to correctly install the tourniquet and remove the awl from the rubber.
Peculiarities
It is advisable for every driver to have in his arsenal a special kit for repairing tires in case of a puncture. Due to their ease of use and low price, these sets have proven themselves well on the market. The kit is designed to work in various conditions.
The advantages of using such a kit are quick and high-quality repairs of tires with your own hands. This kit can be used both in the garage and in emergency situations when a tire gets punctured on the road. Practical use of this method has shown that it takes approximately 10–15 minutes to complete the entire job. After this, the wheel can be inflated with air to the desired pressure.
Despite the sufficient reliability of this repair method, we recommend, if possible, disassembling the wheel in order to apply a patch. Such repairs can be carried out at every tire station. This repair method is considered more reliable.
Source autolirika.ru
No car owner is insured against a puncture or cut on a tire. A nail, glass shards, or a sharp curb or rail can damage a tire at any time. Of course, if there is a spare wheel or a tire service nearby, then the problem can be solved quickly. But if the driver is on the highway, what should he do?
How to store it correctly?
To prevent the glue from drying out, make sure that the tube is always tightly closed. Don't leave it in the sun. Frost, as well as overheating, can cause drying out. Storage conditions are indicated on the packaging. Store the rubberized strips included in the kit in a plastic bag. Protect all components from contact with chemicals. It is better to put the tube of glue in a place where nothing will put pressure on it. Otherwise, it may be punctured or crushed. If any of the components are lost or become unusable, you can replenish the kit by purchasing the missing items.
Done Deal kit instructions
How to fix a tire puncture yourself using a tubeless tire puncture repair kit
So, as they say, it happened, a nail was caught on the most deserted section of the road, you have a tubeless tire and there is no spare tire or tube to find at least some solution to this situation. But then you accidentally remember that someone gave you a gift, or you yourself accidentally bought some strange, incomprehensible kit for repairing tires with a harness. But you don’t even know what it is and how to use it.
And since you don’t have much to choose from, then, after rummaging through your car trash, you find this treasured, and in this case, life-saving set of harnesses for repairing punctures in car tires
As a rule, a kit for repairing tubeless tires looks like in this photo; it may differ slightly in appearance and in the color of the harnesses.
How to use a tire repair kit (photo and video tutorial) (7 photos + 1 video)
1. Wash the wheel and look for the puncture site.
2. Take out the nail/screw/other iron nonsense.
3. Take a similar kit for repairing tubeless tires.
This set looks standard: a tourniquet, an awl-rasp, an awl-needle and glue (I have never used it).
4. Take an awl-rasp. We insert it into the puncture site (it will be very tight), expanding it and cleaning it at the same time. There is absolutely no need to use glue.
5. Take an awl-needle and insert a tourniquet into it so that its ends stick out from the “eye” to approximately the same length. No glue needed.
6. Insert the needle with a tourniquet into the puncture site. First, completely down (it will go very tightly - press more boldly, you can twist it a little, but don’t overdo it), and then pull it out towards you. We leave the tails of the tourniquet to stick out a centimeter and a half.
7. Cut off the remaining part with a knife. Ready!
Also, watch the video in detail here:
Repairing a tire with an anchor insert
Another way to repair a punctured tire is to use the “anchor” system, which is not included in the standard repair kit and must be purchased separately. An “anchor” is also called a “fungus”.
For its manufacture, very high quality rubber with an adhesive coating is used. Thanks to its design, it strengthens the tire tread surface from the inside.
If you do everything correctly, there will be no problems when using a tire sealed in this way.
Repairing a puncture using a tourniquet - simple instructions
Getting a flat tire is quick and easy. Repair too! “Behind the Wheel” tells you how to do it yourself.
“It’s annoying to puncture a tire: the damage is minor, but you can’t drive anymore, first you need to somehow get to the nearest tire shop,” many people argue in such a situation. In fact, you can do without the help of a workshop. If the front wheel is damaged, you don’t even need to remove it. The rear will still have to be done, but this will be the most difficult stage in the repair process.
To repair a wheel, you will need a soap solution in a spray bottle (a mixture of shampoo and antifreeze liquid that is not afraid of cold, it is better to prepare in advance and take it with you). You will also need: a file for cleaning the puncture site, a tourniquet, a mandrel for its installation and scissors.
Applying temporary measures when a tubeless tire is punctured
Not in every situation it is possible to immediately determine the point through which the tire goes flat. This is due to the fact that air leaks occur in different areas:
- air is released through the nipple;
- the fit to the sides is not tight enough;
- weak valve fastening;
- long-term operation of wheels without additional pumping.
Mechanical damage most often occurs when the surface is ruptured by sharp metal elements or broken glass. To detect leaks, apply a foamed soap solution or other similar mass to suspicious areas, and you can also lower the inflated wheel completely into a container of water. The puncture will reveal itself as air bubbles.
Do-it-yourself tubeless tire repair is carried out using two methods:
- use of auto chemicals;
- application of patches and tourniquets.
Using the first method allows you to restore the wheel for a short period of time, since in the end you still cannot do without a full repair.
Before using the sealant, you need to study the instructions for the selected product. Do not remove the object that caused the puncture. It is necessary to attach the can containing the sealant to the tire valve, and then pump its contents into the wheel.
Nowadays, the following types of sealants are available:
- gel;
- liquid;
- aerosol.
For many car owners, an aerosol sealant can be an excellent choice, since it allows you to restore the wheel even in the absence of a pump, spare wheel and jack. The main disadvantage of aerosol sealants is a decrease in performance in the cold season and a high flammability. In the winter season, it is better to carry helium sealant with you or purchase harnesses for repairing tubeless tires.
On a removed wheel
To begin with, we carry out the work on the removed wheel. Slowly roll the wheel and apply a soap solution to it to find damage. The appearance of bubbles in the place where there is intense release of air is a clear sign of a puncture. Having found it, take a file and clean the hole in the tire. Smoothly insert it there and twist it clockwise. We slightly widen the hole to make it easier to insert the tourniquet, since its diameter is larger than the diameter of the puncture.
We wrapped the file almost to the middle, and then another two centimeters. Now unscrew the file and remove it. We take a package with tourniquets. They are usually sold in packs of 4. The length of each is about 200 mm. We will need half of one bundle. Let's cut it off. Remove the protective transparent film and the paper backing on which the tourniquet is held. There is no need to worry that it will break. The harness is specially impregnated, so it is not necessary to use glue.
The difference between a tubeless tire and a tube tire
Tubeless tires, when punctured by foreign objects stuck inside, deflate slowly, while tubeless tires deflate instantly. If you regularly inflate tubeless tires, they can be used for more than one or even two months. It should be taken into account that when inflating a wheel, a foreign object damages the cord threads, which act as the spokes of a bicycle wheel (if they are damaged, the wheel will twist to a helical state). It is better not to delay repairs so that corrosion does not start. Thus, the nail should be immediately pulled out and the puncture patched. There are many modern ways to quickly repair tires with your own hands. We will discuss them.
General information about repair kits for damaged tubeless car tires
Some manufacturers do not provide an awl at all in their kits, and in some places there is no glue. Practice has shown several important details:
The most effective is a square rod, twisted in a spiral.
Repair kits allow you to reliably seal a hole not only in a thick tread layer. With the help of a flagellum, side cuts are also eliminated, although not as effectively, but you can still drive a couple of tens of kilometers to the service without any problems.
Tube tire repair
For this type of tire you can use:
- Special auto chemicals;
- Patches and harnesses.
If you decide to carry out repairs using a special rubber insert, purchase special rubber pads, an awl with a side exit and a cutter.
Such an overlay is much more durable than any tourniquets, however, it must be taken into account that even this method will not help eliminate the side cut. If the tire was a radial, it will need to be scrapped.
What kits should you buy to repair damaged tubeless car tires?
Below are 15 sets that are most often found in car dealerships. A brief summary of each of them will help you more or less decide when purchasing. The first three options showed decent results and can take their rightful place in any motorist’s first aid kit.
Top three
- Titan T-609 - the kit for 130 rubles includes five reinforced strands, glue, an awl with an eye and a device for forming holes and stripping. The budget kit fully coped with the task, showing an excellent ratio of quality and price.
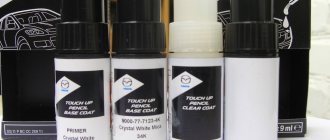
- DoneDeal DD0320 - consists of an awl with a twisted tip, a needle with an eye, glue, a cutter and eight strips of raw rubber. The handles are comfortable, and the presence of a cutter allows you to carefully complete repair procedures. Unfortunately, the cost of 540 rubles did not allow this repair kit to become the leader of the test.
- Michelin Tire Repair Tools Kit – to buy this kit for repairing punctured tubeless tires, you only need to have 180 rubles in your pocket. The equipment leaves much to be desired, however, there is a rasp, a needle and strips of rubber for repairs. The glue is a bit runny, but we managed to repair the wheel.
The only repair kit Titan T-609, which is equipped with a decent set of tools at an affordable price. The DD0320 is equipped with a cutter for cutting harnesses, and if not for the price of 540 rubles, the package is not so bad.
Briefly about other available repair kits
- AVS RK-110 A 78220S - a set from China for 180 rubles includes a spiral awl, an installation needle, five strips of raw rubber and glue. During repair work, the awl breaks the cord threads, but after restoration the wheel continues to move.
- CityUp CA-793 - a repair kit costing 200 rubles consists of an awl with an eye, stripping, glue and five pieces of reinforced strands. The rasp handle immediately turned, so I had to take another one. There is no way to recommend this option.
- Tire Repair Kit - the kit for 160 rubles includes an awl with a twisted tip, a needle, glue and five strands. The wide groove of the eye of the needle makes the work somewhat difficult, but the set still passed the tests.
Detailed introduction to the tools from the set
Let's take a closer look at the composition, materials and design of the tools from the repair kit:
- A tool that widens a puncture. It is a round file with a sharply sharpened end. Designed for cleaning and expanding the damaged area of the tire before inserting a special flagellum into the hole. To carry out this work it must be very durable, made of hardened steel.
- An awl for installing a tourniquet. It is made from the same durable materials; a cut is made on the edge of the working surface like the eye of a needle. It is necessary so that the seal remains in the tire when you remove the tool after repairing the puncture.
- Special flagella for sealing punctures, the material of which is “raw rubber” with reinforcing fibers.
Attention should also be paid to the handle of the tools. You should not choose those kits where the handles are made like screwdrivers. Give preference to devices with comfortable wide handles, since when working with them you will have to exert considerable effort.
Recommendations from experienced
In practice, it turns out that a car enthusiast not only needs to know how to choose summer tires , but also be able to quickly fix a puncture in order to continue driving. Advice from experienced drivers will help you approach the task fully equipped:
- Use harnesses that are reinforced with synthetic threads; they resemble rope impregnated with a rubber mixture. It is highly undesirable to use conical plugs or strips of raw rubber without reinforcement.
- It is better to choose a tool with a T-shaped handle.
- Sharp rasps should not be used - they always tear the cord.
- When starting repair work, the punctured wheel must have a pressure of at least 0.5 bar.
- If you have doubts about the quality of the “patch,” then move this wheel to the rear axle.
- If the kit contains glue, installation of the harness becomes easier, and its service life is longer.
- If the glue has dried, you can use gasoline instead, but not diesel fuel.
- When it is not possible to repair the wheel, do not rush to remove the nail from the puncture site. While he is in place, the balloon will deflate slowly, sometimes it is worth pumping up the tire.
Preparatory work
We will remove the identified puncture or foreign object ourselves. Difficulties may arise when eliminating damage larger than 5 mm in diameter. Small punctures are easier to repair.
The kit must include the following components:
- a device that expands the impulse;
- tourniquet for raw rubber;
- auxiliary elements for installing the harness;
- special glue or paste for repair.
You will also need a fairly sharp and durable knife that can handle reinforced rope, which is difficult to cut. When selecting a hole expander, it is necessary to take into account that all layers are quite dense, and its working part must pass through all layers.
A device for inserting a tourniquet is also an integral part of the kit. Using a special cut at the bottom, the patch is fixed. After removing the steel rod, the raw rubber bundle goes inside the cavity and remains there. Most patches can withstand many tens of thousands of kilometers.
Carrying out repair work on tubeless tires involves not only eliminating pinpoint radial punctures, but also getting rid of other damage that interferes with normal driving. However, not all of them can be eliminated even by qualified tire fitting companies.
Most often, such problems include side damage to the tire. This is usually the final verdict on the wheel. In non-critical cases, you can restore the ramp and throw it in the trunk as a spare wheel. Before doing this, it is advisable to balance the wheel.
Side cuts often tear the cord, and after that it is difficult to predict the behavior of a car with such a wheel. Vulcanization with a patch from the inside can correct the situation. A well-installed patch can last for many years.
For bent rims on the road, you can use a hammer to pre-align the sidewall in order to get to the service station. A special sealant is used on discs damaged by corrosion processes. The contact area with the disc is processed along the entire perimeter.
DETAILS: Master brake cylinder repair kit - equipment and how to use it to repair the GTZ
If for some reason the spool or nipple is damaged, they must be replaced. You won't be able to drive for long with damaged ones.
What is the difference between tire repair sealant?
Let’s say you didn’t bother with the timely purchase of a preventative composition, but in the glove compartment you have an aerosol that was included with the car and should replace the missing spare tire. The absence of a wheel in the trunk is unnerving, and then the “long-awaited” puncture happens. We read the instructions on the can and find out that repair sealant for tires needs to be injected when the tire is flat. Well, after a few minutes it becomes just like that, all that remains is to try the composition.
We recommend: We treat the plastic interior from scratches. Proven methods!
If you have a really high-quality express repair product, events will unfold as follows. You connect the can to the nipple (after shaking it), directly or through a short adapter, and press the valve. The wheel begins to noticeably round, raising the body of the car; foam or a different consistency of the composition may well begin to emerge from the puncture.
Having measured the atmosphere in the tread, we bleed or inflate the wheel to the desired condition and drive off. After a few kilometers, it is recommended to slow down and measure the tire pressure again, since some compounds maintain activity for a long time.
For example, the optimal pressure is 2 atmospheres, after filling the compound the tire was inflated to 2.4. We bled off the excess air, drove off, took measurements after a few kilometers, and all this time the wheel continued to inflate and the pressure gauge showed 2.2. We need to play it off again. There are compounds that just prevent the tires from deflating, or require regular inflation, but this is far from the best choice.
Be careful, some aerosol sealants contain flammable gases, and it is strongly not recommended to inflate the wheel with air when using them.
Results
To summarize, it is worth saying that most modern cars use tubeless tires. They are quite repairable if it comes to a small puncture. It can be eliminated in the field using a special kit for repairing such tires.
The video explains how to repair a tubeless tire yourself.
Is it possible to use a travel first aid kit to heal a punctured tire? Za Rulem experts tested 16 kits for repairing tubeless tires, and at the same time demonstrated an operation algorithm for saving a damaged tire. The instructions are supplemented by life hacks that will be useful to all drivers.
In ancient times, there was GOST 5170–73 “First aid kits for repairing pneumatic tires.” There were so many components that were not in these first aid kits! And a fungus, and a grater with a plaster, and a roller... And now each manufacturer decides for himself what to put in his kit.
Let's check what the descendants of those travel first aid kits are capable of. Grant's editorial office, one of whose wheels gave up the ghost, pushed for decisive action. Instead of a tire shop, we visited several stores where we purchased 16 different kits for repairing tubeless tires. The price range is sevenfold, although the principle of operation is the same. After finding a puncture, you need to remove the culprit of the problem (screw, nail), then widen the hole and tightly insert a folded rubber band into it. The nuances of technology and tools may vary, but in general the repair algorithm is exactly the same.
Having repaired a tire that encountered a self-tapping screw on the road, we decided to test all 16 repair kits on the poor thing. However, in the end, only 13 stab wounds were inflicted on her, since three sets were immediately rejected: the flagella in them were frankly bad, they instantly tore in the hands.
The instruments also vary quite a bit. Thus, the nice handle in the CityUp CA-793 set managed to rotate relative to the tip during the first attempt to penetrate inside the tire.
Note that some sets do not provide any “picking tools”, and in some places there is no glue. And the names of the instruments are different for almost all manufacturers - in the explanations we give exactly the “proprietary” version.
A tire with so many holes in the tread passed the test at speeds over a hundred for a couple of weeks without losing a drop of precious air. For the sake of the experiment, we didn’t even cut off a few ponytails - and everyone kept it together. We also managed to deal with a small puncture in the sidewall using a flagellum. Although the reliability of sealing is noticeably lower than in the case when the harness is kept in a thick (even a worn tire) tread layer.
Toward the end, they carried out another test - a kind of “everyday” one: they pierced the sidewall of the tire, like some hooligan with a knife or screwdriver. We were no longer engaged in comparative tests, but simply fought for survivability. By the way, the same damage occurs, for example, when the tire comes into hard contact with a curb or the sharp edge of a hole. Such a temporary repair is a priori more difficult: the sidewall is thinner than the tread, and therefore it is more difficult for the flagellum to stay in the hole.
Approximate price:
180 rub.
Equipment:
spiral awl, tool for installing harnesses, strips of raw rubber (5 pieces), adhesive activator
The spiral awl destroys the cord—when installing, you can hear the crackling sound of breaking threads. However, the repaired wheel runs successfully.
Approximate price:
200 rub.
Equipment:
tool for cleaning and forming a hole, an awl with an eye, reinforced strands (5 pieces), glue
The beautiful rasp handle immediately turned - the set can be removed from testing. Okay, we took an analogue of the “picker” from another set... In the end, the wheel was repaired, but I can’t even think of recommending purchasing such a first aid kit.
Approximate price:
540 rub.
Equipment:
tool with a twisted tip, tool with an eye, glue-activator for raw rubber, strips of raw rubber (8 pieces), cutter
The spiral awl is good, the handles are comfortable. Note that the kit includes a cutter; other kits do not have it. I liked the first aid kit, but it was a bit expensive.
Approximate price:
330 rub.
Equipment:
a tool with a twisted tip, a tool with an eye, an adhesive activator for raw rubber, raw rubber flagella (3 pieces)
Application in repair
Tire repair harnesses cannot be installed on the sidewalls for safety reasons. The harnesses are covered with special rubber with adhesive properties. Thanks to it, small cracks that form during the repair process are filled.
They are often used in combination with patches, patches and other products designed to repair damage. The tourniquet is installed in the puncture hole, and a cord patch is applied over it.
If the tire pressure is high enough, the harness may break, so it is recommended to deflate the wheel a little before starting installation.
Large damage and long cuts can be eliminated with patches, fungi and other consumables for tire fitting.
Rubber band with adhesive coating
These products are more reliable compared to cord rope. The repair method is approximately the same, but has certain features. First of all, it is better not to use an awl in the form of a rasp, since in the process of cleaning the hole it breaks the cord threads, and the harness may be damaged during installation. It is better to choose a tool with a side exit. Also, before installing the harness, it should be coated with glue, which should react with the adhesive shell (the glue should be used that is recommended by the manufacturer of the harness).
The key advantage of this repair is the airtight seal of the rubber, but the disadvantages include damage to the tire frame, which is not reinforced from the inside.
Common Mistakes
When using rubber harnesses, motorists made some mistakes, so manufacturers developed reinforced repair harnesses, the frame of which consisted of nylon cord threads, and the adhesive layer acted as a shell. The repair technology remains the same. The cost of reinforced harnesses is not much higher than rubber ones, but they are much more reliable. Alas, the manufacturer does not guarantee the eternal service of a repaired car tire.
Using an "anchor"
“Anchor” is a specific type of tourniquet that ends with a kind of patch. The algorithm for installing it is the same as in previous cases, but in the end it not only clogs the hole itself, but is also glued to it with a patch from the inside (to do this, you need to push the tourniquet inside and pull it back a little).
To install such an insert, you need a special cutter with a 6 mm diameter
, which will have to be purchased separately. But the “anchor” can be called the most reliable method of harness repair.
Rubber mushrooms (anchors) for all types of passenger tires
All harness patches are not intended for repairing side punctures. And in any case, such repairs should not be perceived as final. Only tire service specialists can properly restore a wheel, while prolonged use of harnesses is fraught with destruction of the cord and permanent damage to the tire.