This method is one of the simplest and fastest ways to replace both anthers or one of them. Also, if necessary, you can replace the lubricant in the CV joints or the external grenade.
Necessary tools: a set of open-end wrenches (including 2 pieces for 13 and 17), pliers with variable pitch or just very large pliers, two flat screwdrivers - medium and thin, a hammer 600-800 g, a good drift from soft metal or a CV joint puller, a large or medium-sized vice (or an assistant), CV joint grease-4, a sufficient amount of wiping material, a plastic bag, a stand for the lower arm of the front suspension. Preferably an inspection hole.
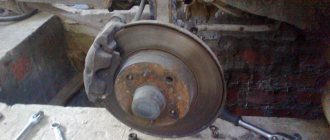
We install the car on the handbrake, you also need to install any rollback wheels under the rear wheels. Loosen the wheel nuts, jack it up, and remove the wheel. We place a reliable support under the lower arm (I use a stack of short boards). We lower the jack, the lever compresses. Unscrew the nuts and remove the three bolts securing the lower ball joint. Unscrew the lower shock absorber mount and push it all the way up:
(R
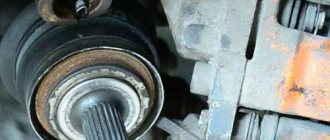
We knock down the chrome-plated hub cap through a wooden block. We unscrew the hub nut, having first placed a stop (a hammer, for example) under the wheel stud so that the hub does not spin (you can loosen the nut at the very beginning, but removing the cap is not so convenient). We take out the cone washer. Grasping the bottom of the brake disc, pull it towards us and move it to the side, while simultaneously removing the grenade axle from the hub. We place the freed CV joint, as conveniently as possible, on the lower cup.
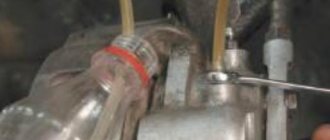
We go down into the pit. By turning the CV joint by hand, we find a convenient position for grabbing the protrusions of the clamp with pliers:
We squeeze the clamp and use a screwdriver to slightly bend the hook and remove it. We make marks on the grenade body and shaft (with paint or a file - the main thing is not to rub it), so that later we can insert the CV joint in the same way as it was, we remember the position well. We move the freed boot as far as possible from the grenade.
Using your finger, we feel for the wire retaining ring inside the CV joint housing, it is in the groove at the very edge, by touch we find the gap in the ring, and pry it off with a thin screwdriver:
Using the shaft, we pull the CV joint out of the housing:
If you don’t need to change the lubricant, you can immediately put a plastic bag on the CV joint and wrap it around it to prevent the balls from falling out and dirt getting in (the balls are held in place only by the lubricant).
We leave the pit and carefully take out the freed part:
We wash away the dirt. We remove the remaining clamps and cut off the anthers that need to be replaced:
We move the plastic casing and boot of the outer grenade to the inner CV joint. To keep them out of the way, you can wrap them in a bag and secure them. We clamp the shaft in a vice with the outer hinge towards the bottom, remove excess lubricant.
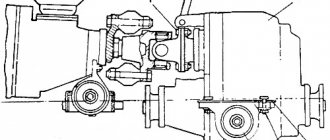
Now we need to knock down or press the inner race assembly with the hinge off the shaft. The radial protrusions shown with a screwdriver are the shaped inner race of the CV joint:
Theory. The inner race of the CV joint is fixed on the shaft with two retaining rings: the outer one (at the very end of the shaft) of circular cross-section; and internal, square section (it is slightly visible in the previous photo between the inner race and the shaft). When knocking down, the holder with a conical groove should compress the outer ring, push it into the groove of the shaft and move further. If the impact energy is insufficient, the ring will open again and the cage will return to its original position.
Option 1. Using a soft metal drift and a hammer, lightly tap the race around the circumference to center the outer ring, then, placing the drift as close to the shaft as possible, knock it down (you can hold it at a slight angle, it’s not scary). The ideal option is for an assistant to pull the hinge shaft downwards. The blow must be strong enough and “long” - using all the inertia of the hammer. 400 g. I managed to knock it down with a hammer only 4 times, although I hit it from all over my shoulder - a heavier hammer would be better. If it doesn’t go astray, the impact force needs to be increased; quantity won’t help.
Option 2. Use a puller. I bought it on the way to the garage, especially for the FAQ, 160 rubles, the price tag said “CV joint puller 2108”. To be honest, I didn’t want to show off the barbaric drift that I had previously used. There were vague concerns about the puller, but as it turned out, it was in vain, I liked working with it, I was so carried away by the new toy that I forgot to take a photo before removal:
Remove the outer ring. Then carefully remove the inner ring from the groove:
Loosen the vice and lightly hit the shaft with a hammer to tighten the ring. The outer groove is narrower, the ring will not get stuck there:
As you can see, the rings and shaft are not damaged:
If a lubricant change is necessary, we wash everything. The outer CV joint can be washed without disassembly, although this takes quite a long time. It can be disassembled; to do this, you need to mark with paint the relative positions of the outer race (housing), the separator and the inner race. Then turn the separator and the inner race until the first ball comes out, remove it, and then remove everything in turn in the same way. Then tilt the separator with the cage at 90 degrees, and, having caught the position, pull it out along with the inner race. Wash, assemble the outer joint and put “CV joint -4” lubricant in 150 and 60 cc sizes into the inner and outer joint housings. respectively.
Lightly lubricate the shaft and put on the boots and cover. We clamp the shaft in a vice and install both locking rings:
We install the hinge on the shaft, and, having felt the splines, lower it until it comes into contact with the outer retaining ring:
Using a hammer, preferably through a spacer made of soft metal, we hit the CV joint shaft and put it in place (do not try to screw the hub or other nuts onto the threads - you will either ruin the nut or the threads). We check the fixation of the hinge in both directions with our hands. I didn’t have a soft spacer, so I hammered it like this, after three fairly strong blows, as we see, nothing happened to the shaft - the metal is hard:
We put the boots in place (the place where the clamps are installed on the shaft corresponds to the deepest groove). We place the clamps in such a way that when moving forward the grass does not cling to them (i.e. on the wool). It takes a lot of effort:
Dismantling the drive assembly on a Niva 2121 car
As for the repair procedure, we present the main points below:
- First of all, we lift the car with a jack (it is also advisable that it is in the inspection hole).
- Using a screwdriver and a hammer, knock off the protective cap of the hub nut and unscrew it.
- Using a 13mm wrench, unscrew the nuts securing the ball joint to the steering knuckle.
Now you can remove the drive shaft from the Niva's front wheel hub. To remove/replace the outer CV joint, remove the retaining ring.
To release the internal one, you must first unscrew the three nuts securing the pressure plate.
- Then we pry up the plate with a screwdriver or a sharp chisel and pull out the inner CV joint from the front axle gear housing.
- Since the space between the shock absorber and the front suspension spring is minimal, it is not very convenient to pull out the drive assembly, so it can be disconnected.
- If necessary, defective CV joints are knocked down and new ones are installed in their place in the reverse order.
- It is imperative to apply a lubricant, such as a CV joint, to each of the grenades and securely fix the boot clamps.
- The assembled drive is installed on the Niva in the reverse order.
Nuances of dismantling the Niva front drive shaft
To get acquainted with the difficulties that await you when you have to remove the front drive shaft, watch the video:
Removing the drive shaft and replacing the internal CV joint on a Niva or replacing the drive assembly
Disassembling the axle shaft
To access the inner CV joint, it is necessary to carry out the following disassembly operations:
- Remove the grenade boot clamps and remove the inner CV joint boot.
- Knock the CV joint off the drive shaft.
- To remove the inside of the hinge, you need to remove the retaining ring of its cage.
If, when removing the inner CV joint, chips were found in the boot, and there is any damage on the hinge, then replacing the inner grenade is simply necessary.
Before putting the boot on the new inner
CV joint, it is necessary to fill it with special CV joint grease -4 (quantity 150 cm). Replacing the outer and inner CV joints on a VAZ 2110, VAZ. To ensure that there is enough lubricant in the grenade, it is recommended to stuff lubricants under the boot.
How much does it cost to replace a CV joint on a Niva?
The price of new assembled drives starts from 3000 per one. If we consider the CV joint separately, then for the internal one you will have to pay from 900 rubles, and for the external one from 1600 rubles and more. The final price depends on the place of purchase and the manufacturer.
In the article, we discussed the removal and installation of front wheel drives in the article - “Replacing front wheel drives.” In this article we will look at replacing the angular velocity joints of the front drive VAZ-21213.
We prepare the car for repair. We install it on a viewing hole or on a lift.
We remove the drive from the car. We clean the hinge from the outside and clamp it in a vice with soft pads.
Since the outer hinge is most often replaced, we will consider this operation first.
1. Using pliers or pliers, squeeze the small clamp by the protrusions and, prying it up with a screwdriver, disconnect it.
2. Remove the large clamp in the same way. If the protective cover is attached using plastic clamps, then simply cut the clamps using side cutters.
3. Slide the protective plastic and rubber cover along the shaft. We clean and wipe the end part of the hinge from old grease.
4. Using a drift made of soft metal or a wooden spacer made of durable wood, we knock down the hinge, striking the end of the cage. We take into account that the drift should not transfer force to the separator or balls in order to avoid their damage. This is the case if you need to put this hinge back on the shaft.
5. Remove the hinge. The joint on the shaft is held in place by a retaining ring, which is located in a groove at the end of the shaft.
6. The locking ring is usually sold complete with the hinge. Pry up the retaining ring with a thin screwdriver
7. Remove the retaining ring
8. Separate the protective covers
9. Remove the rubber cover
10. Remove the plastic casing
11. If you need to replace the thrust ring, remove it with pliers
Install the hinge in reverse order.
We clean the shaft and joint from old grease, apply a thin layer of new CV joint grease and put a casing and a new cover on the shaft. We install a new retaining ring on the shaft. We put 3 CV joint-4 lubricants into the 60 cm joint cavity.
Using a soft metal drift or a strong wooden spacer, press the joint onto the shaft.
We put on a rubber cover. We install clamps. Before tightening the clamps, you need to release excess air from the rubber boot by prying up the seating belt of the boot with a screwdriver.
Depending on the mode of operation, sooner or later there comes a time when on a VAZ 21213 Niva a CV joint malfunction leads to its replacement. The catch is that these elements cannot be repaired and if they wear out, they are replaced with new ones after they break down. Diagnosing problems with the VAZ 21213-21214 CV joint (commonly known as grenades) is quite simple, but extending its service life is more difficult.
It just so happens that most motorists pay attention to some part of the car after it breaks down. A new CV joint is purchased and replaced, which takes time and considerable money. In fact, there is no drift to the angular velocity hinges installed in the Niva.
Unlike front-wheel drive VAZ 2110-2114 cars, in the Niva the torque is distributed over 4 wheels. This means that the load on the front wheel drive is half as much as in the same VAZ 2114. And if we theoretically assume that not a drop of abrasive dust and dirt gets inside the hinge mechanisms of the axle shafts, then the service life of the CV joint will be equal to the “life” of the CV joint itself. auto. Of course, this is impossible in real life, and the Niva is designed for off-road driving.
It is quite possible to prolong the life of grenades as much as possible. To do this, you must regularly perform the following activities:
- Conduct a visual inspection of the anthers covering the hinges. When the car is operated on an asphalt road, an inspection should be carried out every 10-15 thousand km. When driving off-road or on embankment and dirt roads, the grenade cases need to be inspected more often, especially after driving in difficult conditions.
- If the slightest damage to the boot is detected, immediately replace it with a new one. This also applies to the clamps that hold the covers in place.
- During replacement, remove old grease from the Niva CV joint along with any dirt that has fallen into it and apply new one. The lubricant used is CV joint-4, its quantity for the outer grenade is 40 cm 3, for the inner grenade - 80 cm 3.
Structure
Important! If you decide to replace the CV joint yourself completely or change its individual parts, you need to understand its design, and only then dismantle it and then replace it.
Replacing a CV joint is an expensive procedure, which in a service center will significantly affect the thickness of the car owner’s wallet. The part is made of heavy-duty materials that are resistant to mechanical stress and aggressive environments. Accordingly, these materials, like the part itself, are quite expensive. It is designed for long-term operation, but not always road conditions and the driving style of the drivers themselves allow all parts of the chassis to be used for many years without the slightest breakdown.
And the cost of replacing a CV joint will be approximately half the cost of the mechanism. That is why many try to replace it themselves in order to save some money on repairs. But not everyone is born an auto mechanic, so the average person must first find out what parts the mechanism consists of. Here is their list:
The anthers perform two functions at once: they protect the hinge from dust and dirt. After all, in essence, a CV joint is an external part that is located on the bottom of the car. This means that all small particles when driving fall on the hinges in the same way as on the rest of the chassis.
On each wheel drive there are two mechanisms, which have almost the same structure, only slightly different in shape and size. As a rule, left and right CV joints are interchangeable on most car models. If you are in doubt, it is better to go to a car service center and ask if it is possible to buy left-handed hinges for right-hand drive on such and such a VAZ model for installation on right-hand drive, or vice versa.
Sometimes the entire mechanism requires repair, but more often it is the outer one that is worn out, while the inner one, as a rule, is almost eternal. But sometimes it may require replacement.
Checking the CV joint
First, you should jack up the car and see if the boot is cracked. If there is visible damage in it, then a large amount of dirt has probably accumulated inside, which will cause an unpleasant crunch when turning and starting with the wheels turned.
As a rule, in this case, it is enough to clean and rinse the internal parts with gasoline, lubricate them, and put them back together. In addition to lubrication, you will also need to replace the anthers with new ones. But if you operate a car for a long time with dirt inside the CV joints, this can lead to their complete failure, which is why at the slightest crunch you need to immediately sound the alarm. Do not forget that replacing a CV joint on a VAZ 2110 or any other car model will cost approximately 1,500 rubles, this cost is only for the part.
How to diagnose joint wear
There is a proven method for diagnosing joint wear. To do this, you can “start” with the wheels turned out, if at the same time you feel a clear crunch in the front part of the chassis, then they will have to be changed. To be completely sure, you can also spin the car or start with the wheels slightly turned. You will immediately feel whether the left or right mechanism crunches. If it is both, then you will have to jack up the car and determine which of them has play. If both hinges are loose, you need to prepare for significant expenses.
Signs of wear will be visible if you put the car on a jack on the side where you hear the crunching sound. Then you need to grab the drive with your hand and shake it in different directions. If you feel significant play, the bearings are definitely worn out, and you can prepare to buy a new CV joint.
A couple of tips to help prevent CV joint wear
Despite the fact that many car enthusiasts do not even suspect the presence of such a part in their car, as a rule, they themselves are the culprits of its breakdown.
It must be remembered that aggressive driving is the first reason for joint failure. In particular, these are constant sharp starts with the wheels turned out and driving in reverse with the same steering wheel position. In addition, we need to remember what roads we often have to drive on. If rough terrain is normal driving conditions, then the boots should be checked more often than usual. In addition, timely replacement of lubricant in CV joints is the key to their long-term operation.
Aggressive driving, as you know, also means sharp starts. They are the cause of overheating of CV joints, and where there are high temperatures, there is increased wear of parts, no matter what high-strength materials they are made of.
see also
VAZ 2121 does not move when the speed is on
- 0 1 871
Cuts the thread of the CV joint on the Niva
- 0 1 778
Crackling CV joint after replacing 2121
- 0 1 615
CV joint crunches
- 520 7 241k
Do I need to drain the oil when replacing the inner CV joint?
- 0 1 6k
The most common transmission problem on Niva cars is failure of the drive CV joints. The first symptoms may be minor , in the form of a slight crunching sound at the beginning of movement with the steering wheel turned out.
If you do not replace the CV joint on the Niva in time, the consequences can be disastrous, to the point where your drive jams while driving with all the ensuing consequences. To avoid this, it is necessary to promptly replace the hinges, and also constantly monitor the presence of lubricant in them.
So, to replace you will need at least the following tool:
- Head 13, 27 mm
- Ratchet and crank
- Extension
- Hammer
- Chisel or flathead screwdriver
- Jack
- Balloon wrench
Replacing the CV joint on a VAZ 2114 and other VAZs with front-wheel drive
As already mentioned, all hinges for VAZs have the same device and are practically no different. Replacement of this part will be carried out according to the same scheme.
It includes dismantling and installing a new one. Next, detailed instructions will be provided for replacing the inner and outer CV joints.
- While the car is still on its wheels, you need to loosen and tear off the hub nut. To make this easier, it turns out that someone needs to press the brake pedal.
After this, the drive must be clamped in a vice so that the hinge can be released from it. Next we perform the following steps:
- Turn the boot inside out or push it all the way to the side.
- We hit the cage with a hammer, without touching the separator in any way, otherwise the internal parts of the hinges may be damaged.
- After this, the CV joint remains in your hands.
Here is a video of replacing the outer and inner CV joints on a VAZ 2110:
And this is a video on replacing a CV joint on a Niva:
From the video data we can conclude that the procedures are practically no different.
If we talk about other models of front-wheel drive cars, even from foreign manufacturers, then replacing this part will look almost unchanged, with the exception of minor nuances during disassembly.
In this situation, the most difficult thing is to dismantle the drive along with the hinges in order to subsequently replace the outer CV joint or the inner one, depending on the condition of both parts.
If you only need to replace the boot, then this operation will need to be done anyway, since it is impossible to remove the unnecessary one and then install a new boot without removing the CV joint from the drive.
If you replace an old CV joint with a new one, you need to make sure there is lubricant in it. The outer joint must have at least 40 cm3 of CV joint grease, and the inner joint must have at least 80 cm3. As a rule, new mechanisms are sold without lubrication. Therefore, you need to thoroughly lubricate all the parts, then fill all the cavities well with lubricant, and only after that install them in place.
A new or washed hinge with fresh lubricant is mounted in the reverse order using the same tools and accessories.
For example, replacing a CV joint bearing on a Cherie Tigo will not differ in the procedure from the same process performed on Niva.
All these actions can be performed without much experience in car repair. The main thing is to follow the instructions and love your car.
Disassembling the axle shaft
To access the inner CV joint, it is necessary to carry out the following disassembly operations:
- Remove the grenade boot clamps and remove the inner CV joint boot.
- Knock the CV joint off the drive shaft.
- To remove the inside of the hinge, you need to remove the retaining ring of its cage.
If, when removing the inner CV joint, chips were found in the boot, and there is any damage on the hinge, then replacing the inner grenade is simply necessary.
Before putting the boot on the new inner
CV joint, it is necessary to fill it with special CV joint grease -4 (quantity 150 cm). Replacing the outer and inner CV joints on a VAZ 2110, VAZ. To ensure that there is enough lubricant in the grenade, it is recommended to stuff lubricants under the boot.