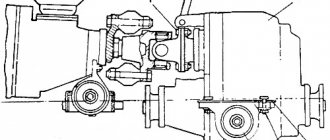
After removing the engine from the car (dismantling the engine can be seen in the article), we install it on the stand.
Using a spanner wrench or a 17mm socket, unscrew the nut securing the power unit support to the bracket.
Removing the support
Using a 13mm wrench, unscrew the bolt securing the starter shield to the bracket
Unscrew the four nuts securing the bracket to the cylinder block.
Remove the bracket from the cylinder block studs. Unscrew the four nuts and remove the left engine mount bracket.
Using a 13mm wrench, unscrew the two nuts securing the starter shield to the exhaust manifold and remove the shield
Remove the ignition module; knock sensor; generator; generator bracket; oil filter bracket; oil separator for crankcase ventilation system; oil pump; coolant pump; flywheel and clutch housing cover; cylinder head assembly with receiver, intake pipe and exhaust manifold; timing chain, chain tensioner shoe, crankshaft sprocket; oil pump drive shaft.
Using a 10mm socket, unscrew the six bolts securing the crankshaft rear oil seal holder to the cylinder block
Use a screwdriver to pry up the bosses of the holder and remove it complete with the oil seal.
We remove two bolts with square heads from the oil seal cover. We remove the gasket.
Using a 10mm wrench, unscrew the bolt securing the oil separator drain pipe bracket and remove the bracket
Using a 14mm socket, unscrew the two nuts securing the connecting rod cover.
Tap with a plastic hammer on the surfaces of the connecting rod cover
Some questions about engine disassembly can also be found here.
Remove the connecting rod cover
We take out the lower connecting rod bearing
Leaning on the ends of the rods of the connecting rod bolts, we move the lower head of the connecting rod from the crankshaft journal
Use the wooden handle of a hammer to press against the lower head of the connecting rod and push the piston into the cylinder
Remove the piston and connecting rod from the cylinder. We also remove the pistons from other cylinders.
Unlock the upper compression ring
Remove the upper compression ring.
Also remove the lower compression ring
We take out the two oil scraper ring discs.
Removing the oil scraper ring expander
To remove the piston from the connecting rod, use a screwdriver to pry up the piston pin retaining ring.
Remove the ring from the piston boss groove. In the same way, remove the second locking ring.
By sliding the piston pin, remove it from the holes in the piston and in the connecting rod head
Remove the piston from the connecting rod
If parts are to be reused, they must be marked.
Using a 17mm socket, unscrew the two bolts securing the crankshaft main bearing cover.
Removing the main bearing cap
Remove the main bearing shells from the cover. We also remove the remaining main bearing caps.
Remove the crankshaft from the block.
We remove the half rings from the grooves of the rear support of the cylinder block.
We remove the upper crankshaft main bearing shells from the cylinder block supports.
Maintenance intervals
Manufacturers recommend the following frequency of operations such as repair and maintenance of the Chevrolet Niva SUV. The following parameters should be checked every week:
- Presence of water in the washer reservoir.
- Brake and coolant levels, oil level in the engine block.
- Condition of batteries, tires and lighting fixtures.
If you do not drive your vehicle regularly, these routine checks should be performed every 400 km.
7-8 thousand kilometers Every 7-8 thousand kilometers the engine oil and filter should be changed. This will make car repairs less expensive, since the motor will work with exclusively clean liquids. Therefore, it will wear out more slowly
Air conditioning and heater
Oiling of the air conditioner compressor is possible due to leakage of the discharge tube. It must be tightened carefully - the bolt may burst with little force. After a “mud bath,” the air conditioner bearings may become noisy.
According to owners' reviews, in winter, when warm air is distributed in the cabin, not enough heat reaches the feet of the rear passengers. If the stove does not work, you need to check the damper control cable. The heater radiator begins to leak after 150,000 km. The pipes will require replacement after 200,000 km.
Annual Maintenance
A year after the start of operation of the Chevrolet Niva, you need to check a number of parameters. You can do this yourself or undergo a technical inspection at a service station. You may find that your vehicle requires transmission repair, especially if the vehicle has been driven off-road for a long time or if you like to drive. At this stage they check:
- Oil level in the gearbox and electrolyte level in the battery.
- Performance of electrical systems and washers.
- Condition of steering, brake system and suspension.
- Integrity of connections, hoses and parts under the hood.
- For diesel engines, you need to control the crankshaft speed at idle.
- It is necessary to lubricate all moving elements in the trunk and doors.
Chassis
The suspension of a light SUV does not cause problems up to 60-80 thousand km. Then, when driving over bumps, dull knocks may appear in the rear of the car. As a rule, the source is in the rear links. Upon external inspection, the rubber bands appear intact from the outside, but on the inside they are most likely already worn out.
Silent blocks last 80-100 thousand km. When knocking noises occur, they may be pulled out.
The design of wheel bearings requires them to be adjusted and tightened every 30,000 km - a real anachronism. They may need to be replaced when the mileage exceeds 80-100 thousand km.
Ball ones run about 50 - 70 thousand km.
Shock absorbers last about 60-80 thousand km. When replacing them, do not carry out pulling with the car hanging, otherwise the shock absorber rod may break off-road.
The weak point in the front suspension is the rubber-metal hinges of the upper right arm due to thermal effects from the exhaust system.
After 100,000 km or 5 years of operation, it is better to replace brake hoses with new ones. Front brake hoses often fail. Front brake discs last about 60-70 thousand km, front brake pads 30-40 thousand km. The rear drums last more than 120 thousand km, the rear brake pads - about 60-80 thousand km.
Here are the problems you will encounter if you take a Chevrolet Niva: Top 6
Chevrolet Niva began production 17 years ago, in 2002. The model has come all this long way without even changing the first generation. Restyling, however, did not bypass it in 2009, but you definitely won’t find any great differences in the two versions of the same compact SUV. By the way, the update was implemented by the well-known car studio Bertone.
Nevertheless, the car remains in demand among compatriots due to its affordability and good consumer performance. With a cost of less than 700 thousand rubles and a “ceiling” of 810,000 rubles at the moment, as well as a 4x4 wheel arrangement with very reasonable all-terrain properties, it is difficult to find a better budget compact SUV. And, unlike the same UAZ Patriot, the Cehvy-Niva is comfortable both in the city and on the highway on the way to the dacha.
Yes, there are drum brakes at the rear, yes, the “maximum speed” is 140 km/h, and the consumption in the city is about 14 liters of AI-95 from a modest 1.7-liter engine (80 hp, 127.5 Nm of torque), and this is with standard driving mode on an undamaged engine.
Yes, the interior is old... and there are many other “buts” in this car. But it’s cheap, accessible, and easy to repair. See also Top 5 most terrifying facts about Hyundai Creta
The buyer still votes with rubles for the old man. This can be seen even in model sales in April 2020. The SUV is included in the Top 25 best-selling cars with the number of SUVs sold in the amount of 1,853 units.
Moreover, it didn’t work out with the new product, but that’s a separate conversation.
Maintenance of Chevrolet Niva / VAZ 2123 since 2001
A faulty fuse is determined by the failed circuits protected by this fuse, in accordance with the table. The current strength for which the fuse is designed is indicated on its front part, and the fuse number is marked on the body of the mounting block. The new fuse must have the same current rating as the one being replaced.
The layout of relays and fuses is shown in the figure below. The layout of the unit installed on your vehicle may differ from that shown.
Attention
: It is strictly prohibited to install a homemade jumper or fuse of a different rating to replace the blown one.
If the fuse fails again, you need to contact your dealer to find out and eliminate the reasons that caused it to melt.
Additionally, under the instrument panel there are relay blocks with fuses that protect the elements of the injection systems.
The fuses have a current rating of 15 A. An additional 30 A fuse protects the cooling system electric fan circuits.
Fuses do not protect the electrical circuits of ignition, engine start, generator, low beam headlight relay, high beam headlight relay.
| Fuse number (current, A) | Protected Circuits |
| F1 (5 A) | Backlight lamps Trunk lamp Engine compartment lamp License plate lamps Front parking lamps |
| F2 (7.5 A) | Low beam lamp (left headlight) Electrical headlight corrector Motorized corrector |
| F3 (10 A) | High beam lamp (left headlight) |
| F4 (10 A) | Left fog lamp |
| F5 (30 A) | Power window relay Power windows |
| F6 (15 A) | Cigarette lighter |
| F7 (20 A) | Horn relay Horn |
| F8 (20 A) | Rear window defroster relay (contacts) Rear window defroster element |
| F9 (20 A) | Glove box light Windshield wiper relay Windshield wiper switch Windshield wiper motor Headlight wiper relay (contacts) Headlight wiper motors Headlight washer motor |
| F10 (20 A) | Electric door lock control unit |
| F11 (5 A) | Tail lamps Instrument lighting control |
| F12 (7.5 A) | Low beam lamp (right headlight) Corrector motor gearbox (right headlight) |
| F13 (10 A) | High beam lamp (right headlight) |
| F14 (10 A) | Right fog lamp |
| F15 (20 A) | External mirror control unit External mirror control gear motors |
| F16 (10 A) | Relay-breaker for direction indicators and hazard warning lights (in hazard warning mode) |
| F17 (7.5 A) | Individual lighting lamp Immobilizer warning lamp Brake light lamps Additional brake light Interior lighting lamp |
| F18 (25 A) | Reversing lamps Heater fan Windshield washer motor Rear window defroster relay (coil) Rear window wiper relay Rear window wiper motor Rear window washer motor Door lock control unit |
| F19 (10 A) | Turn signal and hazard warning light relay (in turn signal mode) Instrument cluster Differential lock indicator lamp Starter relay |
| F20 (7.5 A) | Rear fog lights Immobilizer |
Body care
The body is the basic and most expensive element of a car. It is made of modern materials and protected from corrosion by high-quality protective agents. The basis for the durability of corrosion protection is laid by the manufacturer, but its effectiveness and duration depend on proper care, climatic conditions, the ecological state of the environment and storage conditions.
To avoid scratches on the paintwork of the body, do not remove dust and dirt with a dry wipe. It is better to wash your car in specialized car washes, which use modern equipment and detergents that are gentle on the paintwork of the body. As a last resort, washing with a low-pressure water jet using a soft sponge and a special car shampoo is allowed.
Attention
: Do not wash your car with the engine running!
After washing, wipe the washed surfaces dry, as when drops of water dry, stains form on the painted surface. In winter, after washing the car in a warm room before leaving, wipe the body and door seals dry, since when the remaining drops freeze, cracks may form in the paintwork and the seals will freeze to the body. It is not recommended to use soda and alkaline solutions, as well as waste water, to wash the car so that the coating does not fade.
Before washing your car, clean the drainage holes in the doors and sills. When washing your car, avoid direct spray of water on electrical equipment, electronic devices, sensors and connectors in the engine compartment. Monitor the condition of the protective covers of detachable connections of electronic units and sensors. If moisture gets in, blow out the detachable connections with compressed air and treat them with a water-repellent agent to protect the contacts from oxidation.
When washing, thoroughly rinse the flanges of the doors, hood, welds and joints of the engine compartment and door openings, since accumulated dirt in these places will lead to the destruction of the protective and decorative coating and to metal corrosion.
If signs of corrosion are detected - corrosion deposits, local swelling of paint, chips, etc. - remove loose and sheet rust with fine emery cloth and treat the cleaned area with a rust converter, according to the instructions for the converter. Then apply primary primer and touch up with enamel. Apply bitumen anti-noise mastic to the ground on the underbody and wheel arches.
Chips and scratches on the paintwork, chips of mastic along the wheel arches and on the bottom are associated with mechanical impacts of an operational nature. Traces of corrosion on welding joints and joints of body parts are superficial in nature and can be removed at the initial stage with polishing pastes. If measures are not taken in a timely manner to eliminate defects in the protective and decorative coating of an operational nature, this will lead to the development of corrosion under the coating layer, its peeling and swelling.
To increase the corrosion resistance of the body, a special anti-corrosion composition is applied to the closed box-shaped cavities of the sills, side members, cross members and other elements of the body base. When operating a vehicle, we recommend restoring the protective coating of hidden body cavities at maintenance facilities during the first year of operation and then periodically once a year.
During vehicle operation, the coating on the underbody is exposed to gravel, sand, and salt. As a result of this exposure, the mastic and primer are erased, and the bare metal rusts. Therefore, regularly monitor the condition of the bottom coating and promptly restore the coating in damaged areas. To maintain the shine of your car's painted surfaces, especially for cars stored outdoors, polish them regularly using polishing pastes. These pastes close microcracks and pores that have arisen during use in the paint coating, which prevents the occurrence of corrosion under the paint layer.
Preparation
You will be interested:How dangerous is the new coronavirus?
In order to repair the Chevrolet Niva engine, you will need to stock up on the necessary set of tools. This kit includes:
- a set of keys from “10” to “36” or a universal analogue, you can also use a gas model;
- socket heads at “12” and “13”;
- hammer;
- screwdriver;
- special puller for the oil filter.
If possible, it is better to work on a rotating stand, which allows you to approach the motor from different sides. This feature is due to the fact that the power unit is quite problematic to securely fix. Otherwise, it is difficult to unscrew fasteners that are tightened with great force.
Repair features
Repair of the main functional components of the SUV in question has the following features.
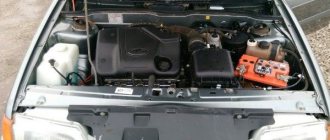
Engine
Since the car is specific and the design is not complicated, there will be no surprises in terms of repairs.
Changing the air filter and oil is extremely simple. As for the oil filter, it is located on the side of the block, so it is not easy to get to it. Stock up on 3.75 liters of oil and a hexagon. There is no need even for a lift or a pit, since the ground clearance is quite high. Raising the car makes sense only if there is serious crankcase protection.
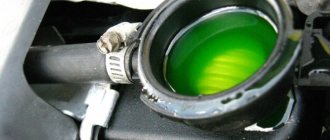
A burst expansion tank can also become a problem, and this happens due to its unfortunate shape. Inconsistent lid quality also aggravates the situation.
In general, the layout for independent implementation of repair and maintenance work under the hood is quite convenient. The only difficulty may be removing the starter, while adding fluid, replacing the air filter or lamps will not create problems at all.
Transmission and chassis
When buying a Niva that is not the first freshness, pay attention to the presence of increased vibrations if the previous owner had the habit of driving without one cardan. In this case, the transfer case supports may not be suitable. In general, the statistics on gearbox breakdowns are quite meager, which indicates the decent reliability of this unit, but the same cannot be said about the clutch. All cylinders, both worker and main, must be replaced. It is noteworthy that it is better to change the mechanism completely than to follow the lead of the green toad and buy a repair kit.
As for changing the oil in gearboxes and gearboxes, it should be the same - 75w-90, and the volumes are as follows:
- 1.3 l for the rear axle;
- 1.15 l for the front gearbox;
- 0.79 l for transfer case;
- 1.6 l for gearbox.
Adjusting the wheel bearing
To work, you will need an indicator and a torque wrench.
To prepare for adjusting the wheel bearing, you must perform the following operations:
- Secure the indicator by resting its leg on the hub near the adjusting nut.
- Place spanners on the studs and secure them with nuts.
- Rotate the hub and move it axially. (Screwed spanners are used as handles).
- Measure the amount of axial movement (clearance) of the hub, guided by the indicator readings.
- If the stroke exceeds 0.15 mm, adjust the play.
The adjustment is carried out as follows:
- Straighten the collar of the nut.
- Unscrew it with a spanner.
- Install a new nut and tighten with a force of 2 kgf*m.
- Loosen the nut and tighten again with a torque of 0.7 kgf*m.
- Loosen the tension by turning the key 20-25 degrees counterclockwise.
- Check hub play.
- Make sure that the indicator readings correspond to the norm (0.02-0.08 mm).
- Lock the nut by pressing its edge into the groove of the outer CV joint.
You can adjust the hub play without using a torque wrench. To do this you need:
- Tighten the nut tightly.
- Rotate the wheel a few turns.
- Check the play.
- If necessary, loosen or tighten the nut slightly.
- Continue until the free play of the hub is within 0.02-0.08 mm.
- Lock the nut collar.
Video instructions for adjusting the wheel bearing You can install non-adjustable IVECO bearings on the Chevy Niva. To do this, you need to buy the appropriate hubs or remake the old ones. For the rework you will need a jig boring machine. In addition to boring the mounting hole, you will have to make spacer rings. Drawings of parts are provided at the link.
The design of the rear wheel mounting of the Chevrolet Niva is very different. However, they also use bearings that need periodic replacement. They are replaced either together with the axle shafts or separately. The second option is much cheaper, but requires good metalworking skills and a torch to heat the metal.
Also interesting: Buy Niva Wheel Hub Cap online, Niva Wheel Hub Cap at a discount on AliExpress
To work you will need:
- Jack, wheel wrench, chisel, hammer.
- Standard set of screwdrivers and wrenches.
- Axle puller.
- Gas (gasoline) burner or muffle furnace.
- Repair kit including bearing, oil seal and retaining ring.
- A pipe with a diameter of 40-45 mm, the length of which exceeds the size of the axle shaft.
Replacement of bearings is carried out as follows:
- Place the machine on a level surface.
- Place wheel chocks or bricks under the front wheels.
- Jack up the car.
- Remove the wheel.
- Place a support under the rear axle.
- Unscrew the brake drum mount.
- Dismantle the part.
- Unscrew the nuts holding the bearing.
- Load the rear axle by lowering it onto the stand.
- Pull out the axle shaft using a puller.
- Hang the brake mechanism on a wire.
- Knock down the retaining ring using a chisel, hammer and grinder.
- Crack the bearing races using a chisel.
- Remove rust and dirt from the seating surface.
- Put the new bearing in place.
- Heat the locking ring to 200-250 degrees (dark red color) and hammer it into the seat with a pipe
- Replace the oil seal.
Assembly is performed in the reverse order of disassembly. The bearing does not need adjustment.
A visual process of replacing a Niva Chevrolet axle bearing
- Loosen the nut and tighten again with a torque of 0.7 kgf*m.
- Loosen the tension by turning the key 20-25 degrees counterclockwise.
- Check hub play.
- Make sure that the indicator readings correspond to the norm (0.02-0.08 mm).
- Lock the nut by pressing its edge into the groove of the outer CV joint.
https://www.youtube.com/watch?v=RdXcXbHjaRI
Video instructions for adjusting the wheel bearing You can install non-adjustable IVECO bearings on the Chevy Niva. To do this, you need to buy the appropriate hubs or remake the old ones. For the rework you will need a jig boring machine. In addition to boring the mounting hole, you will have to make spacer rings. Drawings of parts are provided at the link.
Assembly is performed in the reverse order of disassembly. The bearing does not need adjustment.