Do-it-yourself turbine repair may be necessary if the power of the diesel power unit decreases. You can check the serviceability of the unit by pressing the gas pedal to create maximum speed. If the turbocharger does not reach maximum pressure, it means it is faulty. Alternatively, the turbine can be replaced. However, if you want to save money, it is better to try to fix the element yourself. Let's consider the main reasons for part failure, as well as methods and possibilities for repair.
Peculiarities
The process of repairing a turbine with your own hands requires a careful approach. It is unlikely that experts will recommend that you do this yourself. This is due to the fact that even a small grain of sand can damage the unit. If you have certain skills and desire, then the repair should begin by preparing a repair kit. To do this, you will need to purchase liners of different sizes, a set of seals, washers, screws, screws. If possible, mark all installation locations and slots during disassembly. The work must be handled with extreme care and attention.
Disassembly
Further repair of the turbine with your own hands on a diesel engine continues by dismantling it. First, all the fixing bolts of the turbine and compressor housing parts are unscrewed. Often the first assembly is stuck tightly; to remove it, you can use a mallet, unscrewing the bolts evenly throughout the entire volute. Then it must be carefully moved away.
Care should be taken to ensure that the turbine wheel does not become deformed. Depending on the model of the unit, the compressor scroll can be secured with bolts or stoppers. After removing all the clamps, the cochlea itself is dismantled.
Then check for play in the cartridge. Transverse movement is allowed in small amounts, and there should be no longitudinal play. Otherwise, the element will need to be replaced. Using pliers with sliding jaws, remove the compressor retaining ring. The reverse side of the shaft is clamped using a figured straightener. When disassembling, remember that the part has a left-hand thread.
Do-it-yourself Passat turbine repair
To remove the compressor wheel, use a special universal puller. The relative placement of the wheel and nut is pre-marked, which is necessary to prevent the unit from being unbalanced. The most common cause of play is wear of the bushings. They are secured with locking rings and three bolts. Three more stoppers hold the liner in place.
After disassembly, the cartridge and wheels are thoroughly cleaned of dirt and carbon deposits. The seal ring is removed from the shaft. If relaxation of the nominal liners is observed, the shaft will need to be grooved and balanced. The remaining parts are replaced with analogues from the repair kit. The inserts are cleaned and lubricated with oil.
Assembly
After the Volkswagen turbine has been repaired with its own hands, we begin to assemble the unit. Internal retaining rings are mounted into the cartridge. You need to make sure that they are tightly seated in their nests. Then the turbine liner is installed, lubricated with engine oil. After fixing the element with a stopper, insert the compressor liner. The bushing is lubricated, after which the oil scraper, plate and bolts are installed.
Tighten the fixing screws carefully with the required, but not excessive, force. Next, the dirt protection plate is attached using locking rings. Oil scraper rings are installed on the shaft. Here you will have to be patient, since the process is very difficult and monotonous. After lubricating the shaft, it is mounted and tightened using a nut with a force of about 4-5 Nm. The cleaned snails are put in place along with the valve (wastegate). The assembly bulkhead can be considered complete.
Device
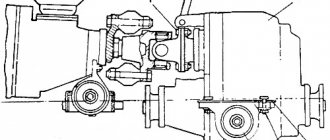
In order to repair a KamAZ turbine with your own hands, you need to study its structure. Despite the apparent complexity, the node configuration includes only three main parts:
- Turbine block (exhaust gas side).
- The compressor responsible for the boost.
- Intermediate cartridge (bearing unit).
The cartridge aggregates with a rotor shaft, which is connected together with a turbine wheel. The compressor analogue is fixed separately on the shaft. The unit is equipped with an adjustment system, which is located on the turbine or compressor housing, depending on the modification of the unit. This device is responsible for the operation of the bypass valve. The cartridge has seals that prevent oil from entering the housing parts.
Common mistakes
When repairing a turbine with their own hands, many users make a typical mistake, which is associated with a misunderstanding of the damper, the effect of which is provided for in the design of the bearing assembly. Damping is required due to the operating characteristics of the power unit. Exhaust gases are supplied to the exhaust manifold and then to the turbine wheel in a dosage determined by the opening size of the engine exhaust valves. In this regard, the flow has a pulsed nature.
To compensate for the impact in the case of constant feed, it would be necessary to make the rotor more rigid. This, in turn, would lead to an increase in the size and weight of the entire unit. Sliding bearings and floating bushings allow the situation to be stabilized. There is a certain gap between them and the housing, which serves to form an oil film, like between the rotor and the bushing. The element rotates approximately twice as slow as the rotor; two layers of oil successfully neutralize the pulsed effect of exhaust gases on the turbine rotor.
When repairing a diesel turbine with your own hands, excessive play between the housing part and the bushing may be mistakenly diagnosed. Some “craftsmen”, taking this as a defect, grind enlarged bronze bushings, which are mounted with increased tension. Such an error leads to negative consequences. The turbocharger begins to work with maximum effort, and the absence of an additional chamber with an oil film leads to a decrease in the damping effect and increased wear of the bearings. In some cases, this can lead to deformation of the rotor shaft.
Causes of turbocharger malfunctions
Why did the turbine break down? ...
It is extremely important to determine and eliminate the cause of turbocharger failure before replacing it!
If the original cause of the turbocharger failure is not eliminated, all the money spent on repairing or purchasing a new turbine will be wasted. The turbocharger will fail again!
It has been established that the most common reason for turbine failure is an external factor, that is, the cause of the failure itself lies not in the turbocharger, but in an extraneous, external influence on it. By itself, the turbine does not have parts that are subject to too much wear when operating in the modes provided by the manufacturer. The service life of the turbine is equal to the life of the engine. Manufacturers of turbochargers exclude the presence of defects in their products. A completely reasonable exception, because the production of modern turbines uses automated high-tech lines. The entire production process undergoes strict, automated control. Alas, when operating a turbocharger the situation is somewhat different and over time, problems arise with the turbine in practice. A frequent case is when a turbine fails much earlier than it is supposed to serve. There are no exceptions when a new, recently installed turbocharger for some reason fails before the vehicle has even driven a hundred meters, immediately after the repair shop.
Old contaminated engine oil and aggressive environment
Damaged bearing.
Oil from the engine enters the turbocharger to lubricate the rotating parts of the turbine. Oil contaminated with foreign large particles has an extremely negative effect on the turbocharger, severely wearing out its moving parts, scratching and damaging its bushings and bearings. Large abrasive particles leave deep scratches in the form of grooves on turbine bushings and bearings. This typical wear on turbocharger parts is most often associated with an unusable engine oil filter. Dirt getting into the engine oil can be caused by careless engine repairs or opening engine covers in unfavorable conditions. Significantly exceeding the service life of engine engine oil contributes to the formation of small abrasive particles in the lubricant, the oil loses its lubricating properties, which leads to severe wear of the shaft, gradually erasing its surface, and strong play of the turbine rotor appears. Poor quality or unsuitable oil, the presence of foreign additives in the oil lead to chemical contamination of the engine oil, which contributes to intensive wear of the sliding parts of the turbocharger.
Overheating at maximum turbine operating conditions
Worn bushing (bearing).
The cause of severe wear and tear on the rotating parts of the turbine may be overheating caused by a malfunction of the vehicle's cooling system, improper operation of the gas distribution system, or an inappropriate type of fuel. Also, a malfunction of the turbine control system or a faulty air pressure sensor lead to foreign formations on the shaft and impeller, which contributes to their overheating. When overheated, violation of the temperature characteristics of the turbine leads to deformation of turbocharger parts and the formation of cracks on the shaft impellers. Inapplicable parameters of control systems lead to exorbitant rotation speeds of the turbocharger rotor, forming cracks on the blades, subsequently destroying the entire rotor. A lack of engine oil in the turbine leads to overheating and destruction of its parts. A lack of lubrication may be due to the lack of lubrication or poor-quality gaskets, which become an obstacle to the supply of oil to the moving, rotating parts of the turbocharger.
Damage from foreign particles
Damaged turbine shaft.
Solid foreign objects entering the turbocharger will cause irreparable damage to it. As a result of careless repair or installation, a foreign washer, nut, or plastic that gets into the turbine will damage the impeller or the entire turbocharging shaft. Even a small piece of soft paper, cardboard, or wood will cause a complete imbalance of the turbine rotor, subsequently leading to complete destruction of the bushings and bearings. Damage to the blades by foreign objects in variable geometry turbines (VNT, VGT) leads to failure of the turbine geometry control system, which can lead to overheating or the assignment of incorrect turbine operating parameters. Sand or dust that has penetrated into the air channels of the turbine will quickly deform the impeller blades and quickly wear out the remaining parts of the turbocharger. Careless installation, poor-quality air filter, and leaky air duct pipe can be a serious cause of failure of a newly installed turbocharger.
Automotive turbocharger design
Despite its apparent complexity, the turbine is not distinguished by a large number of parts. It consists of only three main sections: a turbine section, otherwise called a hot section, which works with the engine exhaust, a compressor section, which is responsible for supplying compressed air to the motor, and a bearing unit connecting them, which is more often called a cartridge; the rotor shaft passes through it.
In addition, there is an adjustment system, which in different turbocharger designs can be located in the hot or compressor part of the turbine. It regulates the operation of the device's bypass valve. The compressor impeller is mounted directly on the shaft, and the turbine impeller and shaft are one piece. The cartridge has seals that prevent oil from entering the volutes. That's all the components of a car turbocharger.
When a seemingly simple mechanism breaks down, it makes a technically savvy driver want to do the repairs on his own. This desire is especially stimulated by the cost of a new turbocharger, which varies between $500-1000, and after repair can amount to $540. Purchasing a used turbine can save the situation, but who can guarantee its proper operation in the future?
It should be noted that finding a specialist who can competently repair a turbocharger is quite problematic. And if one is found, you often have to wait in line for several weeks. On the other hand, a driver who decides to carry out repairs on his own is faced with a lot of “pitfalls” that are difficult for an inexperienced car enthusiast to even imagine.
Diagnosis of the problem
Turbocharger diagram and element functions
As a rule, problems with the turbocharger are indicated by a sharp decrease in engine power, the presence of a large amount of thick exhaust smoke, an increase in fuel and oil consumption, as well as a change in the sound of the car.
Here you should understand not only the design features of the compressor, but also the entire car as a whole. If the sight of an open hood does not throw you into a stupor, then you can start working.
A turbocharger consists of several main parts:
- Turbine;
- Air centrifugal pump;
- Directly the compressor;
- Main axis;
- Various rings, bearings, valves and other parts.
In addition, in some cases the problem is not with the compressor itself, but with something else. For example, a lot depends on the performance of the exhaust system, air and oil lines. Therefore, it is recommended to check the engine and other elements of the car.
Operating principle and little-known nuances
It would seem that the principle of operation of a turbocharger is not particularly complicated. Exhaust gases from the car's power unit spin the turbocharger impeller, which converts the kinetic energy of the gas flow into mechanical energy. Using a pump, fresh air is supplied to the compressor through a filter device and, after compression, enters the car engine. Using this process, it is possible to increase the efficiency of the power plant by 20-25 percent by increasing the efficiency and rate of fuel combustion.
The damping effect and the consequence of its misunderstanding
One of the “pitfalls” for those who decide to undertake repairs is a lack of understanding of the damping effect, which is closely related to the design features of the bearings of the turbocharger. This issue needs to be considered in more detail, since repair work without understanding it often leads to disastrous results.
The design of the turbine initially provides for the need for damping due to the operating characteristics of a car engine. The exhaust passes through the exhaust manifold and enters the turbocharger impeller in jerks, rather than gradually, in proportion to the opening of the power unit valves. It turns out that the gas flow is non-uniform and affects the turbocharger impeller with impulses.
To compensate for such a heterogeneous effect, it would be necessary to design a rotor of increased rigidity, which would result in an increase in the mass and dimensions of the device. The problem was solved by bushings installed in the bearing assembly, which created a damping effect on the volute side.
It's quite simple to explain. The diameter of the bushing is chosen such that there remains a small distance between it and the volute, allowing an oil film to form during operation, almost the same as that formed in the gap between the bushing and the shaft. The rotation speed of the sleeve is approximately half the speed of the shaft, and a pair of oil films makes it possible to successfully absorb uneven exhaust pressure on the turbocharger rotor.
When repairing a turbocharger on your own, it may seem that there is excessive play between the cartridge body and the bushing. Most car enthusiasts will consider this effect to be a malfunction and will begin to grind out a new bushing (usually bronze) and press it in quite hard during installation. This is usually done by analogy with the bushings that are installed on the starter or connecting rod head, but in this situation such an understanding will cause disastrous results.
The turbine rotates at a very high speed, the disappearance of the second oil film will reduce the damping effect by almost half, which, in turn, will cause rapid wear of the bearings. Sometimes in such cases, due to impulsive load, the rotor shaft may even break.
Imbalance
In order for the rotating part to work as correctly and as long as possible, it is balanced. The most common example in this area is the process of wheel balancing, which is carried out constantly after repair work affecting the wheels and chassis of the vehicle. If this procedure is not followed, considering the front wheels, runout will be propagated through the steering system. And in the version with rear wheels, even without any pronounced signs of imbalance, the tires may wear out prematurely, which will be visible by special spots. Do not forget about the increased load and accelerated wear of suspension elements.
Of course, the turbocharger impellers are much smaller than the diameter of the wheels, but we must not forget about the rotation speed, which is many times higher for the turbocharger rotor and averages 100,000 rpm, and in some models reaches 300,000 rpm. Who remembers physics, the load on a rotating element increases in proportion to its speed squared. So, if we take into account the high rotation speed, the loads on the turbocharger rotor and the car wheels are quite comparable, and lack of balancing often causes serious damage.
Turbocharging defects and causes of their occurrence
Malfunctions of diesel and gasoline engine turbines are no different from each other. Below are some of them:
- Wear of the shaft bearing journals and sliding bearings. Reasons: low pressure, poor quality or severe contamination of the oil. A sign of this malfunction is the noisy operation of the turbine at any speed.
- Mechanical damage to the impellers. Occurs when there is a large uneven wear between the shaft and the bearings, leading to the impellers beating against the housing. Or when foreign objects get on the impeller blades.
- Clogging of bearing lubrication channels with burnt oil. This is possible when turning off the diesel engine immediately after stopping the car. Because if, after stopping the car, you do not allow the engine to idle for several minutes, overheating of the bearing housing is inevitable. And in the case when the turbine is liquid cooled - when the thermal conductivity of the channels of this system decreases due to the deposition of scale or antifreeze sealant on their surface.
- Oil entering the engine intake manifold from the turbocharger. The reason is increased gaps between the surfaces of the shaft journals and the bearings, together with a clogged oil drain line. This makes itself known by the appearance of blue smoke at high engine speeds. As the crankshaft speed decreases, the exhaust becomes almost colorless.
- Actuator malfunction. Most often this is a jamming of the bypass valve in one of the extreme positions. A sign is insufficient compressor boost or exceeding the permissible impeller speeds.
- Leaks in the joint between the compressor scroll and the intake manifold. The reason may be a violation of the geometry of the turbocharger housing or the gasket becoming unusable. This malfunction reveals itself by the whistling sound of compressed air escaping through the defect.
Article on the topic: How the transfer case works
Removing the turbocharger
- Cool the engine and drain the antifreeze.
- Disconnect the oil lines and cooling pipes from the assembly housing.
- Unscrew the volute flange fasteners. To avoid damaging the edges of bolts or nuts, use only box and socket wrenches.
- Disconnecting the compressor volute flange from the intake manifold is usually not difficult. The turbine scroll flange usually sticks tightly to the exhaust system. To separate this joint, you should use WD-40, and if this does not help, then a wooden mallet.
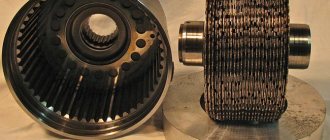
What is a turbine cartridge
An engine turbocharger cartridge is a unit consisting of a bearing housing, liners and a shaft with impellers installed in them. Available for sale, it does not require balancing the shaft with impellers or other preparatory operations and, after removing the preservative grease, is completely ready for installation.
What are the types of turbocharger malfunctions and how to recognize them?
The main signs of a malfunctioning turbine are a sudden drop in the power of the vehicle's power plant, increased oil consumption, a change in the sound of the engine and turbocharger, and blue or black exhaust gases.
Any of these signs indicate that it is time to check for a turbine repair kit. It is necessary to find out whether the turbocharger is working properly, and also be sure to check the operation of the engine and other components of the machine. These recommendations should not be ignored, since a car’s power plant with normal operation and quality maintenance is the key to stable operation of the turbocharger for a long time.
Don’t buy into the words – “We can do anything and everything will work!”
We have a GateTest 12 machine that we show the client, as well as the entire electronic actuator pulse motion diagram. But this will be a test of the electronic actuator at this moment in time, for this minute. If you install a turbine, and the current pulse at the valve control is increased in the electrical wiring, the auger in the actuator will jam, which will lead to a recurrence of the problem. There are portable devices that program and test electronic actuators, but again this is just a check for the moment and nothing more. I want to make an accent! Do not buy cheap advertising that repairs cost from 2900 rubles. The equipment that is used, that warehouse, those labor resources cost quite a lot of money, so they simply lure you with a cheap price, then when disassembling the turbine it will be difficult for you to refuse it and they will “charge” you the full price, which is 2 times more expensive, for example what we do. Therefore, by phone, determine what the price limits may be, clearly and specifically.
The average cost of repairs for passenger cars (standard price of a repair kit) is from 8,500 to 11,500 rubles. There is a gradation for replacing the shaft with a repair kit (sleeve bearing, support bearing, compression rings, spool and seal). different types of turbines, models and manufacturers - price from 2000 to 5000-6000 rubles.
- Compressor wheel replacement from RUB 1,500. up to 3000 rub.
- Cartridge replacement from 9,500 to 18,500 rubles.
depending on the type of turbine. - Replacement of the unit for changing the angle of attack of the exhaust gas from 2500 to 6000 rubles.
To avoid various surprises in the repair, the algorithm is very simple: Disassembled in the presence - defective - received the technician's explanations - listened to the proposed solutions to the problem - selected the parts - agreed on the cost - made sure of the quality of the parts - took away their old parts - received the repaired turbocharger. It’s better to trust the repair of your turbine to trusted professionals and companies.
We wish your turbine a long life and many kilometers.
Turbine repair in artisanal conditions
Let us remind you once again that experts do not recommend repairing the turbine with your own hands without the proper equipment. In addition to the above reasons, it must be said that if even one grain of sand gets inside the turbocharger during assembly, it may fail. On the other hand, some car enthusiasts still repair the turbocharger themselves, why can’t you?
If you decide to do repairs, you will at least need a repair kit for the turbine, which usually consists of several different liners, rings, screws, a solid set of a wide variety of seals, washers, screws and spare liners. While working, you need to be as careful as possible and remember that disassembling is always easier than assembling. It is advisable to mark the places where various elements are attached and their position in relation to the body or other parts.
Let's start the repair
Before disassembling a turbine in makeshift conditions without experience in such matters, you need to once again weigh the pros and cons.
- First of all, the turbocharger must be dismantled. To do this, you need to unscrew all the bolts securing the hot and compressor sections. When dismantling the compressor scroll, most often no special problems arise. But the section where the exhaust gases enter is often firmly welded. Several methods are usually used to dismantle it. You can carefully knock it down with a mallet, but it’s better to first use the housing bolts for this purpose, which can be used to move it away. The hot section is located on a cone, so you need to turn the bolts little by little, albeit with force, and ensure uniformity. This can be a complex process due to the design of the turbocharger. Occasionally, you still have to pick up a mallet.
- The compressor part is removed in different turbines in different ways, depending on the design. GT17 is bolt-on and GT25 is snap-ring. In this part of the dismantling, you need to keep an eye on the washers, and after removing the snail, carefully fold them so as not to lose them.
- After removing the retaining ring or unscrewing the bolts, it is necessary to remove the volute. This must be done carefully so as not to cause any damage to the wheel.
- When the cartridge is freed from the snails, you should check the play on the shaft. Ideally, the longitudinal play cannot be felt at all, but the transverse play should be present, but not more than a millimeter. However, the presence of play in a turbocharger, or its absence, is not a guarantee of proper operation and measured oil consumption.
- Then we proceed to dismantling the compressor impeller, for which we will need special wire cutters. At this time, one side of the shaft is fixed with a shaped mandrel or other suitable device. Attention! The compressor side of the shaft has a left-hand thread!
- Most often, the compressor impeller sits tightly on the shaft, and to remove it you will need a standard universal puller. Before doing this, it is advisable to note the location of the nut in relation to the compressor wheel. In this way, the risk of imbalance after assembly can be reduced.
- The O-rings are secured with circlips, and the bushings are secured to the shaft with a trio of T15 bolts. Most often, play occurs due to wear of these bushings. The liner located on the compressor part is fixed by one retaining ring. And to secure the turbine liner, two locking rings are used.
- The entire cartridge will need to be thoroughly cleaned from dirt and carbon deposits. Carry out a similar procedure with wheels. The sealing ring is removed from the shaft.
- We have already written about a turbocharger repair kit, which assumes that you already have one. If the nominal liners are loose, you need to do a little work with the shaft, it needs to be sharpened and balanced. In most cases, the repair kit contains liners of various sizes; they will have to be cleaned and oiled.
- Then we install the internal locking rings into the cartridge. You need to make sure that they fit well into the grooves intended for them. After this, a liner for the hot part is installed, which is thoroughly lubricated with oil. Fixation occurs due to the locking ring, then the liner for the compressor part is inserted. Oil is also applied to the bushing, after which the oil scraper ring is put on, the plate is installed and tightened with T15 bolts. In this case, you need to apply enough effort, but not overdo it.
- At the last stage of assembly, the turbine already looks almost like new. We install the dirt protection plate and secure it with retaining rings. Then you need to install the oil scraper rings. This is probably the most unpleasant and tedious part of the work, because installing the rings on the shaft will not be easy. Then the shaft must be lubricated with oil and inserted, and the nut must be tightened with a torque from 2.5 Newton/meters to 5.0 Newton/meters. We put the cleaned snails back in place, it won’t be that difficult. Then a wastegate is installed.
- Before installing the assembled turbine, it is necessary to thoroughly rinse the oil supply hose, since the correct operation of the device is directly dependent on the oil supply to it. Moreover, as we have already written, grains of dirt remaining after repair work can end up inside the turbocharger and cause damage. Let us repeat, when repairing a turbine, you should try to work as cleanly as possible. Before installing the turbocharger on a car engine, you need to pour approximately 20 grams of oil into the receiving hole, and then make a couple of revolutions with the shaft so that the oil is well distributed. It is imperative to change the oil, air and oil filters.
Do-it-yourself turbocharger repair - detailed instructions
Even in the last decade, a car turbine was considered an attribute only of premium cars, but today it is a necessary part for almost every car, which can significantly increase the output of the power unit and reduce fuel consumption. And these days, it is these characteristics that often become decisive when purchasing a new vehicle.
Therefore, today it would not hurt any driver to familiarize himself with the design of a turbocharger and learn to understand how it works and what problems there may be, which, in turn, will allow him to orient himself in time and determine the malfunction in his car.
Despite its apparent complexity, the turbine is not distinguished by a large number of parts. It consists of only three main sections: a turbine section, otherwise called a hot section, which works with the engine exhaust, a compressor section, which is responsible for supplying compressed air to the motor, and a bearing unit connecting them, which is more often called a cartridge; the rotor shaft passes through it.
In addition, there is an adjustment system, which in different turbocharger designs can be located in the hot or compressor part of the turbine. It regulates the operation of the device's bypass valve. The compressor impeller is mounted directly on the shaft, and the turbine impeller and shaft are one piece. The cartridge has seals that prevent oil from entering the volutes. That's all the components of a car turbocharger.
When a seemingly simple mechanism breaks down, it makes a technically savvy driver want to do the repairs on his own. This desire is especially stimulated by the cost of a new turbocharger, which varies between $500-1000, and after repair can amount to $540. Purchasing a used turbine can save the situation, but who can guarantee its proper operation in the future?
It should be noted that finding a specialist who can competently repair a turbocharger is quite problematic. And if one is found, you often have to wait in line for several weeks. On the other hand, a driver who decides to carry out repairs on his own is faced with a lot of “pitfalls” that are difficult for an inexperienced car enthusiast to even imagine.
It would seem that the principle of operation of a turbocharger is not particularly complicated. Exhaust gases from the car's power unit spin the turbocharger impeller, which converts the kinetic energy of the gas flow into mechanical energy. Using a pump, fresh air is supplied to the compressor through a filter device and, after compression, enters the car engine. Using this process, it is possible to increase the efficiency of the power plant by 20-25 percent by increasing the efficiency and rate of fuel combustion.
The damping effect and the consequence of its misunderstanding
One of the “pitfalls” for those who decide to undertake repairs is a lack of understanding of the damping effect, which is closely related to the design features of the bearings of the turbocharger. This issue needs to be considered in more detail, since repair work without understanding it often leads to disastrous results.
The design of the turbine initially provides for the need for damping due to the operating characteristics of a car engine. The exhaust passes through the exhaust manifold and enters the turbocharger impeller in jerks, rather than gradually, in proportion to the opening of the power unit valves. It turns out that the gas flow is non-uniform and affects the turbocharger impeller with impulses.
To compensate for such a heterogeneous effect, it would be necessary to design a rotor of increased rigidity, which would result in an increase in the mass and dimensions of the device. The problem was solved by bushings installed in the bearing assembly, which created a damping effect on the volute side.
It's quite simple to explain. The diameter of the bushing is chosen such that there remains a small distance between it and the volute, allowing an oil film to form during operation, almost the same as that formed in the gap between the bushing and the shaft. The rotation speed of the sleeve is approximately half the speed of the shaft, and a pair of oil films makes it possible to successfully absorb uneven exhaust pressure on the turbocharger rotor.
When repairing a turbocharger on your own, it may seem that there is excessive play between the cartridge body and the bushing. Most car enthusiasts will consider this effect to be a malfunction and will begin to grind out a new bushing (usually bronze) and press it in quite hard during installation. This is usually done by analogy with the bushings that are installed on the starter or connecting rod head, but in this situation such an understanding will cause disastrous results.
The turbine rotates at a very high speed, the disappearance of the second oil film will reduce the damping effect by almost half, which, in turn, will cause rapid wear of the bearings. Sometimes in such cases, due to impulsive load, the rotor shaft may even break.
Imbalance
In order for the rotating part to work as correctly and as long as possible, it is balanced. The most common example in this area is the process of wheel balancing, which is carried out constantly after repair work affecting the wheels and chassis of the vehicle. If this procedure is not followed, considering the front wheels, runout will be propagated through the steering system. And in the version with rear wheels, even without any pronounced signs of imbalance, the tires may wear out prematurely, which will be visible by special spots. Do not forget about the increased load and accelerated wear of suspension elements.
Of course, the turbocharger impellers are much smaller than the diameter of the wheels, but we must not forget about the rotation speed, which is many times higher for the turbocharger rotor and averages 100,000 rpm, and in some models reaches 300,000 rpm. Who remembers physics, the load on a rotating element increases in proportion to its speed squared. So, if we take into account the high rotation speed, the loads on the turbocharger rotor and the car wheels are quite comparable, and lack of balancing often causes serious damage.
Dismantling a bearing assembly or changing the pressure of the bolts that secure it sometimes causes imbalance. Hence the obvious conclusion is that in “home” conditions it is impossible to balance the rotor, despite the correct replacement of all damaged elements. Accordingly, such repair work becomes pointless, because a turbine with an imbalance will again very quickly stop working.
The turbocharger rotor is balanced on special equipment by experienced craftsmen in several stages. First of all, the rotor itself is balanced, then the cartridge is assembled and the entire assembly is balanced. Specialists use two different devices for this process, one of which makes it possible to recreate the operation of a turbocharger under conditions close to real ones: pressure is created on the rotor, and oil of the required temperature is supplied to the bearing assembly.
Let us note once again that it is impossible to balance a turbocharger rotor at home. Despite the technically correct replacement of all necessary elements and correct installation, the turbine will still be unbalanced, and obviously this will quickly cause its failure.
The main signs of a malfunctioning turbine are a sudden drop in the power of the vehicle's power plant, increased oil consumption, a change in the sound of the engine and turbocharger, and blue or black exhaust gases.
Any of these signs indicate that it is time to check for a turbine repair kit. It is necessary to find out whether the turbocharger is working properly, and also be sure to check the operation of the engine and other components of the machine. These recommendations should not be ignored, since a car’s power plant with normal operation and quality maintenance is the key to stable operation of the turbocharger for a long time.
Let us remind you once again that experts do not recommend repairing the turbine with your own hands without the proper equipment. In addition to the above reasons, it must be said that if even one grain of sand gets inside the turbocharger during assembly, it may fail. On the other hand, some car enthusiasts still repair the turbocharger themselves, why can’t you?
If you decide to do repairs, you will at least need a repair kit for the turbine, which usually consists of several different liners, rings, screws, a solid set of a wide variety of seals, washers, screws and spare liners. While working, you need to be as careful as possible and remember that disassembling is always easier than assembling. It is advisable to mark the places where various elements are attached and their position in relation to the body or other parts.
Let's start the repair
Before disassembling a turbine in makeshift conditions without experience in such matters, you need to once again weigh the pros and cons.
- First of all, the turbocharger must be dismantled. To do this, you need to unscrew all the bolts securing the hot and compressor sections. When dismantling the compressor scroll, most often no special problems arise. But the section where the exhaust gases enter is often firmly welded. Several methods are usually used to dismantle it. You can carefully knock it down with a mallet, but it’s better to first use the housing bolts for this purpose, which can be used to move it away. The hot section is located on a cone, so you need to turn the bolts little by little, albeit with force, and ensure uniformity. This can be a complex process due to the design of the turbocharger. Occasionally, you still have to pick up a mallet.
- The compressor part is removed in different turbines in different ways, depending on the design. GT17 is bolt-on and GT25 is snap-ring. In this part of the dismantling, you need to keep an eye on the washers, and after removing the snail, carefully fold them so as not to lose them.
- After removing the retaining ring or unscrewing the bolts, it is necessary to remove the volute. This must be done carefully so as not to cause any damage to the wheel.
- When the cartridge is freed from the snails, you should check the play on the shaft. Ideally, the longitudinal play cannot be felt at all, but the transverse play should be present, but not more than a millimeter. However, the presence of play in a turbocharger, or its absence, is not a guarantee of proper operation and measured oil consumption.
- Then we proceed to dismantling the compressor impeller, for which we will need special wire cutters. At this time, one side of the shaft is fixed with a shaped mandrel or other suitable device. Attention! The compressor side of the shaft has a left-hand thread!
- Most often, the compressor impeller sits tightly on the shaft, and to remove it you will need a standard universal puller. Before doing this, it is advisable to note the location of the nut in relation to the compressor wheel. In this way, the risk of imbalance after assembly can be reduced.
- The O-rings are secured with circlips, and the bushings are secured to the shaft with a trio of T15 bolts. Most often, play occurs due to wear of these bushings. The liner located on the compressor part is fixed by one retaining ring. And to secure the turbine liner, two locking rings are used.
- The entire cartridge will need to be thoroughly cleaned from dirt and carbon deposits. Carry out a similar procedure with wheels. The sealing ring is removed from the shaft.
- We have already written about a turbocharger repair kit, which assumes that you already have one. If the nominal liners are loose, you need to do a little work with the shaft, it needs to be sharpened and balanced. In most cases, the repair kit contains liners of various sizes; they will have to be cleaned and oiled.
- Then we install the internal locking rings into the cartridge. You need to make sure that they fit well into the grooves intended for them. After this, a liner for the hot part is installed, which is thoroughly lubricated with oil. Fixation occurs due to the locking ring, then the liner for the compressor part is inserted. Oil is also applied to the bushing, after which the oil scraper ring is put on, the plate is installed and tightened with T15 bolts. In this case, you need to apply enough effort, but not overdo it.
- At the last stage of assembly, the turbine already looks almost like new. We install the dirt protection plate and secure it with retaining rings. Then you need to install the oil scraper rings. This is probably the most unpleasant and tedious part of the work, because installing the rings on the shaft will not be easy. Then the shaft must be lubricated with oil and inserted, and the nut must be tightened with a torque from 2.5 Newton/meters to 5.0 Newton/meters. We put the cleaned snails back in place, it won’t be that difficult. Then a wastegate is installed.
- Before installing the assembled turbine, it is necessary to thoroughly rinse the oil supply hose, since the correct operation of the device is directly dependent on the oil supply to it. Moreover, as we have already written, grains of dirt remaining after repair work can end up inside the turbocharger and cause damage. Let us repeat, when repairing a turbine, you should try to work as cleanly as possible. Before installing the turbocharger on a car engine, you need to pour approximately 20 grams of oil into the receiving hole, and then make a couple of revolutions with the shaft so that the oil is well distributed. It is imperative to change the oil, air and oil filters.
Under no circumstances should sealants be used when installing tubes through the gasket; only high-quality gaskets are suitable for this. When the turbine is installed, you need to start the car's power unit and let it idle for about 15 minutes. At this time, it is necessary to inspect for coolant or oil leaks at various connections. The turbocharger runs in for approximately 1 thousand kilometers; during this time, you cannot accelerate the car over 100 kilometers per hour and sharply change driving modes.
It is almost impossible to repair a turbine in a makeshift setting or a standard auto repair shop. Qualified repairs with a guarantee can only be performed by those workshops that are designed for such work. Such workshops have instruments for diagnosing all components of any type of turbine at any stage of repair. Also, such a workshop should have equipment for preliminary and final balancing of the turbine rotor.
Materials: https://vsepoedem.com/story/remont-turbokompressora-ili-turbiny-svoimi-rukami-princip-raboty-prichiny-neispravnostey-i
In conclusion
It is almost impossible to repair a turbine in a makeshift setting or a standard auto repair shop. Qualified repairs with a guarantee can only be performed by those workshops that are designed for such work. Such workshops have instruments for diagnosing all components of any type of turbine at any stage of repair. Also, such a workshop should have equipment for preliminary and final balancing of the turbine rotor.
Published by Author on March 20, 2019
It is not recommended to disassemble and repair the turbine yourself at home or in a garage. The main reason is the lack of special equipment for diagnosing and repairing the unit. The restoration of turbines in the workshop takes place under the most sterile conditions, since the smallest grain of sand that gets into a spare part can put it out of working order in a matter of minutes. Is it possible to repair the turbine yourself and how to do it, we will tell you in the following theses:
Diagnosis of turbocharger malfunction
There are simple ways to identify a turbine malfunction without removing it from the engine. However, a complete diagnosis and conclusion about the condition of the turbocharger can only be done at a service center by removing the turbine from the engine and conducting diagnostic tests on specialized stands. A complete diagnosis of a turbocharger should be performed by qualified personnel with the proper equipment for repairing and diagnosing turbines.
Diagnostics of the turbine on the engine
The following describes steps that allow you to partially diagnose some turbocharger malfunctions without removing the turbine from the engine.
- The air lines from the turbine should be disconnected. The pipes connecting the turbocharger with the air filter and intercooler are removed. The disconnected air channels should be dry or slightly damp from oil fumes. If there is a significant amount of engine oil in the air pipes and their connections, and the overall oil consumption of the vehicle is greatly increased, it is necessary to accurately determine the cause of the leak. The problem could be in either the turbocharger or the engine;
- The rotor impeller should be inspected. The impeller blades must not be worn or ground down, bent or otherwise deformed. The impeller must have regular, symmetrical shapes. If defects are observed on the impeller, the turbocharger must be repaired or replaced;
- Try to set the turbine shaft in motion along its axial direction. This can be done simply by hand, pulling the shaft (rotor), or grasping the shaft or impeller with your fingers. The play in the axial direction should not exceed 0.05 mm and, in principle, should not be felt by hand. If the movement of the turbine shaft in the axial direction exceeds the stated values, the turbine must be repaired or replaced;
- Move the shaft in the radial direction of the axis. The movement of the turbine shaft in the radial direction can already be felt by hand. The play (clearance) in this direction should not exceed 1.00 mm. By pulling and turning the impeller, it should not touch the walls of the cold part of the turbocharger. If the turbine impeller or its blades come into contact with the turbine wall, this turbocharger malfunction must be eliminated;
- Inspection of external parts of the turbocharger. Over a long period of operation of the turbine, its housing may crack or deform. This fate will befall almost any turbocharger over time, regardless of the model, conditions of use, manufacturer or brand of car. If a crack, split or other type of critical deformation of the housing is detected, immediate repair of the turbine or its replacement is necessary.
Turbocharger diagnostics on test benches
The turbocharger removed from the engine undergoes a series of tests and tests using special equipment. Diagnostics are carried out by experienced specialists using high-tech, modern tools. The main test of a turbocharger under stationary conditions is to diagnose its core (turbine cartridge).
- It is necessary to disassemble the turbocharger and remove its cartridge (core);
- The turbine cartridge is placed in balancing equipment, where it undergoes a dynamic test, rotating the turbine rotor at speeds of up to 200 thousand revolutions per minute;
- The vibration spectrum of the turbine rotor is analyzed as it rotates at various speeds. A test characteristic of the rotor rotation and vibration parameters is compiled;
- The cartridge is balanced by removing metal parts from the rotor that cause excessive vibration. Balancing is carried out in strict accordance with the specified standards of the turbocharger manufacturer;
- If there is an electronic valve (drive, actuator) at the turbine, its mechanical parts are tested, the functionality of the electronics is checked, and the software is corrected. Pneumatic and vacuum valves are also tested;
- All turbine parts are reassembled. The turbocharger undergoes complete assembly.
What is needed to restore a turbocharger
If the car owner is confident in his capabilities, then the following devices will be useful for the turbocharger restoration procedure:
- Inserts of several sizes;
- Oil seals;
- Rings;
- Screws;
- Washers;
- Screws;
- Spare earbuds;
- Socket and open-end wrenches;
- Screwdrivers;
- Mallet;
- Puller;
- Figure swimsuit;
- Nippers with sliding jaws.
It is easier to disassemble iron than to assemble it. It is advisable to designate all the fastening points of the turbine elements and their location relative to each other.
To understand possible failures of the mechanism, you should first study the design of the diesel engine turbine. The turbocharging system includes:
- Compressor impeller;
- Supercharger impeller;
- Support shaft;
- Bearing assembly;
- Lubrication fitting;
- Boost pressure control regulator.
Disassembly and assembly of the turbine
Do-it-yourself repair of a diesel engine turbine should begin with disassembly. The following actions are performed:
- The bolts are unscrewed or the latches that secure the housing of the turbine and compressor assembly are removed;
- If the knot is strongly “glued”, it must be “awakened” with a mallet by tapping;
- Remove the turbine “snail”;
- The bearings in the cartridge are checked - longitudinal play is not allowed, transverse play is very weak;
- Remove the compressor retaining ring using needle nose pliers (nippers). Clamp the reverse side of the shaft using a shaped melt;
- When disassembling the unit, it is worth remembering the left-hand thread on the shaft;
- The compressor wheel is removed using a puller;
- When the bushings wear out, the retaining rings come down and the fastening screws are unscrewed;
- The liners that are held in place by the stopper are replaced. Before removing the rings, soot is cleaned from the impeller shaft and cartridge;
- When the shaft wears out, old liners of standard sizes are replaced with repair ones. The shaft is ground to the repair parameters and balanced.
Once the repair is complete, you need to put the diesel engine turbine back together and secure it in place. Be sure to double-check the tightness of the locking rings when installing them on the cartridge. If the retaining rings do not fit into their sockets, the system may fall apart during the restoration process. Lubricate the bushings, liners and oil scraper rings of the shaft with oil before installation, which will guarantee the absence of scuffing during startup. The turbine elements are assembled in the reverse order, that is, what was removed last is assembled first. The impeller fastening nut is tightened with a force of 5 Nm, unless the turbine manufacturer specifies otherwise in the operating manual. The updated turbocharger is installed on a diesel engine and is secured using screws or stoppers.
The intricacies of do-it-yourself turbine repair, video:
However, in order to avoid mistakes when repairing the turbine, it is strongly recommended to contact a service center. Specialists of this profile will easily disassemble and assemble the supercharging system, will be able to notice gaps and backlashes, and will carry out balancing on a specially prepared stand. If the restoration is incorrect and inattentive, the unit will break irreversibly.
Turbocharger repair
To eliminate an actuator defect, complete disassembly of the engine turbocharger is usually not required. If the malfunction is more complex - jamming of the actuator valve, then its elimination will require complete disassembly of the unit. To repair the turbocharger yourself, do the following:
- Wash the housing and inspect the assembly to determine the malfunction.
- Use marks to mark the position of the turbine scroll relative to the compressor scroll.
- Remove both volutes from the bearing housing.
- Disassemble the “cartridge”. To do this, unscrew the fastenings of the impellers and remove them. Please note that the threads for fixing at the ends of the shaft are always left-handed. The fit of the impeller hubs on the shaft is conical. Therefore, for removal it is often necessary to use a universal puller.
- Correct a slight violation of the geometry of the blades by bending them. After this, as well as after replacing the impellers, the shaft with impellers must be balanced.
- If the geometry of the shaft bearing journals is violated, grind them on a cylindrical grinding machine if the wear does not exceed the maximum permissible values. If the maximum permissible wear is exceeded, replace the shaft.
- Change the shells in the bearing housing. Make sure that the oil supply holes in the housing and liners line up.
- Treat the inner surface of the liners with a reamer. Its size should be 0.04 mm larger than the diameter of the shaft support journals.
- Blow and wash the bearing housing cavity.
- Lubricate the bearing journals with oil and assemble the cartridge.
- Attach the snails.
- If, when installing a turbocharger, you find that the old gaskets have become unusable, you can make them yourself. To seal the connection through which exhaust gases pass, metal asbestos must be used. For the rest, paronite or pressed gaskets are suitable. When installing, the latter should be lightly lubricated with ordinary silicone sealant.
Article on the topic: Eliminating oil leaks in spark plug wells
Repairing a turbine cartridge requires access to equipment and tools not found in a typical garage. If you don't have one, you will have to pay for the services of specialists who will perform the necessary operations. Therefore, it is most profitable to repair the engine turbocharger yourself. If you want a guaranteed good result, it is best to replace the cartridge with a new one.