The crankshaft position sensor plays an important role in engine stability. Perhaps this is the only sensor in the electrical engine control circuit, due to a malfunction of which the engine may not start.
Types of crankshaft sensors
According to their design features, crankshaft position sensors can be magnetic, based on the Hall effect, or optical.
A magnetic (magnetoresistive) type sensor operates under the influence of a magnetic field arising from a permanent magnet passing in close proximity. In a Hall sensor, the current strength varies depending on the magnitude of the magnetic flux - according to the principle of operation, this model resembles an ignition distributor. The optical sensor has a toothed disc built into it.
Gear
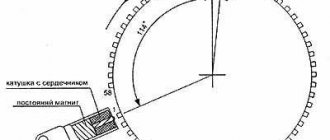
The gear is always present where there is a crankshaft position sensor (CPS). When teeth pass near the sensor, the direction of the magnetic flux changes, and the sensor transmits the changed signal to the engine control unit. The unit synchronizes the data received from the DPKV with the injectors, supplying a spark to the cylinder at the moment when the piston is at top dead center and the compression cycle is in progress.
The teeth are located around the circumference of the wheel every 6 degrees. If a circle of 360 degrees is divided by 6, then there should be 60 teeth. But in this circle there is a gap of 2 teeth, so there are only 58 of them. This is done so that the sensor can determine through the crankshaft when the top dead center of the first piston will be cylinder.
Structurally, the teeth can be made on the crankshaft pulley, on the crankshaft itself, on the flywheel, and even on the clutch basket. Accordingly, the DPKV is located next to the gear wheel. The distance between the sensor and the edge of the tooth should be approximately one millimeter. This gap is necessary to create a magnetic field.
Step-by-step replacement instructions
You can check the condition of the sensor in different ways, but specialists at a service station can do this better and more accurately. Before checking, of course, it needs to be removed and this is done very simply and even a novice car enthusiast can do it. If you are sure that the sensor is not working correctly, you can also replace it yourself.
- Turn off the ignition.
- Raise the hood cover.
- Find where the sensor is installed.
- If it and the place where it is installed are very dirty, then you must clean it with a rag or brush.
- Removing the block. Removing the block from the connector
- Unscrew the bolt. Unscrew the securing bolt
- Remove the shaft position sensor. Take out the required part
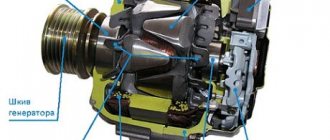
- We check the generator drive toothed pulley for damage and other malfunctions. This is very important because if it becomes damaged, data will not be transferred correctly.
- Before installing a new sensor, clean the installation site.
- We install a new one or an old one, if you determine that it is working.
- Tighten the bolt. In this case, it is necessary to strictly control that the moment is not higher than 8-12 Newton meters.
- Using a feeler gauge, we control the gap between the pulley and the DPKV core. It should not exceed one millimeter. Maximum deviation 0.4 mm in the direction of increase. Required clearance
- Let's start the engine. If it starts confidently, and the operation of the VAZ 2114 power unit is stable, then we can state that the work was done correctly.
As you can see, there is nothing complicated and you shouldn’t go to a service station unless absolutely necessary, spending extra money.
Have you replaced the crankshaft position sensor?
Survey
- Yes
- No
- This is the first time I've heard of such a detail.
Loading …
Dismantling and installation
So, you have determined that the DPKV has failed. Therefore, there is nothing left to do but replace it. To do this you will have to dismantle the old device.
- Turn off the ignition and open the hood. Securely secure it to avoid unpleasant blows to the back or head.
- Remove any dirt from around the sensor so that it can be removed and visually inspected.
- Disconnect the wiring block from the corresponding connector.
- Using a 10 mm wrench, you can easily remove the crankshaft sensor mount.
- Remove the damaged device.
- At the same time, be sure to check the generator drive timing pulley. It is not uncommon for damage to appear on it, due to which the device cannot operate correctly. These teeth cause error codes to appear on the on-board computer.
- If there are no defects and nothing prevents the installation of a new device, begin assembly.
- If necessary, clean the installation site of the DPKV.
- Place the new measuring device in the socket and tighten the mounting bolt. In this case, do not exceed a tightening torque of more than 12 N m.
- Be sure to use the adjusting washer, which is already supplied by responsible sensor manufacturers.
- Using a special feeler gauge, make sure that there is a gap of 1 millimeter between the pulley and the DPKV core.
- The gap error can be no more than 0.41 millimeters in the upward direction. Under no circumstances should the gap be less than the required 1 mm.
Maintain clearance
Price issue
As we have already noted, VAZ 2114 owners are not often faced with the need to change the DPKV. But always be prepared for such troubles.
You don’t have to spend a lot of money purchasing a new sensor. The price depends on the store and region where car parts are sold. On average, a recreation center costs about 200-400 rubles.
Replacement at a service station is still a cost around the cost of several sensors. Therefore, think about who exactly will do the work - you or the car service specialists.
The VAZ 2114, like any modern car, has a complex electronics system, an integral part of which is a variety of sensors. There are quite a lot of such devices in the fourteenth; they are necessary for the ECU (electronic on-board control) to receive information about the current state of various vehicle systems - engine, brakes, amount of consumables, etc.
The only sensor whose failure can completely stop the car is the DPKV. This is what will be discussed in this article. You will learn what this unit is, what breakdowns are typical for it and how to identify them, as well as how to check the crankshaft sensor yourself.
Crankshaft position sensor
Kinds
Depending on the design and operating principle, there are three main types of crankshaft sensors. Let's look at the features of each of them in the table.
| Sensor type | Design Feature | How does it work |
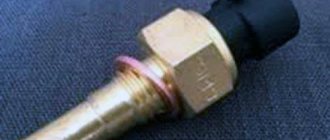
| Inductive | Inside it is a metal rod with a magnet at the outer end. It magnetizes the rod. There is a copper winding around the rod, and its ends are connectors for connecting wiring | When a steel object is near the rod, signals appear on the terminals |
| With Hall sensor | The internal design of this type of sensor includes a Hall sensor | When a metal object approaches it, the state changes from zero to one and vice versa |
| Frequency | The design is based on reading pulse frequencies that are generated by the ECU | Pulses of a certain frequency are supplied to the sensor. When you bring a metal object, the generation frequency changes. By changing frequencies, the DC determines the presence of objects near it. The reaction occurs due to the metal teeth of the crankshaft crown |
ERRORS AND SYMPTOMS OF PROBLEM
The fact that problems have arisen with the DCPV is indicated by the appearance of errors 0036 or 0035 on the on-board computer screen.
- Error No. 0035 appears in cases where the device transmits the wrong signal to the car’s brains;
- Error No. 00436 occurs when the ECU does not receive any signal from the sensor at all.
If your fourteenth does not have an on-board computer and you cannot see possible errors, pay attention to the signs of a malfunction of the VAZ 2114 crankshaft position sensor:
- Firstly, with a faulty DCPV, the engine may simply not start; there may be many reasons for this, in addition to the sensor itself, but the device should be one of the first to be checked;
- Also, if the sensor is broken, there are dips when accelerating during acceleration, or vice versa, the speed can increase on its own;
- Typical problems are when idling - the speed fluctuates or the car stalls;
- The engine's thrust is significantly weakened;
- The “Check Engine” light is on.
In general, all DKVP faults can be divided into three main groups:
- Mechanical damage to the device - cracks in the housing or broken mounting threads, damage to the core or contact block;
- Damage to the sensitive element due to wear;
- Damage to the winding, resulting in a change in the pulse frequency to the controller (the ECU cannot decipher the signal).
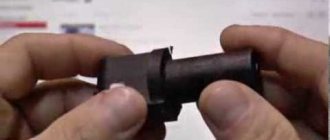
Remove the sensor, look at the external deformations and test - everything will become clear
AC voltage measurement
Checking the VAZ 2114 dpkv by measuring the variable component of the output signal is as follows. In order to measure the alternating component of voltage, it is necessary to ensure the appearance and absence of metal at its sensitive surface with a frequency of at least 200 Hz. To do this, you can use an auxiliary motor with a disk and a slot or protrusion, depending on the type of sensor. And power the sensor winding with a constant voltage of 1 or 2 V. Then switch the multimeter to the voltage measurement mode with a limit of up to 2 V of the alternating type. Next, you need to take a capacitor with a capacity of at least 1 μF and connect it to one of the terminals of the crankshaft position sensor, and the other end to one probe. Place the second probe on the second contact of the coil and turn on our resulting stand. Voltage should appear on the device readings when the disk rotates, this indicates that it is working properly. But, unfortunately, you will not see this voltage rating in the passport data. Because it depends on the selected capacitance, the more you increase it, the closer the readings will be to the supply voltage.
This method is the most reliable and with its help you can be 100% sure of the current state of the sensor. To do this, you need to turn on the oscilloscope to a limit of 10 ms and an amplitude of 1 V/div. And try to start the engine with the starter. In this case, on a well-charged battery, the engine should be accelerated by the starter to 800 rpm, this will correspond to a frequency of 200 Hz and a corresponding period of 5 ms/div. You should observe impulses, one period of which occupies two cells.
A modern car consists of many parts, each of which performs its own important function. Information about the condition of the engine and other components is transmitted by various sensors, but the VAZ 2110 crankshaft sensor performs work that is unusual for these devices.
Purpose of the crankshaft position sensor VAZ 2110
If the 9th or 10th series refuses to start, any driver immediately begins to check the power and ignition system, and when it comes to contacting a car service center, they say that the DPKV has failed (this is what the abbreviation for the full name of the sensor looks like). The bewilderment of car owners is dispelled when they find out that this is the only sensor without which the engine will not work.
The crankshaft sensor of the VAZ 2110, as well as on many other cars, does not perform a monitoring function, but synchronizes the phases and supplies the pulse to ignite the combustible mixture in the combustion chamber. Obviously, removing such an important attribute from the design makes it impossible for all systems to work harmoniously.
In its operation, the sensor uses the principle of electromagnetic induction, and reads the necessary “information” from the drive toothed pulley, in the immediate vicinity of which it is installed.
Crankshaft sensor VAZ 2110 - malfunctions and their diagnosis
Considering that the role of the DPKV in the operation of the engine is very significant, in the event of its malfunction, a variety of “surprises” can be expected. A completely failed sensor will definitely prevent the engine from starting. Other manifestations of sensor problems include:
- unstable operation of the engine at idle;
- power reduction;
- increase and decrease in the number of crankshaft revolutions (spontaneously);
- detonation with increasing load;
- launch intermittently.
For a device such as the VAZ 2110 crankshaft sensor, faults come down to two types:
- damage to the windings and parts of the sensor itself;
- violation of the integrity of the wire and the quality of connections in the circuit.
The PCV sensor itself is very simple in design and rarely fails. A crankshaft position sensor error or breakdown can be caused by reasons such as: manufacturing defects, mechanical damage, significant contamination. The first two reasons do not depend on the driver, and the car owner can monitor the cleanliness under the hood.
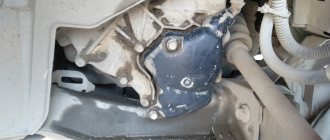
In addition to the fact that the engine compartment is always under the influence of many destructive factors, such as temperature changes, small stones and dust flying from the roadway, significantly adding to the problems of oil leakage. If it is discovered that there is a leak in any place, especially in the area where the sensor is installed - on the oil pump body, it must be repaired immediately. The contacts of the sensor wire connections must always be clean and protected. The wire insulation must not be damaged or exposed.
How to check if the crankshaft sensor of a VAZ 2110 is working?
Considering that a crankshaft position sensor error or complete failure has very similar symptoms to many other breakdowns, you should understand how to check its condition. You can only verify that the DPKV is working if you remove it. This is not at all difficult to do, you just need to follow these steps:
- turn off the ignition;
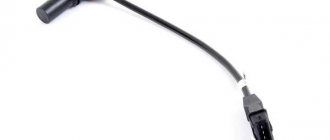
- remove the terminal connector with the wire from the sensor;
- unscrew the only screw holding the sensor on the oil pump cover;
- remove the sensor.
To check, you need to have an ohmmeter and check the resistance of the windings. If the instrument readings differ from the required 550-570 Ohms, it means the crankshaft sensor is faulty. You should not try to repair it, as this device cannot be repaired. The only way out of the situation is to replace the crankshaft sensor of the VAZ 2110. The cost of the DPKV is low, installation does not require much time and skills, especially since the car without it still remains motionless. If the device shows that the resistance of the sensor windings is normal, then the breakdown should be looked for elsewhere.
How to replace the crankshaft sensor?
Installation, as well as removal of the PCV sensor, is done quickly and without difficulty. Before proceeding with installation, the installation site should be cleared of dust and dirt. Next, simple steps are performed: the new sensor is inserted into its regular place; the fastening screw is tightened; The connector with the wire is put on. At this point, the replacement of the VAZ 2110 crankshaft sensor is completed and you can start starting the engine.
It is no secret that the engine control of the “tenth” model of the domestic automaker AvtoVAZ is carried out through the operation of a computer. Various sensors take data and send it to the main computer, which distributes the operation of the systems.
It is noteworthy that only this element is capable of keeping the engine running if the regulator fails. The task of this sensor is to synchronize the ignition system and the fuel supply system.
If the device breaks down, synchronization is disrupted.
Consequently, the entire system malfunctions. There is no spark, no fuel is supplied. The engine may behave strangely for a while, but then it will still stall.
Types of crankshaft position sensors
Crankshaft sensors differ in their design features:
- magnetic;
- optical;
- built on the Hall effect.
The magnetoresistive type of sensor operates under the influence of a magnetic field that arises from a nearby permanent magnet. The optical sensors, in turn, are equipped with a built-in toothed disk. The Hall effect sensor is similar in its operating principle to an ignition distributor, since the current strength in it varies depending on the strength of the magnetic flux.
The Role of the Gear
This mechanism must be located together with the crankshaft position sensor. The mechanism of interaction of these parts is arranged as follows: when the teeth pass in close proximity to the sensor, the direction of the magnetic flux changes, at which time the sensor transmits the already changed signal to the engine control unit. When new data is received from the camshaft sensor, the unit synchronizes with the injectors and supplies a spark to the cylinder.
The action occurs at the moment when the piston is located at the dead top point and the compression cycle is carried out.
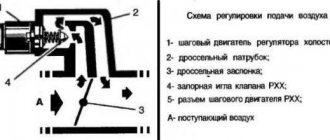
How does the fuel system receive the signal from the sensor?
While the sensor is operating, the on-board computer (microcontroller inside the car) determines the specific position of the piston at a certain moment of its operation in each of the cylinders. To regulate operation using a sensor, the process is built according to the following plan:
- The crankshaft has a special gear in which 2 teeth are specially omitted.
- When the crankshaft moves, all the teeth pass next to the DPKV sensor, greatly distorting the state of its magnetic field.
- As a result, pulses are generated in the inductance coil of this device, which are sent to the on-board computer database. In this case, the missing 2 teeth are the starting or zero point, thanks to which the computer determines the initial position of the shaft.
- Next, the computer inside the car counts the number of pulses sent by the device and determines the position of the crankshaft in each period of time.
- After this, the return signal is sent by the computer to the sensor responsible for triggering the fuel injector, which already supplies fuel to the ignition system.
Thus, if the DPKV works correctly, the car will operate at the highest performance, while consuming a minimum of fuel.
Advice:
The wiring diagram for the VAZ-2110 will easily help you find out the cause of the sensor malfunction. It shows the location and combination of all elements of the car.
Signs of breakdown
You can determine that the sensor has failed by the following signs:
- Idling malfunctions, instability in engine operation is observed;
- The engine loses power;
- The engine accelerates chaotically or, conversely, slows down;
- Heavy plant;
- During high-speed movement and, especially during acceleration, dips are observed.
The main malfunctions may be the following:
- Mechanical deformation;
- Broken wires or shorted wires (this problem is especially common in used cars);
- Wear of the pulley and other parts.
Repairing the sensor is difficult and almost impossible at home. But replacement is not difficult, and it is not that expensive. Let's now find out how to replace the sensor on a VAZ-2014.
Options for crankshaft sensors on the VAZ-2114
Crankshaft position sensor
When considering the issue of crankshaft sensor malfunction, it is worth paying special attention to the possible options for this part. According to the technical data of the manufacturer, there are several products that can be distinguished by design features and operating principle:
- Inductive . Inside the product there is a metal rod, which is surrounded by a magnet. The entire product has a copper winding, which is connected to the connection wires. When a metal part is located next to the sensor, a pulse appears on the rod and goes to the ECU.
- The hall sensor is located inside the crankshaft sensor . When a metal product is attached to it, its state changes.
- Frequency . In this case, the electronic control unit sends a certain pulse, and when a metal part approaches the sensor, the frequency of this pulse changes, which gives a signal to the ECU.
Symptoms of a problem
Location of the crankshaft sensor near the flywheel
There are not many signs of a malfunctioning crankshaft position sensor. As practice shows, in many cases, problems with the product are caused by the fact that dirt or plaque adheres to it, which prevents the data from being read, or makes this operation incorrect.
So, let's look at the main signs of a DPKV malfunction:
Schematic designation of the location of the crankshaft sensor relative to the flywheel
- Unstable idle mode.
- The revolutions are floating. This will be visible from the tachometer reading on the dashboard. It will look like this: the car picks up speed, and then it drops sharply in the same operating mode.
- Loss of power.
- Acceleration failures.
- The car starts very poorly.
In this case, it is worth dismantling the sensor and diagnosing it. It can be done in a simple way - with a multimeter, or if you have an oscilloscope - with this device.
A clear example of the location of the sensor relative to the flywheel
Also, in addition to signs of malfunction, it is worth considering the reasons why the crankshaft position sensor may fail:
- Deformation or destruction of the housing.
- Short circuit that damaged the winding.
- Wear.
Diagnostic methods
With the sensor removed, diagnostic operations can be carried out that will accurately determine the condition of the product and its performance. So, let's look at the methods for diagnosing DPKV:
- Using a multimeter . In this case, it is necessary to close the power supply connectors to resistance. The normal value should be 500-700 Ohms.
- The second method also involves using a multimeter . A reading of 200 millivolts is set on it, and a metal object is brought to the sensor core. If the sensor is working properly, then a fluctuation in readings will be visible on the multimeter.
- Using an oscilloscope. This device shows the most accurate result from all diagnostic methods. The test is carried out in different modes: at 800 rpm (that is, at idle), 2000 and increasing up to 6000. Depending on the result on the screen, the cause of the malfunction can be determined.
Oscillogram for checking the crankshaft sensor
OPERATING PRINCIPLE AND DESIGN FEATURES OF DPKV
As the name implies, the DPKV reads and transmits information about the current position of the crankshaft to the on-board computer of the fourteenth. Based on these indicators, the ECU determines the frequency of fuel supply to the engine cylinders and the moment the spark is supplied to the spark plugs.
If the DCPV breaks down, complete desynchronization of the engine occurs. The consequences of a malfunction of the DPKV, due to which the fuel ignites at the wrong time, contribute to the incorrect operating mode of the power unit - the engine will twitch or trip, and normal driving will become impossible.
On the VAZ 2114, depending on the year of manufacture and type of engine, different crankshaft position sensors can be installed. Their differences lie in the principle of operation: DPKV can be frequency and electromagnetic. Let's take a closer look.
- Electromagnetic (inductive) – inside such sensors there is a metal part with an electromagnet. The metal rod is covered with copper winding. The ends of the wire are brought to the surface of the sensor housing, and the ECU wires are connected to them. When a knee shaft appears next to the magnetized DPKV, a corresponding signal is sent to the VAZ 2115 electronic control unit;
- Frequency - such DPKV react to the crown teeth of the crankshaft. The frequency sensor generates constant pulses that are transmitted to the ECU. At the moment when the crankshaft is near the device, the pulse frequency changes, due to which the electronic controller determines the current position of the crankshaft.
Causes and symptoms of malfunction
A sensor can malfunction or even fail for a variety of reasons. Often, the most common dirt adhering to the DPKV can cause data reading errors.
Signs of malfunction:
- Unstable operation at idle.
- Spontaneous increase and decrease in power unit speed.
- Reduced engine power.
- During acceleration, “dips” appear.
- The car is difficult to start.
- As a rule, in such cases, the only way out is to replace the DPKV.
- If error 0335 or 0336 appears, then in this case with a high degree of probability it can be stated that the wire near the connector is broken. In this case, you just need to replace the connector. Oscilloscope reading of the crankshaft sensor
Main faults:
- Physical damage to the case.
- Short circuit of the winding turns as a result of which incorrect data is transmitted to the control unit.
- Wear.
- Damage to pulley teeth.
Functionality check
Don't rush to conclusions. You shouldn’t blame DPKV for all the troubles. Sometimes it turns out that the cause of the problem is completely different. Therefore, first you should check whether your DC is working or not.
There are several ways to check.
- Multimeter. Your task is to measure the coil resistance on the induction sensor. If it is working properly, then the indicator will be from 500 to 700 Ohms.
Multifunctional multimeter
- Set the measurement limit on the multimeter to 200 millivolts, connect the probes to the output and pass a metal object around the core several times. If the sensor is working, it will be able to detect this metal and a voltage spike will appear on the display. If there are no surges, the DC must be replaced.
- An oscilloscope. This verification method gives the most objective and accurate result, equal to almost 100%! (MISSING)Connect the device to the engine and read data in different modes. The engine will need to be started at different speeds - from 800 and above, up to 6 thousand. Look at the lines appearing on the screen. If they are of different lengths, you should look for the reason for the malfunction. Sometimes simple cleaning of dirt, checking the pulley for damage and other measures helps.
REPLACEMENT OF DKPV
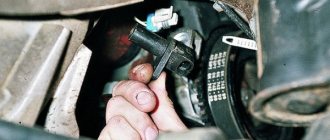
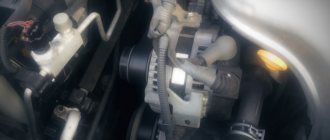
Let's figure out where the crankshaft sensor is located on the VAZ 2114. Determining the location of the device is easy - open the hood and inspect the left side of the engine compartment. Near the oil pump you will see a small device with a plastic case, fixed in a socket on the cover of the generator pulley; this is the DCPV.
Replacing the crankshaft sensor on a VAZ 2114 requires a ratchet wrench with a 10mm head, and an extension to the wrench 5 centimeters long would also help, since access to the sensor itself is limited by nearby units.
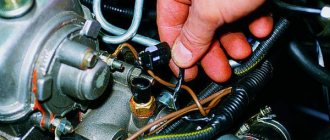
Removal of the DKPV is carried out in the following sequence:
- Open the hood of the car, find the sensor and disconnect the power wires going to it;
- Place the head of the ratchet wrench on the fixing bolt and unscrew it;
- We remove the DCPV from the mounting socket.
Installing a new device is carried out in reverse order. Here it is important to observe the rule of minimum clearance between the DCPV itself and the generator pulley, which can be adjusted using the landing washers included with the DCPV.
According to the rules, the gap between the generator pulley and the DCPV core should not exceed 1 mm and be no less than 0.61 mm. Use a caliper to determine the gap size.
It is also worth noting that if the sensor breaks down, you should not hope to repair the device yourself.
This measuring device has a very delicate filling, and if the sensitive element or contacts begin to act up, there is nothing you can do to help the sensor - it’s easier and faster to just buy and install a new device, fortunately, it is not expensive (the cost of a DCVP ranges from 300-500 rubles , depending on the manufacturer.), and the replacement, as you can see, is completed within 5-10 minutes.
Signs of a malfunction of the VAZ-2114 crankshaft sensor
Experts agree that the crankshaft sensor on VAZ cars is distinguished by its reliability and rarely fails. One of the most common reasons for the breakdown of this part is a simple wire break or dirt and oil that gets into the gap between the sensor and the toothed disk. It should also be noted that the functioning of the sensor is often disrupted due to an impact or collision while driving.
If the VAZ-2114 crankshaft sensor breaks down, signs of its malfunction may be as follows:
- Engine idle speed floats.
- You notice insufficient engine power.
- Detonation knocks are heard in the cylinders.
- The engine can independently gain or lose speed.
- The engine refuses to start.
- A warning light is on inside the car.
conclusions
The causes of the malfunction of the crankshaft position sensor of the VAZ-2114 have been established. So, do not forget that you need to make sure whether this is actually the reason, or whether there are other faults with the car. For this, there are diagnostic options that can and should be used.
One of the most important roles in stable engine operation is played by the crankshaft position sensor. It is precisely because of the malfunction of this single sensor that the entire electrical engine control circuit may refuse to work, and the engine will not start. It is important to know what signs of malfunction the VAZ-2114 crankshaft sensor has in order to avoid additional problems with the device.
How to check for sensor malfunction with the device?
Despite the fact that a sensor malfunction is usually determined by the above symptoms, this may not be enough for a correct diagnosis, since different types of breakdowns have the same symptoms. Dips during acceleration can also occur when other parts are deformed, such as the ignition system or braking system, and this also occurs when the engine itself malfunctions.
You can definitely check the sensor using the following method:
We buy a voltmeter (it’s easy to find in any car store) or a multimeter, which is even better. On the multimeter we turn on the voltmeter function, measuring 200 mV. Now we connect the probes to the sensor. And then the most interesting thing: take any screwdriver (necessarily with a metal rod) and hold the screwdriver close to the sensor. The data on the voltmeter will change, monitor its data: if the device shows 0.3 V, then the device is working properly; If the readings fluctuate, replace the sensor without a doubt.
Input impedance measurement
The easiest way is to check the dpkv with a multimeter and measure the resistance of its winding. To do this, you need to have an appropriate device that can cope with this. If there is no such device, then you will have to resort to amateur radio. So, having switched your multimeter to resistance measurement mode and set the limit switch to 2 kOhm, securely install the probes of the device onto the sensor contacts, and they must be clean.
To achieve this, you can wash it with alcohol or gasoline. This may be the cause of the problem. Having installed the probes on the contacts, we observe the readings of the device, which should fit into the range from 550 to 750 Ohms. If this is the case, then the sensor is most likely working. But this can be stated with a probability of 50%, because during breakdowns and short circuits the resistance may change. And if the new one had 750 Ohms, and when checked it turned out that it was 500 Ohms, then this means that it is faulty. And he had an interturn short circuit.
This leads to a decrease in the pulse level that is detected by the controller. Therefore, to be sure of its 100% serviceability, you need to refer to the passport data, which will indicate its exact resistance and inductance. Based on this, you can check the inductance of the sensor winding. To do this, you need to switch your device to inductance measurement mode, if of course there is one. The readings on a working sensor should be up to 400 mH with a resistance of 750 Ohms. If, according to the passport, the sensor has a resistance of 500 Ohms, then accordingly its inductance will be 200 mH. If so, then the sensor is working.
In addition, the condition of the sensor insulation should be checked. To do this you need to have a megohmmeter. Although the multimeter has a mode for measuring high resistance, it is measured with low voltage and high error, while the megohmmeter produces voltage up to 500 V and is a separate device. So, having set the measurement voltage on the device to 500 V and the measurement accuracy to 10% under normal conditions (20-22 0), we place one end of the probe on the sensor body, and the other on the contact. The resistance should not be less than 20 MOhm.