A car's paintwork has a limited service life. If at the same time the car was exposed to negative environmental influences, its bumper and wings often suffered from the attack of small stones from the road surface, and some parts of the body suffered from corrosion - it is necessary to urgently paint the car.
different paint
It is better to entrust this procedure to professionals, because it must be carried out using special equipment and have some practical skills to perform high-quality painting. But some car enthusiasts prefer to do it themselves.
How much paint do you need to paint a car?
Before you buy a product to change the color of your vehicle (or update an old one), you need to correctly calculate how much paint you need to paint your car. If the purchased materials are not enough, it will be difficult to find a completely matching shade. And purchasing too much paint is an extra expense.
Useful tips for painting your car yourself
If you decide to paint your car yourself, you cannot do without information support. Read the recommendations of specialists and experienced service station employees with body restoration services, ask your questions in the comments to the texts. You can learn how to paint metal and plastic body parts without much difficulty - just understand the theoretical part, watch useful photos and videos of the painting process.
Every car deserves to be beautiful, no matter how old it is. When restoring a vehicle after damage or simply if the paintwork is too old and you want to change it, you can use the information on our portal and get maximum confidence in the quality of the work. We are happy to help you master painting techniques, including the most complex airbrushing processes and other difficult options for car restoration.
What affects paint consumption?
The consumption of paints and varnishes (hereinafter referred to as paints and varnishes) is affected by the following:
- car model and its condition;
- color and quality of surface preparation;
- material viscosity;
- indoor air temperature;
- dyeing method;
- type of paint;
- number of layers.
Mixing instructions must be followed. When repainting a dark body in light colors, additional layers are required, this increases material consumption by 40-50%. It is also important to consider that the color of the paint applied affects its covering power. This characteristic is worse for yellow, blue and light red pigments.
https://youtu.be/vXeeMOPVouk
Average consumption rates
On average, 1 m² requires 200-250 ml of undiluted paint, and to treat various body elements, if up to 50% of the surface is damaged, the following amount will be required:
- on the door or rear fender - 150 ml;
- on the hood – 200 ml;
- on the threshold or radiator grill - 50 ml;
- on the front or rear bumper - 100 ml;
- on the trunk lid - 300-400 ml;
- for the inside of the car - up to 1.5 liters.
If the surface of a part is damaged by more than 50%, paint consumption increases by 1.5-2 times.
Alkyd enamel requires 40-50% more than acrylic enamel. So, for a medium-sized car you will need 3-3.5 liters of the first or 2-2.5 liters of the second paint.
Brands of paints and varnishes of different brands differ in composition and, despite the same color, have different covering abilities. Calculation of the consumption of paints and varnishes is made after determining the scope of work.
Flow determination steps
Room measurement
Removing scratches on a car body without painting
It is by measuring the room that it is best to start making calculations. To do this, write down the height and width of each wall. Next, the total surface area of the walls in m2 is determined. This task will not be particularly difficult, since usually opposite walls have the same dimensions.
The total area of the walls can be quickly calculated by adding the result for each of the four walls. The results obtained should be briefly recorded in a notebook.
Calculation of the area of windows and doorways
It is necessary to calculate the total area of windows and doors
At the next stage, it is recommended to calculate the area of the main non-painted areas, such as doors and windows. The result obtained must be subtracted from the total area of the walls, which will allow you to more accurately calculate the required amount of paint composition. As a result, we will get the net area of the walls, which should be recorded.
Taking into account individual characteristics
If you are going to paint additional elements of the room, such as a window sill, baguette, etc., then the consumption may be higher. As a rule, to calculate the area for these elements, you need to add 10% to the net result obtained at the previous stage.
Calculating the amount of paint for door frames and baseboards
Often people also try to paint these elements, choosing a slightly different shade. In this case, to calculate the required amount of paint and varnish composition, you should calculate the length of the baseboards and multiply it by the height, which is usually 3 inches. To the result obtained, add 20% for painting the door frames.
Determining the ceiling area
The next step is to calculate the total surface area of the ceiling. The easiest way to do this is to measure the width and length of the floor. The lamp areas and any other holes are subtracted from the result obtained. If you are dealing with a textured ceiling, then you will need to spend a little more paint and varnish on it.
Determining the total amount of paint for the entire room
At the final stage, you need to calculate the total amount of paint that is needed for the entire room as a whole. To do this, you need to add up the entire area obtained in the previous calculations and multiply it by the consumption coefficient.
As a rule, for most modern compositions the consumption is approximately one liter per 8-10 m2 of surface. This applies to well-plastered smooth interior walls.
The resulting amount will be enough for you to completely paint the room when working with a roller and brush. If you want to work with a sprayer, then you should take 10% more paint material.
Thus, everyone can independently calculate the amount of paint that will be needed to paint a particular room. To do this, you will need to calculate the total area and multiply it by the consumption coefficient, individual for each type of paint and varnish composition.
Which car paint is better to choose?
For painting your car yourself, there are the following types of paints:
- acrylic;
- alkyd;
- nitro enamels;
- cellulose;
- metallics;
- Griftal.
Each tool has its own advantages and disadvantages.
Acrylic enamel is most in demand; it is suitable for complete repainting of the car. Its features:
- easy to use;
- lays down evenly;
- dries quickly;
- the resulting surface is resistant to solvents, reflects light well, and therefore does not require varnishing;
- due to insufficient covering power it is necessary to apply 2-3 layers.
The surface covered with hard-setting acrylic enamel is durable, while the soft-setting type is highly polished.
Alkyd enamel is suitable when you need to paint a small area. Its features:
- low cost (cheaper than acrylic);
- easy application;
- good covering power, it is enough to apply 1-2 layers;
- dries slowly (this process can be influenced by adding an accelerator to the enamel or increasing the drying temperature);
- The surface is difficult to polish and needs to be varnished.
Nitroenamel is considered an outdated product, but it is used to eliminate minor defects. Its characteristics:
- dries well;
- fades quickly;
- flammable;
- Polishing and varnishing are required to achieve shine.
Cellulose paint has similar properties.
Metal enamels have a complex composition and manufacturing technology. They are used to eliminate small chips or scratches on parts originally painted with this type of paint. Cover the surface with 1-3 layers. It is not recommended to completely paint your car with metallic enamel, because... Without special skills, it is difficult to achieve good quality coating in a garage.
Glypthal paints have the following properties:
- create a thick film;
- takes a long time to dry (at a temperature of +20...+25°C, the coating hardens within a day, and complete drying may take up to 1 month);
- the surface does not need polishing.
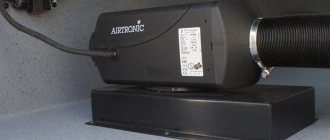
How is a car painted at the factory?
Factory painting of a car
Factory painting has its own specific features. And the main one is the airless method of applying acrylic paint with a single or double layer coating. Painting occurs using a robotic method under special conditions.
Airless painting technology means that paint is sprayed using a special nozzle without access to air. This eliminates the possibility of paint defects due to dust in the air flow. Painting errors are also eliminated due to the fact that all work is programmed by computer.
The types of car painting during repairs are quite varied. You have to repaint your car not only to emphasize your own individual style. Road accidents, minor scratches, and poor parking often lead to damage to the paint layer and lead to partial or complete painting of the vehicle. This type of painting is called “repair”.
How much spray paint will you need?
Paintwork in cans is indispensable for small-scale repair work. Manufacturers declare its consumption:
- 150 ml is enough to paint 0.25-0.5 m² of surface in 1 layer or an area of 0.25-0.38 m² 2 times;
- 400 ml can be painted on an area of 0.65-1 m² in 2 layers.
The consumption of aerosol paint depends on the skill of the master and the same factors as when processing other types of paintwork on the body.
There is a special acrylic paint for wheels that improves the appearance of the entire car. It is applied 2 times. For 4 discs, 2 400 ml cans are enough.
Aerosol auto enamel is the most convenient and affordable coating material. It lays evenly even on shaped structures, is economical, and has high protective properties.
How much does a can of car paint cost?
The price will vary and depends on the following factors:
- Volume of the can.
- The manufacturer that produced it (from 150 to 350 rubles).
- The chemical composition of the paint and the rarity of the chosen color (popular shades are cheaper than rare ones).
Professional automotive paints of a wide range of colors and characteristics can be purchased at special construction supermarkets and automobile markets. But buying paint in cans will not be advisable if the surface area to be painted is large enough.
Therefore, if the question arises about what paint to paint your car, it is better to consult a specialist.
Base paint and varnish
For medium-sized cars - class C and upper limit B (Opel Astra, Kia Ceed, Ford Fiesta, Volkswagen Golf, VAZ models, etc.) for basic painting you need at least 2 liters of enamel. In most cases, the surface is additionally varnished. It protects against mechanical damage, gives color depth and richness. You need the same amount of varnish as the base paint, or a little more. Its consumption is associated with the following operating moments:
- Number of layers. Apply 2-3 times so that the next layer is thicker than the previous one.
- Hiding ability. It is better for varnishes based on synthetic resins than for acrylic and nitro-combined ones.
An average car may require 2.5-3.5 liters of varnish. It is not bred all at once.
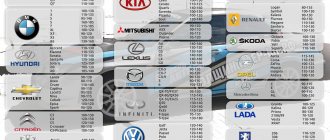
If the car is being prepared for sale, it is recommended that the thickness of the paintwork meet factory standards. For different brands, this value is individual, for example, for the Suzuki Grand Vitara - 77 microns, Lada Granta - 98, and Lexus RX - 140. Changing this characteristic sharply reduces the market value of the car, because it is considered recovered after the accident. In order to maintain the factory values of the new coating when painting (with the appropriate layer thickness on different parts), you should contact the services of a specialized company.
When choosing materials, you need to consider the compatibility of varnish, paint and solvents. It is recommended to buy a little more LKS than calculated, with a margin. What will not be used during repairs can be stored for a long time in a tightly closed jar, and when thickened, diluted with a solvent.
Why car body painting may be necessary
First of all, painting the car body is necessary when the coating is damaged. This service is also one of the procedures necessary for long-term operation of the machine. The fact is that the surface of the paintwork is daily exposed to precipitation, sun, aggressive chemicals, minor mechanical damage, etc. All this negatively affects the condition of the coating. Therefore, in order to prevent the development of corrosion and return the car to an attractive appearance, the car body or its individual elements should be painted.
Paint consumption for painting a car. Table of averages
Over time, the factory paint on a car loses its attractiveness. Its protective characteristics are deteriorating. This can occur as a result of environmental influences on the paint layer (heat, frost, moisture, temperature changes), or damage of various types. As you know, painting a car can restore its original appearance and improve its protective characteristics.
Factors that determine paint consumption per car
Painting at a service will entail considerable expenses; it is cheaper to do it yourself. But when choosing the latter option, you need to have certain skills and calculate the paint consumption for the car. The quantity is influenced by several factors:
- original body color and new enamel
- car dimensions
- tools
- area to be painted (entire or separate area)
- paint viscosity
- personal experience in coloring
- surface preparation
Next, we will analyze all these factors in more detail.
Machine size
It is quite difficult to accurately determine how much paint is needed to paint a car. Below is the approximate paint consumption for individual parts.
On average, to paint a car , you will need from 2 to 3 liters of enamel. A small minibus or Gazelle will require no more than 5 liters, for jeeps, vans, crossovers, business class cars - 4 -5 liters, segment comfort - about 3.5 liters.
Paint color and original body color
The consumption of paint and varnish material will depend on the original color of the car. If the color is contrasting with the original, more paint will be used than with standard coloring.
You need to know: dark colors do not overlap well with light shades.
It is necessary to apply paintwork in several layers. For example, red or yellow do not cover the substrate well. It may take about 9 or 10 coats of paint to completely cover. Black, green and their shades cover the base well.
Paint viscosity
Of all the parameters when painting a car, the most significant is the viscosity of the paintwork material. It depends on how correctly the coloring composition was diluted. Most cans indicate the proportions that must be followed when mixing the activator and paint. It could be 2:1 (or another value). In this case, dilute 2 parts of the dye and 1 part of the activator.
It is strictly forbidden to add all the ingredients by eye. Such an experiment can lead to the paint being either too thick or thin. In the first case, when painting, an “orange peel” effect occurs, and in the second, drips form.
A viscometer and a graduated container will help you calculate the required number of components. The operating principle of this device is to pour a certain amount of liquid into a special container through a hole of a certain diameter. The device's stopwatch records the time.
If you don’t have a professional measuring tool, you can use a regular ruler. It is placed in a container and a coloring agent is poured. The ruler scale determines the amount of activator that needs to be added.
Important: Viscosity may depend on the room temperature, as well as the surface of the parts. When the temperature in the garage is cold, “tears” form on the painted surface. It is better to perform coloring at a temperature not lower than +23C.
It is worth considering that the thicker the paint, the better its coverage, as a rule. This means that fewer layers will need to be applied than when using a less viscous material.
Type of spray gun, tools
Not only the quality of the painting itself, but also the consumption of paint and varnish material depends on the spray gun. You can find many different models of spray guns on sale. They all have different spray systems. The paint consumption is affected by the diameter of the nozzle and the uniformity of air supply by the compressor. Before applying enamel to the surface of the car, it is recommended to test the spray bottle on the inner surface of the part, and if everything is satisfactory, start painting the car.
Experience in car painting
Having skills will help reduce the consumption of paints and varnishes. There are a number of rules that should be followed when painting a car, otherwise the enamel layer will lie unevenly and you will have to additionally cover it. This may entail additional material costs. Therefore, if you have no experience in painting, then you should practice on some unnecessary surface.
The main nuances in coloring:
- Hold the spray gun correctly - the tool is held at a right angle relative to the surface of the part to be painted. It is permissible to hold it at an angle only when painting hard-to-reach places, arches, and ends;
- Monitor the distance between the spray gun and the surface to be painted - the distance should not be less than 15 cm and more than 20 cm. If you apply paint from a close distance, smudges will form, if too far away, this is fraught with excessive pollination and high paint consumption;
- Speed of hand movements - the higher the speed of movement of the spray gun over the surface, the thinner the layer obtained. But, this parameter can be adjusted by making the supply of varnish less or more;
- The trajectory of the tool - you need to move the spray gun from right to left. At the same time, it is important to maintain the same pace of movement.
Temperature and weather conditions
This parameter, as already noted, affects the viscosity of the coating material. It is also important for drying paintwork materials. There are paints that dry already at a temperature of +20. And, there is a material that requires high temperature to dry. Such enamels are used in workshops where there are all appropriate conditions.
Important: to save paint, it is advisable to apply a new layer after the previous one has dried
Preparing the surface to be painted
It is worth noting that the consumption of paint and varnish material is influenced by the correct preparation of the machine or its individual parts. The surface of the part must be finely porous and carefully polished. The optimal abrasive for matting the surface is sandpaper with a grit of P 800-P1200. Smaller grains impair the adhesion of paint and parts, while larger grains increase paint consumption.
Materials and tools, room
In order to paint a car in two colors, the following will be useful:
- compressor and spray gun;
- covering film, capes, masking tape from different manufacturers;
- varnish, enamels, solvents, primer;
- putty materials to remove scratches and dents;
- containers for stirring;
- painting mask or respirator;
- abrasives and polishing pastes, sandpaper of various grain sizes, power tools for preparing the surface of a car and polishing after painting.
Some other things may be required, but it will also be important to properly prepare the room where the painting work will be done. The main obstacle is dust, which is usually invisible, but will settle on the surface when painting. It can make all efforts to paint a car pointless and ruin the work. Therefore, you need to clean the room with a vacuum cleaner, wash the floor, and remove everything unnecessary before starting work on painting the car.
How to calculate the consumption of paint and varnish?
To calculate how much paint or varnish is needed to paint a car or its parts, you can use the average rate. According to approximate calculations per 1 sq.m. body, ¼ liter is spent. material. It follows from this that a vehicle will need 3.5 - 4 liters of paintwork.
As for the varnish, its consumption will be the same as the coloring composition (for a two-layer coating, the amount of substance must be multiplied by two). The amount of varnish also depends on the covering power of their base. Taking this parameter into account, in order to save on consumption, it is better to choose compounds made from synthetic resins. Nitro-combined and acrylic analogues “cover” the paint worse.
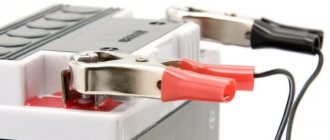
Paint consumption in cans
An economical option when painting a car is a can of automotive enamel. In addition, using a can is very convenient when painting individual parts.
In this situation, as in the case of ordinary paint, there are only approximate cost estimates. The table shows approximately how much varnish and spray cans are needed for painting different car parts.
Features of choosing a shade for painting
Painting the entire car body is somewhat simpler (compared to painting individual parts). However, due to its significant volume, it takes much longer. The main problem that arises when painting individual body elements is the selection of paintwork that exactly matches the tone. It should be remembered that the color codes specified by the manufacturer are quite arbitrary and are only the basis for obtaining a huge number of shades. The situation is complicated by the fact that over time, the color of the paintwork of an individual car changes somewhat under the influence of external factors, so a freshly painted part of its “native” color will still stand out from the others. Our specialists have extensive experience in car body painting , so they will be able to select the required shade with maximum accuracy.
How to calculate how much paint is needed to paint a car
How much paint does it take to paint a car? Tuning vehicles costs money, and all owners want their car to meet all the requirements. You can paint the body yourself if you have experience working with materials, the skills to calculate a sufficient volume, and select the appropriate substance.
For finishing in the garage, a base is used that is varnished. Acrylic enamels have a good shine due to their composition, so they can be varnished as desired. It is more difficult to work with red, yellow, and blue colors - you have to apply several layers to paint over the original shade.
Which facade paint is the best and why?
Manufacturers of facade paints strive to ensure that the material meets the requirements for painting, has a long service life, and is of high quality.
In production, it is practiced to add various elements to dyes, which contribute to their best quality. Let's consider the rating of paints on the domestic market.
Among the manufacturers of facade paints, the most popular are:
The popularity of these manufacturers is primarily based on the creation of high-tech, high-quality paint and varnish products that satisfy the consumer.
Materials from leading manufacturers meet all the characteristics of coloring products and environmental friendliness. Painting compositions are produced in a large assortment and classified according to the type of work.
Thus, when choosing facade paint cladding, it is necessary to be guided not only by the popularity of the manufacturer, but also take into account the characteristics of the base that needs to be painted, weather conditions and the properties of the coloring compositions.
What to consider when calculating
Automotive paint is expensive, so materials are calculated. If you don’t buy enough ingredients, you’ll have to buy more, but the shade will be different.
The following parameters are taken into account:
- Car size.
- Color of parts and paint.
- Quality of material.
- Model of a spray gun.
- Professional skills.
Hiding power is the ability of the composition to cover the original shade of the surface.
- A small runabout will require up to 2 liters of solution, an SUV will require a lot of paint, and finishing openings increases consumption.
- The initial color affects the amount of finishing materials.
- Consumption increases if the shades are contrasting.
- The number of layers increases if the paint has low coverage.
- Red and yellow are often applied up to 10 times.
- White, black, bright green have high hiding power.
- Restoration will require less finishing materials than changing color.
Each manufacturer creates mixtures using its own technology, so the composition may vary.
The model of the spray gun affects the consumption; HVLP devices transfer mixtures well to body parts; for high-quality devices this figure corresponds to 75%. All liquid gets onto the part and does not scatter to the sides.
Consumption is determined by the experience of the painter, who knows how to set up the spray gun and dilute the mixture. Materials flow over the surface rather than settling on it like dust. First of all, restored areas and new body elements are processed, then stage-by-stage finishing is carried out in other places.
Primer of the part
Before the next steps, you need to get rid of dust in the work area by wet cleaning it. Priming and painting are the most critical activities. Primer and paint are applied using a spray gun and compressor. The compressor must be equipped with an air dryer, otherwise it will be impossible to provide high-quality painting.
Work with the primer is carried out in several stages. Each layer must be completely dry. Most primers require elevated temperatures to dry. This can be done using powerful infrared lamps. At the priming stage, the surface is once again inspected for previously undetected defects. After complete drying, the primer layer is wet sanded with fine-grained sandpaper. With this technique, it is possible to avoid the appearance of dust, and the abrasive is not clogged with waste material.
After drying, the part is degreased again, and you can proceed directly to the most difficult part - painting.
How to make the correct calculations for varnish and paint
The above factors and manufacturer's advice affect the consumption of mixtures during operation. Solvent is added to the undiluted base before carrying out work.
- The volume of solvent is 20% of the base, but each type of enamel has its own proportions.
- Average figures for finishing are 200-250 ml of enamel and the same amount of varnish.
- A passenger car requires approximately 3 liters, and a gazelle – up to 5 liters.
- When painting elements on 2 sides, you will need 2 times more mixture.
- Acrylic is consumed 60% less than alkyd.
Painting rules
- The temperature of the air in the garage and the parts should be the same.
- Surfaces must not be heated before finishing.
- Sticky wipes help to apply the material evenly and remove dust and debris from the element before processing.
- The body is always protected with goggles, a respirator, and a special overall.
- Old body parts are used for training.
Components of quality formulations:
- Primary color pigment.
- Binder.
- Solvent.
The following substances are used for finishing in the garage:
Advantages of acrylic compositions:
- Affordable price and good quality.
- Applies evenly to the surface.
- Naturally sparkles.
- It lasts a long time.
- Little consumption - 200 ml per 1 sq. m.
- Does not require special skills to operate.
- Applies in a few hours.
Acrylic withstands minor impacts well, scratches do not appear.
- Highly flammable.
- Fades quickly in the sun.
- A thin layer is applied several times.
Many acrylic enamels consist of 2 components, and in order for the mixture to dry on the body, a hardener is added, and varnish is applied in rare cases.
Determine how many liters of paint are needed to paint a car. Tips and approximate figures.
Whatever type of painting work you perform, be it a complete repainting of a car or a local type of repair, in any case you will be faced with the problem of selecting the necessary consumables. One of the most frequently asked questions that interests many is how much paint and varnish does it take to paint a car? After all, the final price of the work depends on the volume of these materials, and paint and varnish for cars are quite expensive, so no one wants to waste extra money. It is worth noting that you will not be able to guess the volume of material 100%, but it is quite possible to reduce the remainder.
After painting
When the painting is finished and the outer decals are glued on, all that remains is to cut the body and make holes in it (if you have not done this before). I would like to give some tips that will help preserve the appearance of your creation longer.
- Never use bare clips to secure the body to the chassis. Use clear washers or self-adhesive pads to avoid unsightly scratches.
- Apply protective tape (usually vinyl) to areas where the body may touch the chassis. Otherwise, during the race, the chassis may scratch the body from the inside.
- In collisions, car bodies usually break at the front. Each body has its own weak points, depending on the model. Cracks in the body can be sealed with cyanoacrylate glue, but it must be applied carefully and in small quantities, because This glue dissolves spray paints. To increase strength, the Lexan body can be covered from the inside with repair tape using a special glue - Shoe Goo. The same materials are used to repair damaged bodies.
- If you have a touring car, adjust the bumper so that it is as close to the body as possible. To do this, you can use self-adhesive bumper pads. This will reduce the likelihood that the body will become severely deformed and break during a collision. If you use one body for your chassis, then the linings are glued to the bumper, but if there are several bodies with different geometric dimensions, then by gluing the linings to each body, achieve the desired result.
Analysis of the main factors
Before you move on to choosing a material, you need to know what features affect the consumption of paint and varnish. There are actually several of them.
- Area of the treated area. Will it be a complete restoration of the car's paintwork, or only local repairs where a minimum of material is needed.
- Type and brand of paint. Different manufacturers produce paint with different component compositions, on which the covering ability of the material directly depends.
- Paint shade. The choice of color is also important, since, for example, white or green tones have a higher covering power, and you will need to apply fewer layers of paint. And, for example, red, blue and yellow shades require more layers, which in turn will affect the volume of consumables.
- The quality of surface preparation, especially the structure and color of the primer. Does the tone of the primer match the base paint? If not, then you will need to apply many layers to achieve a high-quality, rich shade.
- Spray gun parameters. The level of uniformity of the layer, the correct setting of the equipment and the remaining material in the device itself will also determine how much material is needed to paint the car.
This also includes such a parameter as skill. It is also important, because if you have already done painting work with your own hands more than once, then you have probably become skilled in the technology of applying layers of paint and will be able to use material more economically.
Taking into account the viscosity parameter
Viscosity is one of the basic parameters of paints and varnishes. If you dilute the paint too thickly, you will end up with a layer defect in the form of an “orange peel”. If you dilute the material too much with a solvent, then smudges may form during application.
To avoid these defects, and this, in turn, is an overconsumption of material to eliminate them, you must strictly follow the instructions given by the paint manufacturer regarding the proportion of material and solvent. To maintain the dosage, you can use the tool as a viscometer, but if you don’t have one in the garage, you can use any containers with marks corresponding to the volume of the substance. You can also use a ruler as an indicator.
Also, the viscosity parameter may depend on the temperature conditions observed in the working area.
Chronicles of a Freelancer – TavroBlog
A rather controversial article, again not claiming to be absolute. However, in fairness, it should be said. The fact that domestic cars are painted is terrible. Even if it’s “like a foreign car.” Both Tavria and Kalina have shagreen, albeit a small one.
This opus prompted me to write a lot of your questions related to the technology of painting a car body with metallic or pearlescent , as well as everything that is driven under varnish. Just like painting a car with metallic or pearlescent ? And even more so in a garage environment.
Naturally, this work should not be considered as a masterpiece in painting or as the ultimate truth. I do not pretend to be the last word in painting technologies and there will probably be people who have eaten more than one dog with this car painting technology . But, constantly stepping on the rake in this matter, eventually gained a lump called experience.
Take this article as you wish. For some this will be invaluable advice, but for others it will be an empty phrase. Let me emphasize once again that all the advice given below is only the result of many years of trial and error and, accordingly, conclusions (experience) made on their basis.
We prepare and paint cars in combat conditions or close to them, i.e. in garages. Therefore, you won’t be frightened by heat or cold; the lack of exhaust hood puts us in a state of euphoria!
The results we achieve, even when painting close to zero degrees Celsius, sometimes exceed the results of painting in ideal conditions of a paint booth, with its supply and exhaust ventilation filters and dryers. I am in no way belittling the advantages of spray booths, this is what you need to strive for, but, unfortunately, there is a financial issue, and then, sometimes a person just needs to do a one-time job, for example, paint a couple of mirrors or a bumper. Therefore, I think this article will be somewhat useful to you, especially if you work in the same conditions - garages, i.e. in combat.
Remark: I saw a new KIA car in the showroom, made in Izhevsk.... Hand on heart, I was horrified!!! We paint better...!!! Native auto industry NAH.... So, enough of the introductions, let's get started!
Let's assume that all the elements intended for painting are already ready (that is, primed, sanded and degreased). The room, in our case the garage, is prepared for dust-free painting.
Some useful rules:
1. If we are painting with a simple metallic paint, then the primer should be the same shade as the base (i.e., for a light metallic paint - a white primer, for a dark metallic paint - a black primer, then, shades of gray can be selected by mixing white and black primers of the same brands). 2. If we paint with PEARL, then a special pigment is placed under the base, which must correspond to the factory settings (well, these subtleties will have to be explained to you by the tinting specialist from whom you will order the paint, and you will buy this pigment from him).
If all of the above does not raise questions... Then let's start painting!
For example, let's take the hood of a car.
1. The first thing we must do is dilute the pigment (base) with the supplied solvent. By the way, here is the first remark: when the painter asks you - should you add solvent to the base or give it separately? Categorically refuse mixing (of course, give it separately!), I’ll explain why below.
For example: The base is mixed with the solvent 1:1. You bought 200 gr. base and you were given 200 grams for it. solvent. In ideal conditions, let me remind you that this is a paint booth, everything would be like this! Mix 1:1, and the golden key is in your pocket! But in our combat conditions this was not the case.
For pain-free painting, we do something like this: We estimate that we will apply three layers of pigment (base).
For the first applied layer, add no more than 50% solvent to the pigment. Let's say 100 gr. base and 50 gr. solvent (as painters say, make the first layer “dry”). The “dry layer” will protect us from the appearance of such unpleasant defects on the first applied base layer, such as “fish eyes”, which can be formed from microscopic specks, as well as from swelling at the transitions of the primer and old paint. What happens when there is an excess of solvent in the pigment. Next, we wait until it becomes matte (dries) for at least 10-15 minutes, maybe a little more if the ambient temperature tends to zero.
Here, it’s better to wait than not to wait!
Note:
For precise dosing and mixing, use special measuring jars for mixing paint with solvent. You can buy them from the same paint sellers and colorists.
During this time, we add the remaining amount of solvent to the pigment so that in the end we get 1:1 , as prescribed by the manufacturer (different ratios for different manufacturers!). To do this, pour the paint, if any, from the paint gun into a common container and bring it to the desired consistency by adding a solvent (thinner).
We apply the second layer thickly, without fear of consequences. Because the second layer will clearly not cover the ground (it will show through), then we dry it (wait for it to become matte) and add a third layer of pigment.
Now everything should be SUPER! True, if you come across a non-opaque paint (base, pigment), then it is possible to apply a third and fourth layer.
Here another small question arises: What is the hiding power of the pigment? Different paint manufacturers have different hiding power. Some people are saving money, others are clearly cutting corners, or maybe the colorists are cutting corners by selling us solvent at the cost of the pigment? Here the choice is yours. As noted, newly opened tinting points (for example, on the market) are most preferable, there are fewer defects during selection (it would seem that it is easier?) and a thicker pigment.
Lately we have been using selection from NOVOL , this is by no means an advertisement, but so far they have it better. At a cost of 300-350 native rubles per hundred grams, the price corresponds to the quality and the hiding power is excellent.
2. Now all that remains is to fill our detail with varnish. To do this, dilute the varnish with a hardener and solvent. Here we roughly follow the same pattern as above. For the first layer we apply dry varnish. Those. Instead of the prescribed, for example, 10% solvent (usually the manufacturer indicates it on the jar), pour about half (5%) for the first layer. (The varnish will fall in small “grains”, that’s how it should be.) We fill our hood with this composition and wait quite a long time. The drying speed depends on the ambient temperature, so I can’t say for sure. Tactile, i.e. You can check it by touch like this - in an inconspicuous place, and this can be found on every body element, in the case of the hood, this is the place, for example, where the emblem is attached. The varnish should not smear, just stick; if it still smears, then it is too early to apply the next layer, the solvent has not yet come out. The approximate drying time of the first layer is from 5 minutes in summer, to 25 minutes in winter, if the ambient temperature is slightly above zero. For the second layer, add another 10-15% solvent to the varnish, and fill our hood in an “adult” manner. If this is your first time, then I recommend that you first practice on old body parts so as not to cause any “snot”!
In this opus, I gave you some techniques and methods based on which you can paint at any ambient temperature, making allowances for the drying time of the paint and varnish. Basically, everything written above is focused on cold weather and low temperatures, of course, above zero - just above zero Celsius.
During the work, “normal” solvents were used, i.e. neither fast nor slow, as a result, not a single painter was injured! (smiley!)
Some necessary conditions, or if you want rules, the observance of which will lead you to the desired result: 1. The temperature of the surrounding air, the element being painted, paint or varnish must be the same! This condition is mandatory! This is a condition for success. Do not heat the paint or heat the pre-painted element under any circumstances. 2. Use a “sticky cloth”; there will be less debris on the lower layers of the part to be painted. 3. Be sure to use a painting suit with a hood. 4. Sometimes holding time is the best way to combat smudges (“snot”).
And remember: Shagreen and small debris can be sanded, but the “snot” (residues) will still be visible! Even after sanding. But that is another story! Therefore, when painting in a garage, it is acceptable that it is not recommended when painting in a chamber. For example, applying several thin layers of varnish (more than 2, for example 3-4), for further sanding and polishing.