A constant velocity joint performs the function of a universal joint, but its design is much more complex. In fact, this is a powerful ball bearing with a floating cage, to the cages of which the hub and axle shaft of the car's front suspension are attached. The hinge body is called a grenade due to its external similarity. The design is created as non-demountable.
Many manufacturers of spare parts offer to replace the entire worn joint. This is not an economical solution, since play appears only in one half - most often in the outer grenade.
The hinge body contains a cage with balls, into which the axle shaft is inserted using a spline connection. Inside the so-called There are mechanical stoppers located on the glass, the size of which does not allow the assembly of the holder to be removed. The axle shaft is secured with a retaining ring, which is not accessible. This is not a power element; the stopper is designed to prevent the grenade from falling apart during transportation. However, using conventional tools, it is impossible to separate the splines without special pullers.
Types and design of CV joints
Before we move on directly to describing the signs and causes that indicate problems with CV joints, we need to find out what they are for and what they are. This will make it easier for you to understand how to diagnose and repair them in the future.
Types and location of CV joints
The job of any constant velocity joint is to transmit torque between the axle shafts when they are at different angles at different times. CV joints are used in front-wheel drive and all-wheel drive vehicles to allow the front wheel to turn and rotate under load. There are several types of hinges, but we will not dwell on this in detail. It is important to know that, basically, they are divided into internal and external . Any front-wheel drive car has only four CV joints - two internal and two external, in pairs on each front wheel. The task of the internal one is to transmit torque from the gearbox to the shaft. The task of the external one is to transmit torque from the internal joint directly to the wheel.
a tripod inserted into it - a set of needle bearings operating in three planes. The main shaft (from the “glass” side) is inserted into the gearbox, and another axle shaft is inserted into the tripod, to which torque is transmitted. That is, the design of the internal CV joint is simple, and, as a rule, problems with it arise infrequently. The only mandatory condition for the normal operation of the hinge (this also applies to the external “grenade”) is the presence of lubricant inside it and the integrity of the boot. You can read about choosing a lubricant in a separate article.
Inner and outer CV joints paired
The outer CV joint is a more complex and fragile structure. On one side it is connected to the internal hinge through the axle shaft, and on the other - directly to the hub through its own splined shaft. The design of the outer hinge is based on a ball cage . It can rotate within the angular ranges specified by the design. It is the ball mechanism that is most often the reason why the CV joint crunches. A boot is placed on the body of the external “grenade”, which reliably protects the insides from dust and dirt. The normal operation of the device directly depends on this, and according to statistics, it is a torn boot that is the root cause of the complete or partial failure of this mechanism.
Operation of the outer CV joint
Remember that any constant velocity joint experiences greater loads the greater the angle at which its two axle shafts operate. If they are parallel to each other, then the load on the node is minimal; accordingly, at a maximum angle, the load will be maximum. It is thanks to this property that a faulty hinge can be identified, which we will talk about next.
Repair recommendations
If defects are detected in the transmission, they should be eliminated as quickly as possible. It is possible to accurately diagnose the condition of the hinges only after dismantling them, disassembling them and washing the parts. You can see how to do this for a car in the video.
Due to the design features, it will not be possible to repair damaged metal parts. Drivers can only replace protective boots and clamps.
After washing off the old lubricant, carefully inspect the contact surfaces of the housings, balls, and separator. There should be no pockmarks, cracks or chips on them. If they are, the CV joint assembly must be replaced. In case of minor damage, the hinges on the drive wheels can be swapped. In this case, unworked surfaces will be loaded. This measure is temporary and is needed to extend the life of the components until scheduled replacement. After assembly, the hinge must be filled with fresh grease and sealed with a boot.
The constant velocity joint is one of the main components of a car transmission. All its elements are made from quality materials. Typically, a CV joint has a long service life, but it can wear out prematurely. Timely diagnostics will allow you to detect the defect in time and prevent the formation of an emergency situation.
- How to choose the most reliable off-road crossover: rating of the best options
- How to behave in a traffic jam
- Digital service booklet - goodbye to tangible service history
How to identify a crisp CV joint
Finding out which “grenade” crunches is quite simple. First of all, you need to understand that the characteristic crunching or creaking noise when turning is produced by the outer CV joint. The inner joint may make a clicking noise on a straight road. We will touch on diagnostic algorithms below.
The crunching sound of the outer CV joint usually occurs when the driver turns with the wheels fully or strongly turned (in their direction). This is especially audible if you also “give on the gas” at this time. At this moment, the hinge experiences maximum or close to this load, and if it is faulty, then the mentioned sounds occur. Externally, this may manifest itself in the fact that you will feel “kickback” in the steering wheel when turning.
As for internal CV joints , their failure is more difficult to diagnose. Usually a similar sound comes from them when driving on an uneven road, and the deeper the holes the wheel gets into, the greater the load the joint experiences, and accordingly, the more it crunches. In some cases, a malfunction of the internal CV joint is diagnosed by vibration and “twitching” of the car during acceleration and at high speeds (about 100 km/h or more). Even when driving on a straight and level road (symptoms resemble a situation when the wheels are not balanced).
Next, let's move on to answering the question of how to determine which CV joint is crunching, internal or external. There are several verification algorithms. Let's start with the outer hinges.
Diagnostics of the internal CV joint
It can be quite difficult to determine the malfunction of this component, and sometimes it is impossible to do without the help of specialists.
Drivers can try a number of tests to try to determine if this part is faulty on their own. To do this, you need to find a straight road with small potholes. Drive along it without turning. If you hear a familiar sound, this indicates a clear failure of the internal joint.
You can also load the rear of the car (with passengers or luggage) so that the front of the car rises. In such a situation, the axis of the inner CV joint will bend, so when driving even on a flat road, characteristic sounds should be heard.
Definition of a crunching sound from an outer CV joint
Outer CV joint design
It is necessary to choose a flat area on which you can drive a car. Turn the wheels to one side as far as they will go and drive off quickly. This will put more stress on the hinge, and if it is faulty, you will hear a familiar sound. By the way, you can listen to it yourself (with the windows open) or with an assistant so that he is near the wheel while the car is moving. The second case is especially good for diagnosing right CV joints, since the sound from there reaches the driver worse. However, similar procedures can be carried out on the road or in the field, so as not to bother and look for an additional place for tests.
When turning the car to the left , the right outer CV joint will crunch , and when turning to the right , the left one . This is due to the fact that at this moment the corresponding hinges are the most loaded, since most of the mass of the machine is transferred to them, subject to the creation of significant torque. And the greater the load, the louder the sound. However, in rare cases the opposite happens. Therefore, it is advisable to listen to which side the noise is coming from, outside the car,
Diagnosis of damage
It is not enough to know the signs to determine a malfunction of the internal or external CV joint. Noise can also occur due to other defects in suspension parts. You should identify the symptoms to find out about a CV joint failure. Defects in internal and external hinges are diagnosed differently. What they have in common is working under increased loads and in extreme positions. This is the only way to determine critical wear without removing the hinges from the car.
To check the internal grenade and determine the faulty CV joint, you need to load these parts. When driving a car, drivers use two diagnostic methods: driving over obstacles and overloading the car. In the first case, they drive along an uneven road with potholes and bumps. To do this, select a section of the canvas so that the obstacles are located on one side. Alternately drive at a speed of 15-20 km/h over uneven surfaces with the right and left wheels. If there are defects, when you hit potholes there will be a characteristic knock in the area where the hinges are attached.
The second method is to overload the car so that the front of the car lifts slightly.
In this case, the internal hinges will work at critical angles, which will provoke the appearance of more obvious noise. To make the car heavier, drivers place passengers in the back seat and load heavy objects into the trunk. When the front of the car is slightly raised, drive through a flat section of the road, preferably with an upward slope. Under increased load, the joint should knock more. For your information!
It's not just the drive that can make noise when the car is moving. To accurately determine the failure of the internal CV joint, you need to diagnose the unit at a service station or service workshop.
Once the signs appear, it will not be difficult to identify a malfunction of the outer CV joint. The driver needs to choose a flat area where he can freely drive in different directions without disturbing anyone. To diagnose, you need to alternately turn the wheels to the right and left, and quickly move away. The joint with the groove will make a crunching noise. Due to the large distance between the parts, it will be easy to determine the side where the defective CV joint is located.
It is better to listen to the sound coming from the transmission with the windows open. You can choose a site next to the wall. In this case, the effect will be amplification of sound waves when they are reflected from an obstacle and reach the driver. You can also ask an assistant to listen to the noise coming from the transmission parts. As a rule, when turning right, the left CV joint will make noise, and vice versa. This is explained by the forces of inertia acting on the car and the redistribution of the load.
The diagnostic algorithm allows you to more accurately determine which parts are damaged. Sequencing:
- Place the car on a level surface, secure the rear wheels with the hand brake, and place wheel chocks.
- Use a jack to jack up the front right and left wheels one by one. For safety, it is better to install supports under the body.
- Start the engine and engage first gear. At this time, the hanging wheel will begin to rotate.
- To diagnose the internal joint, smoothly press the brake pedal, loading the drive. The appearance of noise near the gearbox indicates wear of the part.
- To check the outer CV joint, turn the steering wheel completely, alternately to the right and to the left. If only the inner joint is faulty, the sound will not change. When the external one wears out, tapping will also be added to the general noise.
Universal diagnostic method
Diagnosis of a malfunction of the internal CV joint
We present to you an algorithm for another, universal option, how to find out which “grenade” is crunchy. You need to act in the following sequence:
- Place the car wheels level.
- Raise one of the front wheels using a jack.
- Put the car on the handbrake and neutral gear.
- Start the engine, depress the clutch, engage first gear and slowly release the clutch, that is, “move off” (as a result, the suspended wheel will begin to rotate).
- Slowly press the brake pedal, creating a natural load on the joint. If one of the internal “grenades” is faulty, then at this time you will hear familiar knocking sounds on the left or right side. If the internal CV joints are in order, then the car will simply start to stall.
- Turn the steering wheel all the way to the left. Slowly press the brake pedal. If the internal “grenade” is faulty, it will continue to knock. If the outer left CV joint is also faulty, then sound will also be added from it.
- Turn the steering wheel all the way to the right. Carry out similar procedures. If a knocking noise occurs when the steering wheel is turned to the right, it means that the right outer joint is faulty.
- Be sure to put the gear in neutral, turn off the engine, and wait until the wheel comes to a complete stop before lowering it to the ground.
Why does the CV joint start to crunch?
Constant velocity joints, both internal and external, are quite reliable mechanisms, and with proper care their service life can be calculated in years. In some cases, it is even comparable to the service life of the entire car. However, this circumstance directly depends on the care and operating conditions of CV joints.
One of the reasons why joints fail prematurely is an aggressive driving style and/or poor road surface on which the car is driven. As mentioned above, CV joints experience maximum load during sharp turns and high torque from the engine (in other words, when the driver enters a turn “with gas”). As for bad roads, they can damage not only the car’s suspension, but also the CV joint, since a similar situation is created here. For example, the driver accelerates the car through the CV joint, and at this time the wheel oscillates significantly in the vertical plane. Accordingly, under such conditions the hinge also experiences increased load.
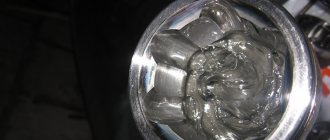
Torn CV boot and lubricant splashed from it
The second reason why the CV joint begins to crunch is damage to its boot . This is especially true for the outer CV joint, since it is located in close proximity to the wheel, and accordingly, a significant amount of dust and dirt gets on its body. Under the boot there is a lubricant, which, when moisture and dirt gets into it, immediately turns into an abrasive compound that begins to destroy the surfaces of the internal joint components. This should under no circumstances be allowed. It is necessary to regularly check the condition of the boot in the inspection hole, as well as the presence of lubricant in it. Also check if there is any grease on the wheel rims and parts close to it, because often when the boot is torn, it simply splashes onto the mentioned surfaces.
The third reason why the “grenade” crunches when turning is the natural wear of its internal components under normal operating conditions. This is especially true for cheap Chinese or domestic CV joints. If the mechanism is made of “raw” or low-quality metal, then the service life of such a unit will be short. In the outer hinge, at the point of contact between the balls and the cage, a groove gradually begins to appear. As a result, the designated balls roll very freely, along grooves having a larger diameter than the balls themselves. This rolling is perceived by the human ear as a kind of crunch.
Detecting play on the CV joint
An additional sign of partial failure of the CV joint is the appearance of play on the shaft or axle shaft. It is quite easy to detect it by driving the car into the inspection hole and tugging at the corresponding parts with your hand.
Is it possible to drive if the CV joint crunches?
Each wheel has two hinges: internal and external. This significantly complicates the diagnostic process, since they are located next to each other, so it is almost impossible to determine by ear which of the components makes sounds. A few tips will help you find out which CV joint is crunching (internal or external):
- Turn off the vehicle, and then use a flashlight to locate the hinge pins. Pull them one at a time without applying much force. If no play is detected, then the part is fully operational. If a large amount of wear occurs, your actions will lead to a crunching sound, which will help diagnose the failure of a particular hinge.
- The second method allows you to diagnose a breakdown of the external hinge. You need to drive onto a flat road, and then turn the wheels to the side until they stop. If at this moment you hear a characteristic sound, then the problem is in the internal CV joint. The left part is worn out when there is a sound when turning right. With the right part there will be a sound when turning left. This is due to the fact that when turning, the entire weight of the car falls on the opposite side of the turn.
There is no clear answer to this question, since the component can only be partially worn out, so it will still last a certain number of kilometers without any consequences. If a crunching sound occurs, all experts strongly recommend contacting service, as delay can lead to more serious consequences, which include:
- Structure jamming. The hinge stops rotating completely. This is extremely dangerous when driving at high speed. Losing control of a car can lead to death and a traffic accident.
- Broken axle shaft or shaft. No torque will be supplied to the wheels, making it impossible to continue driving your vehicle. There is also always the danger that a rupture will damage other components in the immediate vicinity.
In most cases, a complete replacement of the constant velocity joints is necessary, however, with minor wear, drivers can carry out a number of works that will help eliminate the crunching noise. These include:
- checking the integrity of the anthers and replacing them in case of wear;
- cleaning the structure, replacing lubricant;
- in some cases, you can try sanding the surface to eliminate play.
The appearance of a crunch is not critical, and you will be able to drive to your home or auto repair shop. But if such sounds are detected, it is naturally recommended to immediately take appropriate measures to eliminate the malfunction. The sooner the repair is completed, the cheaper it will be. The information above will help every motorist in a garage to determine the breakdown of a specific joint.
Consequences of a CV joint crunch
Is it possible to drive with a CV joint crunching? It all depends on the degree of wear and tear. At the initial stage of the breakdown, you can drive, but it is not advisable , since the operation of the unit leads to even greater damage. Therefore, the sooner you try to repair the hinge, the, firstly, it will cost you less (perhaps everything will cost you by replacing the lubricant), and secondly, you will not put the life and health of you and your passengers in the car at risk.
So, the consequences of a CV joint crunching can be:
- Jamming . That is, the CV joint will stop rotating. This is especially dangerous at speed, as you risk losing control of the car, which can be fatal. You can try to wedge the hinge, but the best solution is to replace it.
- Clip break . If we talk specifically about an external grenade, then when it comes to the wedge, the clip simply breaks, the balls scatter, and then the consequences are unpredictable.
- Shaft or axle shaft rupture . In this case, the gearbox will turn only the designated parts, but for obvious reasons the torque will not be transmitted to the drive wheel. This is the most extreme case, and further movement of the car is possible only with a tow truck or tow truck. Naturally, the only correct solution in this case will be to replace the CV joint. And you will be lucky if you only have to change the hinge itself. After all, there is a risk that other parts nearby will be damaged during this accident.
In the worst case scenario, the CV joint can jam or break, which will lead to an emergency on the road. When this happens at speed, it is fraught with serious consequences! Therefore, if you hear that a “grenade” is crunching on any side of your car, carry out diagnostics as quickly as possible (on your own or at a service station) and repair or replace the hinge.
Garage repair
Now let's get straight to replacing the boot without removing the hinge itself, that is, the CV joint.
It is quite possible to replace the anthers without dismantling the drive. After all, the main task is to release the outer end from the hub. Then all that remains is to simply pull the new seal, like a contraceptive (condom), across the entire shaft.
Before tightening, be sure to turn the boot inside out correctly.
After this, you will need to cut the old element, install new clamps, and add high-quality lubricant. Since the new boots are highly elastic, you can tighten them without any problems. In this case, reliability will not be affected.
Step-by-step instruction
If you decide to do everything yourself, then you need to follow a certain sequence and follow the instructions.
The whole process roughly looks like this. Here it is worth making allowances for design differences between different cars.
- First, place the car on a pit or lift. The vehicle must be securely secured and prepared for work;
- Unscrew the drive nut first. There is a possibility that it will have to be changed;
- If you have a MacPherson type suspension, you will need to unscrew the ball joint nut;
- After this, you can pull the hub to the side. This will allow you to pull out the outer part of the drive;
- Armed with a pry bar or large screwdriver, pry up the inner CV joint and pull out the drive;
- The drive is in front of you. Place it where it is convenient for you. Dismantle the old clamps, remove the retaining ring;
- Now carefully pull on the new boot;
- Connect the 2 parts of the drive until you hear a characteristic click;
- Return the locking ring to its place and fully tighten the fresh boot;
- All that remains is to tighten the clamp and return everything to its place.
The only problem is that this method is not suitable for everyone and not always. First you will need to purchase a special elastic boot. Many commercially available parts are extremely hard.
Therefore, in the case of their use, there is no need to talk about any possibilities of twisting and pulling, like a condom.
Special devices are also used to tighten the anthers. But they are not so easy to get, plus the price is high.
How to repair a CV joint
Damage to the internal parts of the hinge most often leads to a complete replacement of the mechanism. However, this only happens with significant wear. In most cases, it is recommended to simply replace the CV joint grease and boot. This is often enough to get rid of the annoying sound and make it easier for the parts to interact.
Therefore, if knocking or clicking sounds appear on one of the four CV joints (we will assume that you have already found out which one), you must perform the following steps:
POSSIBLE FAULTS
This unit is very reliable: under normal operating conditions, its service life can exceed the service life of other elements of the car. However, the entry of a small amount of dust, dirt or water into the hinge greatly increases friction in the hinge, thereby increasing its wear and hastening failure. Due to their importance for the normal operation of a car, CV joints are well protected by special “protective covers” - anthers. They provide the hinge with reliable protection from dust and dirt, as well as complete sealing. Typically, the anthers are made of dense rubber or plastic and are secured to the drive shaft using clamps. By the way, usually the clamps for anthers have a slightly unusual appearance. In the photo below you can see the clamps on the anthers, a special device for tightening them and the tightening process itself:
One of the main causes of CV joint failures is precisely due to the ingress of dirt or water through damage to the boot. If it happens that your boot is damaged and dirt gets into the hinge, you must immediately inspect it and then clean it (repair if necessary). To do this, you need to remove the drive and wash all its elements. Next, make sure that there is no excessive wear in the elements and install them back, after filling the CV joint with fresh lubricant.
Repairing a damaged boot can be done using a regular tire patch and sealant.
CV joint puller: types and principle of operation
The general technique for removing a grenade from an axle shaft is quite simple - you need to pull the nodes in opposite directions with great force. This cannot be done by hand; you need a mechanical puller for the CV joint.
- The inertial tool works according to the familiar principle of a reverse hammer. With its help, you can remove the CV joint without removing the entire suspension assembly of the car. One part of the hinge is fixed to the axle shaft, and the dismantled middle is removed for maintenance. Using a special eye, the hammer guide is attached to the axle shaft with a hub nut. A few sharp blows are enough, and the spline joint, compressing the locking spring, comes out of the holder without damage.
- CV joint boot puller, working on the wedge principle. To create the spreading force, two support platforms are required. We create one of them using clamps placed on the removable CV joint axle shaft. The second is made in the form of a split ring. It rests against the clip, like on silent block removers. Wedges are inserted between them (on both sides to ensure uniform force). How to apply the effort is not important. Typically, wedges are driven in using two hammers of equal weight. It is enough to move the axle shaft by 3-5 mm, and the retaining ring is compressed, freeing the movement of the part. There are also pneumatic boot removers.
- It is convenient to use a screw puller when the entire CV joint is removed from the car. This bulky design allows you to work with units of any size, since the length can be adjusted. A homemade CV joint puller is made for a specific car, while a factory tool is more universal. It consists of two thrust (more precisely, tensile) platforms connected by longitudinal rods (rows of holes are located on the rods to adjust the distance between the supports). One platform is fastened with a clamp, the second with its eye is put on the threaded connection of the axle shaft. By rotating the hub nut, you create enough force to compress the retaining ring.
This is interesting: A few words about the purpose of HBO cylinders
Such devices make it possible to save on visiting a car repair shop. You can purchase the tool at any auto store: both universal and for specific CV joint models.
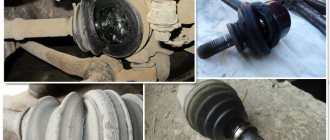
OUTER CV JOINT
There are two ways to detect possible malfunctions in the outer (outer) CV joint:
- visually detect a violation of the integrity and tightness of the boot: cracks, breaks, traces of grease on the outside;
- by characteristic sounds (characteristic crackling, crunching) when turning the steering wheel, entering a turn, etc.
If you have disassembled the outer CV joint and discovered wear on one of its components, then it is possible to significantly extend the life of the joint without replacing it. First of all, if you find wear on the cage at the points of contact with the balls, then there is no point in panicking. The rolling elements are installed in it with a gap, and a significant one, so that wear at the contact points is completely harmless. It’s another matter if wear appears on the rolling elements themselves or elsewhere in the cage.
If only the rolling elements are worn out, then their repair is not possible. But it won’t be difficult to find the same ones at the nearest auto repair shop, car market or auto store. The main thing is to choose balls of the right diameter.
If the separator is worn out, then there are two main repair methods:
- replace the entire outer CV joint;
- replace the separator;
- swap CV joints.
The first method is simpler and most preferable, although it will be more expensive than the second. A lot of articles have been written and many video tutorials have been filmed on how to properly replace an outer CV joint. There can be many features and subtleties associated with each specific car model.
The second method is to purchase a repair kit (which are produced mainly for domestic cars) or find an outer CV joint for your car at a disassembly site, remove the separator from there and install it in the old CV joint. Naturally, before installing a used separator, you need to make sure that there are no visible signs of wear. Next, soak it in a rust converter if it shows any signs of corrosion. It would be a good idea to clean it with sandpaper after this.
The essence of the third repair method is to swap the grenades of the left and right axle shafts. This will help because the direction of rotation of the rolling elements will change (unworn areas will be involved). However, this will result in a crunching sound when reversing.
Another “cunning” way that allows you not to spend money on purchasing the entire CV joint or its components. However, not every car can be “repaired” in this way. Its essence is to replace the outer race separator with an inner race separator. Here, of course, there are two conditions:
- Firstly, the separators must be identical to each other.
- Secondly, the wear on the outer ones should not be too severe, and the inner ones (ideally) should have almost no wear.
Since these two conditions are not met on all car models, such repairs cannot be made on every car.
Emergency repairs
Every motorist who cares about his own vehicle is simply obliged to know how wheel alignment is performed. This largely prevents a number of problems during operation.
If they didn’t pay attention, or the breakdown occurred unexpectedly, the driver felt the steering wheel creaking when rotating, or other characteristic signs of a violation of the integrity of the boot appeared, repairs need to be carried out.
An emergency repair method is relevant if trouble catches you on the road. But it is only suitable as a temporary measure.
The idea is to wrap the boot with film and secure it with electrical tape or a clamp. The film can be seen with a bag or rubber glove. This is no longer fundamentally important.
There are drivers who have traveled thousands of kilometers using a similar life hack.
If the boot ruptures, water, dirt, dust and sand probably managed to get inside.
Therefore, in the very near future the CV joint will begin to suffer greatly. The best solution in this situation would be to remove, wash, add lubricant, and install a new boot.