Restoring the ball joint. Including liquid polymer, we repair it ourselves
I already wrote about the design of the ball joint, you can read it here .
In that article, I briefly touched on the problem of repair, but many of my readers began to write - is it possible to restore it yourself. At first I thought that this was not the right saving, but after understanding the problem, it turns out that sometimes it is much more profitable to repair. Once again I emphasize much! The thing is that the supports are currently installed in the levers and cannot be removed! This is not the same structure as it used to be on our VAZs... ARTICLE CONTENTS
That is, the ball joint used to be removed in 95% of cases, it was physically unscrewed from the suspension arm (in our VAZs they were called “burdocks”), and in many foreign cars of the 90s - 2000s they were often removable. Now many manufacturers weld supports into the lever or into the steering rack. They are not removable. Thus, you not only need to change the “ball” but also the entire lever! And this can be very expensive in terms of money. For example, on Mitsubishi the cost of one can reach up to 20 - 25,000 rubles for the original, for BMW - up to 50,000! Therefore, whether willingly or not, the question of restoration arises. Moreover, this can sometimes be done with your own hands.
Which restoration method is better?
THE CONTENT OF THE ARTICLE
Let us immediately note that torn ball joint boots and poor condition are the main reasons why such parts need to be changed quite often. As a rule, if a ball joint fails, this element is replaced with an original or an analogue that is as close as possible in quality.
However, although ball joints are officially unrepairable, restoration methods have been developed, that is, restoration of ball joints in order to reduce the cost of repairs. Let's look at when it is advisable to perform a hinge joint restoration, how it is done, and what you can expect after such a procedure.
First of all, ball repairs are divided into:
- restoration with disassembly;
- repair without disassembly;
Read more: BMW X6 F16 E71 test drive of all models - price photo video technical specifications reviews
The first option involves disassembling the ball and replacing the liner. This task requires a lathe and other specialized equipment. In fact, if all the work is done efficiently, the part will last another 60-80 thousand km. Typically, large service stations specializing in chassis restoration provide a guarantee of 1-3 months or 10 thousand kilometers.
- In a nutshell, the ball joint body needs to be flared on a lathe, after which specially machined polymer or caprolon inserts are installed instead of worn crackers. Next, the assembly is assembled and rolled.
At the same time, the ball can be restored in this way several times. If necessary, in addition to inserts, a new ball pin and/or body can be made. The price of a comprehensive repair is not the lowest, however, it turns out to be noticeably cheaper than buying a new lever with ball assembly.
- Repair of ball joints without disassembly is a relatively new technology for restoring ball joints and tie rod ends. In short, a special material is supplied under pressure inside the part, which eliminates gaps that arise as a result of wear.
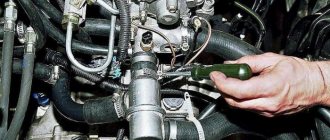
To perform the procedure, the unit is removed from the car, after which a small hole is drilled in the ball body on a repair machine and a channel is inserted to supply the heated polymer composition. Then the hinge pin is fixed in the working position and, under pressure, “driven” into the polyamide-6 ball. After cooling, the part is cleaned of any remaining composition, a new boot is installed, and reassembly begins.
As a rule, given the condition of the roads, a guarantee for such work is not provided or is conditional. At the same time, a well-restored element will last 30-40 or even 50 thousand km. This method is also suitable for repeated use.
The main condition is the normal condition of the ball pin and body, the absence of mechanical damage and corrosion. In fact, the cost of restoration is lower than repairing a ball with disassembly, but the service life is shorter and a minimum guarantee is provided.
The first and main reason to think about it is knocking. It usually occurs at low speeds when hitting bumps (potholes, speed bumps). This indicates the presence of play in the pin in the body, which is a consequence of wear or lack of lubricant. But not only ball bearings can knock, but also worn-out silent blocks, stabilizer struts, etc.
Currently, there are several recovery methods that are popular. One of them is that the lever is dismantled and the rolling is removed. Next, the ball itself is disassembled directly. When visually inspecting the finger, two options are possible: grinding or replacing with a new one. You also need to grind out the liner.
It is worth noting that the resource largely depends on the condition of the liner. If caprolon wears out, backlash appears. The beating leads to complete wear of the plastic, and the finger in the body begins to loosen a lot. As a result, it hits the mounting hole of the lever, and the ball gradually wears out, decreasing in size. Ultimately, this can lead to the ball breaking out and the car not going anywhere.
It should be immediately noted that after the repair is completed, the ball joint will not be completely restored and its service life will be shorter. However, if everything was done correctly, then you don’t have to worry about the safety of the unit’s operation. There are several ways to restore the ball's functionality. At home, two technologies are most often used:
- Repair of ball joints with polymer using SJR technology.
- Collapsible - the body is converted from a non-separable one into a collapsible one, after which the ball surface of the pin is polished and the liners are changed.
Using polymer
The essence of this method is to inject heated polymer material into the housing. In this case, the support does not need to be disassembled, but an extruder must be manufactured. It is worth noting the main advantages of this method:
- Since the housing structure is not destroyed, high reliability of the factory connection is ensured.
- The polymer fills all the voids and wear-out areas that caused the support to fail.
- When the material hardens, it forms a solid liner, the characteristics of which are at least as good as the factory part, and sometimes even superior.
- The polymer contains special ingredients that provide high-quality dry lubrication of the finger.
- High strength under impact loads is achieved.
To use this technology, a hole must be drilled in the lower part of the body, the diameter of which is selected in accordance with the extruder used. It is necessary to thoroughly clean the gap between the liners and the ball surface of the pin from dirt, and also blow the assembly with air to remove chips and grains of sand.
The polymer is injected into the housing using an extruder through a pre-drilled hole. Once the plastic composition has hardened, the repair work can be considered complete. The only drawback of this technology is the inability to check the geometry of the spherical surface of the finger.
Collapsible method
After the support is removed, it is necessary to disassemble the housing. To do this, you will need to drill out all the welding points in one half, then divide the part into two parts using a hammer and chisel. Then the flared edges are ground down and a blow is applied to the end of the pin to separate the bottom of the body.
After this, a new liner and the restored finger are placed in the body. Having connected the two parts of the body, they should be secured by welding. Care must be taken to avoid overheating the liner.
Then the previously made ring must be welded to the body. After this, all that remains is to screw the plug into the body to tighten the liner and drill a small hole in it (diameter about 2 mm) for the cotter pin.
It is important to know! After repair, the ball is not restored to the condition of a new part. The service life will be shorter. But you don’t have to worry about operational safety.
There are many recovery methods. A fairly popular repair method is the SJR technology, when molten polymer is pumped into the cavity between the holder and the ball.
We will consider repairs with disassembly of this unit.
Often the problem occurs due to damage to the boot, and not to the metal itself
Only the polymer liner is subject to wear. It is when it is abraded that backlash appears. If you continue to drive with a loose ball joint, the top of the cylinder will also break, and then the pin may fly out of the race.
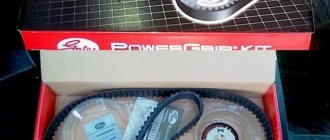
Inserts are sold in car dealerships as consumables. If your ball joint is collapsible, you can easily pull out the bottom and replace the polymer inside the product.
Consumables can be sold in a store at a more reasonable price than buying a new spare part
- The threaded plug looks preferable since there is no temperature effect on the support. However, this method requires a thick bottom, which is not always present on compact parts.
- A glass with thread is the golden mean. Welding occurs without affecting the plastic, but the strength characteristics of the metal deteriorate.
- Welding is the simplest, but ineffective method. After treatment at high temperatures, new polymer inserts lose their properties and their service life is reduced.
- Flaring is an ideal method from a quality point of view. You actually get a new ball joint, manufactured using factory technology. However, this technique does not work at home.
Read more: Geely Emgrand X7 2019-2020: test drive, owner reviews, video, review
About the device
If you didn’t click on the link above and didn’t read it, here I’ll remind you a little about the structure. You need to understand that the ball joint serves for a movable joint that can rotate, that is, movement in several planes at once. In cars it is mainly used in the front suspension to turn the front wheels.
- There is a cylindrical body.
- A polymer liner that is immersed in it.
- Metal finger or “ball” or rod, there are many names. On one side it has a spherical element, on the other side there is a threaded rod.
- The boot protects the structure from the penetration of dust and dirt.
- Pressure spring or even the bottom. By the way, sometimes it is not there if the support is not collapsible.
Just like that, but we need this in order to understand how to restore.
How to repair a ball
Experience, skills and special tools are required, because... In most cases, restoration of supports is complex and is not provided for by the manufacturer. Most people suggest simply replacing the worn-out lever assembly. This is not necessary; you can purchase an original spare part in good condition at a dismantling facility in Moscow or repair your own.
There are 2 common restoration options: through simple “machinations”, non-removable devices are made collapsible. They change the polymer inserts and lubricant, and polish the rings. The second method is more difficult to implement. The assembly is removed from the lever, all worn elements are replaced using a special polymer. For restoration, we recommend using the services of a specialized car service that guarantees quality.
What goes wrong
The design of the ball joint is quite durable and can last for thousands of kilometers. However, over time, the polymer liner wears out. This is the only weak point. It is he who takes on the main load from uneven roads.
A torn boot aggravates the situation; when it tears, dirt, dust, sand, etc. get inside. All this begins to work like “sandpaper”, a metal ball (finger), begins to erase the polymer insert.
That is, only two main parts are subject to wear - the polymer insert and the rubber (silicone) boot - they are the ones that need to be restored.
I would like to note that in very advanced moments, when the liner is worn down to the ground, the “metal ball” itself suffers, because it begins to rub against the metal of the case walls. But this is a completely neglected case.
Do-it-yourself restoration with liquid fluoroplastic
This can be done, but it is difficult. You will need special equipment and polymer (fluoroplastic). The principle is this: we simply drill a hole in the bottom of the ball, then cut a thread so that we can screw in a special metal “receiver”.
A “receiver tube” from a special press (extruder) is screwed into this thread, which supplies molten fluoroplastic under pressure. It should be noted that it melts at temperatures of 170 - 200 degrees Celsius.
Then we heat the tube, usually the press itself with the “liquid mass”. Inside the spherical fluoroplastic also melts + mixes with the mass that enters through the tube, the process occurs under a pressure of 2 atmospheres.
After filling, the tube is disconnected and the press with the polymer is removed. The polymer hardens and forms a monolith that envelops the “ball”; all knocks and vibrations pass - after all, the broken place is filled with polymer. A special valve or “grease fitting” is screwed into the hole that has been drilled.
After such a repair, the ball joint can run for a very long time, sometimes even no less than a new one. Let's watch a detailed video.
However, it is worth noting that if the boot is broken and a lot of dirt gets inside the “ball”, then you should first clean it, otherwise the wear will be very great. Cleaning should be up to the mirror.
Also useful video.
That's all. In conclusion, I would like to say that if it is possible to change and install a new original support, it is better to do it. After all, a new one, I emphasize ORIGINAL (not China), will always be better than a restored one. It will last you for many thousands of kilometers.
How does recovery happen?
There are several ways to restore or repair a ball joint. If the boot changes easily enough, just throw it out and install a new one. But with the polymer composition it’s not so simple. There are only two main repair methods:
- Physical repair, usually used for dismountable support. When you disassemble the “ball” and change the polymer filling.
- Repair of non-removable support. Here the principle is different; liquid polymers are used, which are pumped into the housing.
Now in more detail about each method.
Physical repair
This is the easiest way - when the ball joint is disassembled. The bottom is unscrewed, we take out the worn polymer insert and replace it. Previously, such repairs were carried out on many cars, including those sold for our rear-wheel drive VAZs. Repair kits were also sold that could be purchased and replaced.
Therefore, the supports lasted a very long time, although the “inserts” were changed quite often. A little later, they stopped producing such balls, either it was not profitable, or it was a “conspiracy of the manufacturers.” Now in 95% of cases they are non-separable.
Repair of a non-removable ball joint
Not only can you not take them apart, but sometimes you won’t even be able to remove them using the lever! It’s simply absurd - in order to change the “ball”, we completely change the lever! But there can be two of them in the lever.
There are also two ways:
The first is to physically cut off the bottom - say, with a grinder, select an insert and weld the bottom. The method is not one of the best, but possible. Personally, I don't recommend it to you.
The second is pouring liquid polymer inside under pressure, that is, non-separable restoration. Fluoroplastic is usually used. It's worth going into more detail.
Diagram of a homemade ball joint remover
The main components of a screw puller are:
- steering knuckle (2);
- pin (1), which is set to position 2;
- puller bracket (3), it fits directly onto the fist;
- When turning, the screw stop (4) creates the necessary pressure on position 1.
This design is superior to the fork and lever model in that it can not only be made with your own hands. Also, during its operation, uniform pressure is created on the entire area of the ball joint, which eliminates damage to components and their distortions.
The only drawback may be the lack of free space above the fastening nut, which is why such a puller may not fit.
Materials needed for production
The tools and materials available in the workshop will do ; you will need to find:
- a hammer and a vice to bend the rod in the desired direction;
- die used for carving;
- a long steel rod (15-17 cm), its diameter can be from 10 to 12 mm, it can be replaced with a suitable bolt;
- drill;
- nut , its size is selected according to the bolt used;
- a plate about 50 mm thick, made of metal, measuring 2x8 cm;
- welding machine;
- Bulgarian.
Device and purpose
The ball joint allows for a reliable movable connection between the wheel hub and the suspension arm. The assembly includes a housing, a ball pin , and an insert made of plastic. The body most often has a welded structure - two parts with a stamped spherical recess for the finger are connected using spot welding.
Essentially, this element is a thick-walled glass made of metal into which an insert with a finger is then inserted. To make the housing structure non-separable, its edges are flared. Often the liner is not manufactured separately, but the area between the walls of the housing and the ball surface of the finger is filled with a special polymer material. To protect the unit from dirt and water, a boot is placed on top.
It should be noted that active wear of the ball joint begins after the boot is damaged . Until this happens, the unit is practically not subject to wear. Thus, if you monitor the condition of this element and replace it in a timely manner, you can significantly increase the life of the unit.
However, it is worth remembering that the weld joints do not have sufficient tightness and even with an intact boot, water can get inside. To avoid this, the case should be filled with lithol.
Ball joint
There are other types of hinge joints that can provide more degrees of freedom for rotating structures. The connection of parts in which they move around a common center is called a ball joint. The pin in it is made in the form of a sphere.
Unlike a cylindrical one, the trunnion of a ball joint has all degrees of freedom. Being limited only in its position, it provides the parts articulated with its help with the ability to move in different directions.
The ball joint is called a spherical kinematic pair. The body, which houses the spherical trunnion, is usually made of cast iron. The parts assembled into such a unit are capable of taking positions at different angles to each other. To reduce friction of the surfaces in the hinge, the trunnion is protected by special liners from contact with the body filled with lubricant. The boot protects the joint from dirt and prevents lubricant leakage.
All existing mechanisms were initially noticed in natural phenomena. As well as a ball joint, very reminiscent of the hip joints and spinal vertebrae of the human body.
Node diagnostics
You can find out about the need for restoration work on ball joints through diagnostics. As soon as you hear a creaking and knocking sound from the suspension while driving on an uneven road, the unit is worn out and needs to be restored. To accurately determine the source of these sounds, it is better to carry out diagnostics together - one person enters the inspection hole and puts his hand on the ball joint, and the second begins to rock the car.
If the sound is felt by hand, then the support must be removed and checked for play in the hinge joint, securing it in a vice. It should be remembered that the finger should not move under the influence of light forces, but at the same time it should not bite. It is also recommended to carry out a similar check in the following situations:
- A squeaking sound is heard when turning the steering wheel.
- When driving in a straight line, the car spontaneously wobbles.
- To turn the steering wheel you have to apply quite a lot of force.
CV joint
A peculiar mutant, obtained by crossing a ball joint with a Hooke cardan, represents a completely new type of connection of elements. It is a deformed ball bearing, where the inner race has taken the form of a sphere with slots, and the outer race has taken the form of a sphere with grooves on the inner surface. Both rings are splined onto the drive shaft. The balls placed between them are held by a separator.
The constant velocity joint undergoes heavy loads at significant angles of rotation. “Turned wheels” at nominal speeds are fraught with damage to the unit.
CV joints are subject to mandatory sealing with anthers. Their place of operation allows dust and moisture to get inside the hinge, which quickly disables it. Abrasives and corrosion destroy grooves, balls, and kill the separator. Modern cars use a very reliable articulated joint, sealed in a casing, which facilitates full use of its resource.
The swivel joint requires periodic inspection of the rubber boot. Maintaining its integrity protects the unit from contamination. If a violation of its tightness is detected, it is advisable to replace the entire hinge.
Removal and installation
If after carrying out diagnostic measures it becomes clear that the unit is worn out, it must be repaired. Many novice car owners cope with all the work and restore the ball joints with their own hands. To remove and install the support after repair, you will need several tools:
- Special puller for supports.
- Car stand.
- Jack.
- Mount.
- Pliers.
- A set of keys.
Most often, ball joint pullers are not universal. If you cannot find the required tool, you can solve the problem using a hammer. Moreover, its weight should be about 600 grams. In addition, you need to know the place where you should strike so as not to damage the node.
There is no need to try to knock your finger out of the seat. The blow should be directed perpendicular to the finger along the eyelet. To remove the ball joint, you first need to loosen the front wheels and jack up the car. After this, the wheel is removed.
If the nut on the pin has a cotter pin, it should be removed using pliers. This will allow you to unscrew the nut and use a puller or hammer to squeeze out the pin. After this, you should unscrew the housing mount and, using a pry bar, press the lower lever to remove the support.
To install the unit after repair, you first need to attach the housing to the lower arm. After tightening the fasteners, use a pry bar to release the lever and return the pin to the socket. Then the nut is screwed onto it and tightened. If after this the finger rotates, then the lower lever must be pulled up. The last step will be to install the cotter pin on the nut or replace the old one with a self-locking one.
Ball replacement steps.
In order to replace a faulty element yourself, you need to equip yourself with the following tools:
- Keys for seventeen and nineteen.
- Support removal device.
- Lift (jack).
- Crowbar or similar device.
- Balloon wrench.
To replace the ball, you must first lubricate the element with a special compound (litol). To do this, remove the protection, process the element and return the protection to its original position.
- First of all, we loosen the holders. It is important not to unscrew them completely before installing the machine on the lift.
- We lift the car and remove the wheel
- We remove the finger holders that secure it to the support itself.
- Using a ball removal device, it is necessary to loosen the fixation of the element.
- Next, using a crowbar, we pull the used support out.
- The new support is mounted on the pin. At this time, the assistant should gradually lower the lever, directing the element to the required position.
- Lower the lever and fix the finger holders.
The process is complete! Next, check the reliability of the fixation and return the car to its original position.
Thus, we replaced the ball. When carrying out work, you must adhere to the instructions provided and remember the safety requirements. With a competent and responsible approach, the work will only take a few hours. For the efficiency and quality of the work performed, it is not recommended to do the work yourself, without additional help. When dismantling and changing an element, use a high-quality and proven tool for your own safety. During inspection and repair, be extremely careful and careful, as considerable physical stress occurs. With due attention and strict adherence to the instructions, you will get the desired result. Happy renovation!
Repair work
It should be immediately noted that after the repair is completed, the ball joint will not be completely restored and its service life will be shorter. However, if everything was done correctly, then you don’t have to worry about the safety of the unit’s operation. There are several ways to restore the ball's functionality. At home, two technologies are most often used:
- Repair of ball joints with polymer using SJR technology.
- Collapsible - the body is converted from a non-separable one into a collapsible one, after which the ball surface of the pin is polished and the liners are changed.
Using polymer
The essence of this method is to inject heated polymer material into the housing. In this case, the support does not need to be disassembled, but an extruder must be manufactured. It is worth noting the main advantages of this method:
- Since the housing structure is not destroyed, high reliability of the factory connection is ensured.
- The polymer fills all the voids and wear-out areas that caused the support to fail.
- When the material hardens, it forms a solid liner, the characteristics of which are at least as good as the factory part, and sometimes even superior.
- The polymer contains special ingredients that provide high-quality dry lubrication of the finger.
- High strength under impact loads is achieved.
Why do you need a ball joint remover?
Without it, it is difficult to dismantle and carry out repair work on the chassis of the car; a puller may also be needed to disassemble the steering joints . It can be used for ball joints of different diameters. When choosing its design, they rely on the technical characteristics of a particular car.
Theoretically, the dismantling of ball joints can be carried out with any available tool, using a sledgehammer or hammer, but such repairs are classified as “stressful”.
If a car service center offers just such services, then you should think carefully before agreeing to them. After all, after such a repair, the impact goes to the suspension elements, which can quickly fail.