Smooth running or how to adjust the clutch on a VAZ 2107 yourself?
Hello dear friends! It's time to talk about how to bleed a clutch without outside help. When servicing a car, we cannot always count on someone’s help. In some situations, it makes no sense to entrust the work to workshops, since nothing complicated needs to be done, and they charge a lot of money for such services.
As you remember, we have already discussed with you the replacement of brake pads, and also talked about starting the engine independently when the battery is dead. Both here and there we managed on our own. Therefore, you will probably easily cope with pumping. I believe in you.
When the clutch in a car is repaired, it is dismantled completely or partially. Dismantling leads to the fact that air can get inside the system (hydraulic), which will negatively affect the operation of the clutch itself.
Therefore, all mechanics and car enthusiasts know that after any intervention in the clutch, it must be pumped, thereby removing excess accumulated air. This will be required after replacing elements, when the main cylinder fails, the PSU or any other components of the unit break down.
The system can be pumped quickly and efficiently even if you do not have extensive experience in such matters.
There are several reasons why a hydraulic clutch may become filled with excess air. The main ones include:
- carrying out diagnostic measures;
- performing repair work;
- use of low-quality spare parts;
- poor tension of connecting elements;
- faults and cracks in pipelines;
- initially defective clutch due to the fault of the manufacturer;
- natural wear processes;
- aggressive use of the clutch pedal;
- mechanical damage;
- consequences of improper repair of clutch-related components, etc.
Before you start pumping alone, it is strongly recommended to find the cause of the problem. It's one thing if it's just a standard procedure after repairs.
Things are completely different if there is damage in the system, some defects or malfunctions. Is it necessary to start pumping under such circumstances? No. The procedure will be pointless. Don't waste your energy and precious time.
- First, fix the problem, make sure that the fluid level in the hydraulic system is normal, and only then start pumping yourself.
- There are several characteristic signs that indicate that the clutch needs to be pumped:
- when driving, the car begins to jerk actively;
- when you press the clutch pedal you feel a beat;
- it is not possible to fully depress the pedal;
- the effect of the depressed clutch occurs only after 1-3 presses;
- excessive force has to be applied to the pedal;
- the car reacts inadequately to gear shifting;
- traces of leaking hydraulic fluid are formed, etc.
If a car's clutch does not work properly, continuing to operate it is potentially very dangerous. Therefore, be sure to fix the identified malfunction.
No one forbids you to go to a car service center, where technicians will quickly bleed the system. But if there are no clutch failures, this procedure can be easily performed independently. You just need hands, feet and a small set of tools.
We have already worked with you to restore the battery, understand the issues of engine decarbonization, and even repair the windshield washer motor. And do you really think that after all this you won’t be able to cope with bleeding the clutch?! Everything will work out. Rest assured.
Similar operations can be carried out on any machines, regardless of their price and manufacturer. But more often, owners of domestic and inexpensive imported cars, such as:
- UAZ Patriot;
- VAZ 2106;
- Chevrolet Lacetti;
- Chevrolet Niva;
- Gazelle;
- KAMAZ;
- Deo Nexia;
- Renault Logan;
- Audi 80;
- Skoda Octavia;
- Renault Duster, etc.
There is absolutely nothing scary about pumping. You can do everything right if you follow the instructions and also rely on the owner's manual for your specific vehicle.
First of all, you will need to prepare a certain set of tools and necessary materials. Yes, everything can be done in absolutely field conditions, but it is better to choose a garage for pumping.
You will have to buy what you need for pumping in small ways. The procedure is not expensive for any car, regardless of its market value. But you still have to make some purchases if you don’t have what you need in your garage.
Let's start the preparatory stage. Tools and materials used:
- new hydraulic (brake) fluid;
- an empty container where hydraulics will be drained;
- standard automotive tool kit;
- hose (preferably made of rubber with a diameter that fits the fitting);
- gas stop or its equivalent;
- a pair of hands;
- a pair of legs;
- clean rags;
- some free time;
- good mood.
A gas stop or its substitute is needed for only one purpose. With its help you will fix the clutch in the desired position. But if you still decide to invite a friend to help you level up, then this tool will no longer be needed. Although then pumping will not be considered independent.
The choice is yours.
Leveling up
Compared to checking knocking hydraulic compensators, bleeding a car clutch without outside help is much easier and faster. You can get there in literally an hour.
Before starting the procedure, make sure that the clutch is pre-adjusted. Otherwise, pumping will actually be of no use.
You also need to check the selected brake fluid to ensure it meets the car manufacturer's requirements. If you use the wrong fluid, you risk simply breaking the entire clutch.
This happens when the rubber pads begin to swell and collapse due to contact with liquid.
If everything is fine, you can build on the instructions and video recommendations and pump the clutch yourself. This is done as follows:
- The master cylinder tank is thoroughly cleaned so that no dirt gets in when filling fluid;
- Brake fluid (TF) is poured so that there is still about 2 cm of empty space left to the top edge of the tank;
- There is a bypass valve on the top of the PGU (pneumatic-hydraulic booster). The rubber cap is removed from it and a suitable hose is put on, which you have prepared in advance;
- 200 ml of TJ is poured into an empty container and the second end of the rubber hose is lowered;
- The bypass valve needs to be turned 1 turn and the clutch pedal pressed to the floor (a tool or assistant does this). The pedal is depressed gradually. At the same time, make sure that the hose is lowered into the fuel tank;
- If there is excess air in the system, you will see this by the release of bubbles in the container with liquid;
- While pressing the pedal, watch the fuel fluid level in the tank. If it drops to about 3-4 cm relative to the top of the tank, it will need to be topped up;
- When your pedal is fully pressed, lock it in this position. At the same time, the bypass valve is tightened;
- Release the pedal and open the valve 1 turn again. The pedal is pressed to the floor again;
- Repeat similar operations 3-4 times until the air is completely removed from the hydraulic system;
- The procedure is completed by carefully tightening the valve, removing the hose and returning the cap to its place.
When it's all over, check the current fuel fluid level in the tank again. If it is low, be sure to add brake fluid. It should be 1.5-2 cm from the top border of the tank.
Well, if the problem was only the presence of air inside the system, and you were able to properly bleed the clutch, then everything will start working as before.
I hope I was able to help you. Write in the comments what you think about this.
Thanks to all! Subscribe, ask questions, comment and stay with us!
Of course, no one will dispute the importance of the friction clutch in the vehicle control system. Simple procedures for setting up this unit will significantly reduce the risk of wear of parts.
Skills in bleeding the hydraulic drive will not be superfluous, because any intervention in the system, be it replacing the working cylinder or a drop in the fluid level in the drive reservoir, leads to airing of the system.
It is recommended to check the settings regularly at every car maintenance. But there are still signs when the procedure should be started immediately, so it wouldn’t hurt any owner to know how to bleed the clutch on a VAZ 2107 on their own. Malfunctions in the operation of the coupling during operation are expressed by the following symptoms:
- Slipping – the clutch disc slips when the pedal is fully released, and is unable to transfer all the power from the internal combustion engine to the transmission.
- Drives - the disc does not move away from the flywheel when the pedal is fully depressed, which makes it difficult to change gears.
The clutch may engage too early or late due to the pedal not moving properly, resulting in jerking while driving. The free play of the pedal should be within 0.4-2.0 mm; if these indicators are violated, then adjustments are necessary.
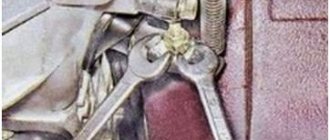
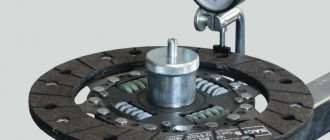
If you look under the car, you can check the free play between the pusher (indicated by the red arrow) and the release fork (blue arrow). Before adjusting the clutch on a VAZ 2107, you need to pump the fork by hand; if there is no free play or exceeds 5 mm, then adjustment of the unit is necessary, because the release bearing will be subject to constant loads.
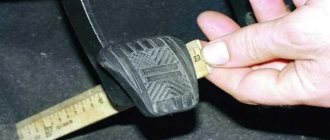
If all adjustment parameters are normal, the pedal stroke before the clutch starts engaging should be 25-35 mm. This is determined using a ruler; if the indicator does not correspond to the norm, then you will have to adjust some components of the clutch drive system.
The procedure for fully setting up the friction clutch control system consists of two parts, one is performed in the cabin, and the other is performed under the car from the inspection pit. To work you will need a set of tools:
- Set of keys.
- Set of screwdrivers and pliers.
- Ruler or square.
A bracket with a pusher is installed under the steering column in the cabin. By rotating the nuts, you can achieve the desired clearance between the pusher and the clutch master cylinder piston. It is this parameter that is responsible for the initial free play of the pedal; the adjustment technology is quite simple:
- Use a wrench (no. 1 in the photo) to hold the travel stop, and use a second wrench to unscrew the lock nut two turns.
- Rotate the limiting pin with the first key (screw in or unscrew), set the desired initial free play of the pedal - 0.4-2.0 mm.
- Check the free play using a straight edge and, if necessary, repeat the adjustment operation.
- Tighten the locknut with a wrench.
- Using pliers, remove the spring from the fork and then from the working cylinder. The check can be done without dismantling the spring, but when checking the free play, you will have to apply force to overcome its resistance.
- Check the stroke of the fork with a ruler, pressing it all the way. The readings should be within 4-5 mm; if there are deviations, then the following points should be followed.
- Clean the cylinder of dirt and spray the nuts with WD-40.
- Using wrenches “13” and “17”, hold the adjusting nut “a” with one, while unscrew the lock nut “b” with the other.
- Secure the pusher with pliers and unscrew nut “b” two turns.
- Rotate the adjusting nut with wrench “a” to adjust the free play of the fork. At the same time, hold the pusher with pliers.
- Clamp the pusher and adjusting nut “b” with pliers, and then fix the lock nut “a”.
- Check the fork free play parameters and repeat the process if necessary.
Basic clutch malfunctions
Next, signs of breakdowns, causes and ways to solve problems with the clutch system (CC) working in conjunction with a manual gearbox (MT) will be discussed.
Incomplete clutch disengagement
In these cases, drivers say that the car is “driving.” In this case, the driven disk is not completely disconnected from the engine flywheel. As a result, the car moves away abruptly, and when changing gears the same thing happens, no matter how smoothly you press the clutch pedal.
Causes and solutions to the problem
- Lack of required pedal free play. This refers to the distance from its bottom to the floor. The data for each car brand is different, so you need to look for it in the appropriate sources and instructions.
- Incorrect adjustment of the CC shutdown drive. To solve this problem on cars with a mechanical clutch system (usually installed on front-wheel drive cars), it is enough to find the correct ratio of the two adjusting nuts. In a car with a hydraulic drive, adjust the stroke of the CC fork by adjusting the stroke of the working cylinder rod.
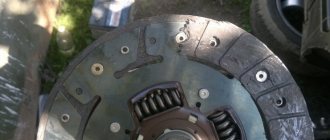
- Warping of the driven disk. If the mechanical runout exceeds 0.5 mm, the lining begins to warp and finds itself almost constantly pressed against the flywheel.
- Jamming of the driven disk hub (misalignment) on the splines of the gearbox input shaft. The problem can be solved by cleaning and lubricating them like LSC15. Typically, such a problem occurs on a car that has not been in use for a long time and has been parked in the open air. If the above steps do not help, you will have to replace the disk or input shaft.
The clutch is slipping
You press the gas, the engine roars, and the car (especially uphill) drives reluctantly and accelerates slowly. Another symptom: there is a burning smell in the cabin.
Reasons and methods of repair
- Incorrect clutch pedal free play adjustment.
- Contact of lubricant on the friction lining of the driven disk. This is typical for old cars, in which oil leaks out in “unknown” ways due to loose connections, bad seals, and when driving it splashes under the bottom, reaching the lining. As a result, we get a burning smell. To fix the problem, find the source of the lubricant leak and wipe the disc.
- Friction lining wear. There are two options: replace this element (which is what they did in Soviet times and the 90s) or buy a new driven disk, which is preferable, since riveting the lining correctly is not at all as easy as it seems: if done incorrectly, you will again have to dismantle the manual transmission and, in the end, still buy a new disk.
- Drive failure. Inspect the CC fork, cable (for vehicles with a mechanical system) and make sure the working cylinder is working (for vehicles with hydraulics). To do this, place the car on the inspection hole and ask an assistant to press the clutch pedal several times: From below you should see how the working cylinder rod pushes the fork.
- In vehicles with a hydraulic drive, the cause of clutch slip may lie in the master cylinder, where the compensation hole may be clogged. The device must be removed and washed.
Noise when pressing the clutch pedal
But if you let it go, the sounds disappear. Signs of a clutch malfunction lie in the nature of the noise, which can be different: from a not particularly annoying rustle to an intermittent grinding sound (either loud or quiet).
Causes and repairs
- Wear of the release bearing due to drying out of the lubricant or play in the cage. The part is not removable, it just needs to be replaced. Rapid wear of the release bearing is facilitated by frequent exposure to moisture, which may be associated with fording (if you have an SUV).
- Breakage, wear of the driven disc damper springs, “petals” (elastic plates) of the clutch basket. Only a change will help.
- Worn bearing (front) input shaft of the box. It will be necessary to replace the part with partial disassembly of the gearbox.
The pedal remains buried in the floor or squeaks
You can remove it back with the toe of your shoe. Here, problems with the clutch consist of jamming of the drive or wear of the release bearing. The master cylinder rod and pedal spring may also malfunction: this is due to prolonged downtime of the machine. If there is a squeak, inspect the axle bushing on which the pedal is attached. The problem can be corrected using lubricant - LITOL-24, etc.
Clutch disengages when pressed hard
And if you press the pedal smoothly and release it, the CC will not turn on. Such signs of clutch failure appear on hydraulically driven machines.
Causes
- Insufficient fluid level in the CC.
- Lack of tightness in the connections of pipes and hoses of the clutch system.
- Wear and damage to elements (usually cuffs) of the master cylinder or its mirror.
Jerking when the clutch operates
If there is nothing to do with the drive, you need to remove the basket with the disk and inspect them: perhaps the friction linings have worn out or the rivets securing them have become loose. In the latter case, just knock them out with a hammer.
"Soft" clutch pedal
Often, possible clutch malfunctions are associated with the presence of air in it. It does not allow the elements of the assembly to move quickly due to insufficient pressure created by the liquid. Turning on and off is difficult. The air must be removed from the system.
Bleeding the clutch
Prepare brake fluid, a tube with a diameter slightly larger than the bleeder fitting of the working cylinder of the unit, a small container, and tools. Progress of the procedure:
- Place the car on the inspection hole.
- Fill the clutch master cylinder reservoir with as much fluid as possible.
- Find the working cylinder and put an elastic tube on its bleeder fitting (it should be closed with a plastic cap), the other end of which is lowered into a container with brake fluid.
- Ask an assistant to depress the pedal 3-4 times and hold it near the floor.
- Unscrew the fitting: if you see air bubbles, wait until the liquid stops flowing out and tighten it.
- Repeat the operation until only clear liquid comes out of the tube.
Why and how to bleed the clutch on a VAZ 2107 in your garage?
Bleeding is necessary if the clutch does not disengage completely. For example, the pedal is depressed, the first gear is turned on, but before you even have time to release the pedal, the car is already moving. A slight pedal stroke also indicates the need to remove air from the system. The procedure must be performed with an assistant who will press the pedal. To work you will need:
- Brake fluid.
- Rubber hose 50-100 cm long.
- "8" wrench.
- Container for liquid.
- Brake fluid.
Car owners who are interested in how to properly adjust the clutch on a VAZ 2107 should know that bleeding is carried out through a fitting located on the working cylinder under its bottom. The operation is no more difficult than, even a novice car enthusiast can perform it.
Pumping technique
It is advisable to carry out the work on an overpass or inspection hole; in extreme cases, the machine should be raised on supports. Further actions are carried out according to transitions:
During pumping, do not allow the liquid level in the tank to drop below 15 mm, and top it up in a timely manner. Finally, you need to check the functionality of the coupling:
- Start the car and put the car in reverse gear; the appearance of jamming or extraneous noise is unacceptable.
- Check the gear shift while driving; if acceleration and shifting occur without jerking or extraneous noise, then the clutch control system is configured normally.
- Brake fluid.
- Rubber hose 50-100 cm long.
- "8" wrench.
- Container for liquid.
- Brake fluid.
Replacing the clutch master cylinder VAZ 2107
The simplest way to repair a VAZ 2107 clutch is to change the worn cylinders (main and slave). Their price is low, and the labor intensity of the operation is much lower than when carrying out repairs. Therefore, car owners often prefer to replace rather than repair clutches.
Let's start by replacing the master cylinder. The order of operations is as follows:
- Drain the brake fluid from the clutch reservoir into another container. This can be conveniently done using a syringe.
- Loosen the clamp and remove the hose from the master cylinder fitting.
Note: You can drain the liquid without using a syringe. To do this, you need to remove the hose going from the tank to the cylinder fitting and redirect it into a previously prepared container.
- Unscrew the fitting of the metal tube going from the master cylinder to the slave cylinder and disconnect the tube.
- Using a 13mm wrench or a socket with an extension, unscrew the two nuts securing the master cylinder to the body bulkhead and remove the master cylinder.
Note: If the threads are rusty and the nuts cannot be unscrewed, the studs should be pre-treated with WD-40. Otherwise, if you use excessive force, you can twist the pins, which will cause a lot of difficulties.
The new clutch master cylinder can now be installed. Before doing this, you should check the condition of the flexible hose of the clutch reservoir. If it cracks at the end, it needs to be trimmed slightly or replaced with a new one.
When installing a new cylinder, it is necessary to ensure that the clutch pedal drive rod fits inside the cylinder. For convenience, you can ask your partner to slightly press the clutch pedal and hold it. Then follows:
- Install the master cylinder onto the studs and tighten the nuts.
- Attach and tighten the metal tube fitting.
- Place the pipe from the clutch reservoir and tighten the clamp.
- Fill the reservoir with brake fluid, following the level marks.
The clutch master cylinder has been replaced.
How to replace clutch fluid on a VAZ 2101-VAZ 2107?
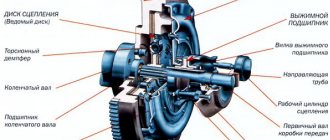
The clutch is engaged and disengaged using the release bearing. Moving forward, it presses on the spring heel of the basket, which, in turn, retracts the pressure disk and thereby releases the driven disk. The release bearing is moved by the clutch on/off fork. This fork can be pivoted in different ways:
- using drive hydraulics;
- flexible, durable cable, the tension of which is automatically adjusted.
The operating principle of the VAZ 2107 clutch hydraulic drive is quite simple. When the engine is running and the clutch pedal is in the up position (depressed), the clutch and flywheel rotate as a unit. Pedal 11, when pressed, moves the rod with the piston of the master cylinder 7 and creates brake fluid pressure in the system, which is transmitted through tube 12 and hose 16 to the piston in working cylinder 17.
The piston, in turn, presses on the rod connected to the end of the clutch engagement fork 14. Rotating on the hinge, the other end of the fork moves the release bearing 4, which presses on the spring heel of the basket 3. As a result, the pressure disk moves away from the driven disk 2, the latter is released and loses traction with flywheel 1.
The clutch on the VAZ 2107 is controlled using a hydraulic drive, the pressure in which is created using an outboard pedal mechanism. The main elements of the hydraulic drive are:
- clutch master cylinder (MCC);
- pipeline;
- hose;
- clutch slave cylinder (CLC).
The performance of the drive depends on the volume and technical characteristics of the operating fluid, which for the VAZ 2107 is usually DOT-3 or DOT-4 brake fluid. DOT is a designation for a system of requirements for the physical and chemical properties of diesel fuel, developed by the US Department of Transportation Institute (DOT - Department of Transportation).
Compliance with these requirements is a prerequisite for the production and certification of the liquid. The composition of TJ includes glycol, polyesters and additives. DOT-3 or DOT-4 fluids have a low price and are recommended for use in drum-type brake systems and hydraulic clutch drives.
The GCS is designed to create working fluid pressure by moving a piston connected to the clutch pedal. It is installed in the engine compartment just below the pedal mechanism, mounted on two studs and connected to the working fluid reservoir with a flexible hose. The cylinder is arranged as follows. Its body has a cavity in which a return spring, a working piston equipped with two O-rings, and a floating piston are located.
Replacing the GCS is quite simple. To do this you will need:
- set of wrenches and sockets;
- round nose pliers for removing the retaining ring;
- long thin slotted screwdriver;
- disposable syringe 10–22 ml;
- a small container for draining the working fluid.
The work is performed in the following order:
- The working fluid is drained from the hydraulic clutch drive. To do this, you can use a medical syringe or simply pull off the sleeve from the GCS fitting.
After carefully removing the GCS from its seat, you can begin to disassemble it. This is best done on a table or workbench with good lighting in the following order:
- Clean the outer surfaces of the housing from dirt.
- Carefully remove the protective rubber cover. Unscrew the fitting of the hose going to the reservoir with the working fluid.
Assembly and installation of an assembled or new GCS is carried out in the reverse order.
The clutch is bled when air enters the system. Most often this occurs due to depressurization of the system hoses or loose tightening of threaded communications. This breakdown is one of the most unpleasant, which can take any motorist by surprise. The main problem is that the car will not be able to go further.
To repair the vehicle, you will have to call a tow truck or look for a kind fellow traveler who will tow it to the garage. In the first case, such a trifle will lead to additional financial costs, and in the second, it may require a lot of time, since today on the road it is not often possible to meet an understanding motorist; everyone has their own problems and affairs.
2) Next, grab the tank cap with your hand, and thereby completely unscrew it and put it aside so as not to lose it.
3) Next, if the crankcase protection installed on your car bothers you, let’s say it’s too big, then remove it to gain access to the clutch slave cylinder. (For information on how to remove the protection, see the article: “Replacing the crankcase protection”)
4) Now perform the following operation, to do this, again using a cloth, wipe the protective cap located on the fitting of the clutch slave cylinder and at the same time clean the cylinder fitting itself from dirt.
5) After the dirt has been removed, take a wrench and use it to unscrew the fitting itself by about 3 or 4 turns (At your discretion), and after unscrewing the fitting, at this time let your assistant help you, thereby pressing the pedal clutch several or even more times, generally until all the fluid flows into the container you prepared in advance.
Note! When pressing the pedal, be sure to warn the assistant that it may fail, that is, fall to the very bottom and not go back, then in this case, let him return the pedal to its place with his hand, bending it to do this and thereby lifting it!
Filling: 1) When all the liquid has been drained from the tank, then in this case tell the assistant that you don’t need to press the pedal anymore, and at this time you tighten the bleeder fitting that was unscrewed earlier so that the liquid no longer pours out of the working cylinder and always remained in it.
Note! At the very end of the operation, fill the clutch hydraulic reservoir with brake fluid to the required level!
And after pouring the liquid before screwing the lid, visually inspect this lid for defects, and also check the compensation cavity, which is indicated by the arrow and which is also removed from the lid, so if after removal you see signs of rubber aging, signs of cracks and tears, then In this case, replace this cavity with a new one!
Advice! By the way! You can also replace the fluid in the clutch drive, displacing the old one, to do this you need to ask your assistant to add fluid to the reservoir as it is displaced, and do all this until normal, clean fluid begins to flow into the container you are holding!
Important! Be sure to bleed the car’s clutches when you finish replacing. (For information on how to bleed the drive, see the article: “Bleeding the clutch on a VAZ”)
The clutch is bled when air enters the system. Most often this occurs due to depressurization of the system hoses or loose tightening of threaded communications. This breakdown is one of the most unpleasant, which can take any motorist by surprise.
The main problem is that the car will not be able to go further. To repair the vehicle, you will have to call a tow truck or look for a kind fellow traveler who will tow it to the garage.
In this article we will talk about how to bleed the clutch, what is needed for this and what nuances arise in the process of implementing this activity.
- brake fluid;
- an empty small container for draining hydraulic fluid and a hose whose diameter must correspond to the drain fitting;
- standard set of tools for a car;
- a stop for fixing the clutch pedal, in the event that you did not have an assistant and had to perform the operations yourself.
Before proceeding with the immediate stages of bleeding on systems with hydraulic and mechanical clutches, you need to configure it. The need for adjustment is determined by the fact that the lack of free play for the main cylinder piston pusher (main cylinder) makes it impossible to carry out the bleeding operation. In fact, the piston and pusher is a shut-off valve.
To make the adjustment, you will need two keys, and you will not have to spend a lot of time on all operations. The pedal travel for VAZ cars should be from 120 to 130 millimeters. The stroke is adjusted by turning the adjusting nut.
The distance from the pusher rod to the end of the release fork should be within 5 mm. Before making adjustments, remove the spring from the bracket and fork. To increase the stroke, the fasteners need to be tightened; to decrease, on the contrary, they need to be unscrewed. The control bolt is tightened with the second wrench.
After achieving the desired parameters, you need to press the pedal 3 times and measure the distance, repeat the procedure if necessary.
Fluid replacement
It is also recommended to replace the working fluid before bleeding. Remove the cap and place a pre-prepared hose on the fitting, the other end of which must be lowered into the drain container. Using a size 8 wrench, turn the fitting 3/4 of a full turn.
Now you can remove the liquid. Pressing the pedal several times, repeat these actions until all the working fluid has flowed out, then tighten the fitting. If the clutch pedal does not rise on its own, pull it up by hand.
Fill the hydraulic system with new brake fluid through the clutch reservoir.
Changing the brake fluid can be done gradually. To do this, liquid must be added to the tank in small doses in the intervals between pressing the pedal.
When clean liquid flows from the working cylinder (WC), tighten the fitting and fill the barrel to a level no lower than 1.5-2 cm from the top edge.
Pumping technique
VAZ 2107 clutch device
Why the clutch slips, diagnostics and main faults
The “Seven” has a dry single-disc clutch. The clutch hydraulic master cylinder is located directly under the pedal, when pressed, the pusher moves, acting on the master cylinder piston, creating pressure. The brake fluid that fills the hydraulic drive is squeezed out and flows into the working cylinder.
The piston of the working cylinder is connected to the clutch fork by a pusher. When you press the pedal, the latter moves the fork, it displaces the release bearing and separates the support and pressure discs. As a result, the torque from the crankshaft flywheel is no longer transmitted to the gearbox and it becomes possible to change gear.
If the clutch unit malfunctions, when you press the pedal, the gearbox shaft continues to rotate and changing gears becomes difficult or even impossible. If the clutch is adjusted incorrectly, the discs may slip, which is accompanied by accelerated wear.
You cannot continue to drive a car with a faulty clutch - both the clutch discs and the gearbox may be damaged. Therefore, at the first sign of a malfunction, you should start repairing and adjusting it.
Management
This is done using a brush that uses steel wire instead of bristles.
Work on pumping the clutch on a VAZ 2106 must be carried out on an overpass or pit. You will also need the help of a partner.
The tools we need are:
- brake fluid;
- rubber hose;
- capacity;
- key to 8.
The best option for VAZ 2106 is Neva M
Algorithm of actions
- First of all, pour fresh liquid into the VAZ 2106 tank to the bottom mark of the neck.
- Now you need to slightly loosen the fitting located on the working cylinder.
- Next you need to put a hose on it.
- We lower the other end into a container (preferably transparent) in which the remaining wateriness is located.
- At this stage you will need the participation of your partner. It is necessary that he press the pedal until its movement begins to become difficult.
- Next, he must hold the pedal in this position.
- You need to loosen the fitting little by little. At this time, liquid will begin to flow through the hose.
- If you see bubbles in the outlet, this means there is air in the system.
- When moisture starts to come out, you may notice that the clutch is failing.
- Wait until it falls completely and tighten the fitting.
- At this time, your partner should start pumping again.
- Repeat this until there are no bubbles in the outlet.
- During operation, the liquid level will naturally drop. Therefore it needs to be topped up.
- Make sure that the liquid does not fall below ten millimeters from the bottom. If the level drops too low, air will return to the system and the job will have to be repeated again.
- After completing the work, you need to check the level.
- If necessary, top up to the lower neck line.
- We tighten the cap of the VAZ 2106 tank.
- Disconnect the hose.
- We tighten the fitting.
First of all, make sure that there is no grinding of gears when the pedal is fully depressed and reverse gear is engaged. If this is still heard, it means that air remains in the system and all work will have to be repeated.
This video shows how pumping occurs correctly on VAZ 2101-2107 cars.
The VAZ “six” is equipped with a clutch drive, which uses hydraulics in its design. Such hydromechanical systems require increased attention and maintenance, which includes bleeding the hydraulic clutch of the VAZ 2106, carried out as necessary. The essence of such an operation as bleeding the clutch is to remove from this system a certain volume of air masses that has entered during operation.
Air may also end up in the hydraulic system after repair work has been carried out due to depressurization or after replacing the working fluid used in it. Accordingly, before you start bleeding the clutch, it is imperative to eliminate the causative defects, otherwise all the work carried out will be in vain. Indeed, due to defects in this system, breakdowns in the associated units and transmission elements are possible.
Clutch replacement rules
The clutch is slipping on VAZ 2108, 2109, 2109 cars
Let's move on to work “under” the car.
Disconnect the driveshaft and axle gearbox. But before that, we advise you to perform one tricky trick. Draw marks on the flange of each part with a marker so that you can later install them exactly in the position in which they were.
Unscrew the nuts securing the safety bracket, as well as the receiving pipe from the gearbox. There is no need to disconnect the cardan from it, because we will not remove the box.
Unscrew the nuts that secure the box to the bottom of the car. A part such as the cross member of the rear support will also have to be removed.
Disconnect the wiring from the reverse light sensor.
Dismantle the tension spring of the fork, which is responsible for disengaging the clutch, disconnect the two bolts from the working cylinder that releases the clutch.
Unscrew then remove the clutch pan. Now all that remains is to remove the four bolts securing the crankcase.
Using a pry bar, move the box as far back as possible. That way she won't bother you.
In the place where the box was located, there is a distance that will allow you to reach the clutch basket and disc. It is connected to the flywheel with six bolts.
Unscrew them and you can easily remove the clutch along with the release bearing located on the transmission input shaft.
Pull out the basket and pressure plate and inspect them. If they are in good condition, then there is no need to change them.
The necessary elements must be replaced, which may even include both disks, and reassembled.
Before you begin assembly, we recommend lubricating the splines of the gearbox input shaft and polishing the clutch disc with a simple rag.
On a VAZ 2107, the location of the clutch disc to the crankshaft bearing must be adjusted. This should be done using a special mandrel. It can be found at any auto store. If you do everything correctly, the mandrel will freely come out of the bearing and move back.
Thus, you have independently replaced the clutch, which will allow you to be confident in the reliable operation of your car.
Most of the problems identified during the operation of the car need urgent correction. A clutch malfunction can lead to breakdown of the entire assembly or even the gearbox, making it impossible for the vehicle to move further independently. Therefore, it is unacceptable to ignore the symptoms of a malfunction and promptly carry out such an operation as replacing the VAZ 2107 clutch.
Tuned sports clutch
In motor sports, which is a kind of testing ground for the development and implementation of innovations in vehicle components and mechanisms, an increased load is applied to the special clutch. After all, this unit is operated when rotating at an angular speed of 6-10 thousand rpm and at the maximum power values of the power unit.
At the same time, the impact on the drive pedal increases, which creates some problems in the speed of gearbox shifting. Therefore, components such as Kevlar alloy, ceramics or polymer carbon are used as friction linings for the drive type disc. Each type of such friction compounds has its own advantages and disadvantages.
Ceramics does not heat up and withstands large impacts, but it requires the creation of high clamping force and has a reduced friction force. Carbon has high resistance to the mating surface, low material density and high heat resistance. Kevlar alloy has increased wear resistance, heat resistance and at the same time has a reduced friction index.
Of course, no one will dispute the importance of the friction clutch in the vehicle control system. Simple procedures for setting up this unit will significantly reduce the risk of wear of parts. Skills in bleeding the hydraulic drive will not be superfluous, because any intervention in the system, be it replacing the working cylinder or a drop in the fluid level in the drive reservoir, leads to airing of the system.
Clutch faults
The clutch has one, but very important, function - transmitting torque from the flywheel of the power unit to the input shaft of the speed box. The need for this process arises because the engine cannot be constantly connected to the transmission: the connection must be interrupted from time to time. This is exactly what the clutch does. The unit is quite reliable, but its wear and tear, like any other mechanism, cannot be avoided. What are the most common clutch malfunctions and how to identify them? To answer this question, you need to know what is included in this system and how it all works.
What parts and tools are needed
After you have placed your VAZ-2107 on the inspection groove, it is important to prepare a list of required parts and tools. Without them, it will be impossible to carry out the work. So, you will need:
- eight wrench;
- TJ, or brake fluid;
- hose up to one meter long;
- some kind of container where you can drain the brake fluid, preferably transparent.
Then you can proceed directly to the pumping process. To do this you will need:
- Open-end wrench or socket wrench 8;
- Container for draining (with a small amount of liquid);
- New fluid;
- Silicone transparent tube;
- Rags.
This is all the required equipment.
An interesting fact is that with identically used drives on different “Classic” models, the bleeding process is different, so methods for pumping a hydraulic drive on VAZ-2106 and VAZ-2107 vehicles will be described below.
Preparatory work
The clutch pedal is connected to the clutch master cylinder through a rod. The same rod acts as a piston in this cylinder. There is also a working cylinder - it is installed on the clutch housing. The piston of this cylinder is connected to the release fork.
The force from the driver's foot is transmitted through fluid, so the clutch cylinders are connected to each other by a pipeline.
Fluid is supplied to the master cylinder from the reservoir. The working element is ordinary brake fluid.
It all works like this: the driver presses the clutch pedal, the rod enters the master cylinder and pushes the fluid out of it.
To prevent the liquid from flowing back into the tank, the piston closes the supply fitting from the tank.
Since the fluid is not compressed, it moves through the pipeline and begins to press on the piston in the working cylinder. This piston comes out and pushes the fork, which acts on the release bearing.
When the pedal is released, the fork spring pushes the piston back into the slave cylinder and the fluid returns to the master cylinder.
This scheme seems simple, but may not always be reliable. If air gets inside the drive system, the efficiency of the clutch will decrease.
Air bubbles in the system will be compressed when pressure arises, this will lead to the fact that the full force will not be transmitted.
Because of this, even with the pedal fully depressed, the output of the working cylinder rod will be incomplete, the fork will not fully depress the bearing - as a result, the clutch “drives”.
Any car repair procedure must begin with the preparation of the necessary tools and materials. This procedure is no exception.
To bleed the clutch system you will need:
- something to hold the clutch pedal in place. This will be needed if you bleed the system without an assistant;
- a transparent rubber hose that you will connect to the fitting. The diameter of the hose must match the model of your car, so you need to select it individually. If you don’t have a transparent one, you can take a regular hose, but this way you won’t be able to control the process of air bubbles leaving the system;
- hydraulic clutch fluid;
- the container into which it will be drained from the system;
- set of tools. It should be found in the trunk of every car (the set includes a screwdriver, keys, pliers, and so on).
clutch bleeding tools
To get high-quality and quick results, it is better to invite an assistant to do the work. It’s a good idea if your assistant is familiar with the specifics of the pumping procedure.
How to adjust the clutch?
You can familiarize yourself with the features of this process here. You may also be interested in our article on replacing the clutch master cylinder.
Before performing each repair procedure, preparatory work must be carried out. Check the fluid level first. You need to make sure that its quantity does not deviate too much from the norm. If necessary, add a little fluid to the recommended value (there are special marks on the body of the expansion tank indicating the permissible minimum and maximum). Then remove any dirt or dust that has accumulated on the surface of the protective cap.
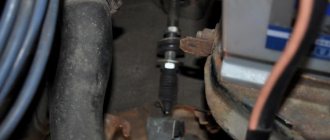
The slave cylinder is a complex mechanism that includes a rod from the clutch pedal. This rod is located under the expansion tank and is mounted next to the brake cylinder on the driver's side. You need to remove the cap installed on the top of the air inlet valve. Then place the rubber hose onto the valve stem.
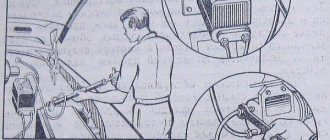
It is possible to do a similar procedure without a hole, but for this you will need an overpass. By following these instructions, people who have virtually no experience working with cars will be able to do the bleeding procedure correctly.
Stages of work
Before you start working, it is better to enlist the help of another person. Then it is important to carefully check the integrity of all connections and the hose on the car - there should be no leaks, cracks, etc. Under your hood there will be either an injector or a carburetor - it all depends on the modification of the VAZ-2107 model. Work should be carried out carefully following all the following steps:
- Pour brake fluid into a transparent container.
- On the body of the working cylinder you can see the clutch bleeder fitting - this procedure will be carried out with the help of it. Remove the protective cap from it and smoothly tighten the rubber tube.
- The lower end of this same tube should be lowered into a container with brake fluid and it is important to ensure that the end of the tube always remains immersed in it.
- Pour brake fluid into the reservoir (expansion tank).
- After this, the fitting must be loosened slightly. To do this, you just need to unscrew it about half a turn.
- During this, the assistant must press the clutch pedal every three seconds and keep it pressed all the way.
- If all of the above was done correctly, then liquid will flow through the tube, and you will also notice air bubbles in it.
- Continue in this manner until the air is completely released. As soon as the bubbles stop coming out, the mission can be considered successfully completed.
- At the end, the assistant must press the pedal, and at this time you must tighten the fitting thoroughly and put on the protective cap, which you removed at the very beginning of this operation.
Symptoms and causes of malfunction
There are not so many symptoms of air in the clutch hydraulic drive - difficult gear shifting, crunching of gear teeth when shifting, especially when engaging reverse gear, weakening of the effort to depress the clutch pedal.
Often the cause of airing is a drop in the working fluid level below the minimum value; in this case, air enters the main cylinder through the fitting.
It is possible that liquid began to leak from the system due to loose connections of the pipelines, or their damage; a leak may appear from under the cylinder sealing rings due to wear.
There may even be an option when the hole in the tank lid is clogged. This hole is needed to equalize the pressure in the tank.
And if it becomes clogged inside the system, a vacuum occurs during operation, causing air to penetrate through the sealing rings.
Well, of course, after repair work related to the clutch and its drive, the system will be aired.
To restore the drive's functionality and remove air bubbles, the system should be bled.
This operation is in many ways similar to bleeding the brake system. But before starting work, the cause of airing should be identified.
Therefore, before starting work, you should carefully inspect all drive elements for leaks. If any are found, they must first be eliminated.