The VAZ “six” is equipped with a clutch drive, which uses hydraulics in its design. Such hydromechanical systems require increased attention and maintenance, which includes bleeding the hydraulic clutch of the VAZ 2106, carried out as necessary. The essence of such an operation as bleeding the clutch is to remove from this system a certain volume of air masses that has entered during operation.
Air may also end up in the hydraulic system after repair work has been carried out due to depressurization or after replacing the working fluid used in it. Accordingly, before you start bleeding the clutch, it is imperative to eliminate the causative defects, otherwise all the work carried out will be in vain. Indeed, due to defects in this system, breakdowns in the associated units and transmission elements are possible.
Bleeding the hydraulic clutch of a VAZ 2106
If the question arises of how to bleed the clutch of a VAZ 2106, you should prepare the necessary plumbing tools and auxiliary material in the form of a container with brake fluid, an auxiliary hose and a reservoir for filling the drained waste.
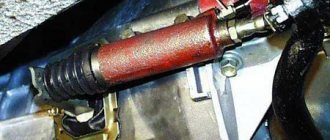
If the hydraulic clutch of a VAZ 2106 is pumped after replacing the brake fluid, then it is first necessary to clean the drain fitting of the main clutch cylinder (clutch master cylinder) from dirt and dust deposits. This work is carried out using a special brush with a working surface made of steel wire.
To gain solid knowledge of how to bleed the clutch, you need to follow the following algorithms:
- We put the pre-stored rubber hose onto the fitting outlet, which has been treated and cleaned of dirt and dust deposits. This connecting element must be pulled onto the fitting with some force. We direct the other outlet of the hose to the tank to receive used brake fluid.
- To carry out the operation of bleeding the clutch, the help of another person is required, who will help carry out subsequent actions while inside the vehicle.
- The assistant must depress the pedal of the device 5-6 times, and the time interval between pumping should be 3-4 seconds. If, after pressing the pedal device, the product does not restore its original position, then it should be returned to the starting position.
- After recessing, the clutch pedal is held in the recessed position by an assistant in the cabin. At the same time, a car enthusiast working on a hydraulic drive must slightly unscrew the fitting to drain the working fluid using a wrench. At this time, the “brake fluid” with air bubbles begins to come out.
- After the leak from the rubber hose has stopped, tighten the drain fitting and give the command to your partner in the cabin to release the pedal so that it assumes a free position.
- We repeat the previous technological cycle with unscrewing and tightening the fitting element. A logical continuation of these actions should be a gradual “hardening” of the clutch pedal, i.e. it should acquire elasticity.
- The frequency of these successive operations must be repeated 3 to 5 times or until the end of the release of air bubbles from the rubber hose directed into the reservoir for draining the used brake fluid. In this case, it is important to control the volume of brake fluid in the standard clutch reservoir. The brake fluid level must not be allowed to decrease less than 10 mm from the lower edge of the hydraulic drive reservoir!
- After creating a vacuum in the clutch hydraulic drive, it is necessary to tighten the fitting device completely and remove the hose from the rubber base. The other end of the hose must be kept in a tank with a “brake seal”, because it contains used liquid, after which it is necessary to drain this liquid.
- Add working fluid to the standard tank to the specified amount and tighten the tank cap with a little force.
- We wipe off excess leaked fluid with a dry rag and test the clutch hydraulic drive unit for possible leaks. Next, we try the operation of the hydraulic drive with the engine turned on and then switching on the speeds. During normal operation the vehicle can be driven.
An important addition: while the hydraulic clutch of the VAZ 2106 is being pumped, one should not forget about adding brake fluid to the standard reservoir in order to prevent air masses from entering the hydraulics.
Bleeding the clutch yourself
Technologically, such a phenomenon as bleeding the clutch is a rather rare process. This can also be attributed to bleeding the brake system. And in terms of its execution algorithm, bleeding the clutch is not very different from a similar procedure for brakes, performed independently. Yes, exactly on your own, because bleeding the clutch will not take much of your time and, moreover, will not require high auto mechanic skills. Therefore, you shouldn’t put everything off and it’s time to quickly learn how to pump the clutch of your “four-wheeled horse.” More on this later in our article.
When is clutch bleeding required?
In correct scientific terminology, clutch bleeding is the procedure for removing air from the hydraulic system of the mechanism that controls the automobile clutch system. Air can enter the system due to faulty pipelines or loose threaded connections.
With the entry of air, various types of malfunctions often appear, which leads to improper operation of the entire hydraulic clutch system. The steps for bleeding the clutch must be performed sequentially and as follows:
— preparing the clutch system for operation;
— connecting the rubber hose to the fitting;
— depress the pedal and then drain the liquid until the air is completely removed.
When independently replacing the hydraulic filler of the clutch system, the following rules must be observed:
— the liquid should not get on the skin;
— new fluid must not be contaminated;
— if you add fluid, then only of the same composition, otherwise it should be replaced completely;
— It is better not to use waste liquid.
The procedure for bleeding the clutch is quite simple. Next, we will talk about what tools are needed to carry out this procedure and how to properly bleed the clutch.
What is needed to bleed the clutch?
As with any other procedure, before starting work, you must prepare the necessary materials and tools in advance. Before bleeding the clutch system, you need to prepare the following:
- a standard set of tools that are often used when carrying out repair work: pliers, a set of wrenches, screwdrivers, and so on;
— a container for draining liquid from the system;
— new hydraulic fluid;
— a rubber hose of the appropriate diameter for connection to the fitting. It is desirable that the hose be transparent, which helps to better control the release of air from the clutch system;
— a convenient device for fixing the pedal in case of carrying out the procedure independently, if you do not have an assistant nearby.
But in order for all the work to be carried out efficiently, it is better to get an assistant, preferably knowledgeable in carrying out the clutch bleeding procedure.
Preparing to bleed the clutch
To bleed the hydraulic clutch drive, preliminary preparatory procedures are required. Initially, you should make sure that the fluid level in the expansion tank is within normal limits.
If necessary, add fluid to the optimal value. After this, clean the protective valve cap of the cylinder from dust and dirt deposits.
The slave cylinder is a mechanism that includes the rod from the clutch pedal. It is usually mounted on the partition of the power unit compartment under the expansion tank on the driver's side near the brake cylinder. Next, remove the cap from the air inlet valve on the slave cylinder and install the rubber hose onto the valve stem. Then take a small container and pour some brake fluid into it, which is used in the clutch system. The liquid level should be such that the free end of the hose is completely submerged by 5-10 centimeters .
Features of clutch bleeding
Before you bleed the clutch system, you should adjust it. The thing is that bleeding the clutch will be impossible if there is no free play of the master cylinder piston pusher. At their core, both the pusher and the piston are a shut-off valve, and if there is no free play, it will be closed. A similar situation occurs when the tension spring is faulty and, accordingly, the pedal becomes stuck when it moves to the uppermost position.
Clutch bleeding process
The clutch can be pumped either with or without compressed air in the system. So, let's begin:
— add working fluid to the master cylinder reservoir so that its level is no lower than 2 centimeters from the top edge of the reservoir. Fill the tank only through a strainer to prevent foreign matter from entering the system;
— in the upper part of the CCGT housing, remove the rubber cap of the bypass valve and put it on the hose. Place the other end of the hose into a prepared half-liter container, one-third filled with brake fluid;
— before pressing the clutch pedal, unscrew the bypass valve one turn. Let your assistant press the clutch pedal all the way until air bubbles stop flowing from the hose into the container;
— make sure that the liquid level in the expansion tank does not fall below 3.5 centimeters from the edge. If necessary, add the required amount of liquid to the tank;
— the clutch pedal remains pressed to the limit until the release of air bubbles stops, and then you need to tighten the bypass valve tightly;
— the experience of car owners suggests that in order to speed up bleeding of the clutch, it is necessary to turn the bypass valve every time after pressing the pedal. Then release the pedal and repeat the operation. Most likely, only three pedal presses will be enough to prevent air from leaving the system;
— remove the hose from the fitting, put on the safety cap and add liquid into the tank to a level approximately two centimeters from the edge;
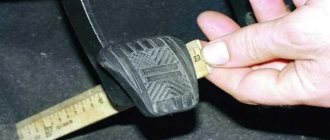
— after bleeding the clutch, check the quality of the clutch. To do this, depress the clutch pedal all the way and check the stroke of the piston pusher. Its stroke should be 27-28 millimeters. If this parameter is not the same for you, then you should adjust the clutch.
It is important to know! The clutch should only be pumped with the working fluid recommended by the manufacturers. In the worst case, the clutch rubber products will swell, with all the ensuing consequences of clutch failure.
When bleeding the clutch, use extreme caution as brake fluid is very toxic. After finishing work, be sure to wash your hands thoroughly with soap. By the way, this procedure for bleeding the clutch will need to be performed after any repair work on the clutch elements. If, after bleeding the clutch, no positive results are observed, then turn your attention to adjusting the free play of the clutch pedal. Sometimes the reason for poor performance of the clutch system lies precisely in this parameter.
If pumping the clutch system helped restore its operation only temporarily, then pay attention to the tightness of the system. It is very likely that the hoses or threaded connections are depressurized and liquid is leaking through them and air is being drawn in. Very often, clutch problems are associated with wear of the seals and rubber seals in the clutch slave and master cylinders.
Subscribe to our feeds on social networks such as Facebook, Vkontakte, Instagram, Twitter and Telegram: all the most interesting automotive events collected in one place.
auto.today
Tuned sports clutch
In motor sports, which is a kind of testing ground for the development and implementation of innovations in vehicle components and mechanisms, an increased load is applied to the special clutch. After all, this unit is operated when rotating at an angular speed of 6-10 thousand rpm and at the maximum power values of the power unit. The standard clutch cannot withstand such force, so install a basket with an increased value of the clamping force from 30 to 100 percent.
At the same time, the impact on the drive pedal increases, which creates some problems in the speed of gearbox shifting. Therefore, components such as Kevlar alloy, ceramics or polymer carbon are used as friction linings for the drive type disc. Each type of such friction compounds has its own advantages and disadvantages.
Ceramics does not heat up and withstands large impacts, but it requires the creation of high clamping force and has a reduced friction force. Carbon has high resistance to the mating surface, low material density and high heat resistance. Kevlar alloy has increased wear resistance, heat resistance and at the same time has a reduced friction index. The disadvantage is that it takes a long time to cool down after heating. For a driven type disk, it is advisable to use a springless damper that can withstand increased loads.
The main function of the clutch hydraulic drive is to provide short-term separation of the flywheel and transmission when changing gears. If the VAZ 2107 clutch pedal is pressed very easily or immediately falls through, you should think about bleeding the hydraulic cylinder of the release bearing drive. To accurately identify the problem, it is necessary to check the level of working fluid in the master cylinder reservoir. You can repair the clutch without contacting a car service specialist.
The principle of operation of the VAZ 2107 clutch drive
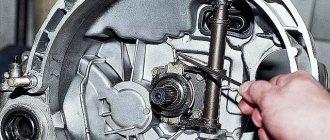
The clutch is engaged and disengaged using the release bearing. Moving forward, it presses on the spring heel of the basket, which, in turn, retracts the pressure disk and thereby releases the driven disk. The release bearing is moved by the clutch on/off fork. This fork can be pivoted in different ways:
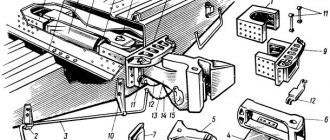
The operating principle of the VAZ 2107 clutch hydraulic drive is quite simple. When the engine is running and the clutch pedal is in the up position (depressed), the clutch and flywheel rotate as a unit. Pedal 11, when pressed, moves the rod with the piston of the master cylinder 7 and creates brake fluid pressure in the system, which is transmitted through tube 12 and hose 16 to the piston in the working cylinder 17. The piston, in turn, presses on the rod connected to the end of the clutch engagement fork 14 Rotating on the hinge, the other end of the fork moves the release bearing 4, which presses on the spring heel of the basket 3. As a result, the pressure disk moves away from the driven disk 2, the latter is released and loses traction with the flywheel 1. As a result, the driven disk and the gearbox input shaft stop. This disconnects the rotating crankshaft from the gearbox and creates conditions for changing gears.
Find out how to diagnose your clutch yourself:
Design of the main elements of the hydraulic drive
The clutch on the VAZ 2107 is controlled using a hydraulic drive, the pressure in which is created using an outboard pedal mechanism. The main elements of the hydraulic drive are:
- clutch master cylinder (MCC);
- pipeline;
- hose;
- clutch slave cylinder (CLC).
The performance of the drive depends on the volume and technical characteristics of the operating fluid, which for the VAZ 2107 is usually DOT-3 or DOT-4 brake fluid. DOT is a designation for a system of requirements for the physical and chemical properties of diesel fuel, developed by the US Department of Transportation Institute (DOT - Department of Transportation). Compliance with these requirements is a prerequisite for the production and certification of the liquid. The composition of TJ includes glycol, polyesters and additives. DOT-3 or DOT-4 fluids have a low price and are recommended for use in drum-type brake systems and hydraulic clutch drives.
Design and purpose of the clutch master cylinder
The GCS is designed to create working fluid pressure by moving a piston connected to the clutch pedal. It is installed in the engine compartment just below the pedal mechanism, mounted on two studs and connected to the working fluid reservoir with a flexible hose. The cylinder is arranged as follows. Its body has a cavity in which a return spring, a working piston equipped with two O-rings, and a floating piston are located. The internal diameter of the GCS is 19.5+0.015–0.025 mm. No rust, scratches or chips are allowed on the mirror surface of the cylinder and the outer surfaces of the pistons.
Replacing the master cylinder
Replacing the GCS is quite simple. To do this you will need:
- set of wrenches and sockets;
- round nose pliers for removing the retaining ring;
- long thin slotted screwdriver;
- disposable syringe 10–22 ml;
- a small container for draining the working fluid.
The work is performed in the following order:
Dismantling and assembling the master cylinder
After carefully removing the GCS from its seat, you can begin to disassemble it. This is best done on a table or workbench with good lighting in the following order:
Assembly and installation of an assembled or new GCS is carried out in the reverse order.
Video: replacing the clutch master cylinder VAZ 2101–07
Design and purpose of the clutch slave cylinder
The RCS ensures the movement of the pusher due to the pressure of the fuel fluid created by the main cylinder. The cylinder is located in a hard-to-reach place on the bottom of the gearbox and is secured to the clutch housing with two bolts. The easiest way to get to it is from below.
Its design is slightly simpler than the GCS design. The RCS is a housing, inside of which there is a piston with two rubber sealing rings, a return spring and a pusher. Its operating conditions are noticeably worse than those of the master cylinder. Dirt, impacts from rocks or road obstacles can cause the rubber protective cap to rupture and various contaminants to enter the housing. As a result, the wear of the sealing rings will accelerate, scratches will appear on the cylinder bore and scuff marks on the piston. However, the designers have provided for the possibility of repairing the main and working cylinders using repair kits.
Replacing the working cylinder
It is more convenient to carry out it on a viewing hole, overpass or lift. To do this you will need:
- set of wrenches;
- screwdriver;
- pliers;
- brake fluid DOT-3;
- preservation liquid;
- container for collecting operating fluid.
When dismantling the working cylinder, the following steps must be performed:
Care must be taken when disconnecting the hose fitting from the slave cylinder to avoid damaging or losing the O-ring.
Dismantling and assembling the working cylinder
Disassembly of the RCS is carried out in a certain sequence. To do this you need:
Installing the RCS into its seat is carried out in the reverse order.
Video: replacing the clutch slave cylinder VAZ 2101–2107
Malfunctions of the VAZ 2107 clutch hydraulic drive
Incorrect operation of the hydraulic drive leads to disruption of the functioning of the entire clutch mechanism.
The clutch does not disengage completely (the clutch “drives”)
If it is difficult to engage the first speed, and the reverse gear does not engage or is also difficult to engage, it is necessary to adjust the working stroke of the pedal and the stroke of the control rod. Since the gaps are increased, they need to be reduced.
The clutch does not engage fully (the clutch “slips”)
If, when you sharply press the gas pedal, the car accelerates with difficulty, loses power on inclines, fuel consumption increases, and the engine overheats, you need to check and adjust the pedal stroke and the distance of movement of the working cylinder rod. In this case there are no gaps, so they need to be increased.
The clutch operates jerkily
If the car jerks when starting from a stop, the cause of this may be a malfunction of the return spring of the main circulation center or the control center. Saturation of the working fluid with air bubbles can lead to the same consequences. It is necessary to find the causes of unstable operation of the clutch control hydraulics and eliminate them.
The pedal falls and does not return
The cause of pedal failure is usually an insufficient volume of operating fluid in the reservoir due to its leakage in the working (usually) or master cylinder. The main reason for this is damage to the protective cap and penetration of moisture and dirt into the cylinder. The rubber seals wear out and gaps form between them and the cylinder walls. Through these cracks, liquid begins to flow out. The rubber elements should be replaced, fluid should be added to the tank to the required level and air should be removed from the system by bleeding.
Do not add used brake fluid to the hydraulic clutch control system, as it contains tiny air bubbles.
Adjusting the travel of the pedal and pusher of the working cylinder
The free play of the pedal is regulated by a limiting screw and should be 0.4–2.0 mm (the distance from the top position to the pusher stopping in the master cylinder piston). To set the required clearance, use a wrench to loosen the lock nut of the screw, and then rotate the screw itself. The pedal stroke should be 25–35 mm. It can be adjusted using the working cylinder pusher.
The length of the working cylinder pusher directly affects the gap between the end of the release bearing and the fifth basket, which should be 4–5 mm. To determine the size of the gap, you need to remove the return spring from the release bearing fork and move the fork itself by hand. The fork should move within 4–5 mm. To adjust the gap, use a 17 wrench to loosen the lock nut while holding the adjusting nut with a 13 wrench. During the adjustment, the pusher must be fixed. To do this, it has an 8 mm wrench flat, which is convenient to grab onto with pliers. After setting the required gap, the locknut is tightened.
Adjusting the length of the working cylinder rod allows you to change the gap between the release bearing and the fifth basket, as well as the magnitude of the clutch pedal stroke
Tips on how to best bleed clutches
The clutch can be pumped both in the absence of compressed air in the system and in its presence.
- Add working fluid to the main cylinder reservoir approximately 15-20 mm from the top edge. You need to fill it through a filter so that there are no various contaminants in the system.
- We remove the rubber cap from the bypass valve at the top of the pneumatic hydraulic booster housing, and then attach a hose to it. The second end of the hose must be lowered into a 0.5-liter tank, one-third filled with liquid.
- We unscrew the bypass valve one turn, after which the assistant must fully depress the clutch pedal and hold it in this position until liquid comes out of the hose without air bubbles.
- The liquid level in the container should not fall below 35 mm from the edge. If necessary, you need to add the required amount of liquid.
- After the bubbles have stopped coming out, carefully tighten the bypass valve.
- Practice shows that you can bleed the clutch faster if you tighten the bypass valve every time an assistant presses the pedal. After this, you need to release the pedal and perform all the steps again. In most situations, a few clicks are enough.
- The hose must be disconnected from the fitting and the cap must be put on, then add liquid so that its level is about 15-20 mm from the edge.
You need to know not only how to properly bleed the clutch, but also understand how to check its operation. To do this, you need to fully depress the clutch pedal and determine the stroke of the piston pusher. If the clutch was pumped correctly, the stroke will be 2.7-2.8 cm. Otherwise, the clutch will have to be adjusted.
I would like to emphasize that you need to pump the clutch only using the fluid recommended by the manufacturer. Otherwise, the rubber elements of the system may fail, which can lead to unpleasant consequences.
Now you can bleed the clutch yourself.
Working fluid for hydraulic clutch of VAZ 2107
The clutch hydraulic drive uses a special fluid, which is also used in the brake system of classic VAZ models. In both cases, it is necessary to create a working environment that can withstand high pressure and does not destroy rubber products. For VAZ, it is recommended to use such compositions as ROSA DOT-3 and ROSA DOT-4 as such a liquid.
The most important characteristic of fuel fluid is its boiling point. In ROSA it reaches 260 o C. This characteristic directly affects the service life of the liquid and determines its hygroscopicity (ability to absorb water). The accumulation of water in the liquid liquid gradually leads to a decrease in the boiling point and the liquid loses its original properties.
For the hydraulic clutch of the VAZ 2107, 0.18 liters of fuel fluid is required. It is poured into a special reservoir for working fluid, which is located in the engine compartment near the left wing. There are two tanks there: the far one is for the brake system, the near one is for the hydraulic clutch.
The service life of the working fluid in the VAZ 2107 clutch hydraulic drive, regulated by the manufacturer, is five years. That is, every five years the fluid must be changed to a new one. This is not difficult to do. You need to drive the car onto a viewing hole or overpass and perform the following steps:
- unscrew the lid of the working fluid reservoir;
- clean the working cylinder from dirt;
- unscrew the fitting with the hose and insert the end of the hose into a previously prepared container;
- by pressing the clutch pedal, ensure that the fluid is completely drained from the system;
- screw the fitting into place;
- add fresh brake fluid;
- bleed the clutch hydraulic drive according to the algorithm described below.
How to bleed a hydraulic clutch on cars
In older cars, the clutch is engaged and disengaged using a cable. Over time, the clutch will wear out and will require adjustment to function properly. In newer vehicles such as vehicles, a hydraulic system was used to engage and disengage the clutch. This eliminated the need for vehicles requiring time-consuming adjustments, as the hydraulic system made the adjustments automatically. However, air can get into the hydraulic system and cause the clutch to feel soft or spongy. To correct this problem, the hydraulic system must be bled.
Under the hood:
- How to Bleed a Hydraulic Clutch on a Corvette
- How to bleed a hydraulic clutch on a Toyota pickup
- How to bleed a hydraulic clutch on a Wrangler Jeep
- How to bleed a hydraulic clutch in an S10
How to Bleed a Hydraulic Clutch on a Corvette
Place wheel chocks at the front and rear to prevent the Corvette from moving. Set the parking brake to prevent the rear wheels from moving.
Raise the Corvette with a floor jack and use jack stands to secure the vehicle before working underneath the vehicle.
Open the hood and locate the clutch master cylinder located on the firewall. Remove the master cylinder cap and fill to the maximum line with new brake fluid.
Attach one end of the clear tube to the bleed screw on the slave cylinder. Insert the loose end of the clear tube into the empty bottle.
Have an assistant sit in the vehicle and press the clutch pedal to the floor. Using a metric wrench, loosen the bleeder screw on the slave cylinder. Tighten the bleeder screw once the clutch fluid stops leaking from the slave cylinder.
Repeat step 5 until air bubbles are no longer visible in the clear tube as liquid flows through the tube.
Tighten the bleeder screw on the slave cylinder and remove the tube from the bleeder screw.
Fill the clutch master cylinder to the maximum level with new brake fluid. Install and tighten the cap on the master cylinder reservoir. Close the hood and have your assistant exit the Corvette.
Lower the vehicle from its jack stands using a house jack. Remove the wheel chocks and release the emergency brake.
Items you will need
- Wheel chocks
- Paul Jack
- Jack is standing
- Clear plastic tube
- Empty bottle
- Wrench
- Brake fluid
How to bleed a hydraulic clutch on a Toyota pickup
Open the hood of the Toyota. Remove the clutch master cylinder cap, which is the component on the far side of the driver's side, near the brake master cylinder. Fill the clutch master cylinder with DOT3 brake fluid. Add about three inches of DOT3 brake fluid to an empty container.
Raise the front of the vehicle using a jack and place the jack stands under the Toyota frame rails. Lower the vehicle until all of its weight is on the jack stands.
Crawl under the truck until you reach the area where the engine and transmission bolt are connected to each other. Find the clutch fork. This is a metal strip that protrudes from the driver's side of the transmission bell housing. Follow the lever until you reach the hydraulic cylinder it is attached to, which is known as the clutch slave cylinder or clutch release cylinder.
Slide one end of the 1/4-inch rubber hose onto the end of the slave cylinder exhaust valve, which is the small gold-colored valve on the side of the slave cylinder. Submerge the other end of the hose into the brake fluid in the container, ensuring that the end of the hose remains submerged throughout the bleeding process.
Have a helper press and release the clutch pedal several times, then hold the pedal to the floor. Loosen the bleeder valve with a straight line wrench and watch as air bubbles come out of the hose into the brake fluid.
Tighten the release valve and have your assistant release the clutch pedal.
Repeat steps 5 to 6 until air comes out of the rubber hose.
Remove the rubber hose from the release valve. Raise the truck off the jack using a jack and slowly lower the Toyota to the ground.
Check the fluid level in the clutch master cylinder. It should be between the "Min" and "Max" lines on the cylinder. Adjust the fluid level by adding fluid to the desired level. Close the hood of the Toyota.
Items you will need
- 1Q DOT 3 Brake Fluid
- Empty empty container
- Paul Jack
- Jack is standing
- 2 feet 1/4 inch rubber hose
- Assistant
- Set of wrenches
How to bleed a hydraulic clutch on a Wrangler Jeep
Fill the master cylinder with new brake fluid. Fill a small clear plastic container with about two inches of brake fluid and set aside.
Raise the front of the Jeep on jacks high enough to gain access to the bleeder screw. The screw is located on the passenger side of the vehicle's transmission on four-cylinder Jeep Wrangler models. The screw is located on the left side of the transmission housing, directly above the hydraulic clutch line fitting on six-cylinder Jeep Wrangler models.
Remove the dust cap covering the drain screw by unscrewing it with a wrench. Place a piece of plastic hose over the screw. Place the other end into a container of brake fluid until the hose is completely submerged in the fluid at the bottom.
Have an assistant press and hold the clutch pedal. Open the bleeder screw on the transmission and allow fluid to flow through the hose.
Once the flow of bubbles and old fluid from the master cylinder stops, close the bleeder screw. Once the screw is closed, have an assistant release the clutch pedal.
Repeat steps 4 and 5 until all air has been removed from the system, indicated by a continuous flow of fluid from the bleed screw, and there are no air bubbles in the hose or container. Lower the car and add fluid level.
Items you will need
- Brake fluid
- Plastic hose
- Empty container
- Wrench
- Jack is standing
How to bleed a hydraulic clutch in an S10
Fill the clutch master cylinder with fresh DOT 3 brake fluid, using a suction tool such as a turkey baster (that has never been used) to apply the fluid.
Raise the front of the truck and secure it to jack stands.
Remove the dust cap covering the exhaust cylinder outlet valve. Attach one end of a small plastic hose to the valve and insert the other end of the hose into a small clear bottle containing about two inches of brake fluid.
Open the release valve on the cylinder while another person presses the clutch pedal inside the truck. Look for air and liquid to come out of the hose and into the bottle.
Close the valve as soon as the second person presses the pedal all the way, then have that person release the pedal.
Repeat each of the previous two steps until fluid comes out cleanly from the release valve without air, then close the valve and put the dust cap back on it.
Lower the truck from the jack stands.
Items you will need
- Brake fluid
- Paul Jack
- Jack is standing
- Plastic hose
- small bottle
Related articles:
- How to pump up Saturn's ionic clutch
- How to bleed a new Isuzu clutch master cylinder
- How to Bleed the Clutch on a Chevy Truck
- How to Adjust a Jeep Wrangler Clutch
- How to Bleed the Clutch on a 1995 F-150
- How to bleed a clutch on a 91 Nissan 300ZX
Bleeding the hydraulic clutch clutch VAZ 2107
The main purpose of bleeding the clutch hydraulic drive is to remove air from the fluid fluid through a special fitting located on the working hydraulic cylinder of the release bearing drive. Air can enter the clutch hydraulic system in different ways:
- through the cracks at the hose connection points;
- through loose threaded connections;
- when replacing the working fluid;
- when repairing or replacing the main circulation system or distribution center.
It should be understood that clutch control using hydraulics is a device that is frequently used during vehicle operation. The presence of air bubbles in the release bearing movement drive system will make it difficult for the lever to engage the lower gear speeds when starting off. It’s easier to say: the box will “growl.” Driving will become almost impossible.
Tools and materials
To remove air from the clutch hydraulic drive you will need:
Bleeding the clutch hydraulic drive can only begin after all identified defects have been eliminated in the master and slave cylinders, the tube and hoses for the supply of operating fluid. The work is performed on a viewing hole, overpass or lift, and an assistant will be required.
Procedure for bleeding the hydraulic clutch
Pumping is quite simple. The actions are performed in the following order:
- We unscrew the cap on the tank with the operating fluid of the GCS.
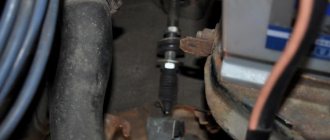
- Using a screwdriver, remove the protective cap on the drain fitting of the working cylinder and put a transparent tube on it, the other end of which is inserted into the container.
- The assistant vigorously presses the clutch pedal several times (from 2 to 5) and holds it pressed.
- Using a 8 key, turn the air bleeder fitting half a turn counterclockwise and watch for bubbles to appear.
- The assistant presses the pedal again and holds it down.
- We continue pumping until air is completely removed from the system, that is, until gas bubbles stop coming out of the liquid.
- Remove the hose and tighten the fitting until it stops.
- We check the fluid level in the tank and, if necessary, fill it to the mark.
Video: bleeding the clutch VAZ 2101–07
Since bleeding the clutch drive hydraulics is the final action, carried out after eliminating all faults in the clutch control system, it must be performed carefully, carefully, and consistently. The working stroke of the clutch pedal should be free, not very difficult, with a mandatory return to its original position. The left foot is often used when driving a car, so it is important to correctly adjust the free and working travel of the outboard clutch pedal.
Bleeding the hydraulic clutch drive of classic VAZ models does not require any special knowledge or skills. However, this simple operation is very important for maintaining vehicle controllability. Bleeding the clutch hydraulic drive yourself is quite simple. This will require a standard set of tools, an assistant and careful adherence to the instructions of specialists.
The car's clutch helps to move smoothly from a standstill, and is also responsible for changing gears, increasing the resource and extending the life of the transmission. Problems can arise when air gets into the system and there is a need for bleeding. Bleeding the clutch, like bleeding the brake system, is not done often. The algorithm itself is not complicated, so having figured out how to bleed the clutch, any motorist can do it with his own hands, without going to a service center.
In scientific terms, clutch bleeding is the operation of removing air from the hydraulic system of the mechanism that controls the vehicle’s clutch system. Air can enter the system if the piping is faulty or if the threaded connections are loose. If air gets in, various malfunctions may occur, which will lead to incorrect operation of the entire system.
The sequence of actions consists of the following steps:
- preparing the system for operation;
- connecting a rubber hose to the fitting;
- the pedal is pressed down, and then the liquid is drained until all the air comes out.
If you change the brake fluid yourself, you must follow the following rules:
- the liquid should not get on the skin;
- it is important that no dust or dirt gets into the new liquid;
- You can only add the same composition, otherwise you need to change it completely;
- It is better not to use waste liquid.
The clutch bleeding procedure itself is simple. Next, I will tell you what tools are needed for this procedure and how to properly bleed the clutch.
Features of bleeding the clutch
First of all, you need to understand in what cases the car’s clutch is pumped. In specialized literature, this procedure is called: removing air from the hydraulic system of the automobile clutch control mechanism.
Our article on how to bleed the clutch yourself will be useful in cases where air enters the hydraulic system. In most cases, this is caused by the breakdown of pipelines or insufficient tightening of the connections of the clutch elements.
In order to bleed the clutch, you need to prepare the following:
- a set of necessary tools;
- reservoir for draining liquid;
- brake fluid;
- hose of appropriate diameter;
- “gas” stop or other device for fixing the clutch pedal (you can also use the help of another person).
Before you start bleeding the clutch, you need to configure it. You need to understand that you will not be able to bleed the clutch if the master cylinder piston pusher does not have free play. The pusher and piston are a kind of shut-off valve that will not open if there is no free play.
This also applies to the failure of the release spring and the clutch pedal sticking during the transition to the upper extreme position.
If you are wondering which clutch is better to choose, read here.
Bleeding instructions
Before the procedure, open the instruction manual and take a good look at the device; the book should tell you about its repair and pumping. Using the diagram indicated in the manual it will be easier to find the necessary fittings.
There are two ways to bleed the clutch; they have some differences. If there are any problems with the pedal, for example, it began to freeze in the uppermost position, or some kind of rigidity appeared, the system is not working well, first of all you need to make an adjustment. Since bleeding cannot be performed if there is no free play of the master cylinder piston pusher. The piston and pusher act as a shut-off valve. If there is no free play, the shut-off valve will be closed. If the pushrod does not move freely, air will not escape from the system and it will not function properly. A similar situation arises if the tension spring is faulty and, accordingly, in this case the pedal sticks when it moves to its upper position.
The first scheme is the simplest and is used for most domestically produced machines. First, check the fluid level in the storage tank and top it up if necessary. There should be 1.-2 cm from the top edge. The tank must be filled using a filter to prevent the ingress of dirt or any impurities. Then the cap is unscrewed from the working cylinder fitting and one end of the hose is put on. The second end of the hose is lowered into a container, which should be one third filled with liquid to prevent air from entering. Next, the clutch pedal is pumped several times at intervals of several seconds, and then it is pressed to the end and kept pressed. The pressed pedal displaces the liquid along with the air through the hose. When it flows out, the cap is wiped dry and screwed back onto the fitting until it stops. The pedal is released.
This procedure must be repeated 6 to 8 times. During the procedure, you must constantly monitor the fluid level in the hydraulic drive and constantly top it up. It should not fall below 3.5 cm from the edge. The level must be above the connection between the hose and the fitting. Bleeding will be more efficient if you constantly close the bypass valve. After bleeding the clutch, check the brake fluid level. To do this, you first need to depress the pedal. If the level is below the permissible level, then the required amount is added.
The second method is more complex and is used more for foreign-made cars:
- You need to lift the car with a jack in order to easily remove the protection from the engine;
- it is necessary to remove one front wheel, since the clutch is pumped through the brake system;
- the caps are removed from the fittings of the central cylinder and the front brake, their surface is thoroughly cleaned;
- first, put a rubber hose on the front brake fitting and bleed the system so that no air gets in;
- after filling the hose with liquid, the end of the hose is put on the main cylinder fitting, both fittings are opened;
- the brake pedal is pressed all the way;
- tighten the fitting on the front brake and release the pedal;
- then unscrew the fitting again and press the pedal;
- the procedure is repeated several times until air bubbles stop appearing in the storage tank.
Air in the clutch: how to bleed it
To begin with, bleeding the clutch is similar to bleeding the brakes when air gets into the hydraulic system as a result of a malfunction or as part of a scheduled brake fluid change. By the way, a note for beginners - the clutch hydraulic drive also uses brake fluid.
To bleed the clutch with an assistant, you will need to prepare:
- brake fluid
- set of tools;
- brake fluid drain container
- a hose that fits the drain fitting in diameter;
Please note that if the clutch is pumped independently (without outside help), a stop is also needed to additionally secure the clutch pedal. It is also advisable to use a hose that is transparent. This will allow you to more effectively control the air exiting the system. Also remember that brake fluid is toxic. Avoid contact with skin, eyes, etc. It is best to use safety glasses and gloves.
So, before bleeding, you must first adjust the clutch. If the clutch is not pre-adjusted, it will not be possible to bleed it, since there may be no free play of the master cylinder piston pusher. To be clear, the piston and pusher are in fact a shut-off valve.
If there is no free play, the valve will be closed. A similar situation occurs when the tension spring is faulty. This leads to the clutch pedal sticking when moving to its final upper position.
Having completed all the recommendations and adjustments, you can proceed to pumping:
Currently reading:
Replacing tie rods and ends: what you need to know
Jun 21, 2020
What oil to fill in Kia Rio: what you need to know
Jun 21, 2020
- At the initial stage, you should pour brake fluid into the master cylinder reservoir (maintain the level at least 2 centimeters from the top edge). It is better to pour liquid into the tank through a mesh filter to avoid debris, foreign particles, etc. from entering the system.
- The next step is to remove the rubber cap located in the upper part of the CCGT housing from the bypass valve. Next, a rubber hose is put on the valve.
- The free end of the hose is lowered into a container (a container with a volume of 0.5 liters is sufficient), into which 200-250 ml of brake fluid should first be poured.
- Now you need to unscrew the bypass valve 1 turn, after which you will need to press the clutch pedal all the way (an assistant presses the pedal or places a stop). Next, wait until air bubbles stop coming out of the hose into the container.
- At the same time, you should ensure that the level of brake fluid in the reservoir does not fall below 3 centimeters. If there is a noticeable drop, the fluid should be added.
- After air bubbles have stopped escaping into the container, you need to tighten the bypass valve with the recommended force. If bleeding is carried out without an assistant, the stop from the clutch pedal can be removed.
- The final step is to remove the hose from the fitting, after which the cap is put back on. You should also check the fluid level in the tank by adding fluid and bringing its level to a mark no more than 2 cm from the top edge.
Let us add that it is often impossible to pump the clutch efficiently in one approach. As practice shows, it is optimal to repeat the procedure several times (2-3). After each press on the clutch pedal, the bypass valve must be closed, then release the pedal and repeat the above steps. This approach allows you to quickly and effectively remove air from the system.
At the end, all that remains is to check the performance of the clutch after bleeding. To do this, press the clutch pedal all the way, after which the stroke of the piston pusher is checked (in accordance with the standard for a particular car). If deviations are noticeable, additional clutch adjustment is required.
Video “Features of bleeding a car clutch”
The recording shows how to bleed a car's clutch.
Due to the fact that the VAZ 2106 is equipped with a clutch, which has hydraulics in its design, from time to time it is necessary to carry out not only routine maintenance and repairs, but also bleeding of the clutch hydraulic drive. This is due to the fact that air may enter the system during operation. The air, of course, depressurizes the entire system, which leads to adverse consequences, be it an accident or even an accident.
Among other things, air can enter the system during repair work, after replacing brake fluid, etc. That is why it is imperative to take measures to eliminate defects. After all, defects in this system that are not eliminated can contribute to the breakdown of interfaces, components and parts of the transmission.
How to properly bleed the clutch on a VAZ 2106
To begin, fill the brake fluid into the clutch reservoir to the bottom of the filler neck. Loosen the fitting on the working cylinder body a little, put one end of the rubber tube on it, and lower the other into a transparent container with brake fluid.
Now you will need the participation of your assistant. Ask him to press the clutch pedal until it becomes elastic. Then you need to hold the pedal in this position. Meanwhile, you gradually loosen the fitting. Liquid and air will begin to flow out through the hose.
The presence of bubbles in the liquid means there is air in the system.
As fluid and air escape, the pedal will sink. When the pedal goes down completely, tighten the fitting and tell your compassionate assistant to bleed the clutch pedal again. Then repeat the entire procedure until clean liquid without air bubbles comes out of the system.
Video of the clutch bleeding process on a VAZ:
As the system is pumped, the fluid level will drop. It is necessary to constantly add brake fluid.
Do not allow the fluid level in the clutch reservoir to drop below 10 mm from the bottom of the reservoir.
Add fluid in a timely manner, otherwise when the bottom of the reservoir is drained, air will enter the system and bleeding of the clutch will have to be repeated.
You can bleed the clutch on a VAZ 2106 yourself, but it’s better to take an assistant
After bleeding the clutch, you need to check the brake fluid level. Fill with liquid up to the bottom edge of the filler neck. Screw on the tank cap. Disconnect the rubber tube. Then you need to tighten the fitting on the working cylinder body.
If during the operation of the car you observe the following symptoms: when the pedal is pressed all the way, the clutch does not disengage completely and is accompanied by the grinding of gears when engaging reverse gear, most likely there is air in the hydraulic drive. At the first signs of depressurization of the system, this operation must be carried out.
Due to the fact that the VAZ 2106 is equipped with a clutch, which has hydraulics in its design, from time to time it is necessary to carry out not only routine maintenance and repairs, but also bleeding of the clutch hydraulic drive. This is due to the fact that air may enter the system during operation. The air, of course, depressurizes the entire system, which leads to adverse consequences, be it an accident or even an accident.
Tooling of the workplace
Don’t know how to properly bleed the clutch on a VAZ 2106 with your own hands? Fortunately, there is a way out! To do this, you just need to use a practical guide, taking into account some recommendations. Naturally, to perform this operation you will need to have the necessary set of plumbing tools, hollow clean containers, an auxiliary hose, and rags.
If it is necessary to bleed the clutch hydraulic drive after replacing the used brake fluid with a new one, then, alas, it is impossible to do without cleaning the main fluid drain fitting. Therefore, you will definitely need a special brush with a steel working surface in the form of wire.
Algorithm for carrying out the clutch bleeding operation on a VAZ 2106
The first thing you need to do is put a rubber hose of the appropriate diameter onto the fitting inlet. Before performing this operation, it is recommended to clean the inlet from dust and dirt deposits. The second end of the hose is directed into the tank to receive brake fluid (used). It should be remembered that the connecting hose must be placed on the fitting with some tension.
Unfortunately, it is impossible to do without outside help when bleeding the hydraulic clutch. Why is it this way? The answer lies on the surface! Help will be required during subsequent operations directly inside the vehicle. Your partner will have to depress the clutch pedal about five times. In this case, the interval between pumping should not be less than 3...5 seconds. If the pedal does not return to its original position, it should be returned to this position independently.
After the clutch pedal is recessed once again, the one who works with the hydraulic drive must unscrew the drain fitting using an open-end wrench. However, remember that the fitting should not be completely unscrewed. This operation is necessary to ensure that the air leaves the system (when unscrewing the fitting, the user will hear the movement of air masses coming out of the hose). Immediately after the leak stops and the air leaves the hydraulic system, the assistant will need to give the command to release the pedal so that it returns to its original position. At that time, the person working with the hydraulic system must tighten the fitting. Professionals working in service centers note that the clutch pedal should acquire elasticity with each operation of unscrewing and tightening the fitting. As soon as the force becomes required, you can stop performing the operation.
As a rule, the brake fluid level, when performing the above steps, does not decrease too much in the standard clutch reservoir. However, despite this, careful monitoring of the brake fluid level should be carried out. A reduction of up to 10 mm from the bottom edge of the drive capacity should not be allowed.
The next step will be to increase the tightening torque of the fitting device to the maximum and dismantle the auxiliary rubber hose. Many car enthusiasts who bleed the VAZ 2106 clutch for the first time do not take into account the fact that liquid remains inside the auxiliary hose after its removal. That is why it is best to drain this liquid back into the tank.
Several ways to bleed the clutch. Video:
So, after completing all the previous operations, you will need to top up the brake fluid into the standard tank by tightening the cap with a little force. Then we use the rags we prepared earlier and remove all the smudges. Many experienced people advise performing a visual inspection of the entire system before turning on the engine. If no problems are found, then you can start checking the system directly with the engine running (with mandatory gear shifting).
The last step will be to check the quality of the work. The test will consist of measuring the stroke of the piston pusher when pressing the clutch. When bleeding the clutch correctly, the stroke should be about 26...28 mm. What to do if the actual parameters do not meet the requirements? You should not make unreasonable decisions. It is enough just to carry out an additional adjustment operation.
Remember that clutch bleeding must be timely and of high quality, since the safety of absolutely all road users will depend on this!
Repairing hydraulic clutch components or adding brake fluid can lead to air entering the hydraulic drive, which must be eliminated. To do this, you need to bleed the clutch. Is it possible to do this on a VAZ 2106 with your own hands?
The presence of air is determined by certain signs: incomplete release of the clutch when the pedal is pressed all the way and the grinding of gears when reverse gear is engaged.
Bleeding the clutch yourself
To begin with, let’s give a precise definition of the concept of “bleeding the clutch.”
Bleeding the clutch is the procedure for removing air from the hydraulic system of your vehicle's clutch control mechanism. This procedure is necessary if air has entered the vehicle's hydraulic system.
Air in the hydraulics can occur for two reasons: either you have a broken (faulty) pipeline, or the threads in the clutch system connection are loose.
How does the clutch bleeding process work? Here is an algorithm that will give you a more or less clear idea of this process.
The master cylinder has a reservoir that contains fluid. Open the cap and add enough liquid to the tank so that no more than 2 centimeters remain to the top edge of the tank level. Important: when you add liquid, be sure to use a mesh filter! This is necessary to prevent dirt from getting into the tank.
In the upper part of the PGU (PGU - pneumatic-hydraulic booster) there is a bypass valve with a rubber cap. Take a piece of hose. Place one side of this hose onto the fitting (which was exposed after removing the cap), and lower the other end of the hose into a container with a volume of 0.5 liters. Important: the container must be filled 1/3 with brake fluid.
Next, slightly unscrew (one turn) the bypass valve and only then press the clutch pedal. Press the pedal smoothly, all the way, and look carefully at the bottle of brake fluid.
The clutch must be pumped until no more air bubbles are released into the fluid bottle! It is also recommended to look into the reservoir after pressing the clutch pedal several times: the fluid level in the reservoir should not be lower than 3-3.5 cm from the top edge. Therefore, if the level in the tank has dropped, simply add the required amount of liquid.
As soon as the bubbles have stopped coming out, get out of the car and close the bypass valve. (When performing this procedure, it is recommended to have an assistant, since the clutch pedal must be recessed when screwing in the bypass valve. But you can do without a partner: just support the pedal with some lever while you screw in the valve).
Now remove the hose from the fitting and plug it - the fitting - with a rubber cap. We look into the reservoir and check the fluid level. If necessary, add.
All that remains is to check how well the pumping procedure was carried out. Press the clutch pedal to the floor and pay attention to the stroke of the piston pusher: it should be 28 mm. If something happens, the clutch needs to be adjusted. We hope that bleeding the clutch is no longer a problem for you.
Kolodiychuk Andrey
, especially for ByCars.ru
bycars.ru
Preparation for bleeding the clutch system of a VAZ 2106
Bleeding the clutch is not particularly difficult, so you can do it yourself. To do this, you need to prepare the necessary items in advance, and also enlist the help of a friend or relative to provide assistance: this way you will be able to follow the work procedure and complete the task faster.
Clutch bleeding is carried out on an overpass or in a pit. Before the procedure, prepare:
- new brake fluid (TF)
- rubber tube
- a transparent container that must first be filled with brake fluid
- 8 mm wrench.
Stages of the VAZ 2106 clutch bleeding process
- Fill the fuel fluid into the expansion tank so that it reaches the bottom cut of the fill neck.
- On the working cylinder body, slightly loosen the fitting and put one end of a rubber tube on it, and lower its other end into a transparent container with fuel fluid.
- At the third stage, it is necessary to involve an assistant in the work. His task will be to press the pedal until it is elastic and hold it in this position.
- While the pedal is held, it is necessary to gradually loosen the fitting. Liquid with air will begin to flow through the hose, which confirms its content in the system. The release of fluid will help weaken the pedal until it completely sinks. After this, you need to tighten the fitting until it stops and repeat the process until the liquid comes out without air.
- During manipulations, a drop in the level of liquid will be observed, which must be constantly refilled. The liquid level must not be allowed to reach below the mark, which is 10 mm above the bottom of the tank.
- When the clutch bleeding is completed, it is necessary to check the fluid level. It should reach the bottom edge of the filler neck.
- Screw on the tank cap and disconnect the rubber tube.
- We tighten the fitting on the working cylinder.