Xenon lamps for car headlights work on a different principle than conventional halogen lamps. They do not have a filament. The glow occurs not as a result of its heating, but due to the burning of an electric arc. For it to occur, it is necessary to change the voltage characteristics of the car's on-board network, so the xenon connection diagram involves making some changes to the standard wiring of the car.
The inert gas, which fills the lamp bulb under high pressure (about 25 ATM), prevents the burnout of its electrodes. Thanks to this, the service life of the lighting device increases to 3000 hours (versus 600 hours for a halogen lamp). The electric arc also provides a higher intensity of luminous flux than the glow of a heated coil. Due to these two advantages, some car enthusiasts are interested in replacing conventional halogen lamps with xenon lamps.
How to choose xenon lamps
Lamps are selected according to several component criteria.
According to base compatibility
HID lamps are manufactured according to standards. To replace halogen lights H7, H11 or any others, you must purchase products with the same markings.
Lamp standards
In halogen lamps with sockets H4, HB5, H13, different filaments are used for high and low beam. Similar gas-discharge ones are called bi-xenon. In them, the change of operating modes occurs due to changes in the positions of the bulb or reflective curtain using electromagnets.
By glow temperature and power consumption
Xenon lamps indicate the so-called color or spectrophotometric temperature (in degrees Kelvin). By its value, you can determine in advance how comfortable driving will be in the dark. In natural daylight, the color temperature is from 6000K.
You can get an idea of what the light from headlights with lamps of different color temperatures will look like from the following image.
Types of lamp lighting
When choosing xenon for fog lights, it is better to give preference to lamps with a temperature of 4000 - 4300K. The closer the emission spectrum is to yellow, the less the effect of a light wall in front of the car that occurs in fog. For low and high beam headlights, xenon lamps with a temperature of 4300 - 6000K are closer to natural light.
Lamps also differ in power consumption - it can be 35 and 50 W. As a rule, drivers prefer 35 W lamps - they “load” the car’s on-board network less and do not heat up the headlights as much.
What is xenon
Let's take a closer look at the purpose and distinctive features of such lamps. A xenon lamp is a device that can simultaneously create both low and high beam. In this case, work occurs only in low beam mode. Such equipment allows you to create an even, intense glow.
At night, xenon lamps provide a large radius of illumination of the road surface. But still, let's figure out how to understand xenon or bi-xenon in front of us.
Most popular manufacturers
To ignite an electric arc, a voltage of about 25,000 volts must be applied to the electrodes. To maintain combustion, 50-80 Volts are sufficient. To ensure compliance with these operating conditions, a xenon ignition unit is required. When installing xenon for the first time, you need to purchase the entire kit - lamps, ignition unit and wires. The kit must be accompanied by instructions with a connection diagram. In the future, individual components can be purchased separately - as they fail.
Such well-known manufacturers of lighting products as Hella, Osram and Philips do not produce kits for self-installation of xenon. On sale you can only find lamps made by them or Chinese counterfeits.
Among others, kits of the following brands are in demand among Russian car enthusiasts:
Each of these manufacturers produces xenon, as they say, in an assortment - with various lamps and modifications of ignition units.
Installation procedure
Next - a little about how to connect xenon with your own hands.
Preparation
The amount of preparatory work depends on the layout of the vehicle. Sometimes it is possible to get to the fog lamps only with the front bumper removed. But the most important thing is to successfully place the ignition blocks. In this case, it is desirable to reduce the length of the wires from them to the headlights as much as possible. It should be taken into account that by unnecessarily “hiding” blocks, you will thereby limit access to them. This will make troubleshooting difficult.
To connect the wires to the lamps, you will most likely have to drill holes in the headlight covers that cover the hatches. The connection kit contains special rubber seals and the drill should be selected in accordance with their size. In cases where the headlight caps are made of rubber, it is enough to make holes in them.
The choice of method for attaching the ignition units is not of fundamental importance. They can be fixed to the body parts using the brackets included in the kit or simply by gluing them to double-sided tape.
Connection diagram options
The easiest way to connect an HID lamp looks like this.
Connection diagram
The principle of operation is simple: when the light switch is turned on, voltage is supplied to the ignition unit, a high voltage is generated in it, which is supplied to the electrodes of the gas-discharge lamp. It is impossible to mix up positive and negative wires when connecting - their connectors are incompatible with each other.
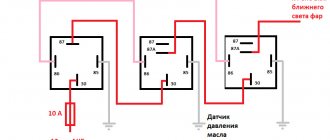
Due to the fact that the voltage of the on-board network can be significantly “drained” at the moment of ignition of the arc, it is preferable to connect xenon through a relay.
As you can see, it’s also nothing complicated. The winding of a conventional light relay (contacts 85 and 86) is supplied with voltage, which in the standard circuit was supplied to the halogen contacts. As a result, contacts 87 and 30 of the relay are closed, which are used as a switch “embedded” in the positive wire coming directly from the battery. This eliminates voltage losses supplied to the ignition unit and makes it easier to “start” the xenon lamp - the circuit becomes practically autonomous. This method is ideal not only for connecting xenon to fog lights, but also for converting the main headlights.
With bi-xenon the situation is somewhat more complicated. The simplest option to improve the operation of switching lamps when changing the “far/close” modes is to install a diode between the “positive” terminals, which prevents the control electromagnet from “sticking”.
Bi-xenon connection
Complete wiring diagram for bi-xenon H4.
Although HID lamps have significant advantages over halogen lamps, you should consider the possible adverse consequences of installing them yourself:
- The design of some headlights makes it impossible to correctly adjust the light beam with non-original lamps. Therefore, “collective farm” xenon often blinds other drivers.
- Making changes to the design of headlights is prohibited by the Rules.
If you modify your fog lights yourself, you will not have such problems. Setting them up correctly will significantly improve visibility during fog.
The popularity of xenon gas-discharge bulbs for cars is due to their better efficiency compared to other lighting sources. It is possible to connect xenon both in a car service center and independently.
What is xenon and bi-xenon in cars? What is the difference?
Almost every car owner has to travel in the dark from time to time. In order to ensure a high level of safety on the road, good lighting of the road in front of the wheels is necessary.
And if most city streets and neighborhood areas are more or less well lit, then on country roads and in small villages you have to rely only on the headlights of your car. Today, halogen lamps have been replaced by brighter and higher quality xenon and bi-xenon headlights. What are they and what is the difference between them? Let's take a closer look.
Xenon lamps
Xenon lamps are gas-discharge lamps filled with a special inert gas - xenon. In order for the lamp to produce a bright, powerful glow, some special additives are added to xenon - salts of certain metals. Gas discharge lamps operate on a completely different principle than conventional incandescent lamps.
The light source becomes a powerful electric discharge, similar to the one that is formed during the operation of an electric welding machine. The electric lamp ignition unit creates high-voltage pulses on the electrodes, the result of which is a powerful discharge that emits a bright glow.
Due to the filling of the flask with an inert gas, the discharge has no consequences other than light radiation. Today, xenon lamps are recognized as the brightest, most powerful and durable, and therefore ideal for car headlights. An important nuance: although the light from xenon headlights is highly bright, it does not blind the eyes of drivers in oncoming cars.
Bi-xenon lamps
According to the principle of operation, bi-xenon lamps are practically no different from xenon lamps: they also use the glow of an electric discharge in a neutral gas environment. But, unlike xenon lamps, which are used only as low beam sources, bi-xenon lamps can play the role of both low and high beam lighting for cars. The difference lies in the design.
An important part of a bi-xenon lamp is the control unit, which moves the lamp screen, changing the focal length. Accordingly, the light beam is either scattered in front of the car or focused into a narrow beam and directed forward as a high beam source.
The control is implemented on the basis of an electromagnet. The bi-xenon lamp thus performs two functions - low beam and high beam.
Which is better - xenon or bi-xenon?
If you make a choice between a halogen and xenon lamp, then for low-level lighting it is in any case better to choose xenon: these lamps not only provide brighter light, but are also significantly more durable.
The xenon lamp will need to be replaced no earlier than after two years of operation. As a rule, a halogen lamp is used as a source of high beam in a regular car.
Those who decide to install bi-xenon headlights are faced with the need to radically alter the car's electrical network in order to equip the connection not only for the power supply of the bi-xenon lamp, but also for its control unit. This is quite complex and expensive work.
Owners of cars that initially use two-filament lamps as headlights find themselves in a better position here. Here the modifications for the bi-xenon will be minimal. If the car has a separate lighting mode for low and high beams, the alteration can cost quite a large sum.
Operational differences of xenon
According to its properties, the light of xenon headlights has some features:
— the emission spectrum of a xenon lamp has a higher light wave frequency than a halogen lamp, therefore it is scattered more intensely, and at a higher power at a long distance there is practically no improvement in illumination;
— when using a bi-xenon lamp in high beam mode, the nearby area in front of the car will be illuminated rather dimly;
— the most correct way is to install xenon in the headlight with preliminary installation of the collecting lens and polishing the diffuser for the low beam.
Experienced car owners consider the optimal combination of a xenon lamp as a low beam headlight, and a halogen lamp for high beam lighting.
How to choose a good xenon kit?
The selection of a suitable xenon lighting source for a car should be based on two factors: the popularity and reliability of the manufacturer and the required brightness of the lamps.
What should a xenon kit consist of?
The complete set of gas-discharge bulbs for headlights or fog lights includes:
- lighting sources designed for a certain power and with specific markings;
- ignition device;
- a set of wires and elements for connecting and fixing lamps.
What to choose: xenon and bi-xenon and what is the difference between them
Modern expensive models already come standard with LED lighting units controlled by an autonomous intelligent complex. Owners of budget cars only have access to regular halogen light. Thus, reviews of the Hyundai Creta on the negative side note the low cost of lighting, which is formed by standard head lamps.
It is for these reasons that car owners ask themselves the question, xenon and bi-xenon and what is the difference between them. Often, motorists solve the problem by other means, namely by replacing factory lamps with more powerful and brighter halogens.
What is Xe lamp?
Xenon lighting sources are gas-discharge lamps filled with an inert gas - xenon. Unlike conventional light generating sources, there is no filament. The glow mechanism of Xe products is as follows: there are two electrodes, between which an electric arc occurs when voltage is applied (the operating principle is identical to the formation of an arc during welding).
Preparation for self-installation and connection of xenon in a car
Every driver can replace standard light bulbs and install xenon lights themselves. When performing installation, the main thing is to follow the manufacturer’s recommendations and follow the diagram.
In order not to damage the light bulbs, the bulb of the light source should not be touched with your fingers.
If this happens, then the surface with the imprint must be treated with a clean rag with alcohol. Before performing the task, be sure to disconnect the battery. When launched, gas-discharge light sources produce 23 thousand volts of voltage, which will be fatal to humans.
What may be required to connect?
To quickly install gas-discharge lighting sources, you will need:
- set of lamps;
- stationery knife or scissors;
- Phillips head screwdriver;
- plastic clamps;
- drill with 25 mm cutter;
- set of wrenches.
Xenon installation diagram
The installation and connection process is carried out as follows:
- First, old lighting sources are removed and new ones are installed in their place. To complete the task, the plastic protective cover installed on the optical instruments is dismantled. Electrical wiring is disconnected from halogen or incandescent lamps. Removing the device may require the release of a special retainer or clamp.
- The gas-discharge bulb is carefully removed from the protective bulb and mounted in the hole on the lantern. If a special clamp is used for fastening, it must be fixed. If there is a spring, the electrical circuit from the gas-discharge lamps must be pulled through this element. Afterwards, the wiring is routed through a plug into the engine compartment.
- Running an electrical circuit near the battery will be problematic. The battery usually blocks access to the flashlight, so it will have to be removed. After the lighting sources are installed, their contact elements are connected to the ignition unit.
- Then you need to make special holes in the plugs of the optical devices; the power line will be laid through them. If the protective casing is made of rubber, you must use scissors for installation. If the plug is made of metal, then you will have to drill a hole to pull the wire through it. A cutter is used for this; a 2.5 cm piece is best.
- After completing this task, a location for installing the ignition device is selected. It will be located next to optical instruments. It is important that the power supply circuit is not stretched.
- When installing the ignition unit, it is recommended to choose a place where the device will not be exposed to high temperatures, moisture, and dirt. These devices themselves are usually sealed, but it is better to take this rule into account. If there is no such place under the hood, then the device should be wrapped with tape or tape, this will partially increase its safety. The block is fixed using plastic clamps or tape.
Xenon connection diagram
More details on how to connect xenon:
- The lighting sources are connected to the ignition unit. Each electrical circuit has a specific color coding; detailed connection information is indicated in the diagram.
- The unit itself is then connected to the standard wiring system. To accomplish this task, one line from the device goes to the block where the old light source was connected.
- The second lamp is connected in the same way. First it is connected to the ignition unit, and then to the electrical wiring of the machine.
- Fixation of electrical circuits is carried out using plastic clamps. If the piece of wire is large, it is recommended to twist it into a ring.
Connection diagram for xenon to standard wiring
How to properly install and connect xenon to fog lights?
If xenon light sources were installed in the headlights, it is advisable to install them in the PTF. This will prevent you from spoiling the aesthetic appearance of the car.
Installation and Connection Precautions
Nuances that must be observed when installing gas-discharge devices in fog lights:
- If damage appears on the light sources during the task, you must stop working. This also applies to wiring defects, as well as ignition units.
- Before performing the task, the car owner must wash his hands, dry them and degrease them. Otherwise, the bulbs may be damaged and you may receive an electric shock.
- When connected, you should not look at the light sources for a long time without glasses.
- The joints are completely insulated using heat-shrinkable tubing or electrical tape. Otherwise, moisture may get into the wiring, which will lead to a short circuit or fire.
- Before mounting the light source bulbs, it is recommended to degrease them.
Algorithm for installing xenon lamps
In the PTF it is necessary to install devices designed for 4300K or 5000K; this option is more effective in fog and when driving on a wet road:
- Fog lights are usually located under the headlights. Therefore, installing them may require removing the bumper. Sometimes it is enough to unscrew the screws securing the front wheel arches.
- After access to the rear part of the PTF is gained, the optics are disconnected from the power supply circuit. Old light sources are being dismantled and new, gas-discharge ones are being installed.
- High-quality fixation of devices is carried out. They may be subject to vibration while driving, so the bulbs must be securely fastened. Otherwise it will cause them to break.
- Ignition units are installed. The best option would be to place them in the engine compartment or under the front bumper. We need to find free space for installation. It is recommended to choose a protected place where the unit will not be exposed to moisture and aggressive external environments. The devices are secured using clamps or tape. If the package includes special fasteners, then they are used.
Using the Lada Priora as an example, user Sergey M showed the procedure for installing xenon light sources in fog lights.
How to replace xenon lamps with halogen ones yourself?
The disadvantages associated with the operation of xenon lead to the fact that many car owners decide to replace gas-discharge lamps with conventional ones. There are nuances in this process, especially if the light sources were installed regularly.
DIY lamp replacement procedure
Replacement is carried out after preparing a wrench and a screwdriver; sometimes electrical tape is required:
- The engine compartment is opened and the negative clamp is disconnected from the battery.
- Installed lighting sources are disconnected from the power supply circuit. The protective elements under which the screws are located are dismantled. They attach the optics to the car body, so they need to be unscrewed, but not completely, just loosened.
- The lights are dismantled. They can additionally be fixed using latches. When performing the task, it is important not to break the fastener. After this, the lighting device is dismantled from the seat.
- The ignition units for gas-discharge light bulbs are removed; for this, the fastenings on the modules are unscrewed.
- The power line is laid from the control unit, the device is mounted next to the steering wheel. If halogen bulbs were installed in cars, then there is no need to change the electrical circuits. But in the case of standard xenon, new cables will be required. This task is performed carefully so as not to damage the conductors.
- Optical devices are installed and connected to electrical circuits. Then the lighting flux is adjusted.
The MazdaGarage channel in its video, using the Xedos model as an example, showed how to remove xenon lighting sources from headlights.
What to do if xenon headlights stop working?
If xenon bulbs stop functioning, the reasons may be as follows:
- damage to the contact on the connector for connecting to the power circuit;
- broken wiring;
- failure of the lighting source, the lamps cannot be restored;
- control module failure.
Why does the ignition unit break?
Reasons for failure of the ignition device:
- Lack of tightness on the module body, which leads to dirt and moisture getting inside the unit. The problem can be determined by disassembling the device and diagnosing its internal components. If dirt or water gets into the module, the lights will not light up or will begin to blink when turned on.
- Negative effects of corrosion. The solder joints of electronic components may oxidize, causing components to fall out of the solder. The problem is associated with assembly errors or regular exposure to moisture.
- The pulse signal from the controller has disappeared. There may be problems with the transistor elements, multiplier or transformer device.
How to repair a xenon ignition unit yourself?
Module repair is performed as follows:
- All electrical circuits are diagnosed for breaks or leaks. This refers to the wires that go to the module. The problem may be a pinched or damaged power line.
- The device is treated with an alcohol solution, this will remove rust and traces of condensation. You must act carefully so as not to damage the board. The sealant is removed from the back of the circuit and the contact elements are re-soldered with a soldering iron. Everything needs to be soldered, since leaky parts are difficult to visually identify.
- An opened ignition device is diagnosed on something that does not allow voltage to pass through. When diagnosing, there are no parts that light up nearby. The test is performed while the device is connected to a light source. The voltage of the multiplying element is 35 kV, so if the unit is not turned on, then it will not be touched until it is completely turned off.
- The next step will be to perform diagnostics on the transistor elements, there are a total of four on the board. A multimeter is used to check. If testing shows a device with a breakdown, it is soldered again. It is recommended to install 4N60 parts.
- Using a tester, it is not always possible to determine an element with a breakdown. It may be necessary to remove each transistor before the ignition device is activated. You can turn it on briefly, for a couple of seconds.
- If the transistor elements are intact, the resistor devices are checked. The burnt out part is replaced with a new one.
When assembling the block, it is not recommended to use silicone sealant.
After hardening, this product is as hard as possible. If the transient device needs to be replaced in the future, opening the module will be problematic.
Video
The “Fire & Ice” channel presented instructions for troubleshooting problems in the operation of a standard ignition module using the example of a Mazda car.
Xenon is an inert gas that is odorless, tasteless and colorless. One of its features is that when an electric current is passed through it, this gas becomes a powerful source of light. There are several reasons why xenon has gained immense popularity among car enthusiasts.
Xenon lamps produce very bright daylight, and this is more familiar to human vision. They have high light output and allow a wider view of the road in front of the car.
Xenon lamps are durable, very economical and resistant to physical influences. In addition, they are quite easily installed in cars instead of standard lamps. It is this process that we will look at below.
Briefly about the process of connecting bi-xenon
The difficulty of installing a bi-xenon with an H4 base with your own hands lies in the correct organization of communication between standard lighting mode control devices, relays, ignition units, and dual-mode high-brightness gas-discharge lamps. The wiring supplied with Bixenon kits allows you to electrify the lamps quite quickly and correctly.
There are two types of wiring:
- autonomous, in which each lamp has its own power supply channel (can be with or without a relay);
- combined - here one common relay is used, on which the power supply system for each ballast and, accordingly, the lamp is “tied”.
Most manufacturers adhere to an autonomous wiring arrangement.
After installing any wiring, it is important to check that the lighting system is operating correctly. The inability to switch lighting modes in off-line mode with off-line wiring is often influenced by the direction of current passing by the diode.
Xenon is an inert gas that is odorless, tasteless and colorless. One of its features is that when an electric current is passed through it, this gas becomes a powerful source of light. There are several reasons why xenon has gained immense popularity among car enthusiasts.
Read more: Tinting in Belarus 2018
Xenon lamps produce very bright daylight, and this is more familiar to human vision. They have high light output and allow a wider view of the road in front of the car.
Xenon lamps are durable, very economical and resistant to physical influences. In addition, they are quite easily installed in cars instead of standard lamps. It is this process that we will look at below.
How to choose a good kit
Today, there are a huge variety of xenon lamps on the automotive market. This variety makes the choice a little more complicated, and we will try to figure out which xenon is best for a particular car.
Most xenon kits consist of:
- xenon lamps;
- ignition blocks;
- wiring and fastening parts.
Xenon lamps have special markings - 6000K, 5000K, etc. It denotes color temperature - the brightness and color of the light that the lamp shines. Xenon marked 4300K shines white with a slight yellow tint . They are often installed in fog lights and in the main headlights of a car. They are best suited for driving on wet asphalt.
lamps emit a shade that is closest to white . Their light output power is the highest, and the light is normally perceived by the human eye. The light of a 6000K lamp has a slightly bluish tint , and is inferior in power to the two previous types, since it has the lowest light output. However, in the Russian and Ukrainian markets this type is the most popular.
The ignition unit is a device that supplies the required voltage to the xenon lamps necessary to ignite them. The more complex and “smarter” this block is designed, the more processes it controls. A high-quality ignition unit will ensure long-term and high-quality operation of the lamps , since during their ignition and glow the lamp parameters are within acceptable limits.
It will be useful for every driver to know what the fine is for driving without insurance or with a expired MTPL policy.
Airbrushing is an original way to decorate your car. We have prepared an article for those who want to make their car stand out from the gray mass.
Xenon installation diagram
The installation process itself is quite simple and every car enthusiast can handle it.
Briefly, the xenon connection diagram can be described as follows: we install light bulbs, ignition units and connect them using the wires that come in the kit. What we need for installation:
- xenon kit - (lamps, ignition units, wires and fastenings);
- scissors;
- Phillips screwdriver;
- double-sided tape or clamps.
You may need a drill and a 25mm cutter, as well as some wrenches.
The fundamental difference between the installation process of Bixenon and Xenon lamps
For bi-xenon lamps, the connection diagram is a little more complicated due to the presence of an additional high beam mode.
Since the latter is activated not by igniting the second filament, but by moving the metal screen, the lamp control algorithm is slightly adjusted by additional wiring (Note: you can read about the specifics of connecting Xenon lamps here). Read more: How to find out which class your child is enrolled in
In a more approximate format, the feature of the scheme is as follows:
- “+” and “–” are sent to the ignition unit when the low beam is turned on;
- When the high beam lighting is activated, “+” is sent to a device that changes the focus of the light.
The connection can be made according to one of two scenarios, the choice of which determines the type of kit:
- with a relay for each lamp or without an electronic key at all;
- with one common relay for two lamps.
We install xenon with our own hands
Do not neglect safety precautions when installing xenon, as you can not only damage the equipment, but also seriously injure yourself. So make sure your hands are dry and oil-free.
It is also forbidden to touch the xenon lamp bulb with your hands. In case of contact with it, it is necessary to degrease the surface with alcohol.
Once you are convinced that the process is safe, you can proceed directly to the installation. First of all, we will remove the old halogen lamps and replace them with xenon lamps. To do this, you need to remove the protective cover from the headlights.
Disconnect the contact wires from the lamp and take it out.
In order to safely remove the light bulb in some cars, you need to release the spring that secures it.
We carefully remove the new xenon lamp from the protective bulb and insert it into the hole. Remember not to touch the flask with your hands . If you had a spring that fixed the halogen lamp, then you need to crush it. The fact is that the wires from the xenon lamps will need to be pulled through it and then brought out through a plug into the engine compartment.
From the battery side, this will be a little more difficult to do, since it will partially block access to the headlight. Therefore it is better to remove it. After installing the bulbs, connect the terminals from the ignition unit to them.
The next step is to make holes in the headlight plugs to run the wires through. There are two types of plugs - rubber and metal. We cut out a hole in rubber ones with scissors; in metal ones we will have to drill.
It is better to use a milling cutter for drilling. The optimal hole diameter is approximately 25 mm.
The stage of installing the light bulbs was the most difficult and time-consuming. Next, you need to select a location to install the ignition unit. It should be located in close proximity to the headlights so that the wires do not pass under tension.
It is better to choose a place that is protected from moisture, dirt and heat. In general, high-quality ignition units should be sealed, but some manufacturers take little care of this. If you still cannot find a protected place, then simply wrap the block with electrical tape or tape. This will increase his safety, albeit partially. The ignition unit itself can be secured using clamps, double-sided tape, or attached with screws.
Next, we connect the wires from the ignition unit and from the xenon lamps. Here, each wire has its own color, so it will be difficult to mix it up. also need to connect the ignition unit to the standard electronic system . To do this, we draw another wire from the ignition unit to the connector where the halogen light bulb was connected.
We repeat the procedure with the second headlight, the process is similar - we install xenon lamps, an ignition unit and connect the wires. We secure all the wiring with clamps so that it does not dangle. We twist the excess wire into a ring.
It is better to check the correct connection using the diagram, which will definitely be in the instructions. You can also use this xenon connection diagram:
Some difficulties arise when installing xenon lights yourself on cars with on-board computers. If the xenon does not function correctly when igniting or during lighting, it is recommended to install a voltage relay. It will stabilize the load on the wiring at the moment when the headlights turn on.
This video explains how to install xenon lamps with your own hands. Lamps manufactured by IL-Trade, color temperature 4300K with H7 base.
Bi-xenon lenses, what are their differences from xenon?
Every experienced motorist wants his movement to be safe. However, this is only possible if the lighting is sufficient. Once upon a time, auxiliary headlights were installed for this purpose, but today the situation has become somewhat simpler. Recently, the whole world has learned about unique gas-discharge lamps, which have a number of positive properties. We are talking about xenon and bi-xenon lighting elements, the light performance of which is several times higher than that of standard lamps. As you understand, this name was received for a reason. Xenon bulbs are so called because there is xenon inside their bulb, which emits maximum illumination.
In just a couple of years, such lighting elements have become very in demand and popular. They began to be used on almost all vehicles. But motorists had not yet managed to move away from xenon, when bi-xenon appeared after it, having slightly different parameters.
However, both of these elements are not equipped with filaments, like a halogen lamp. Light is produced by an electric arc.
It can also be noted that xenon and bi-xenon can only function with the ignition unit.
Most motorists believe that halogen and xenon are somewhat similar to each other. Both the first and second elements provide maximum illumination, making the driver feel more confident at night. Therefore, xenon bulbs have found their use as low beam lighting, and halogen bulbs are used for high beam lighting.
Now as for the bi-xenon, it can be used for both high and low beam lighting at the same time. Therefore, the motorist does not need to install two different light bulbs.
We have said more than once that xenon bulbs are quite diverse. The same can be said about bi-xenon ones.
Each bi-xenon kit consists of ignition units, lamps and wiring. As a rule, lighting elements are presented with the H4 marking.
If we talk about lenses, then they are somewhat different for xenon and bi-xenon. For example, the most popular car bi-xenon lenses are G1, which are round in shape. They are combined with H4 lighting elements and only sometimes with H1 lamps.
Another point that I would like to draw attention to is that bi-xenon lenses are usually presented in the form of angel eyes. That is why they are so in demand among tuning enthusiasts.
If you decide to install such lighting elements in your car, you should understand that they are not cheap. But who said that quality can be bought at a low price.
Bi-xenon installation
Bi-xenon is the same lamp filled with an inert gas, only equipped with a special electromagnet. It controls the focus of the lamp, which allows you to create “low” and “high” light. A conventional xenon lamp constantly shines at full power, and the power of bi-xenon lenses is regulated using a solenoid (electromagnet).
The principle of installing bi-xenon with your own hands is approximately the same. It differs only in the presence of a voltage controller, which is connected to the lamp, battery and ignition unit . Its main function is to control and stabilize the voltage in the wiring.
We wrote above how to install xenon yourself. Now let’s just look at the connection diagram for bi-xenon lenses and look at some of the nuances.
- The high-voltage wires from the bi-xenon lamps are connected to the corresponding wires from the ignition unit.
- The controller is connected to the power connector of the ignition unit.
- The third wire on the lamp is the electromagnet connector, which controls the intensity of the light. It also connects to the controller.
- The connector from the controller is connected to the standard lamp power connector. It has 3 contacts.
- We connect the controller to the battery power, “+” and “-” respectively.
After installation , do not forget to adjust the headlights so as not to dazzle oncoming drivers. Remember that well-adjusted headlights will ensure the safety of all road users.
Statistically, heavily tinted cars are more likely to be involved in accidents. You can find out what standards for tinting the front glass according to GOST on our website.
A good battery will last much longer. Useful tips on choosing a battery for beginners and experts.
Today, there are many different radar detectors available on the automotive gadget market. On this page you can find out /tuning/elektronika/radar-detektor-kak-vybrat.html what parameters you should pay attention to when choosing a radar detector.
We install bi-xenon instead of a regular H4 halogen lamp with our own hands
Inclusion in the circuit of a kit with individual relays
The mechanical part of the Bixenon lamp installation process is simple and absolutely repeats the monoxenon assembly method:
- form a hole in the headlight housing for supplying additional wiring;
- install a Bixenon lamp instead of the standard halogen one;
- secure the ignition units in the immediate vicinity of the headlights.
The first installation of bi-xenon H4 with your own hands often causes difficulties in organizing the connection diagram. The autonomous configuration does not provide for the presence of life support elements common to the two lamps - therefore, the installation process can be carried out sequentially. According to this principle:
- the lamp is connected and tested on one headlight;
- manipulations are carried out with the wiring on the second head lighting device;
- the final test is carried out.
A kit with an individual relay usually contains the following electrical elements :
- 2 ignition blocks;
- 2 relays;
- 2 switching harnesses with soldered diodes;
- 2 lamps.
According to the connection diagram for the bi-xenon kit with an individual relay, the procedure for carrying out the operation is as follows:
- a wiring harness with a diode is connected to the connector coming from the lamp and responsible for moving the screen;
- the standard wiring block, previously connected directly to the H4 socket, is connected to the three-pin connector coming out of the harness connected above;
- the connection harness is connected to the relay;
- the electronic key is connected to the network by attaching the positive terminal to the battery and the negative terminal to ground;
- The ballast (ignition unit) is connected to the relay;
- The power taps of the lamp are connected to the blocks of the ballast.
Inclusion in the circuit of a kit without relay devices
In kits without a relay, the diode is embedded directly into the three-pin power supply block. The connection diagram is absolutely identical, with the exception of operations associated with the electronic key: the power connector of the ignition unit goes directly from the connection with the standard block.
A little about the purpose of the diode
After installing and connecting the H4 bi-xenon with your own hands, the following malfunction is often discovered: the low/high lighting modes do not switch, but the lamp is on. The reason is that when the low beam is on, the screen is already in the high beam position. In order to eliminate the defect, the direction of the permissible charge flow through the diode is changed by changing its polarity.
If the location and polarity of the connector contacts for the bi-xenon installation do not match the pinout in the standard socket, the situation is corrected individually:
- diode position;
- An adapter that changes the polarity is inserted between the magnet control connector, which moves the screen from the low beam position to the high beam position, and the block from the switching harness or from the power connector (in the absence of a relay);
- In the power connector of the ignition unit, the contacts are swapped.
Read more: Welding or blocking for drifting