When repairing an engine, in particular the cylinder head, everything must be done in such a way that there are no gaps between the parts. Therefore, it is important to know how to properly grind valves on a car. The work is very labor-intensive, monotonous, even boring. But the further operation of the engine depends on how correctly it is carried out. And if you have ever dealt with this business, then you know what grinding methods exist, the time and labor required for them, and most importantly, how well they allow the work to be done. But if this is the first time you have heard about such a procedure, then you need to familiarize yourself with it in more detail.
Why is lapping necessary?
Manual valve grinding process
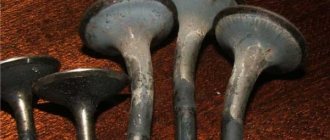
When buying a car, most people look at the compression ratio in the cylinders. This parameter depends on a large number of factors, including the condition of the pistons, rings, and valves. The latter may simply not close the holes well due to wear on the working surface or burnout. A leaky combustion chamber is the cause of low pressure in the cylinder. An external sign is that the performance is deteriorating, acceleration becomes slow, the car simply “doesn’t pull”, and with a heavy load, even a small slope becomes an almost insurmountable obstacle.
And if you have overhauled the engine, and the compression in the cylinders is far from ideal, then first of all look at the valves, how well they close the intake and exhaust ports. Some car models are equipped with a system that performs grinding during operation. Everything is quite simple - the valve rotates around its axis, the excess metal is ground off and as a result a perfectly flat surface is formed. When contacting the block, there are no gaps; the holes are closed as tightly as possible. But most cars don’t have such systems, so you have to do everything manually. There are only three ways, and we will consider them in detail.
How to check valve lapping
Upon completion of valve lapping, it is imperative to perform a quality check of the lapping. This can be done using one of two methods.
Method one
The method described below is the most common, but it will not always show the correct result with a 100% guarantee. It also cannot be used to check the quality of valve lapping on engines equipped with an EGR valve.
So, to perform the check, it is necessary to place the cylinder head on its side, so that the holes of the wells to which the manifolds are connected “look” up. Accordingly, the valves will be located in a horizontal plane, and their covers will be located vertically. Before checking that the valves have been ground in, it is necessary to dry the valve outlets using a compressor to ensure that possible fuel leakage from under them is visible (that is, so that the vertical wall is dry).
Next, you need to pour gasoline into vertically located wells (or even better, kerosene, since it has better fluidity). If the valves ensure tightness, then the poured kerosene will not leak out from under them. If fuel leaks out from under the valves, even in small quantities, it is necessary to perform additional grinding or other repair work (depending on the specific situation and diagnosis). The advantage of this method is that it is easy to perform.
However, this method also has its drawbacks. Thus, with its help it is impossible to check the quality of valve grinding when the engine is running under load (gas leakage under load). Also, it cannot be used for engines equipped with a USR valve, since their design implies the presence of corresponding valves in one or more cylinders, through which fuel will flow out. Therefore, it will not be possible to check the tightness using this method.
Method two
The second method of checking the quality of valve lapping is universal and the most reliable, since it allows you to check the passage of gases through the valves under load. To perform the corresponding check, it is necessary to position the cylinder head “upside down”, that is, in such a way that the valve outlets (holes) are on top and the manifold well holes are on the side. Next, you need to pour a small amount of fuel (in this case, it doesn’t matter what kind, and even its condition doesn’t matter) into the valve outlet cavity (a kind of plate).
Take an air compressor and use it to blow a stream of compressed air into the side well. Moreover, it is necessary to supply compressed air both to the opening of the intake manifold and to the opening of the exhaust manifold. If the valve grinding was done efficiently, then air bubbles will not come out from under them even under the load provided by the compressor. If there are air bubbles, it means there is no tightness. Accordingly, the grinding was performed poorly and rework is necessary. The method described in this section is extremely effective and versatile and can be used for any engine.
Manual valve grinding
This device is used for manual grinding of valves.
This is the most difficult and time-consuming method, but it is worth it, because maximum accuracy is achieved. You will need valve grinding paste and a special device. The latter is made of a metal rod with a clamp on one side and a T-shaped handle on the other. Paste is a mixture of abrasive and fuel oil; in stores you can find it under numbers 1 and 2. The number indicates how large the size of the granules of the abrasive material is.
The process can be divided into several stages:
- The valve is installed in its standard seat.
- The valve plate must be lubricated with paste.
- Place the device on the axis of the rod.
Next, the valve grinder will help you rotate the valve in different directions using the handle. From time to time it is necessary to apply a layer of paste. And most importantly, try to press the working surface of the valve against the seat as hard as possible in order to carry out the grinding in as efficiently as possible.
How to properly lap valves
After the engine head is disassembled, it is cleaned of carbon deposits. Before removing the valves, they are marked to remember where they were installed. To check the quality of the valves, the engine head is turned over and filled with kerosene, and the valves are equipped with springs. In this state, the liquid should last at least 12 hours. If the cavities are empty in the morning, then the valves need to be ground in. Often only one cylinder needs adjustment, this will be visible thanks to the kerosene. Valves that are not ground in are lubricated with paste at the point of contact with the outlet hole. The part is threaded into the groove, and on the other side a hose prepared in advance is put on it. The other edge of the adapter is placed on a rod, which is fixed into an electric drill. By turning the drill cyclically, begin grinding; each paste should be used for at least 5 minutes. When replacing the abrasive, the valve and seat are thoroughly wiped. It is noteworthy that craftsmen recommend treating even parts that do not leak kerosene with the final paste for lapping valves. This is necessary to remove plaque.
Lapping with a hand drill
During grinding in, it is necessary to periodically apply a new layer of paste.
This method will be much simpler, and the quality will not suffer much. And a regular hand drill with reverse will help you in carrying out the work (this condition is mandatory). You will also need to make a special tool - a simple attachment for a drill, which is shaped like a flat-head screwdriver. And stock up on snouts with a small slot for the tip of the nozzle in the center. When the entire tool is ready, you can start grinding in.
Install the cylinder head upside down so that the sockets are clearly visible from above. Lubricate the working surface of the valve to be treated with abrasive paste. Now, using bitumen, glue the patch onto the valve plate. Wait a bit for the bitumen to dry and set. Now take a drill with an attachment, install it in the slot and begin to rotate the valve. Add paste as needed. Try to ensure that the rotation occurs in both directions at approximately equal intervals of time. To remove the patch after grinding, simply heat it.
Grinding in valves. How to do it right?
18:43, April 4, 2017
1821
Valve grinding is a critical stage of engine repair. We'll tell you what tools are needed and how to properly grind the valves and check the quality. TOOLS FOR GRIDING VALVES Lapping paste for valves. lapping paste for engine valves. The main thing you need to buy is lapping paste. During operation, it is applied to the edge of the valve and serves as fine sandpaper that rubs the valve into its seat. There are many options for lapping paste. For example, such as in the picture in the form of valves. It should be chosen based on your finances and preferred manufacturer. The lapping paste differs in the degree of processing: from coarse-grained (for initial processing) to fine-grained (for final processing). The latter is recommended by engine repair specialists, because... the process will go faster with it. Everything depends not on the paste itself, but on the condition of the valves and chamfers and the correctness of the process. For some, a regular tube of lapping paste for 100 rubles will do, but for others, only give it a professional one. If you do it yourself, it’s better to start with regular lapping paste, not the most expensive one. If something goes wrong, then buy the necessary one in the process. “Sharoshka” for removing metal on the valve seat. Old-fashioned cutters for cylinder head repair. This tool is used to restore valve seats. It represents a valve seat attachment made to fit the shape of the valve seat. It is usually fixed in a drill like a drill and is small in size. Are grinders needed for grinding valves? We look at the saddles that are pressed into the head. If they are not damaged, then you can start grinding in, but if they are damaged (by burnout), then you need to treat them with special cutters. In general, the technology is as follows - first it is better to change the valve guides, then grinding in. New valves. New valves are not always needed. If you find that they are somewhat bent, then trying to straighten them will lead to nothing, except wasted effort and time. A better idea would be to head to auto parts and purchase a new set of valves for the engine. When replacing valves, pay attention to their quality. The height of all valves must be the same; no marks or roughness are allowed on the rods, ends and working sealing chamfers. It is better to polish the rods to a mirror shine before installation. It is also worth polishing the plane of the plate and the “black” neck of the valve, so it will heat up less and become overgrown with soot. Do not touch the sealing chamfer, you just need to rub it against the seat. Valve lapping tool. grinding valves using a drill You can use a drill and a rubber hose for this purpose. The process is as follows: we put a hose on the drill (you can use a drill, and fasten it with clamps), and put the engine valve on this hose (we fix it with clamps) with lapping paste applied. Next, insert the valve into the seat and begin the grinding process. The main thing is not to give maximum speed to the drill; the process should occur at low speeds (400-500 rpm). vk.com/autobap If the speed is higher, there is a risk of overheating the valve seats or belts. The main thing is not to make circular movements during the grinding process, but to imitate the operation of the valve back and forth. This method of grinding valves using a drill is not very good and takes a lot of time. GRINDING PROCESS OF ENGINE VALVES There are two types of defects in valves and seats: the working chamfers are covered with shells and carbon deposits, but have the correct shape; the working chamfers are covered with shells and carbon deposits, but their correct conical shape is broken - a stepped surface has formed on the conical surface, and the conical chamfer is rounded. In the first case, it is enough to grind the valve; in the second, before grinding, the working chamfer is turned on a lathe, and the valve seat is processed with conical cutters. Processing of the seat begins with a cutter with an angle of 45°, then the upper flange of the seat is cut off with a cutter with an angle of 15°, after which the lower part of the seat is chamfered with a cutter with an angle of 75° or by grinding the working surface of the seat with abrasive wheels with angles of 45, 15 and 75° using hand drill. They grind in using a drill, when rotated the valve automatically turns in one direction or the other and gradually rotates in a circle. You can grind it in with a hand drill or screwdriver, but it will take longer. A layer of valve lapping paste is applied to the valve chamfer and seat for rough lapping. The valve is rotated 120° and in the opposite direction by lightly pressing the valve head 90...100°. Rough grinding is continued until all pits and scratches are removed, then wipe the valve and seat with a napkin. Afterwards, they are finally rubbed in with the paste until the working surfaces acquire a uniform matte color. The width of the ground surface should be 1-1.5 mm. METHODS FOR CHECKING THE QUALITY OF GRIDING To find out whether lapping has been completed or not, pay attention to the surface of the valve - a gray track about two millimeters wide is formed on it. If there is one, then the grinding process is complete. applying paste to valves for lapping Another detail is the use of oil as the final paste. It must be applied after washing off the paste of all layers. This procedure allows you to determine the degree of grinding, since all shells, if any, will be visible. No matter how much you grind the valves, the engine will still “bring it to its liking.” You can spend a lot of effort to ensure absolute tightness, but after a couple of hours of engine operation, the valve seal will deteriorate. You can grind the valves carelessly, for example, kerosene will protrude from under the valve, but not like a river. And after a few days of engine operation, the tightness of the valves will improve. If you start measuring them for leakage, it turns out that in both cases the engine has worked the valves to a certain optimal state. Therefore, “finishing” with grinding in with different pastes and finishing with GOI paste can be called a waste of time.
Subscribe to our Telegram channel. Stay on top of all the action! We work for you!
