Briefly about the features and structure of the “six” carburetor unit
Before adjusting the carburetor on a VAZ 2106, it doesn’t hurt to know its design features. After 1980, Ozone and Solex began to be installed on Tolyatti cars. The purpose of the unit’s operation is to prepare a combustible mixture before feeding it into the car’s cylinders. Down to the subtleties, this is not a driving school, we will not disassemble the design, it is enough to familiarize yourself with the main components that ensure optimal operation of a carburetor internal combustion engine:
- Fuel dosing system.
- Mechanisms for controlling throttle valves and enriching the mixture.
- Idle system.
- Accelerator pump and econostat.
- Float chamber.
A chamber with a float and a needle valve is responsible for the stability of the fuel level. Next, gasoline, flowing through the spray tube, enters the chamber, where it mixes with air from the inlet pipe. The amount of mixture is adjusted by the throttle valve, which is connected to the accelerator pedal.
Precise adjustment allows you to prepare the correct mixture of gasoline and air in a ratio of 1:15. During long-term operation of the car, the settings get lost and you have to think about how to adjust the carburetor on a VAZ 2106 on your own. The adjustment technology is the same for both Solex and Ozone.
Setup, Repair, Device, Tuning, Malfunctions
This device, located in the propulsion system, serves to ensure that the movement of fuel is carried out in a certain order. Proper operation of the carburetor helps to obtain the required composition of the combustible mixture. Then the mixture can move horizontally, downward or upward. This parameter depends on the design features of the device, but we will talk about this below.
Table of contents
Adjustment Setting Repair Device Tuning Cleaning Malfunctions How to remove
Adjustment
EXECUTION ORDER
Remove the air filter housing (see Replacing the carburetor).
We measure the center-to-center distance between the rod ends, which should be equal to 80 mm.
If necessary, remove one of the tips from the lever by prying it with a screwdriver.
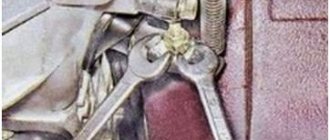
Using an “8” wrench, loosen the lock nut and, by rotating the tip, adjust the length of the rod (in the photo the crankcase gas exhaust hose has been removed).
After tightening the nut and installing the rod in place, ask the assistant to press the gas pedal all the way. If the throttle valve of the first chamber is not fully opened, the valve lever has additional travel.
Remove the end of the longitudinal link from the intermediate lever.
Having loosened the lock nut, we shorten the length of the rod, put it in place and again check the opening of the damper.
Then we release the pedal and check the position of the throttle valve, which should now be completely closed. If necessary, lengthen the pull. Loosen the choke drive cable (see Replacing the carburetor). Inside the car, push the air damper control handle all the way down.
By pressing the three-arm lever, we fully open the air damper...
....and in this position we tighten the locking screw.
By pulling out the control handle, close the air damper. After that, we press it in again until it stops. If the damper is completely open, finally tighten the locking screw. If necessary, repeat the adjustment.
Settings
Tuning the VAZ 2106 carburetor is not a delicate matter. Basically, all advanced car owners replace their original carburetor with Solex or Ozone, their design is very similar, as is the adjustment. You shouldn’t just get into the carburetor, because if everything works fine, then you don’t need to touch anything. However, if the following signs of malfunction occur, you will have to study the device and climb inside:
Dips when accelerating the car (after pressing the pedal, the car does not accelerate, or accelerates very slowly).
Car jerks when accelerating.
Very slow acceleration, albeit smooth.
Cascading dips during prolonged acceleration.
Adjusting the fuel level
Adjusting the fuel level is where carburetor adjustment begins. On Solex and Ozone carburetors this process is practically identical, so that it will help the user of both types. First, warm up the engine a little; you can carry out this operation after the trip. We start by disconnecting the fuel line hose; this must be done carefully so that the hot fuel does not burn you. Next, we remove the top cover of the carburetor (after first freeing the carburetor from the air filter “pan” covering it. Then we disconnect the cable of the choke lever and carefully remove the cover, this must be done so as not to damage the floats. Now we arm ourselves with a ruler, preferably, in fact, a caliper , but a ruler will do. You need to measure the distance from the top edge of the gasoline to the cap, it should correspond to about 24 mm. The fuel level in the chambers may vary, since the carburetor is very rarely located perfectly horizontally, so you need to take the average result. If the result is outside installed frame.Then the adjustment on the Solex carburetor comes down to the fact that you just need to bend the float holders in the desired direction.
Idle speed adjustment
The Solex device is such that all adjustments can be made absolutely easily with just instructions. Adjusting the idle speed comes down to turning the screw with a screwdriver. First, we find the hole with this screw; it is located at the bottom of the Solex carburetor, next to one of the holes for attaching the carburetor to the manifold. Now we tighten the adjusting screw until it stops and unscrew it back 5 turns of the screwdriver. Next, start the engine and completely remove the choke. Now you need to rotate the screw to set the idle speed to the minimum value at which the engine will operate stably. If the tachometer shows a number of about 850 rpm, this will mean that the Solex is functioning quite properly.
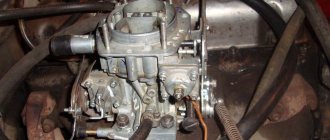
Repair
Dismantling is carried out as follows:
First of all, the air filter is removed along with the housing so that it does not interfere. To do this, you need to unscrew the four bolts and remove the mounting plate, after which the breather hose and the air intake pipe are disconnected. Now you can remove the filter box.
Access to the carburetor is now free and you can now begin to remove it. First you need to disconnect the fuel hose and the thin one coming from the distributor.
Disconnect the wire that controls the solenoid valve.
Next, the throttle control lever is disconnected from the rod. To do this, you can pry it off with a screwdriver. The suction cable is immediately removed by unscrewing the 2 bolts securing it.
Next, you need to remove the thrust spring that connects it to the intake manifold.
After the carburetor is completely freed, 4 nuts are twisted on the sides, which secure it to the manifold, after which it is easily removed from the studs.
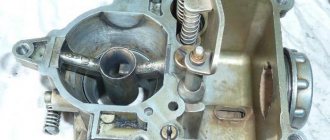
Next, the carburetor should be wiped with a rag to remove external dirt, and then rinsed with acetone or gasoline. It must also be disassembled for deep cleaning. This is done as follows:
First, the carburetor cover is removed.
Then the main jets of the primary and secondary chambers are unscrewed. You can screw them together with a flat screwdriver.
After the fuel, you need to unscrew the primary and secondary air jets, then remove the emulsion tubes that were under the jets.
Next, the screw - the accelerator pump valve along with the seal - is dismantled.
Using pliers, the diffusers of the primary and secondary chambers are removed.
Using a flat-head screwdriver, unscrew the fuel nozzle housing of the secondary chamber.
Then the accelerator pump diaphragm cover is removed, along with the spring and the diaphragm itself, which is secured with four bolts.
The throttle valve drive is removed by unscrewing the two screws that secure it to the carburetor body.
Having disconnected the draft, the carburetor bodies are carefully separated.
After complete disassembly, it is necessary to check the parts for damage and, if any, replace them with new ones.
Device
Operating principle
Fuel enters the carburetor through a needle valve and a special mesh filter. The valve is connected to the float via a cable, which allows the fuel level in the float chamber to be maintained at the required level.
From the float chamber, fuel is supplied through fuel jets to emulsion wells and tubes, where it is mixed with air, which flows through air jets. Then the resulting mixture passes through sprayers into small and large diffusers.
After this, the emulsion is supplied to the hole, which is blocked by the so-called. with a needle, screw the quantity where additional mixing with air occurs. Next, the mixture is supplied to the inlet pipeline.
Design features
The main feature is the presence of two independent devices in the carburetor. The first of them operates at idle speed (it includes vacuum and electric valves equipped with fuel and air jets). The second is a failure of two cameras, which begin to work after the throttle valve is opened, i.e. after pressing the gas pedal.
Despite the fact that both systems operate independently, the composition of the mixture inside them directly depends on the level of fuel located in the float chamber. Accordingly, if the fuel level changes, this directly affects the functioning of the systems, since their regulation is disrupted. In particular, at idle, the engine begins to operate unstably and it becomes impossible to accurately set the idle speed.
Tuning
The VAZ 2106 carburetor modernization scheme includes several stages. At the initial stage, they increase the level of engine dynamics by removing the spring from the air damper drive. After this, you need to be prepared for a slight increase in fuel consumption. Next, the vacuum lever of the throttle valve is made mechanical. Take a steel wire and round it at one end.
The lever is placed under the drive fastening nut. In this case, the place where the outer lever protrudes should be between the wire and the second lever. After this, the nut is tightened tightly. The next step will be replacing the small diffuser. It is located in the main diffuser above the air valve. For replacement, an element with a marking value of “4.5” is selected instead of a diffuser marked “3.5”. The nozzle on the accelerator pump is also replaced here.
Select a sprayer with a different marking value - “40”. After this comes the stage of increasing the jets. As a result, we must keep in mind that fuel consumption will increase. First, they are upgrading the primary compartment. Here they put a fuel type jet, marked as “125”, and an air jet, with a marking value of “150”. After the operations have been completed, you can conduct a rehearsal of starting the car. Acceleration and power should increase.
If this happens, then you can change the jets in the secondary compartment, selecting the marking “162” for fuel, “190” for air. To carry out carburetor tuning, you must have not only technical knowledge and relevant skills, but also common sense. What is better: tuning the VAZ carburetor, replacing it? Or maybe we should leave everything as it is? In each specific case, you need to decide on the situation, based on your own experience, financial capabilities and necessity.
The result of tuning or replacing the carburetor will not be long in coming: the power and dynamic qualities of the car will increase. But at the same time, the consumption of fuel and lubricants and the toxicity of emissions will increase. That is why the issue must be approached responsibly and seriously.
Cleaning
High-quality cleaning of the VAZ 2106 carburetor can only be done if it is removed from the engine and completely disassembled. For cleaning, we need acetone, which corrodes dirt very well, compressed air, a medical syringe with several needles of different diameters, as well as a clean container for acetone.
Having removed the carburetor from the engine, it must be placed on a previously prepared clean surface and you can begin to disassemble it. Having halved the carburetor, it is necessary to remove all plastic and rubber elements and cuffs from it and place them separately, since they can be damaged by acetone. After the work is completed, pour acetone into a previously prepared container and place the carburetor body in it for several hours so that all the dirt is thoroughly deoxidized.
After the required time has passed, blow out the parts with compressed air. It is most convenient to blow out small holes in jets and other channels using a syringe and a needle of a suitable diameter. The air flow from the syringe simultaneously blows out dirt and dries off the acetone. It is not recommended to clean the jet holes with a metal wire as this can damage the internal channels and ultimately make adjustment difficult.
As you clean, check the condition of all rubber seals and gaskets for dryness or breaks. Very often, rubber cuffs and gaskets dry out, especially when the car has not been used for a long time.
Malfunctions
Since carburetors of the WEBER and SOLEKS families were completely copied from foreign analogues, their reliability is not satisfactory. It is enough to clean and adjust these units every 60,000 kilometers, and no problems will arise with the supply of fuel to the engines of your cars.
However, the most common devices are the OZONE family of devices. They need to be cleaned and adjusted twice as often. In addition, they have a lot of different diaphragms, which break every now and then. The most common breakdowns of these units are incomplete opening of the second chamber, as well as malfunctions of the accelerator pump.
Symptoms of the most common breakdowns.
Popping sound when you press the accelerator pedal, as if something is shooting into the carburetor.
Similar pops, but now it shoots into the muffler.
The idle speed is either too high or too low (floats).
The car thinks for a long time when driving on the highway. When you press the gas pedal all the way, it does not accelerate at all or accelerates too slowly.
When you shift into 2nd or 3rd gear and press the accelerator pedal, the car first slows down and then jerks forward with a sharp increase in speed.
The malfunctions indicated in points 1 and 2 arise due to detonation - micro-explosions of the combustible mixture. If detonation occurs in the intake manifold, it means the fuel mixture is too lean, too much air and not enough gasoline. If there is detonation in the muffler, it turns out that the fuel mixture is too rich and there is not enough air in it.
The detonation problem may be associated with a violation of the ignition timing angle. In any case, you should first try to eliminate detonation by adjusting the carburetor. In 90% of cases this helps.
The symptom described in point 3 indicates the need to adjust the idle speed. The situation indicated in paragraph 4 indicates that camera drive 2 is faulty. Eliminated by replacing broken parts. The symptom described in paragraph 5 indicates a breakdown of the accelerator pump - the diaphragm or spring must be replaced.
How to remove
You will need: keys “8”, “10”, “13”, a screwdriver.
1. Remove the air filter (see “Removing and installing the air filter on a VAZ 2106”).
2. Disconnect the return spring from the throttle valve drive lever of the first chamber and remove it.
3. Disconnect the choke rod (see “Replacing the carburetor choke rod”).
4. Using a screwdriver, disconnect the end of the transverse link of the throttle valve drive from the lever on the throttle valve axis of the first chamber and...
5. ...move the pull to the side.
6. Disconnect the wire from the idle air control solenoid valve.
7. Disconnect the vacuum hose to the vacuum corrector of the ignition distributor-interrupter.
8. Disconnect the crankcase gas supply hose of the small branch of the crankcase ventilation system.
NOTE The hose is not secured in any way and is held on the carburetor pipe only by a tight fit.
9. Loosen the clamp securing the fuel supply hose and disconnect it from the carburetor.
USEFUL ADVICE To prevent gasoline from leaking out of the hose, plug its hole in any available way (for example, with a bolt of a suitable diameter).
WARNING It is strictly forbidden to remove the fuel supply hose from the carburetor pipe without loosening the clamp. In this case, the fitting of the pipe in the carburetor cover may loosen, and it will be squeezed out of the socket by the pressure of gasoline while the engine is running, which can lead to a fire.
10. Unscrew two nuts securing the carburetor to the intake pipe on the right and...
11. ...on the left, remove the flat washers located underneath them.
12. Carefully remove the carburetor, being careful not to damage the gasket underneath. If the gasket is stuck to the carburetor flange and comes off with it, carefully pry it off with a knife blade. If you plan to keep the old gasket, install it on the intake pipe studs in the same position as it was before removal, since the gasket is crimped in accordance with the shape of the channels on the lower flange of the carburetor. Replace a badly compressed gasket.
13. If you are not planning to install a new carburetor immediately, cover the intake pipe opening in any way (for example, with a clean rag) to prevent foreign objects from getting into the pipe.
14. Install the new carburetor in reverse order.
USEFUL ADVICE When attaching the carburetor to the engine of a VAZ 2106 car, follow two basic rules: - when tightening the carburetor mounting nuts, the engine must be cold. If this work is carried out on a not warmed-up engine, after cooling the connection will weaken and excess air will be sucked into the intake system under the carburetor, disrupting the normal operation of the engine; — gradually tighten the nuts crosswise without excessive force. If the nuts are tightened too tightly, the flange of the carburetor body is deformed, the heat-insulating gasket between it and the throttle body cracks, and a gap appears between them, which is not compensated even by a new gasket, through which air is also sucked in.
15. After installing the carburetor on a VAZ 2106 car, adjust (if necessary) the drives of its air and throttle valves.
When is adjustment needed?
Adjusting the carburetor unit is no more difficult than adjusting the clutch drive on a VAZ 2107 , since it only involves adjusting the jets. In some cases, they need to be cleaned of resins and other contaminants; the presence of contaminants is felt by power dips in the process of accelerating. Many car owners claim that Ozone carburetors are not a very good option and recommend replacing them with Solex.
However, the signs that the device has begun to prepare an enriched mixture and needs to be adjusted are the same for both types of units:
- Increased fuel consumption.
- Frequent overheating of the motor.
- Black smoke from the exhaust pipe and pops.
- Loss of power.
The preparation of a lean mixture is characterized by the following characteristics:
- Popping sounds in the carburetor.
- Loss of power.
- Engine overheating.
Of course, you don’t always need to immediately grab a screwdriver and turn the adjusting screws - perhaps it’s something else. For example, when the idle speed floats, air may leak through the intake manifold gasket, or there may be a breakdown of the brake booster diaphragm. But even the reasons listed are not all the options, so specific recipes for eliminating certain problems cannot be given. The issue should be addressed comprehensively, taking into account the connection between vehicle systems.
Preliminary stage
Before you properly adjust the carburetor on a VAZ 2106 with your own hands , it is important to carry out a number of work steps:
- Adjust the thermal clearances of the gas distribution mechanism.
- Set the optimal ignition timing.
- Open the air damper completely.
All work on setting up the carburetor unit is carried out on a warm engine. Do not forget that during the process you may need new parts and rubber products, so it is better to purchase a repair kit in advance.
How to Adjust the Carburetor on a VAZ 2106 Video
Exactly how to adjust a Lada carburetor 2106?
The legendary “six”, which was, perhaps, the main car in the country, is increasingly found on our roads. Currently, few people specialize in the repair and maintenance of VAZ classics, and it is quite difficult to find a specialist to configure its power system. However, any car owner is able to independently create a unit for preparing a combustible mixture; to do this, it is enough to use the recommendations of experienced drivers.
Setting idle speed
The process involves two screws that set the quantity and quality of the mixture. For high-quality settings, having a gas analyzer will not hurt. Before adjusting the carburetor on a VAZ 2106, you need to know about the restrictive plastic bushings that are pressed onto the adjusting screws. These plugs do not allow you to violate the factory settings. If this factor prevents you from setting XX normally, then you should break them out with a slotted screwdriver.
Idle speed control technology:
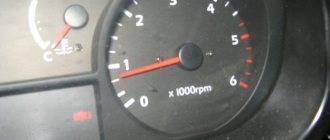
- With the air damper open, set the crankshaft speed screw to 800-900 rpm.
- Rotate the quality screw to set the maximum engine speed.
- Using the quantity screw, set the speed on the tachometer to 950-1030 rpm.
- Use the quality screw to set the maximum speed again.
- Repeat these operations until the speed of 950-1030 rpm does not coincide with the maximum speed set using the quality screw.
- After the moment of coincidence, return the quality screw to the position where the engine speed was 800-900 rpm.
If you have a gas analyzer, use a quality screw to achieve a CO concentration in the exhaust gases of 0.5-1.2%. The final position of the screws must be secured with plastic sealant to prevent spontaneous unscrewing.
How to prepare the engine for idle speed adjustment
Adjusting the idle speed not only stabilizes engine operation in this mode. Correct settings will ensure a minimum amount of toxins in the exhaust gases, but you can only check the CO2 level using a special device. The idle speed adjustment is carried out on a fully serviceable carburetor with the level in the float chamber set, otherwise it will not be possible to achieve stable idle speed.
Before tuning, it is advisable to replace the air filter or at least check the condition of the old one, but the entire adjustment process is carried out only with the filter installed. Before adjustment, the engine is warmed up to operating temperature. The sensor should show the coolant temperature within 90°C. Also, before adjusting, you need to make sure that the thermal clearances of the valves correspond to the norm, and the ignition is set strictly according to the marks. Also, before setting, you need to make sure that the air damper is fully open. This is easy to verify even with an air filter installed.
Adjusting the rods
An equally important stage in the process of adjusting the “six” carburetor is performed through the transitions:
- Remove the air filter and its housing.
- Measure the distance between the central points of the tips, it should be 80 mm .
- To change the length of the rod, release the tip with a screwdriver and unscrew the lock nut with an “8” wrench, and then perform the adjustment by rotating the tip.
- Tighten the fasteners and install the rod in its original place, start the engine and press the gas pedal all the way. If the throttle does not open completely, the damper has a travel reserve.
When asked how to further adjust the carburetor on a VAZ 2106, experts recommend performing a few more simple steps:
- Remove the end of the longitudinal linkage and unscrew the locknut.
- Reduce the length of the rod, secure it and again check the degree of opening of the damper by pressing the gas pedal to the floor. The damper must be completely closed.
- If it is necessary to increase the rod length, you need to loosen the throttle cable.
List 3.. Applicability of carburetors depending on the VAZ 2106 car model and engine type Car model
Carburetors have 2 versions of the idle system: - with an electromagnetic valve (EMV) with an idle jet. Voltage is supplied to the valve when the ignition is on from the fuse box; — with an idle jet placed in a plug holder. There are three more common reasons for the disappearance of idle speed: - contamination of the idle jet; — lack of power supply to the EMC; — EMC burnout. Note This section discusses the version of the idle system with EMC. If your VAZ 2106 car uses a carburetor with an idle jet located in a plug holder, try to eliminate the malfunction as follows: - use a slotted screwdriver to unscrew the plug holder with an idle jet located in the carburetor body; - Using two fingers, remove the idle fuel jet; - pay attention to the central hole. Use a piece of wire or compressed air to remove debris from it, make sure that the central hole is clean; — put the fuel nozzle in place; — put the plug holder in place and tighten it with a slotted screwdriver until it stops. You will need: “8”, “10”, “12”, “13”, “14” wrenches, a slotted screwdriver, an auto tester, a 12 V probe or test lamp with wires, a piece of cable with stripped ends , compressor or air pump. 1. Remove the air filter cover by unscrewing the three nuts with a 10mm wrench. 2. Remove the air filter element. Unscrew the four nuts with an “8” wrench; Without separating the crankcase ventilation line, move the base of the air filter to the side.
3. Turn on the ignition on the VAZ 2106 car. Remove the power cable from the EMC. Try touching the power cable terminal to the EMC terminal several times. If at the moment of contact you hear distinct clicks, it means that power is supplied to the valve and the valve itself is in order. Check the condition of the idle fuel jet... 4. ...cont. Then, using a 13" key ("12" or "14" key, depending on the version), unscrew the EMC from the base of the carburetor. Using two fingers, remove the jet. Pay attention to the central hole. Use a piece of wire or compressed air to remove any debris from it, making sure that the central hole is clear. Reinstall the fuel nozzle. Place the EMC in place and tighten it by hand until it reaches the limit. Attach the power cable and start the power unit.
5. If clicks are not heard at the moment of contact, unscrew the EMC from the base of the carburetor (see point 4). Using an auxiliary piece of wire, apply the “+” from the battery to the EMC terminal, and use its body to touch the “-” terminals of the battery several times. If there are no clicks, the EMC is burned out. Replace with a working one, checking it in advance. 6. If there are clicks when connecting the valve directly, put the EMC in place. Turn on the ignition and use a tester or test lamp to check the presence of “+” at the terminal of the EMC power cable. If there is no power, the wiring is faulty or fuse No. 9 (8 A) has blown. Replace the fuse or (if it is working properly) check the wiring (see paragraph 9 “electrical equipment of the VAZ 2106 car”). Recommendation To get to the nearest auto shop, you can first convert a damaged EMC into a forced open one. To do this, unscrew the EMC from the base of the carburetor and remove the idle fuel jet. Remove the EMC core and put the fuel nozzle in place. Place the EMC in place and tighten it by hand until it reaches the limit. Attach the power cable and start the power unit on the VAZ 2106 car. Keep in mind that when using such a valve, problems may arise with turning off the engine: it will try to work after the ignition is turned off. In such a situation, try not to turn off the power unit immediately, but let it idle for at least five minutes, and after turning off the ignition, slowly press the gas pedal to the limit.
Next page""""""
- 10. 11. 12. 13. 14. 15. 16. 17. 18. 19. 20. 21. 22. 23. 24. 25. 26. 27. 28. 29. 30. 31. 32. 33. 34. 35. 36. 37. 38. 39. 40. 41. 42. 43. 44. 45. 46. 47. 48. 49. 50. 51. 52. 53. 54. 55. 56. 57. 58. 59.60. 61. 62. 63. 64. 65. 66. 67. 68. 69. 70. 71. 72. 73. 74. 75. 76. 77. 78. 79. 80. 81. 82. 83. 84. 85. 86. 87. 88. 89. 90. 91. 92. 93. 94. 95. 96. 97. 98. 99. 100. 101. 102. 103. 104. 105. 106. 107. 108. 109. 110. 111. 112. 113. 114. 115. 116. 117. 118. 119. 120.121. 122. 123.124.125.126.127.128.129.130.131. 132.133.134. 135.136.137.138.139.140.141.142.143.144.145.146.147.148. 149.150.151.152.153.154.155.156.157.158.159.160.161.162.163.164.165.166. 167.168.169.170.171.172.173.174.175.176.177.178.179.180.181.182.183. 184.185.186.187.188.189.190.191.192.193.194.195.196.197.198.199.200.
coming
What do we have after proper adjustment of the carburetor unit of the “six”?
Checking the adjustments of the fuel mixture preparation unit is the same important maintenance step as monitoring the condition of the car battery . An integrated approach to setting up the carburetor guarantees not only a comfortable mode of movement, but also a lot of useful points:
- An increase in power and a confident increase in speed.
- No failures in the operation of the internal combustion engine in the low and medium speed sector.
- Improved dynamic characteristics - the car picks up speed faster and accelerates in a short time.
- Optimal engine response, which is expressed in the responsiveness of the gas pedal.
The listed qualities make it possible to effectively use the combustible mixture, which is necessary both in urban traffic jams and on country roads. Therefore, proper adjustment of the carburetor unit will help the car gain speed in a timely manner and complete the planned maneuver.
A carburetor is a component that prepares the fuel mixture for the engine. Its task is to ensure the correct proportions of mixing air with gasoline. The ideal ratio is: 1 portion of gasoline per 15 portions of air. During operation, the adjustment of the VAZ 2106 carburetor gradually gets lost, which leads to excessive enrichment or depletion of the fuel mixture with gasoline.
Carburetor diagnostics after adjustment
Now you need to make sure that all settings are set correctly. To do this, you need to start the engine and watch it idle. Is he starting to trip? Next, press the accelerator sharply and also sharply release it. Can you hear any dips? If yes, the fuel quality adjustment screw needs to be unscrewed a little.
During heavy braking, the engine should continue to operate stably. If it stalls, you need to slightly unscrew the quality screw.
Thus, you now know how to adjust the carburetor on a VAZ 2106 on your own without special tools.
Experienced carburetor technicians! If you find inaccuracies in the article and want to share your experience, write your comments. Your opinion will be very useful to all readers of the site. Sixes are often equipped with DaAZ and Solex carburetors. Is there a fundamental difference in adjustment between them? Also interested in your opinion.
This article is part of a series of 9 lessons dedicated to 7 carburetors. To view all nine lessons, follow the link: https://7vaz.ru/chto-takoe/karbyurator.html
After reading the article, you will learn how to correctly adjust the carburetor on a VAZ 2106. Several modifications of carburetors were installed on VAZ-2106 cars: 2103, 2106, and since 1980, the model’s engines received devices 2107-1107010-20 providing for operation with a vacuum ignition timing control system and modification 2107-1107010-10 for cars without such a system. It is worth noting that carburetors 2107-1107010-10 are easily replaced with the earlier device 2106-1107010.
The VAZ-2106 car deserves at least a few words about itself in our article. It was produced not only by the Volzhsky plant, but also by the Syzran Roslada, Izhevsk IzhAvto, and even the Ukrainian Anto-Rus. Over the entire period, more than 4 million and 300 thousand copies of various modifications were produced! The car rightfully received popular recognition for its comfort, reliability, and for a long time was a prestigious acquisition.
Adjusting the VAZ 2106 carburetor consists of two stages: adjusting the removed carburetor, and adjusting the carburetor installed on the car’s engine.
Adjustment of a removed carburetor is carried out in several steps listed below:
1. Float adjustment
The fuel level in the VAZ 2106 carburetor depends not only on correctly made adjustments, but also, of course, on the serviceability of the shut-off device, which consists of a shut-off valve and a float. Look at the picture below:
Adjusting the float of the carburetor VAZ 2106
On a vertically located carburetor cover, make sure that the float tongue only touches the ball, but does not recess it. The distance from the surface of the cover with the gasket to the float is set equal to 6.5 ± 0.25 mm. And use the tongue to adjust this value. It is also necessary to check the full stroke of the float; it should be 8±0.25 mm. (from the surface of the gasket to the float), and is installed by bending the float stop. The process of adjusting the carburetor float mechanism is well described in the article .
Although this item is related here to adjusting a removed carburetor, it can be done without removing the carburetor from the engine.
2. Adjusting the pneumatic drive of the throttle valve of the second chamber
Pneumatic drive of carburetor VAZ 2106
The adjustment is carried out with the throttle lever of the 2nd chamber disconnected from the intermediate lever pin. Having fully opened the throttle of the second chamber, we recess and hold the pneumatic drive bushing in this position (it is not visible in the figure, the pneumatic drive rod is screwed into it), and by screwing (or unscrewing) the rod we ensure that the hole of the rod is opposite the pin of the intermediate lever. We put the rod on the pin of the intermediate lever and fix it with a lock washer, and the pneumatic drive rod with a lock nut.
3. Adjusting the position of the throttle valves
This operation boils down to checking and adjusting the full opening of the dampers. With maximum rotation of the damper control lever, the throttle valve of the primary chamber should be parallel to the chamber walls, the distance from the chamber wall to the edge of the damper should be 13±0.1 mm. (Figure “B” below). On the lever (3), you can bend the lower antenna to obtain the required clearance.
Position of the throttle valves of the VAZ 2106 carburetor
When the throttle valve of the second chamber (6) is fully opened, the same distance is 17±0.1 mm. (Figure “B”). It also needs to be checked; it is adjusted by screwing in (unscrewing) the pneumatic actuator rod. During adjustment, of course, it is necessary to completely recess the pneumatic drive bushing.
Another parameter, the value of the partial opening of the throttle of the first chamber (Figure “A”), is set equal to 6±0.1 mm. by bending the upper tendril of the lever (3) at the moment of contact with the lever (2).
4. Adjustment of the starting device
To begin, close the carburetor air damper completely, the rod (3) and the rod (4) should be in the position as in the figure below, and the rod (4) should not be moved by the rod (3). This can be achieved by bending the rod (3).
Adjusting the starting device of the VAZ 2106 carburetor
With the air damper closed, it is necessary to ensure a starting gap of the throttle valve of the first chamber “C” of 0.9-1 mm. bending the rod 7. It is convenient to carry out the measurement using a probe or a drill shank of a suitable diameter in the place shown in the figure.
If the rod (4) of the starting device is completely recessed, the air damper should open to the value of the starting gap “B” of 5.5 ± 0.25 mm. The starting gap of the air damper is adjusted by screw (5).
At this point we can assume that the adjustment of the 2106 VAZ carburetor removed from the engine is completed.
Adjusting the VAZ 2106 carburetor on the engine
Below we will talk about how to adjust the carburetor on the engine on a VAZ 2106. After installing the carburetor, you need to perform simple but necessary operations.
1. Adjusting the carburetor drive
More precisely, there are two carburetor drives: a starter control cable and a throttle valve drive.
Accelerator drive VAZ 2106
The fastening of the flexible rod (9) and the shell (8) must be fixed in such a position that with the starter button fully recessed, the air damper is fully open and fully closed when the button is pulled out.
By pressing the gas pedal (1) all the way, check that the throttle valve of the first chamber is fully open. If this does not happen, adjust the length of the longitudinal rod (13), which has a screw-on tip.
Also pay attention to the transverse rod (14); the distance between the centers of its tips should be 80 mm.
2. Adjusting the idle speed of the VAZ 2106 carburetor
The information below is valid if the engine is in good condition and the ignition timing is set correctly.
The carburetor idle system must be adjusted in such a way as to ensure smooth operation of a warm engine without load at minimum speed and at the same time the CO concentration should be in the range of 0.5-1.2%.
The idle speed adjustment of the VAZ 2106 is carried out with the engine warmed up to an operating temperature of 90 degrees Celsius. Having screwed screws (1) and (2) all the way, unscrew both by 2-3 turns, start the engine and warm up.
VAZ 2106 carburetor idle speed adjustment screws
If you have access to a gas analyzer, great, we proceed according to the following algorithm:
- Using the mixture quantity screw (1), we set the engine crankshaft speed to 820-900 rpm,
- We achieve a CO concentration of 0.5-1.2% by rotating the screw (2). Remember that when twisting, the mixture becomes leaner, and vice versa.
- The rotation speed will probably change; again, use screw (1) to achieve the nominal idle speed.
- If CO goes beyond the limits, return to point 2.
But often you don’t have a gas analyzer at hand, and you need to adjust the idle speed. You can do without expensive equipment, you will have to spend a little more time, but in return you will learn how to do it yourself.
Carburetor VAZ 2106 idle speed adjustment without a gas analyzer.
So, we have an engine warmed up to operating temperature and running:
- By rotating the mixture quantity screw (1), we set the rotation speed to 820-900 rpm;
- Using the mixture screw (2) we achieve stable, smooth engine operation. Please note, not maximum speed, but stable operation. Our task is to obtain smooth rotation of the crankshaft with the quality screw (2) turned out to a minimum.
- If necessary, set the nominal idle speed with screw (1).
It is advisable to repeat steps 1 to 3 several times to get better results. With a little practice, I think you'll get the hang of it.
At this point, the adjustment of the VAZ 2106 carburetor can be considered complete. I hope this article gave you the answer to the question: how to adjust the carburetor on a VAZ 2106. But if you find any inaccuracies, please let me know in the comments, I will be glad to supplement the article with details.
Good luck on the roads!
If the fuel level in the carburetor float chamber is incorrectly adjusted, it is likely that the car engine may not start at all (both cold and hot), or will start and stall.
There may be deterioration in power and throttle response, unstable operation in all modes, failures in engine operation, possible overflow or, conversely, depletion of the fuel mixture. The correct operation of the carburetor and engine in different modes depends on the correctness of this adjustment.
Installation of the required fuel level in the float chamber of the carburetor 2105, 2107 Ozone by setting two required gaps between the float and the plane of the upper part (cover) of the carburetor, ensuring its normal operation in all modes.
Tools required for adjustment
- round probe or drill with a diameter of 6.5 mm
- template (strip) made of metal or plastic 15 mm wide
Before making adjustments, check the parallelism of the side surfaces of the float relative to the imprint of the walls of the float chamber on the cardboard spacer. This will prevent the float from possibly touching the walls of the float chamber.
Checking the parallelism of the side surfaces of the float relative to the imprint on the cardboard gasket of the carburetor cover 2105, 2107 Ozone
In addition, it is advisable to check the serviceability (tightness) of the needle valve before making adjustments, since if the valve is faulty, adjusting the fuel level loses all meaning.
Checking and adjusting the fuel level in the float chamber of carburetors 2105, 2107 Ozone
Remove the carburetor cap
The image shows the approximate fuel level you should see when you remove the carburetor cap. The line runs in the middle of the inclined plane of the float chamber.
Approximate fuel level in the float chamber of carburetors 2105, 2107 Ozone
Place the cap vertically, with the fuel supply fitting facing up.
The float should hang, barely touching the spring-loaded ball at the top of the needle with its tongue, but not recess it. The tongue itself must be perpendicular to the axis of the needle valve. If not, bend it with pliers. This operation must be carried out very carefully, since there should be no nicks or dents left on the tongue.
Distance from float to cardboard gasket (carburetor cover is vertical)
We measure the distance from the carburetor cover gasket to the float. It should be 6-7 mm. In this case, the gasket should be pressed tightly against the carburetor cover body. The most convenient way to measure is with a drill with a diameter of 6.5 mm.
If the measured distance does not correspond to the required one, achieve the required value by bending the float bracket. To prevent the float from knocking on the bottom of the float chamber, another adjustment must be made.
We measure and adjust the full stroke of the float
Place the removed carburetor cover in a vertical position again. Use your hand to move the float to its farthest position. We measure the distance between the withdrawn float and the cover gasket.
It should be 15 mm, which corresponds to a float stroke of 8 - 9 mm. If it does not correspond to this size, then it is necessary to bend or bend the stop (tongue) located on the float bracket, which rests on the needle valve body and limits the travel of the float.
Measuring the full float stroke
The measurement can be carried out with a pre-prepared strip of metal or plastic 15 mm wide.
Notes and additions
— In a similar way, the fuel level in the float chamber of the Ozone carburetor of other modifications is checked and adjusted.
The legendary “six”, which was almost the main car in the country, is becoming less and less common on our roads. Nowadays, few people specialize in the repair and maintenance of VAZ classics, and it is quite difficult to find a specialist to set up its power system. However, any car owner is able to independently set up a unit for preparing a combustible mixture; it is enough to use the recommendations of experienced drivers.
Symptoms of a problem
If the carburetor begins to produce a rich mixture, you will understand this by the following signs:
- Fuel consumption increases
- Loud exhaust is heard from the muffler and the smoke turns black
If the engine receives a lean mixture, you will understand this by the following sign:
- Loud bangs are heard from under the hood.
In both cases, the engine heats up noticeably more, and its power is also lost.
If you encounter a similar problem, remember that it is a natural consequence of using the carburetor. Any element of the car requires care, regular inspection and maintenance. Therefore, the VAZ 2106 carburetor must be adjusted from time to time.
Repairing a VAZ-2106 carburetor with your own hands: video instructions
The production of the famous “sixes” at the Tolyatti Automobile Plant lasted 31 years - from 1976 to 2006. During this time, several modifications of these cars came off the assembly line, beloved by domestic consumers. In addition, they used different models of carburetors. The most popular of them were and remain now “Weber”, which was installed on all modifications of “sixes” produced before 1980, as well as “Ozone” and “Solex” - they were installed on cars from 1991 to 2000.
In this article we will consider the last two models. The thing is that they are the most modern and, in addition, their design was copied from imported devices that have increased reliability and can operate for a long time. These carburetors have a huge margin of safety, but even they fail from time to time and create serious problems for car enthusiasts. We are ready to teach you how to get rid of them without involving experienced specialists to help you.
Major breakdowns of VAZ-2106 carburetors
Both on the Ozone and Solex models, and on other carburetors that were installed on VAZ-2106 cars at different times, the following breakdowns are often encountered:
- failure of the accelerator pump;
- wear or damage to the diaphragm;
- incomplete opening of one of the chambers in which the preparation and enrichment of the air-fuel mixture is carried out.
Adjusting the drive
- Checking the length between the tips. The required size is 80 millimeters.
- If you deviate from this size, remove one tip.
- Loosen its lock nut and by rotating adjust the distance to the desired size.
- Tighten the nut and return the rod.
- You need to check the adjustment. To do this, our assistant presses the gas pedal. We observe the throttle valve to see if it has opened completely.
- If not, then you need to remove the tip from the lever and reduce the length of the rod.
- Now you need to see what position the damper is in when the gas pedal is released: does it close completely. If not, the pull needs to be lengthened a little.
- Next we work with the air damper. We weaken its drive. In the cabin, we completely recess the damper.
- Press the three-arm lever so that the flap opens all the way. In this position, tighten the locking screw.
- Checking the adjustment. To do this, we completely close and open the door from the passenger compartment again. If the damper has not opened completely, we carry out the adjustment again. If the outcome is positive, fully tighten the screw.
Adjusting the starter
These works can be performed directly in the car. But you will have to first remove the filter cover.
- We turn out the plug. Underneath we find the adjustment screw.
- If you carry out the work without removing the carburetor from the car, pull out the choke. If you have the device in your hands, press the three-arm lever. After the damper is completely closed, push the rod down until it stops.
- Let's see what the gap is between the camera and the air damper. A 5.5 mm drill will help us with this.
- If necessary, make adjustments by turning the adjusting screw using a screwdriver.
- We return the plug back.
- Now you need to check the distance between the camera and the throttle valve. The required size is 1 millimeter. A drill with a similar diameter is suitable for this. The gap is adjusted using a rod, which is either rearranged into a different hole or bent.
Adjusting the float system
Before you begin this work, you need to make sure that the needle valve is working reliably.
- We take a measurement between the float and the gasket. This distance should be 6.5 millimeters. A slight deviation of 0.25 millimeters is allowed. You can also simply use a suitable drill bit to measure.
- The clearance is adjusted by changing the angle of the float tongue.
- Turn the float all the way. We measure the distance to the gasket in this position. It should be equal to 8 millimeters. Using the tongue we achieve the desired value.
Adjusting the idle speed on a VAZ 2106
First you need to prepare the car. We warm up the engine to a temperature of 900 degrees. We ensure that the engine operates stably at idle speed.
Let's watch a video in which everything is shown in an accessible and understandable way:
The text instructions are as follows:
- Using the quantity screw, we achieve a crankshaft speed of 820 to 900 rpm.
- Using the quality screw, we bring the unit into stable and uniform operation. Then, by tightening the screw, we destabilize the operation of the motor and unscrew it again to restore it. Our task is thus to achieve the most stable engine operation with the leanest possible mixture.
- Using the quantity screw, we again bring the speed to the desired value.
- It is best to carry out the operation two or three times.
Adjusting the idle speed without disassembling or removing the carburetor
So, let's start adjusting the carburetor without interfering with its internals. Any carburetor primarily consists of:
- Idle jet holder.
- Throttle valve locking screw.
- Screw for adjusting the quality of the cold mixture.
- Idle speed adjustment screw.
Let's start with Ozones; these carburetors have an autonomous idle system. That is, when the engine is idling, the carburetor throttle valves are closed, and the mixture of air and fuel enters the space behind the throttle through the idle passage.
Adjusting the idle speed of the Ozone carburetor consists of adjusting two screws, one of which is responsible for the quality of the incoming mixture, and the second for its quantity. The screws can be found on the lower right side of the carburetor when viewed from the driver's side.
When adjusting the carburetor, the timing system, the carburetor itself and the ignition system must be in good working order. Adjusting the fuel level in the Ozone carburetor consists of the following steps:
- You need to tighten the mixture quality screw all the way and unscrew it four to five turns. That is, the courage will be enriched.
- We also tighten and unscrew the fuel quantity screw three turns.
- We start the warm VAZ engine or warm it up.
- Next, you need to adjust the idle speed screw so that at approximately 800 rpm the engine operates stably.
- And we tighten the quality screw gradually. At the same time, the speed should rise slightly, and then, with further twisting, begin to fall and the engine will begin to operate unstably. After the stage of unstable engine operation begins, unscrew the screw back by half or even a full turn until the engine begins to operate stably again.
- After this, the quantity is adjusted with a screw to the required 800-900 revolutions.
After adjusting the carburetor, it is worth checking its operation with a load on the generator, operation of the stove and light. Let's move on to Solex carburetors. How to adjust a Solex carburetor? Adjusting the Solex carburetor is almost no different from Ozone, the sequence of actions is basically the same. Solex carburetors have a conventional idle system.
The speed is regulated by a throttle stop screw and a screw with a plastic handle. Also, the mixture quality screw can be unscrewed eleven turns. The idle speed of the Solex is regulated by the quality screw, up to the same 800-900 rpm. Next, repeat the adjustment steps using the mixture quality screw. We also recommend watching this video on carburetor adjustment:
Unfortunately, it also happens that you cannot do without disassembling the carburetor, so the next chapter of our publication is about this.
How to set up a VAZ-2106 carburetor: preparation
Before you begin the adjustment, you need to perform a number of operations, namely:
- First you need to choose a place and prepare it where the carburetor will be disassembled and adjusted. It must be clean and covered with rags.
- Next you need to prepare the tools. To work, you will need a Phillips and flathead screwdriver, a set of wrenches and socket wrenches.
- Then you need to prepare a repair kit for the carburetor. This will include various rubber and metal parts.
- The last step is to disassemble the carburetor. Instructions for this work are written in the service book for the car.
Directly adjusting the carburetor should begin with adjusting the float, since the unit directly depends on it. The higher the float is, the more oxygenated the fuel mixture will be. This is good for a certain time, but subsequently the engine's performance decreases, which is why it needs more fuel. To prevent this, you need to adjust the float tongue. You should also set the mechanism so that its stroke is 8 mm. A smaller size will result in loss of power. After this, it is necessary to check the float system assembly, because thanks to it, fuel enters the manifold.
If a problem is detected, you will have to remove the accelerator pump, disassemble it, and then clean this unit.
Carburetor mixture adjustment
Here you need to configure the device at idle. The fact is that if there are problems, gasoline consumption increases significantly, and problems begin in the operation of the engine while driving. This is why setting the mixture is very important. It is performed as follows:
- The engine starts and heats up to 90 degrees.
- The screws for the quality and quantity of the fuel mixture are fully tightened.
- Two screws are opened three turns, after which the idle speed is adjusted.
The principle of setting the required idle speed is to slowly reduce the saturation of the fuel mixture with a quality screw. You also need to reduce this with the quantity screw.
The process of setting up the carburetor VAZ 2106 VAZ 2107
The vast majority of Volzhsky Automobile Plant cars of the sixth and seventh models are equipped with an Ozone emulsion carburetor.
This is a factory option, and therefore this type of carburetor will be considered in the tuning instructions below.
So, let's begin the process of setting up the carburetor, consisting of the following steps (observance of the specified sequence is mandatory!):
- Adjusting the throttle valve drive.
- Setting up the launcher.
- Adjusting the level of the fuel mixture in the float chamber.
- Adjusting the “idle” mode using the “quality” and “quantity” screws.
Traction adjustment
This final procedure consists of the following steps:
- first you need to unscrew and remove the housing of the air filtration and cleaning system;
- after this you need to measure the distance between the central guide rods of the unit. The size should be exactly 80 mm (factory parameters);
- then the operation of the accelerator is checked;
- The length of the pull rod is checked and compared with the value in the vehicle owner's manual.
This completes the work on adjusting the carburetor. Sometimes you still need to adjust the ignition timing. All these procedures are necessary for the smooth functioning of the carburetor. As we can see, if the sequence is followed, it is not difficult to adjust the device or repair it. It is only important to familiarize yourself with the nuances of the work in advance so that the result meets your expectations.