We repair the rear axle gearbox of a Gazelle car ourselves
The time comes when extraneous noise appears, howling, rustling, grinding in the main gear of the Gazelle car, and the gearbox heats up. This is a reason for an urgent inspection of the shank for the presence of play and oil, for the presence of metal shavings and metal fragments in it. Perhaps repairs and adjustments are needed, because the first signs of failure are obvious.
- Advice. Before you start, weigh your knowledge and capabilities. It may be better to contact a car service! If you are confident in yourself, start.
- For convenience and safety, install the gearbox on a stand, or clamp it tightly in a vice. Believe me, repairing such a unit requires rigid fastening and nothing will work on the table or floor.
- Work begins with setting marks on the bearing caps and crankcase. They are needed so that during assembly the parts fall strictly into place.
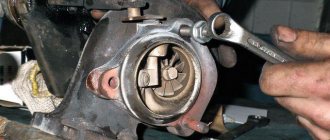
- Unscrew the bolts with a 12mm wrench and remove the yoke stoppers. Using a 17mm socket, unscrew the four bearing cap bolts. They will come off easily if you lightly tap them with a hammer.
- Use a special key - it can be made from a steel strip and a piece of round timber - or use a large screwdriver to unscrew and remove the yoke. The differential is free, remove it.
- Now you need to remove the driven gear. To do this, use a 17mm head to unscrew 10 bolts and knock it out with a soft metal hammer or a drift.
- Before disassembling the differential box, put marks on both cups and unscrew the 8 bolts with a “13” head and separate them.
- Remove the first side gear.
- Carefully knock out the crosspiece with a hammer and disassemble it, removing the washers and satellites from their axes.
- Remove the second gear.
- To make it convenient to remove the flange, lock it, unscrew the nut and unscrew it with a 24mm head. The flange can now be easily removed.
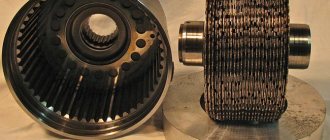
- Pull the drive gear out of the crankcase and remove the spacer sleeve, adjustment ring, and using a puller, the inner and support bearings, the adjusting washer, and knock out the old oil seal from the housing and remove the outer bearing.
- Using a drift, remove the bearing races.
Wash all parts with kerosene, carefully inspect and discard. If necessary, replace them with new or used ones, but suitable for use. Remember that in a gear pair - the main gear - the gears do not change individually. That's why they're a couple.
Assembling the gearbox is a complex and responsible process due to the presence of necessary adjustments, which require special devices. There is no point in describing them, since they are intended only for gearbox adjustments.
The time of use of the assembled gearbox, and therefore its performance, depends on the quality of this work and its correctness.
- Start by measuring the distance from the inner bearing race to the differential axis - according to the standards, it should be 109.5 mm with a tolerance of +0.02 mm -0.02 mm. This checks the correct location of the differential axis and the driven wheel.
- When finished, take the mandrel and press in the outer races.
- Using a tool and indicator, take measurements and calculate the thickness of the drive gear shim. This item must be completed after replacing the gear pair or assembling it with a new crankcase. Place the washer.
- Using a mandrel, press the bearing, without damaging it, onto the drive gear, insert the latter into the crankcase and install the adjustment ring, spacer sleeve, outer bearing, flange into place and tighten the nut with a torque of 16-20 kg/cm2.
- This was a preliminary build. It is needed in order to measure the axial play and the moment of resistance to rotation on the drive wheel -10 -15 kg/cm. The indicated values can be achieved by changing the thickness of the adjustment ring (if the reading is smaller, then it is necessary to reduce it and vice versa, if it is more, then the thickness of the ring should be increased.)
- Disassemble everything to install the oil seal and finally assemble it, turning the flange so that the bearing rollers are distributed correctly, tighten the nut with a 24mm socket with a torque of 16-20 kg/cm2.
- Cotter the nut.
- Assembling and adjusting the differential box begins with installing washers, side gears and the assembled spider into the cups.
- To ensure correct assembly, check if there is any play between the gear and satellites. If it is, you need to increase the thickness of the washers.
- Connect the cups according to the marks and tighten all bolts with a “13” head to a torque of 4 kg/cm2.
- The differential is assembled. Press the driven gear onto it and tighten the 10 fastening bolts with a “17” head with a torque of 9 kg/cm2. Then carefully press on the bearings and install the assembled assembly into the crankcase.
- Carefully install the outer races, place the covers according to the marks and tighten the bolts with a “17” head, but do not tighten them yet. Wrap the yoke and set the thermal gap in the bearings to 0.01 mm.
- Use an indicator to check the lateral clearance between the gears at six points. It should not exceed 0.15-0.25 mm. If the value differs from the recommended value, adjust it with the yokes. To increase the clearance, unscrew the nut on the side of the driven gear by one tooth, and tighten the other by the same amount. To reduce this operation, perform this operation in reverse order.
- After the gap has been established, tighten the four cap bolts with a 17″ socket to a torque of 8.5 kg/cm2 and a 12″ wrench and tighten the yoke stopper bolts. Finally, check the quality of the work.
Adjusting the temperature clearance of bearings
Adjustment of the GAZelle gearbox is done after final assembly of the mechanism. Having assembled the gearbox, you can begin adjusting it.
For the convenience of carrying out adjustment work, we install the assembled gearbox on a stand and secure the bearing yokes with a force of up to 9 kgf. Then, using a special wrench (a plate, possibly with a welded centering sleeve and handle), we adjust the thermal clearance in the bearings: tighten the front yoke nut until it stops, and then release it by 3 mm (the distance is well determined by a special movement indicator).
The adjustment can be made without using a movement indicator. In this case, the yoke nut is tightened until it stops, and then released one slot in it. The nut should rotate freely by hand.
This is quite enough to create a temperature gap in the bearings.
Self-repair of rear axle gearbox on Gazelle + Cherchezhi
Strange sounds appeared in the axle shaft, which means repair of the rear axle gearbox on the Gazelle is on the nose. The topic becomes immediately clear to drivers of cars of class “C” and above, since the concept of differential is much closer to them. It all starts with a slight hum, and if you do not intervene promptly, it will become stronger and stronger, eventually leading to complete failure of the axle shaft or the bridge as a whole.
Due to the fact that few people know where what mechanisms are located, not everyone undertakes to repair a car on their own, although it’s a trivial matter
. Everything will take an hour, an hour and a half, no special experience is required if you strictly follow our practical recommendations.
Repairing the rear axle gearbox on a Gazelle should only begin after you are 100% sure that this is the cause, otherwise you will screw it up.
- Before driving onto an inspection pit or a stationary overpass, it is necessary to warm up the transmission fluid in the axle shafts; it is enough to drive 5-6 kilometers at different speeds. This is done in order to drain the oil from the cavity as completely as possible. In its thick state, it is almost impossible to bring it down;
- Be sure to secure it with shoes under the front wheels;
Some recommendations on how to extend the life of the node:
- Do not overload the car;
- Try to switch to second gear as quickly as possible, since the first one kills the gearbox. Article to help “At what speed is it better to change gears”;
- Do not try to start from a standstill; in this way you will erase and tear off the splines from the rod;
- The oil change period is no later than 35,000-40,000 km. mileage;
- Try to minimize slipping on soft or slippery surfaces.
Now you are definitely a master who can repair the rear axle gearbox on a Gazelle yourself. Good luck to you. Don't rush off, at least on the Gazelle.
Checking the quality of adjustment on the stand
The contact patch of the teeth is a sure way to correctly determine how well the rear axle gearbox has been adjusted in any car (Gazelle is no exception).
To do this, the driven gear (its teeth) are painted with bright paint.
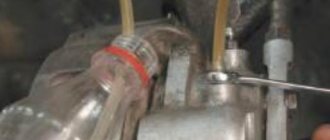
Then you should turn (repeatedly and in both directions) the drive gear by the flange, braking the driven gear. This operation is done before removing paint in the areas where the teeth touch (the appearance of a contact patch).
The location of the spot will indicate flaws in the previously performed adjustments.
If it is at the top of the teeth, then you should install a thicker pinion ring. But if the stain is located at the base of the tooth, then the thickness of this ring should be reduced.
If the stain is on the narrow end of the tooth, the distance between the drive and driven gears should be increased. If the stain is observed at the wide end, then this gap must be reduced.
If the spot is in the right place, this means that the adjustment of the rear gearbox has been successfully completed, and the GAZelle is now ready for a practical check of the quality of the adjustment work performed. We go on a short trip to make sure there is no “extraordinary” noise.
Do-it-yourself Gazelle Rear Axle Gearbox Repair
The popular phrase about the impermanence of everything that exists under the Moon immediately pops up in the head of the owner of a GAZelle, as his ear catches a third-party rumble here and there from below when the car is moving. In most cases, this is observed when driving at speeds above 30 km/h.
The most experienced driver will immediately determine the reason for the appearance of the “extraordinary” sound: the rear axle requires adjustment of the GAZelle gearbox. But the devil is not as terrible as he is painted. We can completely eliminate third-party noise, and do it with our own hands.
You should deal with “freelance” sound immediately, because delay is like death (gearbox). Violation of the mode of interaction of the gears will lead to their rapid wear and breakdown of the gearbox. The problem should not be put off in a long box; it is necessary to immediately begin to eliminate it.
Naturally, this is not a common thing. adjustment of the rear axle gearbox (GAZelle, a completely repairable car with your own hands, as you know). Therefore, you need to be prepared that the first results may turn out to be far from expected.
But do not despair if the adjustment is unsuccessful, but you need to read the “Operation and Repair Manual” again and repeat everything from the beginning.
Adjusting the GAZelle gearbox will first require you to perform an obvious operation - draining the transmission oil.
First you need to heat the oil in the gearbox. To do this, you can drive a car or, by raising the rear axle on jacks or a lift, start the car and engage the gear. This is necessary for high-quality oil drainage from the gearbox.
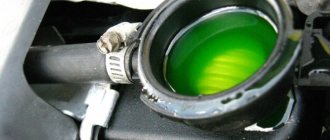
After draining the oil into some appropriate container, you should immediately inspect it for the presence of iron filings. The presence of metal in the oil indicates wear of the gears of the gearbox and the need to change them with the next adjustment of the gearbox.
Disassemble and reassemble the gazelle gearbox WITHOUT FEAR.
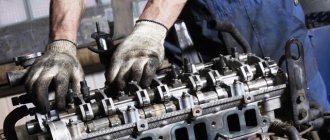
After making sure that the gearbox needs to be repaired, we remove it and disassemble it. If there are cavities, chips and other imperfections on the mechanism parts, then such parts must be inevitably replaced, and the gearbox must be adjusted.
Adjustment of the GAZelle gearbox is done after final assembly of the mechanism. Having assembled the gearbox, you can begin adjusting it.
For the convenience of carrying out adjustment work, we install the assembled gearbox on the shield and fix the bearing yokes with a force of up to 9 kgf. Then, using a special wrench (a plate, perhaps with a welded centering sleeve and handle), we adjust the thermal clearance in the bearings: tighten the front yoke nut until it stops, and then release it by 3 mm (the distance is perfectly determined by a special movement indicator).
The adjustment can be made without introducing a movement indicator. In this case, the yoke nut is tightened until it stops, and then released one slot in it. The nut should turn freely by hand.
This is completely enough to create a temperature gap in the bearings.
It is necessary to set the gap between the planetary gear and the shank. To do this, make a mark on the yoke opposite the cutout of the yoke nut. We install the movement indicator on the planetary gear and, by turning the gearbox shank, determine the required gap. Its value should be 0.15-0.18 mm.
If the gap is large, then do the following:
- unscrew the front bearing yoke nut one notch from the previously made mark;
- tighten the rear bearing yoke nut one notch;
- we check the gap acquired after adjustment;
If loosening the nut by one notch does not result in a suitable gap, adjust the nuts by one more notch. This is done until the required gap between the shank and the planetary gear is reached. Then we install the clamps on the yoke nuts.
Such actions do not disturb the adjustment of the differential temperature gap, which, in turn, will not cause overheating of the gearbox in the future.
The contact patch of the teeth is a sure way to accurately determine how well the rear axle gearbox has been adjusted in any car (Gazelle is no exception).
To do this, the driven gear (its teeth) are painted with bright paint.
Then you should turn (more than once and in both directions) the driven gear by the flange, braking the driven gear. This operation is done before removing paint in the areas where the teeth touch (a contact patch appears).
The location of the spot will give clues to deficiencies in the previously performed adjustments.
If it is in the area of the top of the teeth, then you should get a thicker pinion ring. But if the stain is located at the base of the tooth, then the thickness of this ring should be reduced.
If the stain is on the narrow end of the tooth, the distance between the drive and driven gears should be increased. If the stain is observed at the wide end, then this gap needs to be reduced.
If the spot is in a suitable place, this means that the adjustment of the rear gearbox has been successfully completed; GAZelle is now ready for a practical test of the properties of the adjustment work performed. We go on a short trip to make sure there is no “extraordinary” noise.
After the GAZelle gearbox has been adjusted, its quality should be checked actually, on the go. Do not forget to pour the oil prescribed in the “Operation and Repair Manual” into the axle gearbox.
The check is carried out in motion, the speed should be about 60-70 km/h, the duration of the trip. 20-30 minutes. An indicator of the adjustment properties will be the crankcase heating temperature - less than 95 degrees Celsius.
In order for the rear axle gearbox to guarantee its service life, you need to use it carefully and well.
- overload the car, especially in hot weather;
- pretend to be Schumacher and make sharp starts;
- overcome long climbs in one fell swoop. this will lead to overheating of the gearbox;
- pour any oil into the gearbox housing, and also violate the frequency of its change: in the summer - every 35 thousand km, in the winter - every 40 thousand km.
- forget to check the free play of the shank at every oil change. If it is found, it should be removed immediately;
By the way, the adjustment of the control gearbox (“GAZelle” means) is carried out using a similar technology.
Where to begin
Adjusting the GAZelle gearbox will first of all require you to perform a banal operation - draining the transmission oil.
First of all, you need to heat the oil in the gearbox. To do this, you can drive a car or, by raising the rear axle on jacks or a lift, start the car and engage the gear. This is necessary for high-quality drainage of oil from the gearbox.
After draining the oil into some appropriate container, you should immediately inspect it for the presence of metal shavings. The presence of metal in the oil indicates wear of the gearbox gears and the need to replace them with subsequent adjustment of the gearbox.
After making sure that the gearbox needs to be repaired, we remove it and disassemble it. If there are cavities, chips and other defects on the mechanism parts, then such parts must be replaced, and the gearbox must be adjusted.
Malfunctions of the rear axle gearbox
Like any other complex part in a car, the rear axle gearbox requires periodic maintenance, as well as repair of worn parts.
Signs of a gearbox malfunction may include:
- increased noise from the rear axle. May be caused by beam deformation, wear of axle shafts and gears, or oil leakage. If noise appears immediately after the rear axle gearbox has been repaired, the fault is due to incorrect adjustment;
- noise when accelerating a car can serve as a signal of wear on the differential bearings, damage to the axle bearings, or a low level of lubrication in the gearbox;
- noise when accelerating and braking the engine. The drive gear bearings are destroyed or severely worn, the gaps between the teeth of the main gear gears are incorrect;
- noise when turning indicates wear of the axle bearings, scuffing on the surface of the satellite axle, and the cause may also be their tight rotation;
- knocking sound when starting to move. The gap in the splined connection of the drive gear shaft and the flange has been increased, the gap of the main gear gears has been increased, the hole for the pinion axis in the differential has been broken.
To identify a malfunction of the rear axle gearbox at an early stage, it is recommended to periodically inspect it for oil leaks, external damage and deformations, and listen to extraneous knocks and noises.
Determining a gearbox malfunction at an early stage will save a very substantial amount. If one unit fails, it will necessarily lead to the failure of other parts. Thus, oil leaking from the bridge due to a leaking oil seal will entail replacing the main pair.
Due to bearing wear, play appears in the rear axle gearbox, which has a detrimental effect on the differentials. The axle should be rebuilt after 100-150 thousand mileage to identify and replace worn gears and broken bearings.
In what cases should it be used?
It is advisable to install a gearbox in the following cases:
- Very low water pressure in the water supply system.
In this case, low water pressure can lead to the failure of some household appliances, for example, automatic machines. And the bath will take a long time to fill, which will lead to discomfort, especially if a person is in a hurry to go to work. A gearbox with a pump, which significantly increases the speed of water flow, will help solve this unpleasant situation.
- Constantly changing water pressure
The situation happens quite often. When you open the valve, the water pressure is the same intensity, and after a few seconds it weakens. In this option, it is almost impossible to adjust the desired water temperature.
- Powerful water pressure
This problem usually occurs in apartments located on the 1st floor in apartment buildings. High water pressure is necessary to ensure that it reaches the upper floors. But for residents living below, emergency situations may arise, for example, water pipe connecting parts may burst and a leak may occur.
In addition to regulating the water pressure, the pressure reducer also protects household appliances connected to the water supply network from breakdowns: boilers, water heaters, dishwashers, showers, etc.
Rear gear repair
Repair and adjustment of the gearbox should be carried out by competent people who understand how it works and works. After all, if you adjust the gearbox incorrectly after repair, then after a very short period of time, you may again need to replace certain parts.
However, let's briefly look at the procedure for disassembling the rear axle gearbox, using the Gazelle car as an example.
Disassembling the axle gearbox
On the gearbox clamped in a yew, the bolts that secure the locking plates are unscrewed, after which the plates are removed. It is best to mark the bearing caps before removal in order to avoid confusion during assembly; we do the same with the outer races of the bearings. We inspect the bearings themselves for suitability for further use.
The play of the axle gears should not exceed 0.5 mm; if it is more, then most likely the differential box will need to be replaced. Next you need to unscrew the planetary gear, knock out and pull out the satellite axis.
We remove the drive shaft from the housing and knock out the inner rings of the roller bearing through a drift or soft metal lining. After a thorough inspection of all parts, we discard those with chips and cracks.
If all the gearbox parts remain the same, then you can limit yourself to replacing the oil seal and spacer sleeve. If any elements of the main pair have been replaced, then a new spacer washer is required. The inner race of the bearing is pressed onto the shaft, and after installing a new spacer sleeve, it is installed in the gearbox housing. Having installed the new oil seal and put on the flange, we tighten it all with a new nut. Reinstall the differential and tighten the bearing caps.
Adjustment
The answer to the question of how to adjust the rear axle gearbox is not very simple and requires certain skills. Incorrect adjustment after assembly will negate all your efforts after repair. Therefore, if you are not completely confident in your abilities, we recommend contacting a specialized service, where the adjustment will be carried out by specialists using special equipment.
We will not describe the entire adjustment process in this article; the most complete and clear guide is contained in the video. » alt=»»>