The rhythm of life in modern society forces us to save time. The presence of a vehicle has long ceased to be an indicator of luxury and emphasizing status with bright publicity. A car is a necessity; its presence makes it possible to move freely in personal comfort without being tied to time.
The key to high-quality use of a machine for personal and work purposes is serviceability and reliability. These parameters are achieved by regular visits to a service station and timely replacement of necessary consumable parts.
Often, the problem in the health of the car lies in components that are subject to constant wear, for example in the clutch system. In VAZ cars, model 2107, sometimes the clutch master cylinder fails; repair in such a situation is not effective and replacement must be performed. This part costs between 600 rubles and 1000 rubles
depending on the supplier and region of the Russian Federation.
Signs of a faulty clutch master cylinder
The mission of the clutch master cylinder is to transmit force to the slave cylinder directly from the clutch pedal using working fluid. In a situation where the cylinder does not do its job, there is a risk of losing control of the car, and it is not possible to stop the transmission and engine.
There are a number of actions that will help monitor the health of the system and react in time to a possible breakdown:
- Systematically check the normal level of working fluid in the tank; if there is a sharp drop, you should be wary and suspect a malfunction.
- If traces of working fluid are found on the master and working cylinders, there is a risk of system failure.
- The presence of dips in the operation of the clutch pedal may indicate a possible depressurization of the system and air entry.
- The inability to press the clutch pedal and unstable operation of the lever, extraneous sounds and vibration are not normal.
In addition to the above points, there are a number of parameters that directly indicate the type of malfunction and the search for a possible solution and troubleshooting. So, in the VAZ 2107 clutch system there may be difficulties with:
- The master cylinder is destroyed, cracked, chipped and leaking fluid.
- The cuff has exhausted its service life and has become unusable.
- The piston doesn't work.
- There is damage on the inside of the case.
In order to replace the clutch on a VAZ-2107, it is enough to purchase new spare parts. They are the same for all “classic” models. In addition, there are two ways out of the situation with a broken clutch master cylinder - repair and replacement with a new one. It is possible to repair the body and replace the rubber cuffs. But, as practice shows, repairs do not give the desired effect on cars with high mileage. Therefore, it is better to decide on a replacement.
Typical faults
A large number of rubber gaskets and seals are used for various seals in the cylinder. Most often, they are the reason for the unsatisfactory performance of the GVC. The symptoms will be the following:
- the clutch does not disengage;
- the pedal is not pressed;
- brake fluid leaks on the cylinder body;
- The clutch pedal does not return to its original position.
Such signs are characteristic not only of a malfunction of the main circulation system. Only leaks of brake fluid on the body indicate it reliably. You will have to repair or change the clutch master cylinder of the VAZ-2107, the price in the second case will be noticeably higher, but the service life will also be longer.
- it is difficult to change gears;
- the driven disk slips;
- vibration appears;
- The pressure bearing whistles;
- the clutch is hard to disengage;
- The pedal does not return from the lower position.
Destruction of the pressure plate and basket casing can lead to very serious consequences
Almost any malfunction is accompanied by extraneous sounds - noise, knocking, whistling, etc.
Replacement process
If you entrust the work to specialists at a car service station to replace the clutch master cylinder (MCC), then you should add about 500-700 rubles for the work
. If you have the skills and conditions where you can perform the maintenance yourself, then doing this work yourself is quite possible.
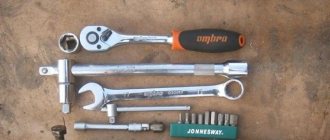
It will be necessary to ensure the availability of auxiliary tools:
- New GCS.
- Brake fluid.
- Keys.
- Rubber bulb.
Actions that will help complete the task must be clear and consistent:
- It is necessary to pump out all the liquid from the hydraulic drive reservoir and use a blower.
- Remove the expansion tank.
- Take key No. 13 and unscrew the tube with it.
- Unscrew the clamp and thereby disconnect the rubber hose that connects the cylinder and the tank.
- Remove the master cylinder.
- Install a new GCS by performing all steps in reverse order.
Thus, there is nothing difficult in replacing the main valve assembly yourself, but if there is no opportunity or knowledge to maintain the car, then it is best to entrust this kind of work to professionals. They will perform the replacement, tighten all connections and bleed the system after installing the new main circulation pump.
Heading
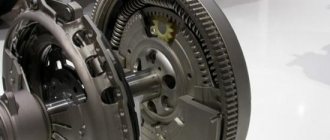
The VAZ 2107 clutch is a part of the transmission mechanism that is involved in transmitting torque to the drive wheels of the car. The clutch is located between the gearbox and the car engine and transmits rotation from the engine to the gearbox. When the pedal is pressed, the clutch is released and the engine is separated from the gearbox. When the pedal is released, the connection is restored again. The clutch ensures smooth starting of the car and silent gear shifting.
CHECKING THE CONDITION OF CLUTCH PARTS
q After disassembling the clutch parts, they must be thoroughly washed and inspected, paying attention to the reliability of the rivet connections, the absence of bents, wear, cracks, nicks and breaks on the drive and driven disks, spring plates, levers, support forks, springs, hub, casing, fork disengaging the clutch and on other parts of the mechanism.
q The friction linings of the driven disk, as well as the friction washer of the torsional vibration damper, must be replaced if their surfaces show signs of overheating, cracks or heavy oiling, and also if the distance from the surface of the clutch linings to the rivet heads is less than 0.2 mm.
q The surface of the pressure plate and flywheel, if there are burrs and ring marks on them, can be restored by grooving and grinding.
q The amount of metal layer removed during processing must be such that the thickness of the pressure plate after processing is less than 15.6 mm, and the thickness of the flywheel (the size from the machined surface to the plane of contact with the crankshaft flange) is at least 27.5 mm. In this case, during assembly, to maintain the pressing force, it is necessary to install additional steel washers under the heat-insulating washers, the thickness of which is equal to the value of the removed layer of metal from the surface of the disk.
Basic faults
The slave cylinder has several rubber seals, which often become unusable or become oily, causing the car’s clutch to “slip.” Replacing old seals with new ones will require using a lift or inspection hole, since the main cylinder is located in an inconvenient place.
When replacing seals, do not forget that there is brake fluid in the system; it must first be drained.
It is advisable not to touch the flare nut, otherwise additional adjustment will be required later. In order to replace the gaskets without removing the master cylinder, certain skills and experience are required.
Another cause of clutch malfunction may be wear of the release bearing.
To replace it, you will have to dismantle the gearbox. Brake disc linings wear out just as often, which is easy to notice by the characteristic noise when the pedal is released. And the most common problem with a clutch malfunction is air getting into the system. Air can be removed by bleeding.
CLUTCH DRIVE DISC ASSEMBLY
Produced in the reverse order of disassembly.
In this case, it is necessary to make sure that the marks made during disassembly on the casing, pressure plate and levers match, and the pressure springs are centered along the flanges of the casing. To prevent the needles from falling out of the holes in the levers, it is necessary to install rubber balls with a diameter of 8.5-8.0 mm or generously lubricate the needles with grease.
To avoid distortion of the pressure plate and to create the required pressing force, pressure springs must be installed only with the required load (Table 1) and one group.
After assembly, adjust the position of the pull levers. If special tool 7820-5079 is not available, this operation can be performed using the removed flywheel. In this case, the pressure plate, assembled by the clutch housing, is installed on the working surface of the flywheel. Between the pressure plate and the flywheel, washers of the same thickness - 8 mm - are placed in three places. By screwing in or unscrewing the adjusting spherical nuts of the support forks, ensure that the size from the end of the flywheel to the end of each lever is equal to (51 ± 0.25) mm (Fig. 3).
| Rice. 3. Adjusting the clutch release levers: 1 — pressure disk; 2 — clutch release lever; 3 — washer; 4 - flywheel |
After adjustment, caulk (punch) the metal of the shank of each spherical nut into the slot of the support fork. Adjustment of the position of the release levers is carried out only with the clutch removed from the vehicle. This type of adjustment is not permitted on a vehicle.
If the release levers, casing or pressure disk were replaced during assembly, it is necessary to statically balance the drive disk assembly by drilling metal from the pressure disk bosses that serve to install the pressure springs. The drilling depth from the edge of the boss should be no more than 25 mm, including the drill cone.
Permissible imbalance of the pressure plate is no more than 25 g.cm.
Table 2. Dimensions of mating clutch parts, mm
| Mating Parts | Hole | Shaft | Landing |
| Driven disk - gearbox drive shaft (spline connection) | 4+0,040+0,017 | 4-0,017-0,040 | Gap 0.0340.080 |
| Release Bearing - Bearing Clutch | Æ50-0.012 | Æ50+0.027+0.009 | Preload 0.0090.039 |
| Release Clutch - Transmission Input Shaft Bearing Cover | Æ38+0.027 | Æ38-0.050-0.085 | Gap 0.050.112 |
| Pressure plate (groove width) - release lever (lever thickness) | 9,55+0,075 | 9,55-0,058 | Gap 0.0500.183 |
| Pressure plate - needle bearing pin of release lever | 8+0,16+0,12 | 8+0,12+0,07 | Gap 0.0000.09 |
| Release lever - needle bearing pins - bearing needles | 11,3+0,050+0,025 | 8+0,12+0,07+ 2x(1.6-0.01) | Total radial gap 0.0050.09 |
| Support fork - needle bearing pin | 8+0,16+0,12 | 8+0,12+0,07 | Gap 0.0000.09 |
| Support fork (groove width) - release lever (lever thickness) | 10,5+0,18 | 9,5-0,058 | Gap 1.001.23 |
| Release lever (size from the axis passing through the centers of the holes for the needle bearings to the edge of the head of the lower part of the lever) | 14+0,3-0,3 | ||
| Working cylinder - piston | Æ25+0.023 | Æ25-0.02-0.04 | Gap 0.0200.063 |
| Master cylinder - piston | Æ22+0.033 | Æ25-0.040-0.070 | Gap 0.4000.103 |
Leveling up
To bleed, you will need brake fluid and a container for draining it, as well as a transparent hose with a diameter of 5mm. and an assistant who will have to press the clutch pedal until heaviness appears in it. After this, it must be clamped, and at this time a second person must unscrew the fitting and drain all the brake fluid. Air bubbles will be visible in the hose. The procedure should be repeated until these same bubbles disappear. Also, do not forget about the fluid level in the expansion tank.
9.4.2. Removing and installing the clutch master cylinder
Due to the location of the clutch master cylinder, removal is labor intensive as preparation work must be done to gain access to the clutch master cylinder. Removing the clutch master cylinder is carried out in the following order: - disconnect the terminals from the battery and remove it. Don't forget to have the security code for your radio with you;
| Rice. 234. Places for fastening the air duct and the AB partition (parts are shown at the fastening points with arrows): 1 - air duct; 2 — battery compartment partition |
— remove air duct 1 (Fig. 234) and partition 2 of the battery compartment;
| Rice. 235. Places for attaching the battery casing and the holder of the additional relay unit |
— if installed, remove the holder of the additional relay unit (Fig. 235, arrows 1 and 2); — Unscrew the fastening bolts (see Fig. 235, arrow 3) and remove the battery casing with the expansion tank of the cooling system. Set the tank aside; — Disconnect the hose from the intake manifold. Collect any leaking liquid;
| Rice. 232. Parts of the hydraulic clutch: 1 - reservoir; 2 - supply hose; 3 — pedal block; 4 — clutch pedal; 5 - safety holder; 6 — pusher rod; 7 — bolt, 20 Nm; 8 — main cylinder; 9 — locking clamp; 10 - gasket, always replaceable; 11 — O-shaped sealing ring; 12 — hose/pipeline; 13 — bracket; 14 — bolt, 25 Nm; 15 — bracket on the gearbox; 16 — nut, 20 Nm; 17 — bolt, 20 Nm; 18 — locking clamp; 19 — dust cap; 20 — gearbox; 21 — oil seal; 22 - O-shaped sealing ring, always replaceable; 23 — working cylinder with release bearing; 24 — bolt with shoulder, 11 Nm; 25 — corrugated cover; 26 — dust cap; 27 — bolt for removing air; 28 — union nut, 20 Nm; 29 - pipeline |
| Rice. 236. Pipeline retaining spring clamp (pressed out using a screwdriver) |
— insert a small screwdriver under the locking clamp 9 (see Fig. 232) of the pipeline and press it in the required direction (Fig. 236, arrow). Disconnect the pipeline from the main cylinder and remove the O-shaped sealing ring 10 (see Fig. 232); — remove the clutch pedal housing;
| Rice. 237. Removing the clutch pedal from the pusher rod |
— insert a screwdriver into the place where the clutch pedal is attached (Fig. 237) to the pusher rod;
— Pull the clutch pedal slightly towards the seat. Using a screwdriver, press both sides of the pedal mount inward (first one side, then the other) and disengage them; — remove the pedal by hitting it in the direction of the seat. If it does not come out, then it can be pulled in the same direction; — Unscrew bolt 6 (see Fig. 232) of the fastening and remove the clutch master cylinder. Install the clutch master cylinder in the reverse order of removal. First, install the pushrod holder onto the end of the pushrod. To fix the pusher, push it towards the front wall until the mount clicks into place. Move the pusher back and forth to ensure it is seated correctly. After installing the clutch master cylinder, bleed the clutch release hydraulic system. carmanz.com
Adjustment
Clutch adjustment on a VAZ 2107 is carried out by adjusting the clutch drive, or rather, the adjusting bolt, which is located at the end of the cable in the engine compartment. Incorrect adjustment causes the clutch to slip.
- The car is installed on an overpass or inspection hole.
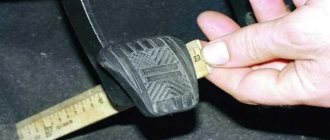
- In the cabin, the free play of the clutch pedal is checked and, if necessary, adjustments are made. To do this, use a 10mm wrench to loosen the locking nut of the pedal stop and set the required gap, approximately 0.4-2 mm.
- The pusher is cleaned of dirt and a penetrating lubricant is applied.
- The working cylinder is checked for free play of the pusher, on which the free play of the release bearing depends. To do this, push the clutch fork back by hand until it stops, while the free play of the pusher should be within 4-5 mm.
- Adjustment of the free play of the pusher is done with a 17 wrench, which will keep the adjusting nut from turning, and with a 13 wrench, loosen the tightening of the lock nut.
- The pusher is held with a key at 8, at the same time with a key at 17
- The adjusting nut is loosened and the required free play of the pusher is set, this is approximately 4-5 mm.
- The locknut is tightened by holding the pusher adjusting nut.
- Inside the car, the total free play of the clutch is checked, which should be approximately 25-30 mm. from the top position of the pedal to the start of switching on. If necessary, the entire operation is repeated several times until it is felt that the clutch is no longer slipping.
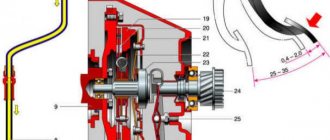
About the hydraulic drive device
To better understand what will be discussed, it is necessary to at least schematically imagine the design of such a drive. Let’s leave its purpose, structure, and role in the vehicle aside; in this case, the hydraulic drive itself is important.
Its implementation, as an example, as one of the possible options, can be seen in the figure below. This is enough to understand the structure and operation of the clutch drive, as well as to understand its role and significance in the vehicle.
Of the drive parts in the figure, it is necessary to note the following components:
- reservoir for filling brake fluid (1), which is used as a filler for the hydraulic drive;
- clutch master cylinder (2);
- hydraulic pipes (3,4,5) and hose (7);
- clutch slave cylinder (8);
- pedal (6) and return spring (9).
Replacing the master and slave cylinders
The master cylinder is replaced in the following sequence:
- Liquid is drained from the reservoir. This can be done using an ordinary syringe, or by removing the hose from the master cylinder fitting.
- The pipe fitting leading to the clutch slave cylinder is unscrewed.
- Using a 13mm wrench, unscrew the two nuts on which the main cylinder is attached.
Replacing the working cylinder:
- The spring is removed from the working cylinder.
- Using a 10mm wrench, unscrew the tube connecting the master and slave cylinders.
- Using a 13mm wrench, unscrew the two bolts of the working cylinder and remove them together with the plate.
After replacement, the working cylinder must be bled.
Dismantling process
Step 1. Remove the protective cap Step 2. Remove the lock washer Step 3. Remove the fitting Step 4. Unscrew the plug Step 5. Use a puller to remove the washer Step 6. Remove the contents of the cylinder
After this, unscrew the two nuts to 13. They secure the GC. Now the GC can be removed outside. We clean the cylinder of dirt so that we can continue working with a clean part. To do this, it must be washed.
You need to know that it is prohibited to use gasoline to wash the master cylinder. This leads to corrosion of the rubber elements. New brake fluid must be used.
To see the design of the clutch master cylinder, you need to release the retaining ring. This can be done using an awl or a special puller. The internal contents must be removed carefully, since the mechanism contains a spring.
You should not scratch the case with metal objects, including a screwdriver, as the surface may be damaged. Clean only with a rag and brake fluid.
Old rings must be replaced, even if they look slightly worn out. It is also necessary to carefully clean all grooves from possible dirt. The assembly process consists of the reverse of disassembly operations. The last step is to install a new retaining ring.
Replacing the clutch yourself
When replacing the clutch, you should carefully inspect all the parts being removed; it is quite possible that you will not need to replace the entire assembly; it will be enough to change only some parts.
The clutch is replaced in the following sequence:
- The battery terminals are disconnected.
- The gear shift lever is disconnected from the transmission.
- The exhaust pipe is disconnected from the resonator, then the working cylinder is disconnected from the gearbox housing. The cardan is disconnected from the gearbox itself.
- The bolts securing the starter to the transmission housing are unscrewed, but before doing this, the two lower nuts that secure the transmission to the engine block must be loosened.
- The gearbox is removed, then the clutch basket is dismantled. After removing the basket, the clutch disc is released
- At this stage, if necessary, the master cylinder and other components are replaced, for example, the clutch fork or antennae on the basket are changed.
- Assembly and installation of the unit is carried out in the reverse order.
When assembling, all parts must be thoroughly washed, but under no circumstances should this be done in gasoline or oil. Lubrication is carried out only with brake fluid.
The clutch is one of the most important components in a car, without which it simply will not move. Therefore, this complex system requires proper attention and care. Malfunctions in the clutch operation can lead to spontaneous movement of the car, and this is a direct threat to the lives of others.
Each car in its design is equipped with such a device as a clutch master cylinder. The car in question is also equipped with a master and slave cylinder in the design of the clutch mechanism. In this material we will pay attention to the clutch master cylinder on the VAZ 2107, its location, diagnostics and replacement features on the seven.
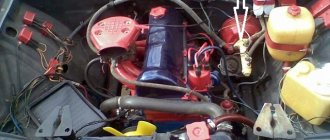
The master cylinder on a VAZ 2107 is located under the hood, directly on the wall separating the interior from the hood, near the driver’s feet. Directly above it is the expansion tank, and next to it are the vacuum booster and the brake master cylinder. Usually, simply looking at the product is enough to determine the problem. The presence of a leak indicates that the part is faulty and requires repair or replacement.
Purpose of the device
Cars are equipped with clutch master and slave cylinders, without which the operation of the mechanism is impossible. The master cylinder of the VAZ 2107 is designed to push out brake fluid. Below is a diagram from which you can visually find out the operating features of the unit.
When you press the clutch pedal, the piston moves in the device in question, thereby pushing out the brake fluid. This liquid enters the working cylinder through a tube, where the reverse process is observed (the liquid pushes out the piston). Brake fluid drives a piston, which is connected by a fork to the clutch disc. As a result, the clutch disc and flywheel are separated, allowing you to change gear. The GCS is also called the main one, since it is with its help that force is supplied from the pedal when it is pressed.
The need to replace the device: when required
Like all parts of any car, the GVC tends to wear out, resulting in the need for repair or replacement. The simplest breakdown of a product is wear of the boot, which can be determined by the characteristic signs of a brake fluid leak.
To identify a cylinder malfunction, an initial visual inspection is required. It is possible to repair a failed main circulation system on a VAZ 2107; for this you can look for repair kits, but this is not always rational due to the quality of modern spare parts, so it is easier and faster to replace it entirely. The malfunction can also be determined by the characteristic loss of pressure in the system, which is determined by pressing the pedal. Let’s take a closer look at how to change a faulty VAZ 2107 mechanism.
We change it ourselves
Replacing the VAZ 2107 clutch master cylinder begins with the need to pump out the brake fluid from the hydraulic reservoir. This can be done using a syringe or a rubber bulb. Together with this socket or a 10mm wrench, unscrew the bracket securing the expansion tank and move it to the side to gain access to the cylinder.
The next step involves removing the clutch expansion tank hose. To do this, you need to loosen the hose clamp, then disconnect the hose and position it so that it does not interfere with further work. If you want to remove the tank completely, this is done very simply.
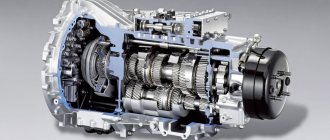
One of the transmission elements of the VAZ 2107 car is the clutch. Its design is single-disk, with a central spring and a hydraulic drive. The hydraulic clutch system includes, among other things, the master and slave cylinders.
During operation, there is a possibility of malfunctions in the operation of one or another clutch cylinder. This may result in fluid leakage through the pistons and o-rings, or wear, wear, or corrosion of the cylinder surface. Leakage of working fluid can cause airing of the hydraulic system and, as a result, failure of the vehicle’s clutch control mechanism.
VAZ design
“Classic” VAZ cars have a hydraulic clutch in their design, which is formed from a pair of cylinders: the worker (RC) and the main (MC). The driver acts on the GC by pressing the pedal. At this time, excess pressure is formed, which is transferred to the DC, which moves the shift fork. The main one is located on top, and the worker is located below.
You need to know that in models 2101-2107 and their modifications, this unit has kept the design unchanged, so before removing the clutch master cylinder, you need to purchase a new one, which will indicate any “classic” model.
The unit uses conventional brake fluid as the working fluid.
Clutch cylinder repair and replacement
In some cases, it may be necessary to remove the cylinder for repair. An exception in which it is necessary to replace the clutch cylinder with a new one is the deterioration (corrosion) of its inner surface that comes into contact with the piston during operation or the leakage of working fluid through a crack in the housing.
Before dismantling the master cylinder, you will need to drain the fluid from the hydraulic system (expansion tank). It is convenient to use a rubber bulb. Loss of fluid during repairs cannot be avoided, so a reserve will be necessary. Moreover, according to the regulations, the fluid must be replaced after 2-3 years, regardless of the car’s mileage, and replacing it during repairs will not be superfluous.
Next, you need to disconnect the fastening (clamp) of the expander and remove the fluid reservoir, unscrew the pipe mounting fitting and disconnect the hose from the clutch cylinder fitting. After this, unscrew the cylinder mounting nuts and remove it. If there is a need to inspect or repair the “seven” clutch cylinder, in other words, disassemble it, first you need to remove the rubber cap and remove the lock washer, then remove the sealing gasket with the fitting.
After this, using a key, unscrew the plug, remove the second stopper, remove two pistons with cuffs and a spring from the cylinder body. If they become dirty, you need to rinse all components in the working fluid and carefully inspect them for damage or wear, not forgetting to pay attention to the spring, which will need to be replaced if it reduces its elasticity. It is also necessary to carefully check the condition of the inner mirror surface of the clutch master cylinder.
Typically, if there are fluid leaks through the master cylinder seals, during its repair all “soft” elements must be replaced (they are all included in the repair kit). After an inspection or repair, the unit is reassembled in the reverse order, preventing solvents from coming into contact with the rubber elements, otherwise this could cause them to swell.
The clutch slave cylinder serves to receive the pedal pressure converted by the master cylinder and transmit it to the release bearing via the clutch fork.
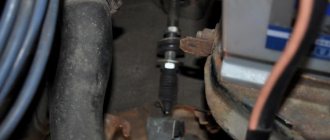
Before dismantling the VAZ 2107 clutch slave cylinder, the car must be installed on an inspection hole or use a lift, due to the location of this element on the clutch housing, which makes it difficult to access it without a hole. Before removing the cylinder, it is allowed not to remove the working fluid from the clutch reservoir. You can also avoid draining it from the hydraulic system even by disconnecting the tip of the clutch system hose. Of course, it will not be possible to completely avoid liquid leakage, but more on that a little later.
To remove the slave cylinder, you need to unscrew its pusher, remove the clutch fork spring, slightly unscrew the pipe hose fitting, unscrew the bolts holding the cylinder and remove the rod from the fork. After this, unscrewing the removed cylinder, you need to disconnect the pipeline hose without losing the sealing washer, and immediately screw a new working cylinder onto it, if it was planned to replace it, or a plug with a gasket prepared in advance. In this way, leakage of working fluid can be minimized.
To disassemble the working cylinder, you first need to pull off the protective rubber cap paired with the pusher, then remove the stopper and squeeze out the piston with sealing rings, plate and spring. Further, the procedure for inspecting and (or) replacing seals is similar to the actions performed when troubleshooting the clutch master cylinder.
After installing a new or repaired working cylinder in place, it is necessary to add brake fluid to the conservator and remove air (bleed the clutch) from the hydraulic system. During bleeding, if necessary, the clutch fork pusher is adjusted.
When choosing a similar new clutch cylinder for a “seven” in order to replace a failed one, you should be interested in the index marked on the cylinder. Another factor when searching for a spare part: a high price does not always mean the best quality of the product.
And today you will learn what the master and slave cylinders of the VAZ clutch
, how to remove and install them on a car, design.
In order to understand how the main and slave clutch cylinders of VAZs work, you need to know their design and the parts they consist of.
In principle, the master and slave cylinders of the VAZ clutch are very similar in operation and design to those.
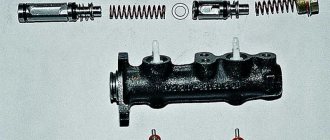
1 – main cylinder body; 2 – lock washer; 3 – fitting; 4 – gasket; 5 – cap; 6 – retaining ring; 7 – pusher piston; 8 – sealing ring; 9 – piston of the main cylinder; 10 – spring.
Before disassembling the clutch master and slave cylinders, they must be removed, to do this:
— remove the working fluid from the system, to do this, put a hose on the fitting, place a container and unscrew the fitting to the floor - three-quarters of a turn;
— press the pedal until fluid flows out of the system;
— disconnect the main and working cylinders from the pipelines;
— remove the tension spring 7 and the cotter pin from the edge of the pusher, then remove the working cylinder, to do this we unscrew two bolts;
— to dismantle the master cylinder, disconnect its hose from the reservoir and unscrew the two nuts that hold it on the pedal bracket studs.
To put it all together, do the same thing only in reverse.
And don’t forget to fill the fluid and bleed the system after assembly.
Repair
If the clutch pedal fails, in order to avoid unreasonable disassembly of the cylinder, it is worth initially bleeding the system and expelling any air that could get in when the fluid in the tank drops below the minimum permissible level. If this does not help, you should start repairing. For this case, there is a repair kit for the clutch master cylinder on sale, which, depending on the make of the car, contains the main wearing parts: cuffs, return spring, rod, retaining ring, etc.
Disassembling the main circulation pump 1. Remove the cover 7 and the mesh filter 8 of the filling tank. Remove any remaining fluid from the cylinder by turning it upside down and pressing the piston pusher 13 several times. 2. Remove the protective cap 14 from the cylinder body 5 and slide it along the pusher 13. 3. Remove the retaining ring 16 and remove the pusher 13 with thrust washer 15 from the body 5. 4. Remove piston 2 with sealing lips and return spring 6 from the body. To avoid damage to the sealing collars, when removing the piston, supply compressed air into the hole for fitting 21. Fittings 20 and 10 of the main cylinder with gaskets should not be unscrewed during disassembly if there is no leakage of working fluid through them.
When repairing the clutch master cylinder, you need to follow some tips : - when repairing the cylinder, you don’t have to completely remove the fluid from the hydraulic drive; — it is not recommended in kerosene, diesel fuel or gasoline, after which the cuffs and other rubber products may swell; the best option for washing is brake fluid; — before assembly, all parts must be lubricated with brake fluid; only the spherical surface of the rod in contact with the pusher needs to be treated with grease.
If faults are found that cannot be eliminated with the spare parts contained in the repair kit, then a complete replacement of the clutch master cylinder is necessary.
Dismantling the VAZ clutch master cylinder
1. Unscrew the plug, remove the protective rubber cap 5 and the locking ring 6.
This will give you the opportunity to remove all the contents from the housing: piston 7, o-ring 8, floating piston 9 with o-ring and piston return spring 10.
2. We check by external inspection the condition of the cylinder and the outer surface of the piston should not have damage, stripes or scratches. The internal diameter of a serviceable master cylinder should be within the range: 19.05:+0.025 –0.015 mm.
3. We also check the elasticity of the piston return spring and, if necessary, replace it with a new one.
4. Change the O-rings and check the protective cap at the rear end
cylinder and if damage is noticeable on it, you will have to replace it with a new one. In order to assemble all the parts into a pile, they need to be cleaned of dirt and washed with brake fluid.
Be careful and keep rubber products away from various liquids that can destroy them.
5. All parts are lubricated with brake fluid and assembled in the reverse order. Can be used for lubrication with preservation liquid NG-213.
1 – body; 2 – fitting; 3 – cap; 4 – pusher; 5 – sealing ring; 6 – piston; 7 – sealing ring; 8 – plate; 9 – spring; 10 – washer; 11 – retaining ring.
Hydraulic clutch drive device
The clutch release drive consists of:
- clutch pedal;
- clutch master cylinder (located in the chain immediately behind the pedal);
- moves the fork and pressure bearing;
- clutch release fork;
- pressure bearing;
- piping system (pipe)
Helpful Tips for Master Cylinder Repair
- When removing the clutch master cylinder, the working fluid from the hydraulic drive does not need to be completely drained;
- When washing cylinder parts, it is strictly not recommended to use liquids such as mineral oils, gasoline, diesel fuel or kerosene. Flush only with brake fluid to prevent swelling of the rubber parts;
- Before assembling the cylinder, lubricate all parts with brake fluid. For the spherical surface of the piston that contacts the pushrod, use grease.
After installing the master cylinder, do not forget to bleed the hydraulic drive.
Good luck with your clutch master cylinder repair.
The design of any hydraulic clutch system provides for the presence of two cylinders, the main and the executive (worker). They ensure the transmission of force from the pedal assembly to the clutch release fork and allow the driver to control its operation. If one of the cylinders is faulty, the mechanism cannot function; the clutch cylinder needs to be repaired or replaced.
Signs of faulty clutch cylinders
- The clutch “slips”, the pedal falls to the floor with almost no resistance;
- To depress the clutch pedal, the driver applies quite a significant force;
- The clutch disengages only if the driver presses the pedal sharply, and smooth pressing does not produce any result;
- Hydraulic fluid leaks appeared in the pedal area and on the cylinders themselves, the fluid level in the system was reduced.
To accurately identify the cause of the listed malfunctions, clutch diagnostics are carried out.
Clutch master cylinder repair
- First, remove the clutch master cylinder, which is attached to the pedal assembly. To dismantle it, you need to drain the working fluid through the fitting, carefully unscrew the fastening nut, dismantle the hoses and pipelines, and remove the fastening clamp.
- To disassemble the master cylinder, you need to remove the piston retaining ring, carefully remove the pusher and piston (it is important not to damage the cylinder body and piston).
- After this, you need to inspect all the parts of the cylinder and check their technical condition. A malfunction of the unit is indicated by signs of wear and distortion of the cuff, damage to the integrity of the hose and pipeline, the presence of corrosion and cavities on the cylinder surface and piston, and wear of the seals. You should also check the cleanliness of the pipeline and the gap between the piston and the cylinder itself (the permissible value of this gap is 0.15 mm).
- To repair the clutch master cylinder, you need to replace worn or damaged parts (cuff, mirror, hoses, piston, seals), and clean the pipelines.
- Finally, the cylinder is assembled. To do this, working fluid is applied to the mirror and the outer surface of the piston, the piston is inserted into the cylinder, a retaining ring and a pusher are installed, and a hose is connected. After installing the clutch cylinder, you need to bleed the hydraulic drive.
Clutch slave cylinder repair
- The slave cylinder is attached to the clutch housing and connected to the master cylinder via a high-pressure tube (pipeline). To dismantle it, you need to disconnect the pipeline and carefully unscrew the fastening bolt. After removing the working cylinder, you need to check the integrity of the boot and make sure there is no fluid leakage.
- After this, the cylinder is disassembled, the condition of the mirror and seals is checked, and the gap between the working cylinder and its piston is measured (it should also not exceed 0.15 mm).
- To repair the clutch slave cylinder, you need to replace the mirror (if it has scuffs, holes, or signs of corrosion), worn cuffs or a piston.
- Then the working cylinder is assembled and installed in its original place.
After repairing one of the cylinders, it is usually carried out.
Any mechanism must have action elements, as well as controls. The car clutch is no exception in this regard. Designed for short-term separation of the transmission and engine, it is an integral part of any vehicle and serves to ensure the ability to control the machine.
To transfer the impact from the driver to this mechanism, a hydraulic drive is usually used in passenger cars; One of the critical parts of such a device is the clutch master cylinder.
What is the Ford Focus II clutch master cylinder responsible for?
Ford Focus 2 has a hydraulic clutch engagement and release. The master cylinder is used to convert force into working fluid pressure. Failure of the main circulation system leads to the fact that it becomes difficult to control the machine. In some cases you have to stop moving.
The clutch master cylinder is responsible for transmitting the command to disable or enable the transmission of torque from the power unit to the transmission. When you press the pedal, the liquid through a sealed circuit from the main circulation center transmits force to the working cylinder. Next, the signal comes to the plug. It presses the release bearing, which allows you to separate the engine and gearbox.
Main malfunctions of the clutch system in Ford Focus 2
According to many car owners, this unit in the car is simple and easy to maintain, but this does not mean that its repair will take no more than five minutes. Every car owner needs to monitor the operation of the clutch, and if the first signs of failure occur, take immediate action.
Considering the simplicity of the design of the Ford Focus 2 GCS, its failure is a rare occurrence. However, this is not excluded. Why does the GVC fail, and what actions should be taken in this case?
The main reasons for the failure of the main circulation system:
- Loss of seal tightness.
- Self-repair errors.
- Air entering the main fluid circulation system due to a small amount of brake fluid in the reservoir.
- Microcracks in connecting tubes (occur for various reasons, the main one being natural wear).
Violation of the tightness of the cuffs also occurs due to their long service life. Swelling of rubber is caused by fuel or oil getting into the drive system, as well as the use of a non-recommended brand of fuel fluid. The presence of an air lock is usually associated with a system malfunction, in particular a brake fluid leak.
Required tools for replacement
Before you change the Ford Focus 2 GCS yourself, you need to make sure you have the necessary tools.
To replace the GCS you will need:
- New clutch cylinder.
- Set of socket heads, wrenches.
- Medical syringe.
- Two flathead screwdrivers.
- Container for waste liquid.
It is worth noting that to perform this procedure you will need the help of an assistant, otherwise the actions will take longer and be much more difficult.