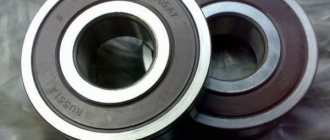
Signs of bearing failure
The main sign of a bearing failure on a VAZ 2110 is a slight knocking sound when the clutch is depressed. If this sound occurs in the summer, there is almost a 100% guarantee that a replacement will have to be made. If in winter, then this may be a simple change in the dimensions of the bearing cup due to a decrease in temperature. The metal from which the release bearing is made is extremely durable, so even if a knocking noise occurs, you can do nothing for a couple of days and just watch to see if it gets stronger.
Replacement instructions
If you are still sure that the release bearing of the VAZ 2110 has failed, then you need to get to work without delaying for long, having first purchased the same new bearing and other components that will be needed during the work.
Tools
- a set of keys;
A set of keys
- Screwdriver Set;
- container for draining transmission fluid;
- rags;
- new transmission fluid (if we plan to replace it at the same time).
Stages
In order to get to the release bearing, you will need to partially or completely remove several fairly large components of the car.
Preliminary work
Unscrew the left nut and loosen the right one that secures the hub. After the wheels are loosened, we lift the car on a lift or jack it up until its front wheels leave the ground. During this procedure, observe safety precautions and place the vehicle only on very strong supports.
- We dismantle the wheels.
- Remove the motor protection.
- We loosen the fastening on the transmission drive rod (after marking the previous installation location in order to simplify the adjustment of the gear shift lever during assembly).
- We disconnect the gearshift drive rods from the gearbox.
- Turn off jet propulsion.
- We dismantle the starter.
- We dismantle the suspension arm and ball joint located on the left.
- Remove the cover on the clutch housing.
- Disable the speed meter.
- We remove the left drive, leave the right one in place, just loosen the hub nut on it.
- We hang the motor (after placing a reliable support under it), which will make it possible to prevent the motor from moving and a possible break in the heater hose. We unscrew the fastenings of the supports located on the gearbox and disconnect the clutch housing from the cylinder block. We move the box away from the engine and remove it.
Removing the release bearing VAZ 2110
- Having released the lock, remove the bearing assembly first from the shaft and then from the holder.
- Remove the bearing from the coupling.
- Before replacing the old bearing, we check the new one. It should rotate freely and there should be no binding.
Installation location
Clutch system for VAZ 2110
Assembly occurs in reverse order.
Abstract: Car clutch
Unfortunately, for a long time there was no research into the development of the automotive industry in our country. In any case, there were few publications on this topic, and they were of a random nature. At the end of the 40s, the attention of domestic historians was attracted by the facts of the primacy of domestic scientists and technicians. Then it became obvious that a country that has become a great world power in the age of scientific and technological progress must have a worthy biography in this area, which would create the foundation for the image of a great power.
The beginning of work in this direction was the article by A.M. Kreer, published in the magazine "Automobile and Tractor Industry" No. 6 for 1950, in which for the first time in the post-revolutionary period the names of 39 Russian engineers, inventors, entrepreneurs were named who played an important role in the formation and development of the domestic automotive industry and transport, as well as the creators of the first Russian car: Evgeny Aleksandrovich Yakovlev (1857-1898) and Pyotr Aleksandrovich Frese (1844-1918).
Subsequently N.A. Yakovlev (1955), A.S. Isaev (1961), V.I. Dubovskaya (1962), L.M. Shugurov (1971), A.I. Onoshko (1975), N.Ya. Lierman (1976), V.N. Belyaev (1981) and Ya.I. Ponomarev (1995) conducted research in this direction. The discovery of A.I., an employee of the state archive of the Gorky region, deserves special attention. Onoshko. Among the glass negatives of M.P. Dmitriev, a photo chronicler of the Volga region, he discovered a fairly clear negative photograph of E.A.’s car. Yakovlev and P.A. Frese, according to which subsequently, independently of each other, V.I. Dubovskoy, Yu.A. Dolmatovsky, L.M. Shugurov and E.S. Baburin used a graphic-analytical method to determine the dimensional relationships of the structure and scale. This made it possible to determine the dimensions of the parts and, in 1996, to build a working copy of the car. Currently, another photograph of the first Russian car is known, placed by A. Shustov in the album “Illustrated Herald of Culture and Commercial and Industrial Progress of Russia 1900-1901.” Description of kerosene engines E.A. Yakovlev, which were produced since 1891 at his plant in St. Petersburg (B. Spasskaya St., 28), were published in the pages of the journal “Bulletin of the Imperial Technical Society” (issue XI, 1891).
A detailed description of the car itself was published in the “Journal of Latest Inventions and Discoveries” (No. 24, 1896), published before the opening of the All-Russian Art and Industrial Exhibition in Nizhny Novgorod, which took place on May 27 (June 9), 1896.
Emperor Nicholas II, as follows from his diary, examined the exhibits of the exhibition for three days and on August 2 (15) inspected the crew department, where he was shown the car in action. It would be incorrect to consider the appearance of the N.A. design. Yakovlev and P.A. cut without analysis of the development of Russian industry. At the end of the 19th century, the country experienced an industrial boom. Military shipbuilding, the weapons industry, steam locomotive construction, and bridge construction moved forward at a rapid pace and were not inferior to the same industries in countries that were economically more developed than Russia. Such technologically complex products as rifles were produced by the Izhevsk Arms Plant in the amount of 70 thousand units in the late 70s of the last century. per year with complete interchangeability of parts. Moreover, such a mass production record as the production of 300 thousand pieces in Izhevsk in 1879 deserves attention. Berdanka trunks.
We also note the surge in the production of steam locomotives in Russia, which occurred not only due to the rapid development of the railway network, but also due to the decision taken by the Russian government at the end of 1866 to stop placing orders for steam locomotives abroad. If in 1880 domestic factories built 256 steam locomotives, then in 1896 - 462. At first glance, these figures seem insignificant, but they should be compared with the scale of subsequent production of steam locomotives in the USSR. In 1940, when steam locomotives dominated railway transport, their production amounted to 914 units.
The military industry was also on the rise at the end of the last century. In Russia, since 1884, torpedoes were produced that were driven by a propeller driven by a piston engine and operated on compressed air, and later on a steam-air gas mixture. The torpedo was controlled by a gyroscopic unit. All this indicates a high technical level of production.
Such examples prove that Russia had priority industries with highly qualified personnel, advanced equipment and technologies for its time. The emerging new industry was based on the high potential of developed priority industries. And it is not surprising that such enterprises as the Russian-Baltic Carriage Plant (1909) and the Torpedo Plant (1904) took up mass production of cars. Their specialists certainly knew about N.A.’s undertaking. Yakovlev and P.A. Frese. But their, as they say today, marketing analysis showed that neither the road network, nor the country's legislation, nor related industries (fuel production) are yet ready for large-scale automobile production.
It cannot be said that Russian engineers did not seek information about the achievements of science and technology abroad. The famous Moscow promoter of technical progress and invention P.K. Engelmeyer met K. Benz in Germany back in 1883, and E.A. Yakovlev and P.A. Frese visited the World Exhibition in Chicago in 1893, where the Benz Victoria car was exhibited.
Many Russian engineers spoke German, French or English, and familiarity with periodicals on technical topics was not difficult for them. So, for example, P.A. Frese knew German and French, and visited Paris more than once, where he established friendly relations with specialists. E.A. In 1890, Yakovlev went to the World Exhibition in Paris to study the engines presented there. Engineer B. G. Lutskoy received a higher technical education in Germany and worked on such automobiles as "Shtever" and others.
Thus, it would be wrong to regard the creation of the car by Yakovlev and Frese as a brilliant insight into technical thought. Moreover, he was born at a time when the preconditions for the birth of the automobile industry were present throughout the world. It was in the summer of the same 1896 that G. Ford made the first ride on his “quadricycle”; the Paris-Marseille-Paris car race took place in France over a distance of 1720 km, and E. Michelin equipped several hundred cars with pneumatic tires. In the same year, Russia introduced traffic rules, Germany produced 181 cars, and in England, parliament repealed the law on a man with a red flag, who had to walk in front of any horseless carriage.
E.A. Yakovlev on his “Machine-building, cast-iron and copper foundry Mill”. At that time in Russia there were many carriage factories, famous for their products: “P.D. Yakovlev", "Iv. Breutigam", "Kümmel", "P. Ilyin”, “The Krylov Brothers”, etc. But the enterprise of P.A. Frese (Ertelev lane, building 10) was special. His owner, like E.A. Yakovlev, had many “privileges” (author’s certificates) for various design innovations. Frese proposed various schemes for body suspension, turning devices, installation of springs, etc. In other words, both Frese and Yakovlev were not only entrepreneurs, but also inventors. Both knew about experiments with self-propelled carriages in France and Germany, and the Benz Victoria model, which they could see in detail at the World's Fair in Chicago, captured their imagination.
K. Benz combined the internal combustion engine with a horse-drawn carriage. At the same time, I solved a lot of technical problems. These included steering, idling, changing speed, formation of a combustible mixture, starting the engine, cooling it while driving, and a braking device. Everything was solved with varying degrees of perfection, but in a complex manner, and represented, so to speak, an engineering ensemble. In the design of each part, an experienced eye found its own logic, which in the minds of practicing engineers, who were also thinking about a comprehensive solution to the same problems, excluded an alternative solution. The design of the German engineer seemed canonical not only to N.A. Yakovlev and P.A. Frese, but also to the Americans R. Olds and G. Knox, the French E. Delyahe and J. Richard, the German F. Lutzmann, the Swede G. Ericsson, and the Swiss L. Popp. Everyone accepted the general concept of K. Benz: layout, transmission design, cooling system.
But the German inventor protected many technical solutions with patents. And here each manufacturer was forced to look for his own ways. This happened with N.A. Yakovlev and P.A. Frese.
The design of the carriage of the first Russian car followed the traditions of light horse-drawn carriages. The wheels, with wooden rims and solid rubber tires, did not rotate on ball bearings, but on bronze bushings. Their bearing surface had to be large and hence the massive hubs.
The spring suspension of continuous axles was then distinguished by a very wide variety of designs, often quite complex. The simplest design for light open carriages (for 2-4 people) is on four longitudinal semi-elliptical springs. A large number of sheets with significant friction between the sheets (a kind of friction vibration damper) made it possible to do without shock absorbers.
Light carriages often did not have a frame. The front and rear beams were hingedly connected by two longitudinal rods, forming, as they said then, a “stroke”. The body, with a frame made of bent wooden beams, was an independent supporting system, which was connected to the “propulsion” through springs. The wheels, equipped with solid rubber tires, did not absorb road shocks well, especially when driving on cobblestone roads. Therefore, the wheels had to be made as large in diameter as possible (1200-1500 mm).
In horse-drawn carriages, turning was carried out by the front wheels. The shafts were connected to the outer parts of the hubs, and the axle itself with the wheels turned on a swivel relative to the body. In this case, the front wheels went under the so-called “goose” (the front of the body), and they had to be made smaller in diameter than the rear wheels so that the “goose” and the sawhorses located above it were not very high.
But at the end of the 19th century, some crew masters began to install the front wheels on kingpins. And since when turning the wheels rolled along arcs of different radii, it was necessary to invent special mechanisms known as the Ackermann system or the Jeantot trapezoid (named after their creators).
Many crew masters followed these principles, and P.A. also adhered to them. Frese during the development of the chassis of the first Russian car. He carefully studied the patent of K. Benz, issued to him in 1893, and found his own solution.
He placed the front wheel suspension springs next to the wheels, like the rear, non-steering wheels. The front springs turned together with the wheels relative to the kingpins, and the kingpins P.A. Frese provided not only in the front axle beam, but also in the cross member located above it, rigidly connected to the body frame. The steering linkage was also attached to it, raised high above the road and thus not subject to impacts against possible obstacles.
For a relatively light (320 kg) stroller P.A. Frese chose wooden wheels. believing that cobblestone pavements require a more durable structure. Bicycle-type wheels would have been simpler, but in St. Petersburg at that time there were no bicycle factories where wheels could be ordered. and “Leitner” were located quite far away: in Moscow and Riga.
Naturally, the wheels were equipped with solid rubber tires, since the St. Petersburg company turned to the production of pneumatic tires only in 1898, two years after the experiments of the French manufacturer Michelin.
As for the engine and transmission, E.A. Yakovlev followed the path of K. Benz. However, he corrected some of its mistakes and made the engine lighter. In any case, the mass of the car he built together with P.A. Frese turned out to be the same as that of the small Velo model by K. Benz, the production of which began in 1894. It is also important to note that the German and Russian cars had almost the same wheelbase and a similar design. But the Russian car had a wider track, was equipped with heavier wooden wheels (bicycle-type in German) and was equipped with a folding leather top. This meant an increase in weight by 50-70 kg compared to the design of K. Benz.
Apparently, E.A. Yakovlev significantly lightened the engine and transmission, in particular, he made the engine itself smaller in size than that of K. Benz. Benz engines installed on the Velo model with a displacement of 1045 cm3 developed a power of 1.5 hp. at a crankshaft speed of 450 min, and since 1896 - 2.75 hp. at a rotation speed of 600 min. At E.A. Yakovlev this power was 2 hp.
E.A. Yakovlev, like the German inventor, equipped his engine with an evaporative cooling system. When the engine was running, the water was constantly boiling, the steam entered the condenser, where it cooled and condensed into water. But some of the water evaporated. It is curious that T. von Liebig, who in 1894 drove a Benz Victoria car with a similar cooling system from Reichenberg to Mannheim and back, spent 21 liters of gasoline and 150 liters (!) of water per 100 km.
E.A. has a water supply (about 30 l). Yakovlev was housed in two side brass tanks. The capacitor itself, in the form of a horizontal long cylinder, was placed behind the back of the seat. Following the example of K. Benz E.A. Yakovlev also manufactured an evaporative carburetor. The pictures of the car show its lower part with a drain valve. This carburetor resembled a vertical cylindrical tank with a diameter of about 200 mm. It was heated by exhaust gases, the gasoline evaporated, saturating the air passing through the tank with vapor. The composition of the working mixture could be changed in the mixer, where it was depleted with additional air if necessary. To regulate its composition, a rotary lever located under the driver’s seat was used. There was no quantitative adjustment of the mixture entering the cylinder, as well as ignition timing. Electric ignition was carried out from a battery and an induction coil with an electromagnetic chopper (a type of Ruhmkorff coil).
These design features did not make it possible to regulate the engine speed in relation to the load on it and along the way predetermined its operation as if in a stationary mode. It was possible to control its operation either by greatly enriching the mixture or by creating gaps in the supply of current to the spark plug. Such actions were necessary when changing gears.
Cars by K. Benz, E.A. Yakovlev and P.A. The milling cutter had a transmission similar in design, the concept of which was borrowed from machine tools. It consisted of two belts (for K. Benz - leather, for E.A. Yakovlev - made of rubberized fabric), running on stepped pulleys. Each corresponded to a low and high gear and each had an idle speed. The movement of the belts and thus the gear shift was controlled using two levers on vertical axes located to the right and left of the steering column. The slipping of the belts when switching replaced the action of the clutch mechanism.
—> READ COMPLETELY
Video “Replacing the release bearing”
This video shows the bearing replacement process. An experienced auto mechanic talks in detail not only about how to change this unit, but also describes the principle of its operation.
The VAZ clutch is a fairly reliable mechanism and has been tested for almost 50 years on our roads. Fiat engineers put a lot of effort into fine-tuning the design, but they could not even imagine that almost the same mechanism would be successfully used almost half a century later on a front-wheel drive car.
Clutch diagnostics on a VAZ-2110
The VAZ-2110 received the mechanism from the eight and nine virtually unchanged, only the downforce was adjusted, which corresponds to the engine torque.
Nevertheless, every clutch has its time. The resource of the unit greatly depends on the driving style and operating conditions. And besides, from the kit manufacturer. By the way, it is not at all necessary to change the clutch assembly due to a failed driven disk or release bearing; it is expensive.
But replacing any element of the mechanism, as well as the entire clutch, at a service station will cost at least 3-5 thousand rubles , not counting the cost of materials. Therefore, it makes sense to do the repairs yourself. This is not the simplest operation, but it is quite accessible even for a novice driver.
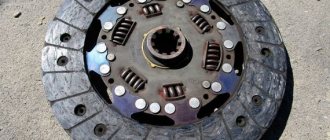
Clutch kit: basket, disc, bearing and mandrel.
Symptoms of a problem
Before removing the clutch on a VAZ-2110, you need to find out its condition based on the following signs:
- The clutch is slipping. This means that when the engine speed changes, part of the torque is lost when the clutch of the driven disk slips - the speed increases, but there is no traction. There may be several options - either the friction linings of the driven disk are worn out, or the adjustment of the free play of the clutch pedal is impaired. In the first case, disk replacement is necessary.
- The clutch is driving. When the pedal is fully depressed, the clutch does not disengage. That is, part of the torque is still transmitted to the gearbox; the drive and driven disks do not open. In this case, either adjusting the same pedal free play will help, or replacing the release bearing or clutch basket if the adjustment does not produce results.
- The clutch vibrates. We observe vibrations in the gearbox area at certain speeds or constantly. In this case, the clutch needs to be replaced; most likely, the basket has failed.
- The clutch is noisy. Increased noise when pressing the pedal, extraneous sounds when changing gears. Most likely, either the entire clutch assembly, or the basket or release bearing has failed. The kit needs to be replaced.
Troubleshooting and Correction
Let's talk about how to detect malfunctions based on special signs, as well as correct them.
1. If the clutch is leading, the following may be to blame:
- Insufficient pedal travel, possibly too tight. Adjusting the drive will help;
- Deformations in the driven disk. If straightening is not possible, then the disk must be replaced;
- The driven disk hub periodically jams. You can try washing and then lubricating the splines on the input shaft. If they or the shaft are worn out, replacement is needed;
- Rivets are loose or friction linings are broken. In this case, it is best to change the casing along with the spring and disk;
- The pressure plate is warped or warped. Replacing the linings will help, but before that, check for any deviations in the end runout of this disk;
- Something is wrong with the cable. The cable needs to be tightened or replaced, depending on wear.
2. It slips, that is, it does not turn on. Possible reasons:
- The friction linings of the driven disc are burnt or worn. “Cure” by replacement;
- The surfaces of the flywheel and both disks are oily. These signs also indirectly indicate that it is time to change the engine and gearbox seals. You also need to check if there is any oil leakage through the bolts securing the flywheel. In this case, it is better to place them on sealant. And rinse the oily parts (white spirit is usually used);
- The drive jams. Check and replace what is damaged.
3. It works, but in jerks. This clutch operation can be caused by:
- Oil getting on surfaces, as mentioned above;
- Jamming in the drive. Trace the “chain”, troubleshoot;
- Deformations or damage in the pressure disk, requiring replacement of the casing along with the disk.
4. It makes a lot of noise when it turns on. Most likely, these are signs that the springs in the damper have broken. Replace the entire driven disk assembly.
5. It makes a lot of noise when it turns off. The first suspect is the release bearing. It can wear out, become damaged, and lose oil. Therefore, naturally, it is better to replace such a bearing.
6. During prolonged operation, the clutch may suddenly disengage. The reason most often is that the release bearing is stuck. It is located on the gearbox guide sleeve. A worn bearing must be replaced with a new one.
There are also other problems. For example, the clutch is very tight, or it disappears when overtaking. With such a problem, you can still slowly drive to the garage, but if the clutch is completely lost, you can’t go, you need to call a tow truck.
The details of changing the gearbox oil yourself are discussed in this article:
Let's look at how to properly dismantle it, repair it, and then reassemble it.
Replacing the clutch on a VAZ-2110 without removing the gearbox
As a rule, tens of clutches, like other front-wheel drive VAZ cars, are carried out without removing the gearbox.
Complete dismantling of the gearbox is necessary in cases where we have problems with gear engagement or with the gearbox. By dismantling the box completely, the work is almost doubled; you have to drain the oil, remove the axle shafts and carry out a lot of other work . Therefore, if the checkpoint does not bother us, we will not remove it.
Conditions
It is most convenient to change the clutch on a lift, inspection pit or on an overpass. You can do it in the field, but it is naturally inconvenient and time-consuming.
To work, we will need a standard set of tools, a jack, several wooden spacers and a mandrel, without which it will not be possible to install the driven disk. This mandrel follows the shape of the gearbox input shaft and centers the disk in relation to the flywheel.
Exact replacement algorithm
We carry out the work in the following sequence:
- Disconnect the negative terminal of the battery, remove the wire block from the mass air flow sensor.
We remove the negative battery and the connector from the mass air flow sensor.
Unscrew the upper starter bolt.
Unscrew bolt 1 securing the starter.
We remove the stretcher along with the lever.
Remove the torque rod bolts.
Remove the control drive rod.
We place a block so that the engine does not tear off the interior heater hoses.
We take the box away and put it on the floor.
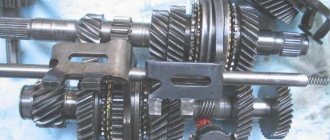
We definitely change the bearing (1), the springs (2) and linings (3) are worn out - the disc needs to be replaced, the surface of the basket (4) will survive another disc.
Peculiarities
At the same time, we check the condition of the flywheel.
Next, we act according to the situation. If it is necessary to replace the entire clutch assembly, unscrew the basket from the flywheel and install a new set . To properly install the driven disk, we will need a mandrel, which we have already discussed. When installing, you need to tighten the bolts securing the new basket, then insert the mandrel into the driven disk and get into the flywheel. This way we maintain the alignment of the gearbox input shaft and the flywheel.
And only after this can you tighten the clutch basket mounting bolts. Assembly is carried out in reverse order.
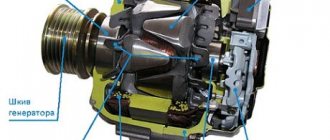
The VAZ 2114 release bearing is a clutch element that is located in the clutch. The clutch mechanism assembly is designed to transmit axial force to the pressure plate, which disengages the driven flange so that engine torque is not transmitted to the transmission.
Replacing the release bearing of a VAZ 2114 is a repair that is distinguished by the complexity of the process of dismantling the unit, since in order to change the part, the gearbox is first removed. Note that it is also possible to change the bearing without removing the gearbox, but the complexity of the repair and the risk of incorrect replacement increase.
A clutch with a release bearing (VP) is a mechanism directly involved in the operation of the clutch, so a malfunction of this unit is unacceptable. If you hear a hum or noise when the clutch operates, the bearing or sometimes the clutch assembly will need to be replaced.
Detailed instructions are accompanied by 50 photos with several videos. First of all, the article is aimed at helping you correctly and correctly remove the speed unit, check the condition of the gearbox with the clutch, and replace parts if necessary.
Replacing the clutch of a VAZ 2110
After the conditions and tools are prepared, you can begin to work. First, remove the front left wheel and securely fix the car. Please note that there are two repair options: with complete dismantling of the gearbox and without it. In our case, we will talk about how to replace the clutch on a VAZ 2110 without removing the box.
The process is made easier by the fact that you don’t have to drain the transmission oil, disconnect the drive axles, and remove the heavy unit from under the car. The smallest set of operations saves time. However, to be on the safe side, you need to have a container ready where, in an emergency, you can drain the oil from the gearbox
.
After fixing the car, open the hood, disconnect the battery and remove it completely. For easy understanding, the entire further process of replacing the clutch with your own hands on a VAZ 2110 will be described in the form of step-by-step instructions:
- Unscrew the two ball joint bolts (the wheel has already been removed);
- go to the engine compartment and remove the connector for the mass air flow sensor;
- disconnect the air intake corrugation;
- remove the air filter housing;
- disconnect the clutch cable from the gearbox by unscrewing the two fastening nuts;
- unscrew the starter bolt;
- Unscrew the gearbox bolt, located slightly to the right of the starter;
- we find another upper bolt securing the gearbox to the engine and unscrew it;
- disconnect the speed sensor plug;
- go to the bottom and dismantle the longitudinal rod along with the cup (crab);
- we find the lower starter bolt and 2 gearbox mounting bolts, unscrew them;
- remove the torque mount;
- unscrew the gearbox shift lever;
- place a jack under the engine through a wooden spacer (on the edge of the pallet);
- unscrew the nuts of the rear engine mount;
- lower the engine with a jack (it will fall to one side);
- carefully separate the engine and gearbox;
- We carefully lower the disconnected box down until it hangs on the drive axles.
The first stage of replacing the clutch on a VAZ 2110 without removing the box has been completed. As a result of dismantling, there was access to the clutch basket on the engine and the release bearing on the gearbox. Unscrew the bolts securing the basket to the flywheel and remove it. Carefully remove the release bearing from the input shaft.
After a careful examination of the removed parts, it becomes clear whether it is worth changing the entire clutch pack or whether you can limit yourself to changing the disc and bearing. It is worth noting that the replacement of the VAZ 2110 clutch basket occurs every 80 - 150 thousand km, depending on the operating mode. The disc and bearing wear out more often.
After purchasing new spare parts, we proceed to the second part of the repair and do the following:
- install the basket with the disk in place and tighten the fastening bolts;
- insert the centering shaft (mandrel) into the central hole of the crankshaft;
- then tighten the bolts tightly and remove the mandrel. It should fit freely into the hole, simulating the gearbox input shaft.
- Next, install the release bearing on the box;
- carefully lift the gearbox and connect it to the engine, slightly rotating the drive axis;
- Once the box is in place, you can fasten it with bolts and install the dismantled parts in the reverse order.
On a note!
It is advisable not to leave the box hanging for a long time (more than 2 days). The fact is that the drive seals are under heavy load and they can be partially deformed. The formation of damage will lead to oil dripping from the transmission during further operation.
.
Signs of malfunction and diagnostics of the release bearing of the VAZ 2114 (how the bearing makes noise and hums)
Direct diagnosis is to check the functionality and presence of the following signs of failure. Signs of a malfunction of the VAZ 2114 clutch release bearing, if detected, will require its replacement:
- When you press the clutch pedal, you hear a noise, hum or knocking (rolling, internal vibrations occur due to damage to the tracks with rolling elements, deformation of the cage or the clutch itself).
- A whistle when the clutch is engaged makes it clear that the quantity or quality of lubricant is not enough;
- The speed does not change or the pedal moves hard (occurs when the clutch has fallen apart, as well as if the ear of the release bearing is broken).
- Watch a video example of how the release bearing of a VAZ 2114 makes noise and hums, as well as how the check is carried out. You can also hear the noise of the bearing after disassembling the transmission after removing the VP.
We change the release bearing on a VAZ 2114 with our own hands - dismantling the gearbox
Provide sufficient lighting above the hood of the car, put the car in first gear, and release the handbrake. If possible, ask a partner for help. Below is a detailed dismantling technology, according to the diagrams presented above.
- Open the hood, unscrew the air filter mounts, disconnect the wire and remove the assembly (see photo). After this, disconnect the battery terminals, and to be safe, remove the battery.
- Now we get access to the upper gearbox mounting bolts. Unscrew the long bolt at the back, the short one at the front.
- Let's move on to the starter. We unscrew the two upper studs, then remove the terminals. Now we look for the clutch cable that comes out of the gearbox, twist the nut to loosen the tension.
- We go down to the wheels, tighten the bolts, and remove the chassis. We tear off the nuts of the VAZ wheel bearings to remove the drive axle shaft on both sides. Use the pipe to extend the key.
- We remove the anthers (mud flaps) with a 8mm wrench, then unscrew the engine crankcase protection bolts.
- We find the suspension arm extension bracket (3.4 in the diagram), unscrew the rear nut with the lower bolts.
- Now unscrew the anti-roll bar bolt (8) on the right side, then the ball joint bolts on both sides (key 17). Then remove the lever (7) together with the stretcher (4).
- The gearbox is half disconnected, now we unscrew the plug to drain the oil.
- After draining the oil, remove the wheel drives. First, we remove the CV joint “grenades” from the hubs, then we take the splined side of the shaft out of the box using a pry bar.
- On the side of the box we disconnect the reverse terminal. We find three bolts securing the gearbox to the engine and twist them.
- To remove the starter, unscrew the two bolts from the bottom.
- Now we disconnect the gear shift rod (10) and dismantle the rocker. The speed sensor terminal is located nearby; disconnect it (see photo).
- We unscrew the locknut to disconnect the gearbox from the side support (cushion), then use a long wrench to unscrew the two fasteners of the rear cushion (9).
- All that remains is to unscrew the two gearbox bracket bolts (2) and disconnect the unit from the engine.
- We dismantle the assembly, hold the body with one hand, and move it with the other using a mount. After removing the assembly, we proceed to replacing the release bearing.
The design of the clutch mechanism on the VAZ 2107
Although the clutch performs a simple task, it consists of many component parts. All parts have a corresponding lifespan, so sooner or later the clutch needs repair and adjustment. Before setting up the clutch on the VAZ 2107, you need to understand its structural elements.
Classic cars of the VAZ family are equipped with a dry closed-type clutch mechanism. The device consists of the following elements:
- The driving part is a driven disk that has splines for transmitting the moment of movement to the gearbox shaft. This rotation is transmitted by friction that occurs between friction linings with the flywheel and the pressure plate.
- Non-separable mechanism - this unit is called a basket, which is fixed to the flywheel.
The clutch mechanism on the VAZ 2107 is activated by the leftmost pedal in the car's interior. The device is driven by a hydraulic drive. The basis of the hydraulic drive consists of the following components:
- Master and slave cylinders.
- On and off forks.
- Release bearing.
All classic VAZ models, as well as carburetor and injection VAZ 2107, are equipped with a similar clutch design. The only difference is the presence of an auxiliary shield on injection models, the purpose of which is to protect against dirt. To give you an idea of what we're talking about, below is a diagram of the device in question.
How to adjust the clutch on a classic
The clutch adjustment on the seven should be done after the work on installing the mechanism is completed. If the setup procedure is correctly completed, you can continue to operate the machine without worrying about premature failure of the unit. Before the adjustment process, you will need to check the hydraulic drive for the presence of air in it. The air must be removed by bleeding the system, and if necessary, replace all the fluid.
This is interesting! If, after replacing the clutch parts, the adjustment of the mechanism was carried out incorrectly, then continuing to further operate the machine with an unadjusted device is not only inconvenient and dangerous, but may risk repeated repairs.
If there is a need to adjust the mechanism in question on the VAZ 2107, then detailed instructions are presented below.
Adjusting the clutch pedal free play
To set the free play of the pedal, you will need to adjust two units - the main and working cylinders. This will allow you to perform the most precise adjustment of the clutch on the VAZ 2107. Procedures for adjusting the travel of the clutch pedal are performed:
- Using two keys at “13” in the car’s interior below, you need to adjust the full pedal stroke. A special rod acts as a full stroke limiter, which is secured with two nuts. Using one wrench you need to hold the travel stop fastening, and with the second you need to loosen the nut a few turns. The full pedal stroke should be about 140 mm, which can be measured using a ruler.
- In the next step, you should set the free play of the pedal. In standard mode, the free play should be approximately 30 millimeters. However, this value is not a reference value, and each car enthusiast can set the idle value based on his preferences. To set the free play of the pedal, you will need to rotate the nut of the limiter itself towards the bracket, which is indicated by the number “2”. As soon as the free play reaches the desired value, you need to hold the nut with a wrench and use a second tool to tighten the lock nut.
- At the final stage of self-adjustment of the clutch pedal, it is necessary to check. We take a ruler in our hands, and resting it on the body as the pedal moves, we take measurements. You immediately need to press the pedal with your hand and press until resistance occurs.
Adjusting the free play of the clutch fork pusher
Let's start adjusting the free play of the clutch fork push rod (working cylinder). First you need to clarify the amount of free play. This is done like this:
- The working cylinder is located at the bottom of the car, so to continue further actions you need to go down into the inspection hole and continue work there.
- Armed with pliers, you need to remove the spring from the resistance release fork. It is not necessary to remove the spring, but then when making adjustments you will need to apply force when checking.
- Using a ruler, you need to find out the amount of free play of the clutch fork.
- Applying force to the fork until it stops, you need to hold it in this position. We remember the position of the fork using a ruler, and then we need to release the mechanism and measure the free play. Its value should be between 3 and 5 mm. The service life of the release bearing depends on this free play. If there is no clearance, then the entire load will go to the release bearing, which will soon cause it to fail.
When the fork clearance is not correct, it should be adjusted. The adjustment process involves performing the following manipulations:
- Using two keys “13” and “17”, you need to loosen the lock nut. The photo shows this process - the letter “a” indicates the key with which you need to hold the nut, and the second under the letter “b” should unscrew the nut.
- Using pliers or an adjustable wrench, it is necessary to fix the end part of the pusher or the RCS rod with them in a stationary form, and loosen the nut “a” by 1-2 turns.
- We set the correct amount of free play of the pusher from 3 to 5 mm.
- We fix the lock nut “a” in the established position, while tightening the nut “b”.
We independently change the release bearing on a VAZ 2114
After removing the gearbox, it is important to inspect the discs, clutch basket, and also evaluate the condition of the gearbox housing from the inside. Remove dirt and excess used oil, make sure that the ear of the release bearing has not broken, then proceed to replacing the clutch. Below is a diagram of the clutch layout.
The principle of operation of the part is as follows: when you press the clutch pedal, the applied force is transmitted to the fork (4) through a cable (3), which moves the release lever along the guide sleeve of the input shaft (1), then the ball bearing housing transmits the force to the pressure plate (basket) (6), After this, the driven disk is disconnected, then the unit is disconnected from the engine to change speed.
- The guide sleeve, which is shown in the photo, fixes and guides the coupling during its operation. To dismantle the old part, find the edges of the clutch spring, lift them with a screwdriver, remove the clutch VP from the VAZ 2114, the replacement of which is required.
- Using CV joint grease, apply it to the bushing splines, and also lubricate the new bearing and seating surfaces.
- We put the new VP on the guide shaft, then fasten the part with a spring. Check the clutch travel by moving the fork. Unscrew the element with your hands and make sure that there are no rolls or problems with ease of rotation.
- At this point, the replacement of the VP clutch is completed; we install the gearbox in place in the reverse order.
What is clutch?
The clutch (or as it is also called “friction clutch”) is a car mechanism that connects the engine to the transmission and from time to time makes it possible to disconnect them when changing gear, braking, or while stopping. The main task of the clutch is the frictional interaction of the disks, which are located on both shafts.
Another function that the clutch performs is the ability to smoothly move the car away. To the extent that the engine shaft rotates and the transmission shaft is in a fixed, stationary position, it is impossible for the machine to start moving without a clutch, since it helps the shafts smoothly rub against each other, and at the same time ensures a smooth acceleration of revolutions, which the shafts provide, and finally then set the car in motion.
If by accident (or not by accident) you disconnect those two shafts too quickly and sharply, then the stationary transmission shaft will jam the rotating engine shaft and your car will simply stall (at best), or there will be breakdowns in the clutch mechanism, which will require considerable repairs. material costs. Basically, modern cars have mechanical clutches.
CLUTCH RELEASE DRIVE
Further study of the car is impossible without understanding the term - drive.
Let's try to figure it out with him.
When it is necessary to transfer force in a car, say from the driver to some mechanism, problems may arise. In order for the car to work properly and the driver to be in his place, there is a mechanism drive.
Imagine a situation where you need to constantly close and open something, but you yourself cannot move. To transmit force over a distance to “open” and “close” the door, you will have to use a stick or remote control. Let it be a stick, tied with ropes with one end to your hand and the other to the door handle. In this case, the stick with the ropes will act as a “drive” that will transmit force over a distance.
In a car, each mechanism has its own drive, through which it is driven. The drive can consist of a large number of individual components and parts, it can be mechanical or hydraulic.
Diagram of the hydraulic clutch release drive and clutch mechanism
1 - crankshaft;
2 - flywheel; 3 — driven disk; 4 — pressure disk; 5 — clutch casing; 6 — pressure springs; 7 — release levers; 8 — pressure bearing; 9 — clutch release fork; 10 - working cylinder; 11 - pipeline; 12 - main cylinder; 13 — clutch pedal; 14 — clutch housing; 15 — input shaft gear; 16 — gearbox housing; 17 — gearbox input shaft. The clutch release drive (hydraulic type)
consists of:
- pedals,
- master cylinder,
- working cylinder,
- clutch release forks,
- pressure bearing,
- pipelines.
When the clutch pedal is pressed, the force of the driver's foot is transmitted through the rod and piston to the fluid, which transfers pressure from the master cylinder piston to the worker piston. Next, the working cylinder rod moves the clutch release fork and the pressure bearing, which transmits force to the clutch mechanism.
When the driver releases the pedal, under the influence of the return springs, all drive parts will take their original positions.
The hydraulic clutch uses brake fluid. Before pouring it into the drive reservoir, it is worth reading what is written on the label. Is it allowed to mix it with the fluid that is already filled in the hydraulic clutch of a car? As a rule, the answer is yes, but there are liquids that cannot be mixed.
Front-wheel drive cars use a mechanical drive, where the clutch pedal is connected to the release fork using a metal cable.
Notes, recommendations and repair tips
1. Average service life before product replacement is 800,000 off-on cycles.2. Recommendations for extending the life of the release bearing: - Avoid holding the pedal for a long time; - It is advisable to release the pedal slowly and press quickly, without stopping between the extreme positions; - Prevent moisture and dirt from entering the transmission; - Thoroughly lubricate the part during the replacement process (see video below ).3. After replacement, when performing reassembly, treat the threads of bolt connections with graphite lubricant.4. Buy auto parts from previously proven retail outlets, check dealer documents and product quality certificates.5. The video shows an example of performing repairs without an inspection hole, as well as without removing the gearbox.
- What you need to know
- Is noise a sign that replacement is needed?
- I'll eat
- Installing a new element
Owners of the domestic VAZ 2110 car often encounter a whistling noise in the clutch , which is caused by the release bearing of the unit. Moreover, this is a problem not only of the “tens”, but also of other cars from different manufacturers, the clutch design of which involves the use of this element. Therefore, replacing the release valve on a VAZ 2110 is not at all an exceptional problem. But it needs to be solved.
DIY bearing installation
Upon completion of all preliminary work on bearing removal, you need to move on to the last stage of repair work - installing a new element. First you need to check the new release component. After all, car owners often forget that an old bearing can be replaced by a new one, which also failed for some reason. It is not difficult to do this check; you need to pick up the release element and twist it, pull it in different directions to make sure that there are no jams in it and it does not wobble.
Once you are sure that you have purchased a truly high-quality element, you can insert it into the coupling. The protruding part of the inner ring should be directed towards the coupling. Having inserted the release device into the required compartment, you need to secure it with holders so that it does not jump out while performing its functions. Before placing a new element on the bushing, the main thing is not to forget to lubricate it. The layer of grease should be thin so that nothing drips from the bearing. Next, the coupling and the bearing itself are fixed using a spring clamp. The final stages of installing this component are placing the gearbox and other dismantled elements in their places, as well as completely adjusting the clutch.
It is worth knowing that replacing a faulty bearing with a working one is not difficult. The most difficult part of the repair process is dismantling the gearbox. All other actions can be called easy and do not take much time to complete. To carry out such work, components such as patience, accuracy and caution are required.
Also, you should not ignore the simplest and very useful thing that can come in handy when repairing a VAZ-2110 car - the instruction manual. It describes in detail almost everything that a car owner needs to know. Based on the instructions in this document, you can perform not only simple repairs of any elements in the car, but also complex ones, the costs of which in maintenance would be incredibly high.
Owners of the domestic VAZ 2110 often encounter a whistling noise in the clutch
, the cause of which is the release bearing of the unit. Moreover, this is a problem not only of the “tens”, but also of other cars from different manufacturers, the clutch design of which involves the use of this element. Therefore, replacing the release valve on a VAZ 2110 is not at all an exceptional problem. But it needs to be solved.
Release
What you need to know
The release bearing is not the weakest link in the clutch system, but for some reason it is the one that causes problems and troubles.
Some car owners have gotten used to the whistle and simply ignore it. But this cannot continue for long, since untimely solution to the problem can lead to even more complex and expensive repairs. If the situation gets worse, then a simple replacement will not be enough for you.
The clutch serves to act on the leaf spring of the clutch basket. It is also called diaphragm, so don't be confused if you hear this designation. Due to this impact, the driven disk is disconnected from the flywheel and the pressure plate of the basket. This disengages the clutch.
If the squeezer is faulty, this can lead to various consequences:
What does a clutch consist of?
In order not to break the clutch, you need to know not only how it works superficially and what its functions are, but also what parts it consists of. The main components include the driven and driven parts, the shutdown mechanism and the pressure system.
The engine rotational torque is transmitted from the flywheel to the drive parts, which in turn transmit torque to the gearbox drive shaft. The frictional moment is provided thanks to a pressure mechanism, which, thanks to the tight coupling of the driven and driven parts, gives the long-awaited result of movement.
Disengaging the clutch is considered important. So one disk, on which springs are located peripherally, is located in a cast-iron crankcase, which in turn is located in the engine block crankcase.
The drive part includes the clutch housing and flywheel, the latter in turn is attached to the crankshaft flywheel using six special bolts. The pressure plate is located in the middle part of the casing. The torque of the pressure plate is transmitted from the flywheel through three protrusions that are located in the disk and enter the casing windows. The driven disk, hub, and drive shaft of the gearbox are the main and mandatory components of the driven part of the clutch.
On both sides of the driven disk there are friction linings made of a copper-asbestos composition (or another metal-asbestos composition), which can withstand unusually high temperatures and are known for their friction properties. The driven disk is connected to the hub with rivets or through springs. These springs are an integral part of the spring-friction damper of rotating vibrations (that is, the damper)
CLUTCH MECHANISM
Clutch mechanism
is a device in which torque is transmitted due to the work of friction forces. The clutch mechanism allows you to briefly separate the engine and gearbox, and then smoothly connect them. The elements of the mechanism are enclosed in a clutch housing, which is attached to the engine crankcase.
The clutch mechanism consists of
:
- crankcase and casing,
- drive disk (which is the engine flywheel),
- pressure plate with springs,
- driven disk with wear-resistant linings.
The driven disk is constantly pressed against the flywheel by the pressure disk under the influence of strong springs. Due to the enormous frictional forces between the flywheel, driven and pressure plates, they all rotate together when the engine is running. But only when the driver does not touch the clutch pedal, regardless of whether the car is moving or standing still.
To start the machine moving, it is necessary to press the driven disk connected to the drive wheels to the rotating flywheel, that is, engage the clutch.
And this is a difficult task, since the angular speed of rotation of the flywheel is 20 - 25 revolutions per second, and the speed of rotation of the drive wheels is zero. Clutch engaged
How to do this? To do this, you must always release the clutch pedal correctly, only in three stages.
At the first stage
work to engage the clutch - slightly release the pedal, i.e. We allow the springs of the pressure plate to bring the driven disk to the flywheel until they lightly touch. Due to frictional forces, the disk, slipping for some time relative to the flywheel, will also begin to rotate, and the car will slowly crawl.
At the second stage
– we hold the driven disk from any movement, i.e. hold the clutch pedal in the middle position for two to three seconds so that the speed of rotation of the flywheel and disc is equal. At the same time, the machine increases its speed.
At the third stage
— the flywheel, together with the pressure and driven disks, already rotates together without slipping and at the same speed, transmitting 100% torque to the gearbox and then to the drive wheels of the car. This corresponds to the state of the clutch mechanism - engaged, the car is moving. Now all that remains is to completely release the clutch pedal and remove your foot from it.
If you release the clutch pedal sharply when starting to move, the car will “jump” forward and the engine will stall.
To release the clutch
The driver presses the pedal, and the pressure plate moves away from the flywheel and releases the driven disk, interrupting the transmission of torque from the engine to the gearbox.
Press the clutch pedal fairly quickly, but not abruptly, with a calm movement until the end of the pedal stroke. The clutch is disengaged.
The driver's actions to disengage and engage the clutch are repeated many times during the trip.
However, having mastered working with the clutch pedal in three stages
, later this will become a habit, which will ensure smooth operation of the car and comfort for passengers.
Is noise a sign that replacement is needed?
In some cases, the noise occurs when the engine is started, and it persists until the car warms up, after which it disappears. In other cases, the noise returns every time you try to disengage the clutch.
The worst option is a grinding sound. This sound indicates that the element is rubbing against the leaf spring, and wear will form on the petals. If you are “lucky enough” to encounter such a situation, there is no time. Replacement needs to be done quickly.
By the way, there is no point in repairing it. Release bearings cannot be repaired, so the only solution is replacement.
Bearing removal
To remove this device, you will have to perform a series of sequential actions.
- Raise the car or drive it into a hole to gain access to the underbody of the car.
- Use appropriate tools to remove the gearbox.
- Squeeze the special clamps from the release bearing.
- Remove the element from the gearbox shaft.
- Press the locking tabs to remove the spring holder.
- After this, it will not be difficult for you to remove the damaged release bearing from the clutch.
The complexity of the process lies in the fact that in preparation for removing the release bearing it will be necessary to dismantle several components and mechanisms, such as:
- Accumulator battery;
- Clutch cable;
- Air filter box together with air flow sensor;
- Upper gearbox fixing bolts;
- The nut responsible for fixing the starter.
The nuances of changing the release bearing
The release bearing is necessary to release the clutch. If it breaks, you won’t be able to switch to another gear, and it’s unlikely that you’ll be able to move at all. Every car enthusiast must know what role the release bearing plays, its functionality and the principle on which it operates. One way or another, this part breaks, it’s a matter of time. A malfunction can be identified based on audible characteristic noises, creaks, whistles, etc.
Note! If the release bearing is not replaced in a timely manner, it will jam in any case, and subsequent operation of the machine will be impossible.
To change the release bearing, you don’t have to go to a service station; you can do the steps yourself at home.
Quick release bearing removal
So:
- First, it is recommended to drive the car into a pit for inspection. Using a standard set of tools, the gearbox is removed.
- The clamps are pressed off the bearing.
- The part required for replacement is removed from the gearbox shaft.
- The paws are wrung out and the spring principle holder is removed.
- Now the bearing can be easily removed from the coupling.
Upon completion of the above steps, the bearing dismantling process is considered complete.
Installing a purchased release bearing
As a rule, after dismantling the old part, it is replaced. Before fixing the purchased release bearing, it should be carefully checked. It should rotate freely, and there should be no jamming or clicking. So:
- To install the bearing, it is necessary to fix it directly on the coupling in such a way that its protruding parts are directed towards the coupling.
- Next, you need to secure the bearing using a holder.
- The release bearing is pre-lubricated with oil and installed on the shaft.
- The part is secured using a spring clamp.
- The gearbox is installed in its place.
At this stage, the process of attaching a new element is completed. All that remains is to adjust the clutch correctly, otherwise the bearing will not last as long as we would like. If you have the necessary tools, repair work can be easily done with your own hands; in any case, the price will be much cheaper than repairs at a service station. Detailed instructions can be seen in the video. In addition, it is recommended to use photographs and pictures as visual aids.
Installing a new element
When you have completed the entire range of dismantling work, you can move on to the final stage - installing a new component.
- The first thing to do is check the condition of the new clutch release bearing. For some reason, many car owners forget to make sure that the bearing that replaced the old one is actually in good working order. This is easy to check. Rotate the bearing, pull it in different directions. If there is no jamming during rotation, and there is also no play, then you bought a really serviceable, good release bearing.
- Insert the new part into the coupling. This must be done so that the protruding part of the inner ring is directed towards the coupling.
- After inserting the element, secure it using the holders.
- Before inserting the new release bearing onto the bushing (guide), do not forget to lubricate it with a grease. The layer of lubricant should be thin, do not overdo it.
- Secure the coupling and bearing using a spring lock.
- Place the gearbox and other dismantled elements in their rightful places.
- The entire repair process is completed by adjusting the clutch.
Do not ignore the most useful thing that you can need when repairing your favorite VAZ 2110 - the instruction manual. Literally everything a car owner needs to know is described in detail there. With its help, you can even perform complex repairs, the cost of which at a specialized service station would be prohibitive.
When replacing the clutch release bearing of a VAZ 2110, the main difficulties are that you additionally have to dismantle several more components and the most labor-intensive process is the process of removing the gearbox. In a word, to replace a small bearing, you need to disassemble almost the floor of the car.
It is better to carry out all work on an overpass.
Units and parts to be dismantled:
- accumulator battery;
- air cleaning element together with a box and an air flow sensor;
- clutch cable;
- Transmission.
Clutch device VAZ 2107, 2109, 2110, 2106
July 31, 2020 — 11:46 9970 views
The VAZ 2107, 2109, 2110, 2106 clutch device is designed for short-term disconnection or, conversely, connection of the transmission and engine. It also makes it possible to protect the transmission from overload.
Mostly, single-disc friction dry transmission mechanisms are installed on passenger car models. An important point in this design is also the reliability of transmission of torque to the gearbox from the engine, as well as the smoothness of gear shifting while the car is moving.
It should be noted that passenger cars can be equipped with both mechanical and hydraulic drives. As for domestic models, a hydraulic drive is installed on the VAZ-2121, and a mechanical drive can be seen on the VAZ-2108, -2109, as well as on the ZAZ-1102.
Initially, cars were equipped with a mechanical drive, which was characterized by many disadvantages (meaning high friction in cables and hinges, low efficiency or efficiency, as well as unreliable operation of the drive).
Trying to correct these shortcomings, it was decided to replace the mechanical drive with a hydraulic one, which, although it corrects the shortcomings of the previous one, still has its own disadvantages: a large mass of elements, a complex design, and also the requirement to remove air from the pipelines. But, despite these disadvantages, the hydraulic drive shows more efficient operation.
The VAZ-2107 clutch device is equipped with a hydraulic drive, which consists of a pedal with a spring and two cylinders, the main and the working ones. So, when the mechanism is turned off, the force that is transmitted from pressing the pedal passes through the master cylinder pusher. And then it is transmitted to the pistons, which push the fluid into the working cylinder through a pipeline. The slave cylinder piston thus assists in turning the fork and disengaging the clutch. In a situation where the corresponding pedal is released, the servo spring and the spring bring the elements into place in the reverse order of restoration. The servo spring is used here to reduce the force that is transmitted to the pedals in the off position.
As for the VAZ-2109 clutch device, it involves a mechanical drive. Thus, the pedal is connected to a lever, which is connected to the pusher using a hinge. At the end of this pusher there is a compressed spring, which helps reduce the force on the pedal when the mechanism is turned off. It also ensures that the element is restored back to its original position. When the clutch is disengaged, the spring force decreases significantly (such springs are also called servo springs). Since the late 80s of the 20th century, backlash-free drives with conventional springs began to be used on cars of this type.
The clutch device of the VAZ-2110 assumes a single-disk design with a pressure spring. A backlash-free cable drive is also installed here. In this design, the housing is attached to the flywheel with six bolts and connected to the pressure plate with three pairs of plates. The driven disk is located on the splines of the gearbox input shaft.
As for the VAZ2106 clutch device, it appears to be a dry single-disc and permanently closed design. It is equipped with a central pressure spring and a torsional vibration damper located on the driven disk. A similar mechanism for this car also involves a hydraulic drive, the operation of which has already been described earlier.
Signs of bearing failure
The main sign of a bearing failure on a VAZ 2110 is a slight knocking sound when the clutch is depressed. If this sound occurs in the summer, there is almost a 100% guarantee that a replacement will have to be made. If in winter, then this may be a simple change in the dimensions of the bearing cup due to a decrease in temperature. The metal from which the release bearing is made is extremely durable, so even if a knocking noise occurs, you can do nothing for a couple of days and just watch to see if it gets stronger.
Replacement instructions
If you are still sure that the release bearing of the VAZ 2110 has failed, then you need to get to work without delaying for long, having first purchased the same new bearing and other components that will be needed during the work.
Tools
- a set of keys;
Stages
In order to get to the release bearing, you will need to partially or completely remove several fairly large components of the car.
Preliminary work
Unscrew the left nut and loosen the right one that secures the hub. After the wheels are loosened, we lift the car on a lift or jack it up until its front wheels leave the ground. During this procedure, observe safety precautions and place the vehicle only on very strong supports.
- We dismantle the wheels.
- Remove the motor protection.
- We loosen the fastening on the transmission drive rod (after marking the previous installation location in order to simplify the adjustment of the gear shift lever during assembly).
- We disconnect the gearshift drive rods from the gearbox.
- Turn off jet propulsion.
- We dismantle the starter.
- We dismantle the suspension arm and ball joint located on the left.
- Remove the cover on the clutch housing.
- Disable the speed meter.
- We remove the left drive, leave the right one in place, just loosen the hub nut on it.
- We hang the motor (after placing a reliable support under it), which will make it possible to prevent the motor from moving and a possible break in the heater hose. We unscrew the fastenings of the supports located on the gearbox and disconnect the clutch housing from the cylinder block. We move the box away from the engine and remove it.
Removing the release bearing VAZ 2110
- Having released the lock, remove the bearing assembly first from the shaft and then from the holder.
- Remove the bearing from the coupling.
- Before replacing the old bearing, we check the new one. It should rotate freely and there should be no binding.
Assembly occurs in reverse order.