Despite the fact that many bicycle models are produced with alloy wheels, the classic version of the rim with thin spokes is still popular. The main function of spokes is to lighten the structure of the wheel and the entire bicycle without reducing strength. If there is a strong impact, the rim and spokes may become deformed and require immediate tightening. Therefore, it is important to know how to properly tighten the spokes on a bicycle yourself, without the help of professionals.
How to tighten bicycle spokes
Bicycle spokes are steel rods that connect the rim to the hub to form a complete wheel. The overall dynamics of the bicycle, the safety of its operation, and the comfort of riding depend on their quality and condition. That is why adjusting the spokes on a bicycle is one of the most frequently performed tasks by masters.
However, with the necessary tools at hand and basic skills, the owner of a two-wheeled vehicle will be able to tighten the spokes on a bicycle himself.
How to tighten a cylinder head without a torque wrench
Earlier this issue was raised by Dmitry Ermakov, but I think it will be useful for everyone who wants to “tighten the nuts according to the manual.”
The key itself in the simplest Chinese version costs from 700 UAH, which does not inspire the desire to buy it suddenly, considering that we need it once every couple of years, so to speak.
In principle, if you have extensive experience in torsioning nuts and the ability to translate Newton meters in your mind into “arm force,” you can do without it, although it is clear that the error will be equal. newton-meters, but now let’s talk about how to “twist it according to Feng Shui.”
So we are talking about adjusting the valve clearance.
The locknuts are tightened there with a force of 14 Nm. Divide by 10 and get 1.4 kgcm (kilogram-force-meter).
This means that the maximum recommended torque for tightening the nut should be equal to the force exerted by a 1.4 kg load. suspended from a key 1 meter long, and not just hanging there, but acting perpendicular to the key!
It is clear that looking for a meter key is an extremely thankless task, but there is a way out!
General formula: M=0.1*F*L. where L is the length of the arm (in cm), M is the moment of force, F is the impact force (weight in kg)
(The coefficient 0.1 was introduced to simplify the calculations. It would be more accurate if we write 0.098 there, but for our small required efforts in Nm, we can round up to 0.1 and still have acceptable calculation accuracy and it’s easier to calculate this in our heads)
Those. we need a wrench for 10 (for example, an open-end wrench, but a open-end wrench is still more convenient), a regular canter (electronic or mechanical, it doesn’t matter)
Started (see picture below):
1. Measure the length of the key with a ruler, according to the figure. 2. Using the formula, we calculated F (in our case = weight in kg.) F=M/(0.1*L). Example: I had an open-end spanner and its length according to the picture turned out to be 12.3 cm. Substituting into the formula I got: F=14/(0.1*12.3)=11.38H, i.e. 11.4kg.
3. We hang the canter on the side where we have a cap key (the hook of the canter will not slip off, which is why such a key is a little more convenient than an open-end wrench on both sides). We pull the canter and look at the scale so as not to exceed our xx kg., calculated earlier according to the formula.
Source: vk.com
What you need
Before tightening the spokes on a bicycle at home, you need to prepare the following tools:
- A spoke wrench, which must be selected in accordance with the size of the nipples and the diameter of the spokes;
- A special machine for adjusting and straightening spokes. If you don't have this tool, you can simply mount the bike up.
- An alignment gauge is a tool for centering the wheel rim relative to the hub.
- Bicycle spoke tension meter.
Is it possible to properly tighten cylinder head threaded connections without a torque wrench?
Tightening threaded connections in the absence of the appropriate equipment is absolutely not worth it for car enthusiasts who decide to independently change the head gasket or grind the valves.
Experienced repairmen who are able to feel in practice the strength limit of any bolt do not always use a torque wrench when tightening. But such ability does not come immediately. To do this, you need to work with torque wrenches for several years.
But even experienced specialists tighten the cylinder head bolts on expensive brands of passenger cars with a torque wrench, because this operation directly affects the longevity of the power unit. In an emergency situation, when it is not possible to use a torque wrench, you can use the option with a mechanical or electronic cantor. In the video below, an experienced mechanic explains to viewers how to properly tighten a cylinder head without a key. It is worth keeping in mind that the correctness of the work should be checked using a protractor.
Video: how to check the tightness of the cylinder head
Tightening the cylinder head bolts on used cars is a responsible, difficult, and specific task. Responsible, because the normal and long-lasting operation of the engine depends on proper tightening. Difficult, because this work is not very convenient to perform due to cramped conditions and insufficient visibility. Specific - because the bolts need to be tightened in several passes, according to a certain pattern, using a special torque tool.
Source: autoclub.su
Action algorithm depending on the type of bicycle spokes
In order to figure out how to tighten the knitting needles correctly, you need to familiarize yourself with their main types.
These parts vary in length and thickness. The thicker the knitting needle, the more strength and weight it has.
The thickness of the spokes should be selected depending on the type of bicycle. For extreme riding, you need the most durable and thick parts, while for everyday riding in urban conditions, thinner options are suitable.
See also: Harm and benefits of cycling
Based on the type of head, there are straight and curved knitting needles. Most bicycle models use curved ones. They have the lowest cost. Straight spokes, typical for expensive branded bicycle models, can be flat, as well as cylindrical with butting - that is, narrowing towards the middle. The advantages of this design are strength, load resistance and reduced weight of the product.
Adjusting the spokes on a wheel occurs in several stages.
Length Determination
The first step is to determine the length of your bicycle spoke. On standard front wheels, all spokes are the same length. If you are going to adjust these parts on the rear wheel, you must first set the length of each spoke.
The easiest and most affordable way to measure knitting needles at home is to use a special online calculator. All that is necessary for this is to indicate the type of wheels (front, rear, with or without a rotor) and then enter the required parameters - the width of the hub, the diameter of the left and right flange, the internal diameter of the rim and its wall thickness, the number of spokes in the wheel, as well as number of crosshairs on the right and left sides.
Installation steps
The next step will require a spoke tensioner and a screwdriver.
Actions must be performed in the following sequence:
- On the wheel parts and threaded parts of the spokes, lubricate all connection points with the bushings with machine oil.
- If there is a recess on the flange on only one side, start installing the spokes from the opposite side.
- Install nine spokes into the flange through the same hole. At the same time, there should be free space between them.
- When working with the rear wheel, pull the spokes on the right side of the hub.
- To the right of the valve inlet, find a similar one on the rim. Place the spoke into it by hand and use a wrench to tighten the nipple two turns.
- In a clockwise direction from the very first installed knitting needle, count four entries and install the next knitting needle in the same way. In this case, the threaded part of the bushing should be directed towards the person installing the spokes.
- The remaining spokes are installed in the same way.
See also: Bicycle rear hub repair and maintenance
Tension
The final step is to tension the spokes on the bicycle wheel. To do this, you need to make sure that the twist depth of the nipples is the same for each spoke. It is for this purpose that it is recommended to perform two revolutions.
After tightening the spokes, you need to install the wheel on a special machine or on a bicycle to carry out testing.
If the wheel is misaligned, you need to adjust the degree of tightening of the nipples - tighten or loosen by turning the key half a turn.
The test should be performed in two positions - vertical and horizontal.
Types of wrenches for correct tightening of threaded connections
The threaded connection must be tightened with such force as to prevent:
- loose fit of mating surfaces of fastened parts;
- thread breakage;
- mechanical destruction of the bolt body;
- turning the edges of a nut or bolt head;
- destruction of engraving washers.
Any material from which the block is made (cylinder head, mounting bolts) has its own strength limit. It is the lowest tensile strength of the weakest link in the fastening unit that determines the greatest tightening force. The weakest link in fastening the cylinder head is the bolts (studs) and threads in the holes of the block. Their weakness is determined not so much by the strength of the material they are made of, but by their incomparable dimensions (diameter) with the dimensions and weight of the block and cylinder head. It is clear that to destroy a solid cast iron block or a massive duralumin head you need to put in much more effort than to break a thin bolt made of high-strength alloy steel.
How much effort do you need to apply?
The threshold or limit value of the strength of critical parts is usually given in the engine data sheet. The values of the maximum tightening forces for the cylinder head bolts are also given there. To perform tightening with the required force, use special torque wrenches.
According to the method of regulation and indication, torque wrenches are divided into the following categories:
- Unregulated with constant tightening torque. They are used for tightening cylinder heads on conveyors during engine assembly. Their advantages are high reliability.
- Adjustable for maximum tightening torque. These are so-called ratchets with the ability to set a certain tightening torque. When this force is reached, the ratchet is activated and further tightening becomes impossible. The ratchet attachment is often equipped with reverse. In this case, it can not only tighten bolts and nuts, but also unscrew them. Many socket sets come with a ratchet.
- With scale and pointer. This wrench can be used to tighten threaded connections with different torques. The main conditions: you need a lot of free space and the ability to conveniently observe the scale. Included in the tool kit of mechanics.
- Digital display in a compact device that measures the applied force. A very accurate, reliable, easy-to-use tool. With its help, you can tighten the cylinder head bolts with an accuracy of hundredths of Nm directly on the car engine.
- Combination of adjustable tightening force with control via digital or dial indicator. Such wrenches protect the threads from applying excessive tightening force, while at the same time allowing you to control the torque using an indicating device.
Photo gallery: types of torque wrenches
General rules for tightening cylinder head fasteners
For the heads of different engine models, the parameters of the order and tightening torque of the cylinder head differ greatly from each other. But there is a general set of universal rules that apply to all types of motors:
- The cylinder head is tightened according to the diagram developed by the engine manufacturer.
- The tightening torque for fastening bolts or nuts is also determined by the manufacturer and is reflected in the operating instructions for this passenger car.
- Tightening is carried out with a working and calibrated torque wrench.
- Fastening bolts or studs with nuts are used in perfect condition without damaging the threads and body of the bolt or stud. The thread must be clean, without nicks or burrs.
- The bolts for tightening the TTY block head have their own specifics. They do not indicate the moment of force, but the installation degree. The necessary information is contained in the operating instructions for the power unit.
- There should be nothing in the blind holes in the block for bolts. Oil should be poured onto the bolt threads, and pouring grease into the “blind” socket is not recommended.
- Before using the bolts, you should check their condition. If, when a bolt is subjected to a torque of 20 kgm, the yield point is not achieved, it needs to be changed. The reason is increased strength. If it is observed that the tightening torque begins to decrease under load, this is a signal that the bolt has begun to fail. It definitely needs to be changed.
- To replace the head gasket, you need to buy only the original one, because it does not shrink.
How to make a torque wrench with your own hands
In order to independently make a tool that is necessary for all mechanics, you need to know its structure. In principle, the design of a torque wrench is simple. This is a socket wrench or a square socket with a wrench with a built-in dynamometer.
It’s easy to make a torque wrench yourself
To work you will need:
- knob;
- manual dynamometer with a weighing limit of 35–40 kg;
- extension;
- table of maximum forces for tightening the cylinder head fastening.
The tightening force in the table is given in Nm (Newton meters), and the dynamometer measures weight in kg. So first you need to understand the numbers.
The length of the collar is constant. It's easy to measure. If in the table the maximum force is 30 Nm, and the length of the driver is 0.3 m, then the force shown by the dynamometer should be 30: 0.3 = 100 N.
One kg equals 10 newtons. Therefore, the device must record a force of 10 kg.
To make the force less, you need to increase the length of the crank. To do this, use an extension cord. And then everything is simple. At the end of the extension we drill a hole for the top hook of the steelyard. Pull the lower end of the scale until the required force is achieved.
Dismantling sequence
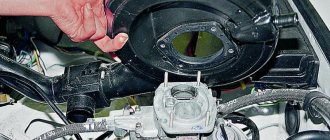
Before removing the front wheel from the bicycle, it is necessary to rid the bike itself of all accessories and additional devices so as not to damage them under the weight of the structure during the dismantling process.
- We turn the bike upside down and put it on a stand for repairs. Or, in the absence of a special stand, simply on the steering wheel with a saddle.
- Now you need to decide on the type of brake system installed on the bike.
- Disc brakes will not cause any hassle when removing a wheel. The only thing worth considering is that hydraulic brakes do not like being in an inverted position, because air can get into the system. In this case, the brakes will have to be bled after all the procedures performed on your bike.
- The rim brakes will need to be unfastened before removing the structure from the mounts. To do this, you need to squeeze the levers with your hands and remove the end of the cable from the clamp, then move the levers to the sides.
- The hub axle is attached to the fork using an eccentric or nuts. In the first case, you simply unscrew the eccentric, unscrew and remove the wheel from the ends of the fork, gently pulling it up. In the second, use a wrench to unscrew the nut; for convenience, while unscrewing, you can hold it with a second wrench.
After the wheel is removed, you can continue to carry out the necessary work with it, for the sake of which it was, in fact, removed.
All steps in one video: replacing the cylinder head gasket
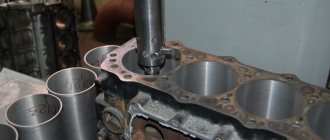
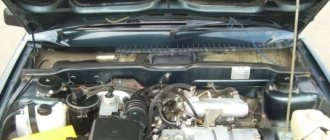
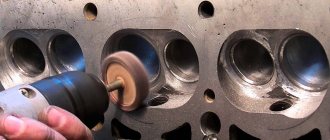
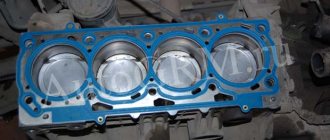
The cylinder head or cylinder head is one of the most important parts of the engine. And during engine repairs, it is often necessary to replace its gasket. I believe that the correct replacement of this auto part involves the indispensable replacement of the cylinder head pins. I will talk about why you need to tighten it, how to determine its torque, about the schemes for tightening the cylinder head bolts and about the general tightening rules later in the article.
Before we get started, let's get acquainted with what this mechanism is. Materials for the production of cylinder head can be: alloy cast iron or aluminum alloy. This is the cap that covers the cylinders. Performs the following functions:
- Protective. It protects the cylinder block;
- The cylinder head contains cavities for: valve bushings, valve spring support washers, for attaching the intake and exhaust manifolds;
- In its front part there is a hole to accommodate the chain tensioner and camshaft drive;
- There are threaded holes for spark plugs.
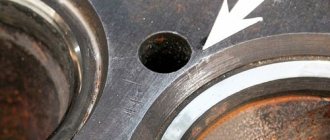
The cylinder head bolts must be tightened in order to prevent the formation of mucus at the junction of the elements in question. This usually happens due to an oil leak.
Torque Control Tools
The main tool for controlling tightening torque is a torque wrench. This is the name of a wrench that has a dynamometer (a device for measuring torque) built into it. The following types of devices exist:
- Indicator - when tightening, displays the applied force digitally or using an arrow. The error is 6–8%.
The indicator torque wrench is inexpensive, but has the largest error
- Digital is a subtype of indicator, but uses an LCD display to display the moment. Supports sound notification capabilities, uploading data to a computer, etc. The error is up to 1%. Digital torque wrench - the most accurate
- Limit - when the specified torque is reached, it stops tightening using a click mechanism. The error is up to 4%.
Tighten the bolts correctly
Any threaded connection is designed for a certain tightening torque. It is regulated by industry quality standards, for example, “OST 37.001.050–73 Tightening of threaded connections. Tightening standards" and guidelines from vehicle manufacturers. Foreign manufacturers use other standards, but they are basically similar to domestic ones. The information below will be presented based on Russian standards.
To what extent can threaded connections be tightened?
Why is it important to maintain the correct tightening torque? Only proper tightening will ensure reliable fixation of the part, on the one hand, and prevent damage to the thread and/or the part itself, on the other hand.
Let's look at what happens when the tightening torque is exceeded using the example of a bolt and nut:
- Immediate thread deformation. Due to too much applied force, deformation and breakage of the threads on the part occurs. The bolt or nut is not subject to further use; in addition, certain difficulties will arise when trying to unscrew the nut for replacement. You will most likely need to use a drill or metal saw to cut off the nut.
- Damage to metal hidden from view. It may seem that the nut is tightened correctly, but due to exceeding the yield strength, irreversible changes occur in the bolt or nut: deformation, disruption of the metal crystal lattice. Such a case is especially dangerous because it is not immediately noticeable, but after some time a crack in the bolt can lead to dire consequences.
Tightening the cylinder head bolts with a torque wrench
The yield strength is a mechanical characteristic of a material that characterizes the stress at which strain continues to increase without increasing the load. Designation σт.
Unit of measurement: Pascal or multiples.
This is an important parameter with which permissible stresses for ductile materials are calculated.
After passing the yield point, irreversible changes begin to occur in the metal of the sample, the crystal lattice of the metal is rearranged, and significant plastic deformations appear.
If, on the contrary, you do not tighten the nut with the appropriate torque, after a while it will simply unscrew, which can also lead to undesirable consequences. Therefore, it is strongly recommended to tighten threaded connections not “with all your strength”, not by hand, but wisely, using special equipment.