Rear brake cylinder device
The rear brake cylinder (RBC) is secured to the top of the support shield with two bolts. The part is equipped with a special fitting designed for bleeding the hydraulic drive of the system. A tip is screwed into this fitting through which brake fluid is supplied. On both sides of the gearbox there are pistons with pad stops.
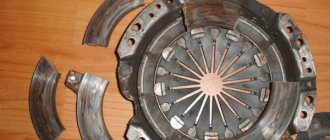
Rear brake cylinder device
The back side of the pistons is equipped with rubber sealing rings, secured with support cups and springs. Anthers, or, as they are also called, rubber protective caps, are installed on the outside of the cylinder. They protect the entire cavity from dirt and dust.
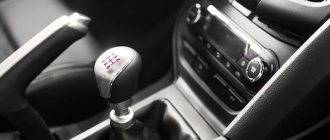
Master brake cylinder for VAZ 2107
Note! The brake cylinder is an important element of the system that converts brake fluid pressure into mechanical force that acts on the brake pads.
Replacement
Replacing the part yourself is not difficult. To do this, you need to arm yourself with the following set of tools:
- screwdriver;
- keys 10, 13;
- 5 – with a cubic syringe or bulb;
- brake fluid;
- clamps.
If during disassembly you find that the old rubber hoses have become hard, it is recommended to replace them with new ones.
- Remove the belt from the expansion tank and put it aside.
- Using a ten key, unscrew the fastenings of the brake fluid reservoir and open the lid.
- Drain the brake fluid into a container.
- To prevent brake fluid from entering the engine compartment, it is necessary to place a piece of dense material under the cylinder.
- Loosen the clamps on the hoses extending from the tank and remove them.
- Disconnect the three brake pipes and move them a little.
- We unscrew the two nuts securing the cylinder to the amplifier, using a 13mm wrench.
- Remove the brake master cylinder.
- We clean the seat of the spare part from dirt and brake fluid residues.
- Let's move on to a new element. We remove the protective seal and install the oil seal there.
- We insert the new cylinder into place and tighten the nuts.
- We remove the plugs and use a syringe to inject brake fluid into the cylinder cavity until it is completely filled.
- We assemble the remaining elements.
The final stage of repair work will be bleeding the car's brake system.
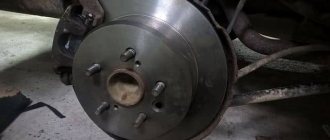
Where is?
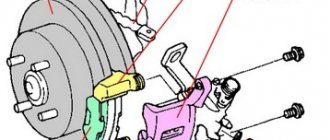
To see the brake cylinder, you need to remove the drum. Even those people who have never seen it before will be able to recognize the part. The ends of the cylinder are connected to the brake pads (see photo). The brake cylinder is placed equally on all wheels. Once the location of the part has been established, it can be diagnosed.
Where is the rear brake cylinder located?
Front cylinder location
Clutch diagram of the master cylinder VAZ 2107
The front brake cylinder is located on the front wheel hubs, next to the wheel rim. Each front wheel has two brake devices, which, when you press the pedal, press the pads against the brake disc on both sides, which ensures effective braking of the car. For clarity, below is a photo in which both devices are indicated by arrows.
After removing the front wheel of the seven, you can see the device data immediately behind it. Having found them, you need to make sure that they are in good working order, or rather, that they are faulty. After all, why change a working part?
When to change cylinders
The main and most common reason for loss of performance, which entails repair or replacement, is jamming of the brake device. If you notice constant braking of the car, a pull to the side when you release the steering wheel when driving in a straight line, or abnormal heating of one of the wheels after driving, perhaps one of the working cylinders has begun to jam. This happens quite often, since aggressive and improper operation, as well as the quality of parts, leads to such consequences. Jamming of the product can occur in any mode of operation - be it constant driving of the car, or its idle time in the parking lot. If at least one of the cylinders on the VAZ-2107 begins to jam, then you should immediately get to the nearest service station and have it repaired. But a service station is expensive, especially for owners of budget cars, so it’s easier to solve the problem yourself, and at home.
Replacement of the product may also be necessary if liquid begins to leak from under the sealing ring. The sealing ring (boot) is shown below in the photo.
If liquid begins to leak from under the rubber band, it means that this will soon lead to a malfunction of the device. You can avoid consequences by responding in a timely manner.
Replacing the front brake cylinder on a VAZ-2107
Replacement begins directly with the removal of the old mechanism. To do this, you need to jack up the front of the car, then unscrew and remove the wheel, and remove the brake caliper. Details of caliper removal can be found in the corresponding section of this website.
Further actions to replace the working mechanism should be carried out as follows:
The caliper should be placed in a vice, but it is important not to clamp it too tightly. If you squeeze it, then part of the part may simply break off, as a result, replacing the caliper cannot be avoided. Once the caliper is removed and clamped in a vice, it is necessary to remove the steel brake pipe
This tube connects both parts of the mechanism. To remove the tube, you need to unscrew two nuts with a wrench. After unscrewing the nuts, you can remove the steel tube. The photo below shows the caliper in a vice, as well as the tube that needs to be removed. After this, you need to find a groove on the side in which the spring locking element is located. To remove the brake cylinder, you will need to press this lock with a screwdriver. The photo below shows the location of the groove with a red arrow.
To remove the working device, you need to hold the spring mechanism with a screwdriver. After pressing the latch, it is necessary to strike the side of the working mechanism with a rubber hammer. You don’t need to hit it too hard, but be sure not to hit the caliper. If you hit the caliper, it may break off. The photo above shows how the working cylinder is struck with a hammer. If the product starts to move, then the process is in progress. To dismantle the part in question, you will need to use a long screwdriver or pry bar. The mount should be placed in the resulting hole between the caliper and the cylinder. Below is a photo of how it looks clearly.
The second cylinder is removed in a similar way. After removing the devices, you can begin to directly replace them with new ones. To install a new product in place of a removed one, you must first press a special latch. When pressed, the mechanism must be installed in the guide grooves until this latch is activated.
This completes the replacement of the working cylinder on the VAZ 2107
When installing a new product, pay attention to the presence of a brake bleeder. If it is missing, then you should remove it from the old cylinder and screw it into the new device
Symptoms of a malfunctioning TTS
What symptoms may indicate the need to replace a brake cylinder? Let's consider the main ones:
- reduced efficiency of the braking system (the pedal is activated only at the end of the stroke);
- the appearance of traces of liquid leakage on the surface of the drum;
- a noticeable decrease in brake fluid in the reservoir.
Signs of a faulty rear brake cylinder
All of these symptoms often occur due to various causative factors. The most common of them include:
- the pads were heavily worn, which in turn led to the pistons being squeezed out;
- low quality of the cylinder itself;
- the cuffs are corroded by the brake fluid (this is possible when mixing different types);
- natural wear of the brake cylinder.
Rear brake cylinder failure
Drivers often encounter jammed pistons inside the housing. In this case, the car constantly brakes, which causes the drum to overheat. You cannot ignore such a malfunction; you need to urgently take the car in for repairs.
Rear brake cylinder wear
Purpose of the brake system
Lada 2107 Arkano-mobile Samara Logbook Replacing the heater tap in a VAZ 2107 with a tap from a VAZ 2108 with its removal from the passenger compartment under the hood
Braking systems are designed to reduce the speed of a vehicle, stop it quickly and hold it in place. Brake systems are divided according to their functions into service, auxiliary and parking. The service braking system ensures a reduction in the speed of the vehicle and its complete stop, with the necessary efficiency, the parking system keeps the vehicle stationary, and the auxiliary braking system is designed to maintain a constant speed of the vehicle for a long time and regulate it. The parking brake system can also be used as an emergency system in case of failure of the service brake system.
The service braking system consists of four wheel brake mechanisms and a hydraulic drive.
Braking of the car is ensured by creating artificial resistance to the rotation of the wheels; for this purpose, the braking torque is applied to the wheels (wheel brakes) and the drum.
What is needed for replacement
To replace the brake cylinder, you need to take care of preparing some tools and materials:
- set of wrenches;
- screwdriver;
- pliers;
- dry rags;
- metal brush;
- WD-40 (if things don't go according to plan);
- jack;
- brake cylinder;
- balloon wrench.
Tools for replacing the rear brake cylinder
Before replacing, it is advisable to purchase a set of brake pads, since they still need to be changed periodically, and the disassembled rear of the car will allow you to do this without any problems. The work needs to be done in a spacious room or outside, so that there is somewhere to put the spare parts after dismantling. It is important to remember not only the sequence of their removal, but also the method of removal . Once everything is ready, you can begin repair work.
Brake cylinder puller
labavto.com
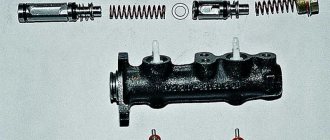
The brake master cylinder (MBC) is one of the main elements of the brake system, which determines how safe the vehicle will be used. The driver is obliged to ensure that it is in good condition. If malfunctions are detected, action must be taken immediately. Negligence and delay in repairs can lead to an accident. You can identify faults and repair the VAZ 2107 GTZ yourself.
GTZ: device and purpose
The VAZ 2107 is equipped with a hydraulic brake system consisting of two circuits. When one of the circuits fails, the other continues braking. This improves traffic safety. The master cylinder changes the pressure in the circuits depending on the position of the brake pedal. The GTZ is located on the rear wall of the engine compartment. It can be found under the expansion tank of two sections, which is filled with brake fluid (TF). It looks like an oblong cylinder with holes for connecting brake hoses.
The GTZ housing contains 2 pistons with sealing collars. They are located sequentially one after another. The first one moves due to the influence of the pedal pusher on it and serves the contour of the rear wheels. It forces a second piston to move, which acts on the two brake circuits of the front wheels. Springs that are located between the pistons return them to place when the driver releases the brake pedal.
GTZ performs the following functions:
- distributes the fuel fluid over two brake circuits, which separately serve the front wheels;
- transmits the force of the brake pedal using fluid to the working cylinders (WC);
- directs excess fuel fluid to the expander;
- returns the pedal and rod to their initial position when the driver no longer presses the pedal.
To avoid problems with the brakes during further operation, for replacement you need to buy an original product, preferably from a Tolyatti plant with article number 21013505008.
Diagnostic methods and possible malfunctions of the GTZ
The need to diagnose HTC arises when the following symptoms appear:
- an indicator lights up on the dashboard warning of insufficient brake fluid level;
- in order to brake, you need to press the pedal hard;
- large free play of the pedal, sometimes it falls through;
- when braking sharply, the car moves away from the direction of travel;
- the car slows down, the pedal is depressed as much as possible;
- leakage of fuel fluid from the tank.
First, the area under the gas turbine engine is inspected for drips. They are usually visible on the side member and vacuum booster. If the tank body is intact, you need to remove and repair or replace the GTZ.
To identify malfunctions of the master cylinder without diagnosing other parts of the brake system, you need to perform the following steps:
- Using a wrench, unscrew the brake pipes from their sockets and screw in screws with fine threads in their place;
- plug the outlet openings of the dismantled removed pipes with wooden choppers or pegs;
- Next you need to press the pedal several times.
If the GTZ is working properly, after several presses the chambers will fill with liquid and it will be impossible to press the pedal. On the faulty element, the sealing cuffs allow liquid to pass through, and it flows back into the expander, and the pedal continues to fail. To confirm a malfunction of the turbocharger, you need to unscrew the nuts on the cylinder and move it away from the vacuum booster; the fuel fluid will flow out of the hole.
Sometimes the seals of the second chamber become unusable, while in the first they cope with their function. In this case, when checking, the brake pedal will fall slower. If the gas turbine engine is working properly, the pedal cannot be pressed more than 3 times, since there is nowhere for fluid to flow out of the cylinder.
How to replace the GTZ and change the cuffs
Problems with GTZ are solved in two ways:
- Disassembling and cleaning the device and replacing the seals from the repair kit.
- Complete replacement of the GTZ.
The most reliable option is the second one.
To carry out the work you need to prepare:
- a set of keys;
- special wrench for unscrewing brake pipes;
- screwdriver;
- bulb or syringe;
- narrow nose pliers;
- plastic bottle for liquid;
- rags;
- repair kit or new GTZ.
For the plugs, you need to prepare wooden choppers 6 mm long with a pointed end. After repairs, be sure to bleed the brake circuits. For this procedure, you need to prepare brake fluid, a wrench for unscrewing the fittings on the working cylinders, a wheel wrench, a transparent tube and a bottle. If the cuffs are changed, they must be selected in accordance with the GTZ. Products from different manufacturers may vary. You should buy the original GTZ
Removing and installing the master cylinder
To preserve the fuel fluid from the tank, it is pumped out using a bulb or syringe into a prepared container. Dismantling of the GTZ is carried out according to the following algorithm:
- Having loosened the clamps, disconnect the brake pipes from the GTZ and lower them into a plastic bottle.
- Next, unscrew the three brake hoses. We take them out of the sockets and insert the manufactured plugs.
- Unscrew the nuts securing the GTZ to the amplifier and remove it from the studs. When removing the master cylinder, you need to remove the washers so that they do not fall to the floor.
- If a replacement is carried out, a new one is installed in place of the removed cylinder. Assembly is carried out in the reverse order, carefully tightening the fasteners.
Replacing the repair kit for the main brake cylinder of a VAZ 2107.
Disassembling the GTZ and replacing the cuffs
Before disassembling the unit, you need to drain the remaining fuel fluid and wipe the body with a rag. Further work on replacing the cuffs is a sequence of actions:
Instructions
The brake fluid level in the reservoir must be sufficient (above the middle or up to the MAX mark). If there is insufficient amount of fluid, the brake system will become airy, which will significantly complicate the work, because in addition to replacing the brake pump, it will be necessary to pump the system. Below are step-by-step instructions for replacing the brake cylinder on the rear wheel using the example of a VAZ 2101-07 car.
Replacing the rear brake cylinder
Step 1 . Raise the rear wheel with a jack and hang the wheel.
Jacking up the rear wheel
Step 2 . Place a reliable support under the car. Do not carry out repair work on the jack, even if it looks strong and reliable.
Installing a reliable support under the car
Step 3 . Remove the car from the handbrake.
Removing the handbrake
Step 4: Place something under the front wheels. This will allow you to securely secure the vehicle.
Fixing car wheels
Step 5: Remove the rear wheel.
Removing the rear wheel
Step 6 . Unscrew the two wheel guides and remove the brake drum.
Removing the brake drum
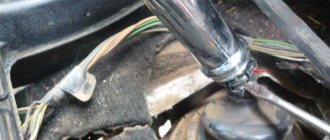
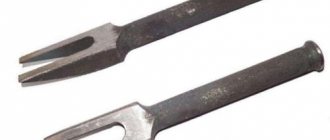
Step 7: Disconnect the brake pipe from the cylinder. It is advisable to do this with a special key so as not to tear off the edges on the fitting.
Brake Line Disconnect Tools
Step 8: Be careful when unscrewing the fitting. It can rotate along with the tube and then you will also have to change the tube.
Unscrewing the fitting
Step 9 . Remove the cap from the bleeder fitting. It is needed to prevent fluid from leaking out of the brake pipe.
Removing the cap from the bleeder fitting
Step 10 . Place the rubber cap on the brake pipe. It will also protect the tube from dirt sticking to it.
Protecting the brake pipe with a rubber cap
Step 11. Remove the two bolts securing the brake cylinder to the support plate.
Unscrewing the brake cylinder mounting bolts
Step 12: Remove the brake cylinder from the vehicle.
Removing the rear brake cylinder
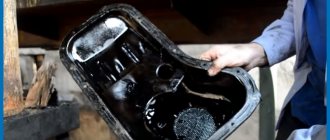
Note! If the pads are not filled with brake fluid and do not need to be replaced, then there is no need to remove them.
Step 13 . Place some special lubricant under the boots of new cylinders. It is needed to protect the part from corrosion.
Applying lubricant under cylinder boots
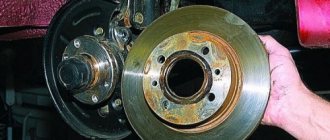
Step 14 . This is what the old and new brake cylinder looks like. By visually comparing parts, signs of wear can be identified.
Visual inspection of the brake cylinder
Step 15. Install the new gearbox in place. Since its pistons are separated, there should be no problems with installation.
Installation of a new ZTZ
Step 16 . Tighten the bolts securing the cylinder to the support plate.
Attaching the cylinder to the support panel
Step 17 . Remove the rubber plug from the cylinder. It is advisable to remove the plug at the very last moment to avoid dirt getting into the part.
Removing the plug from the cylinder
Step 18 . Attach the brake pipe to the cylinder.
Connecting the brake pipe to the cylinder
Step 19 . Thoroughly clean the axle shaft and drum from dirt and corrosion.
Cleaning the drum from dirt and corrosion
Step 20 . Apply some high-temperature lubricant to the contact areas of the parts. Any book on repairing VAZ cars says this, but, unfortunately, now people don’t like to read.
Application of high temperature grease
Step 21 . Reinstall the drum and tighten the two wheel guides.
Brake drum installation
Step 22 . Replace the removed wheel and, removing the support from under the car, lower it from the jack. Don't forget to take back what you put under the front wheels. At this point, the replacement of the rear brake cylinder can be considered complete.
Installing a wheel on a car
Removal and repair
To remove, repair and reinstall, you will need a minimum of tools:
- key to 13;
- special wrench for brake pipes;
- flat screwdriver;
- brake master cylinder repair kit;
- brake fluid container;
- syringe;
- brake fluid.
To avoid spilling brake fluid from the reservoir, it must be poured into a prepared container using a syringe. The procedure for removing the cylinder is as follows:
- loosen the rubber hose clamps on the brake cylinder fittings;
- remove the hoses coming from the brake fluid reservoir to the cylinder fittings;
- use a special wrench to unscrew the three brake pipes;
Note: the tightening torque of the brake pipes is very high; attempts to unscrew them using a conventional open-end wrench can lead to the edges breaking off.
- unscrew the nuts securing the main brake cylinder to the vacuum booster;
- remove the brake cylinder.
Now it is necessary to disassemble the master brake cylinder and inspect it for scratches or shells; if they are not found, if the mirror is clean, then repair is possible, otherwise, replace the master brake cylinder with a new one. At this stage there should not be any problems - you need to unscrew the locking screws one by one, starting from the plug. When you unscrew the second screw, hold the piston so that it does not fly out under the force of the spring. The first piston will come out on its own, the second will need to be knocked out, tap the body on a piece of wood.
- remove all o-rings from the pistons and thoroughly wipe all parts - pistons, springs, housing;
- replace the rubber seals on the pistons;
- Assemble the master cylinder parts and tighten the plug nut.
Screw it to the vacuum body, connect the tubes and hoses from the tank. The tubes should not be screwed in completely; fill the reservoir with brake fluid and, as soon as it begins to flow out from under the tubes, screw them in completely. After final assembly, the system will most likely need to be bled to remove air from it, and the fluid will be completely replaced.
We check the connections and the main brake itself for leaks. It is also necessary to check the effectiveness of the brakes. If everything is fine, then your car is ready for further use.
Checking after replacing the fuel pump
As soon as the new part is installed, you need to check its functionality. The brake pads are checked (whether they are separated at the place where the brake parts are replaced), as well as the system itself for leaks. Experienced motorists check even before installing the wheel, but this requires an assistant. However, there is no way to bleed the brake system yourself.
Check after replacing the rear brake cylinder
Check the rear brake cylinder as follows:
- the assistant sits in the driver’s seat and, pressing the brake pedal, fixes it in this position;
- the second diagnostic participant turns the brake drum with his hands;
- the same second participant looks to see if there are any traces of liquid;
- If there are no leaks, the wheel is installed in its place.
Checking the brake system after repair
On a note! If, when the brake is pressed, the drum rotates or traces of fluid appear, this indicates a faulty brake cylinder. Even if the part is new, it must be replaced.
Malfunctions
There are two types of brake master cylinder failure:
- Damage or swelling of rubber seals;
- Piston jamming.
Signs that it is time to repair or replace an element are:
- leakage of liquid;
- changes in the pressure of the brake pedal: it became softer or began to fail.
To eliminate breakdowns, it is necessary to dismantle the master brake cylinder and then install a new element, or to repair it, namely, change the boot, rubber seals, clean parts from dirt, corrosion, etc.
If the GTZ breaks down, the entire braking system of the vehicle is susceptible to malfunctions. At the right moment, when you press the brake pedal, the car may stop much more slowly than usual, or may not respond to the signal at all. And this can cause a traffic accident.
If, when squeezing the pedal, you feel that it has become softer or the car is braking more slowly, you should check the brake system in general and the brake master cylinder in particular. With a little time, you can improve the safety of your vehicle.
Brake master cylinder price
The cheapest cylinders cost around 400-700 rubles 1,500 rubles . Replacing a cylinder in a car service will cost from 400 rubles , but to save money it is quite possible to do it yourself.
Consequences of untimely replacement
What can happen if a faulty brake cylinder is not replaced in time? In fact, the consequences can be different:
- constant leakage of brake fluid from the system;
- reduction in brake efficiency due to liquid getting on the surface of the linings;
- complete failure of the braking system due to depressurization of the cylinder.
If you do not change the brake cylinder,
all these consequences cannot be called pleasant, because they will bring a lot of trouble to the owner. In addition, driving with a faulty braking system threatens the safety of the driver and passengers. But in order to avoid unpleasant and dangerous consequences, it is important to promptly change the fuel pump and repair other system faults.
Failure of the brake system due to a malfunction of the brake control system
Replacing the main brake cylinder on a VAZ-2107
Now we take an assistant and bleed the brakes. The procedure is very standard, so there is nothing to describe here.
Thanks to the user of our forum Randall for the material. You can discuss the article on the forum: https://www.semerka.info/forum/viewtopic.php?p=69277#69277
- Login to leave comments