What are piston rings and their purpose
Piston rings are elastic, open elements that are installed in special grooves on the piston body. They are made of high-strength steel or cast iron, and covered with an alloying material on top. The alloy coating further increases strength and also reduces wear rates.
Typically, 3 rings are inserted into the piston: 2 compression rings (occupying the 2 upper grooves) and 1 oil scraper ring (the lower groove). The purpose of the compression rings is to prevent hot gases from breaking through along the piston into the engine crankcase. Oil scraper - removes excess oil from the cylinder mirror, preventing it from entering the combustion chamber. In addition, the rings reduce the temperature of the piston, transferring almost half of the heat from its surface to the cylinder walls.
When the piston rings no longer cope with the tasks assigned to them due to their wear, the car engine signals this by displaying the corresponding symptoms.
Signs of piston ring wear
Blue or black smoke from the exhaust pipe indicates that wear has reached a critical stage. This indicates that excess oil entered the combustion chamber past the oil scraper ring and burned there along with the fuel. Black smoke coming out of the crankcase ventilation tube indicates that the compression rings, due to wear, allow gases to escape from the combustion chamber into its cavity.
Critical wear is accompanied by a decrease in compression (the ability to maintain pressure) in the engine cylinders. This means that some of the gases formed during the combustion of the fuel mixture, which was supposed to push the piston, broke into the crankcase without performing useful work. This is what will lead to a drop in pressure in the cylinder, therefore, the engine will lose some power. Increased oil consumption is observed.
Compression is checked with a special device - a compression meter. When the nominal pressure values are unknown (there are no operating instructions), it is first measured in a dry cylinder, then a little engine oil is poured through the spark plug hole, and the measurement is made again. If the compression increases, then the rings need to be replaced. Similar signs can be observed in the case of their “occurrence”.
“Sticking” occurs when carbon deposits formed in the piston grooves prevent the piston rings from springing, resulting in a decrease in the tightness of their contact with the cylinder surface.
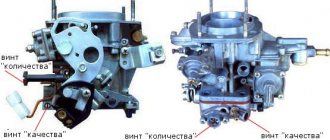
This problem, if the case is not very advanced, can be corrected with the help of special fuel additives. For an engine with a carburetor system, you can try cleaning it with a carbon remover spray that is injected directly into the carburetor. If removing carbon deposits from the combustion chamber has no effect, then there is only one way out - replacing the piston rings and cleaning the grooves.
When nothing will help the engine...
Let's consider the most common cases of irreversible states of the cylinder-piston group... Case number one.
We have before us a perfectly preserved (virtually no wear) piston engine, relatively low mileage, everything is fine with compression and traction... but oil consumption has already exceeded 1 liter per 1000 km. Everything that can be checked has been checked... And the reason is quite simple - the oil simply has nowhere to go - all the through holes of the combined oil scraper ring are clogged. The problem is fatal and irreversible - it is simply impossible to pierce organic matter baked at high temperatures - holes with a diameter of about 0.5 mm are firmly and forever overgrown. Accessibility to this zone and, therefore, the effectiveness of any means of “flushing” is extremely low - I hope it is obvious that the holes themselves are “recessed” into the ring? The piston is in perfect condition (pictured), the rings are movable and not worn - and only the procedure of replacing the rings will help...
And this is what it looks like in normal quality:
And like this, “in the light” in comparison with the “serviceable” ring (below): Now let’s look at the “stuck” rings of the composite profile and it will immediately become clear what the difference is:
Despite all the unsightly condition of the piston, the design of such oil scraper rings allows, after they return to fit, to restore all the functions of oil drainage - the engine and the piston are dirty, everything seems to be deplorable, but the actual oil consumption depends only on the wear of the rings... the difference is in the details, literally. Here's another similar example:
The ring really “lies”, but the oil consumption even without taking any measures will be moderate - such holes are very difficult to hammer tightly, due to the presence of a spring expander... It didn’t even hurt that the ring size was almost critical - there was a time when the pistons could have a groove in the oil scraper ring with a height of 3-4 mm (!), versus modern 1.5 mm... The transition to modern realities of “standardization” of ring heights occurred approximately fifteen years ago, since the beginning of the struggle for the environment and the reduction of friction losses... This fact can be follow changes in spare parts catalogues. Obsolete, Composite, High, 4 components per piston: Modern, Combination, Regular, 3 components per piston:
What? — Clogged oil drainage of oil scraper rings. Why? — Unsuitable oil. Risk group? — Forced engines with a combined oil scraper ring and traffic jam conditions, overheating. In particularly unfavorable cases - rings of any design. Where you can find it: BMW M54, N63, many VAG engines. Solution? — Replacement of piston rings. Now let’s aggravate the picture and consider more interesting and more modern cases (for engines of the previous generation this would be nonsense): typical “modern” case number two. But first, let’s return to case number one, considering the lock gap in the O-rings, which is almost always a constant for the “old” M54 engine:
The trouble is that in many modern engines the degree of boost has approached and even exceeded 100 hp. per 1 liter of working volume! The height of the compression ring is only 1.5 mm, weight - about 10 g. This small piece of metal takes on a considerable amount of heat, constantly being “under pressure” - being inserted into the cylinder. As can be seen above, even in the area of the oil scraper ring the temperatures are sufficient for the additive package to fall out of the “unsuccessful” oil with all the “tolerances and allowances” - and this is certainly far beyond 300 degrees, let alone the upper sealing ring, which is closest to the combustion chamber ?! And now, attention: it doesn’t even “coke” (which, by the way, is very difficult to do in view of its “gap-free”), it doesn’t need this - it simply loses its elastic properties - it “sits” and no longer provides a seal:
Comparatively it looks like this:
And the piston begins to swing in the cylinder: But here is the case in its “pure” form, with an absolutely live oil scraper of the “correct” type:
As a rule, when repositioned, such a piston knocks like a pencil in a glass, killing both itself and the cylinder wall... But the most important thing is that the pressure of the crankcase gases increases sharply - oil consumption increases for a “natural reason”, but with complete “preservation” of the geometry of the oil scraper ring - the ring , as you might guess, are not worn out in the literal sense... The wear of the ring is generally reduced - there is not so much friction left) But here is the initial phase of this process on a forced BMW N63, when the ring has just begun to “sit down”, although the oil drainage is already completely clogged :
What?
— Loss of elasticity of the compression ring. Why? — Factory error in the choice of material. Risk group? - Modern forced and not so powerful VAG, BMW engines such as N52, N63... Solution? — Replacement of piston rings (and it would be nice to use rings of a new type, if the plant came to its senses in time and provided a replacement). To be continued... Tags:
How to change piston rings on a VAZ 2107 without removing the engine video
How to replace piston rings yourself
Of course, replacing rings is a rather labor-intensive procedure. It requires accuracy and certain skills, but by and large there is nothing complicated about it (unless you remove the engine). To do this you need:
- remove the cylinder head, following all the recommendations of the car manufacturer;
- drain the oil, remove the flywheel protection and engine sump;
- remove the oil intake;
- Having turned the crankshaft, set the desired piston to bottom dead center;
- unscrew the connecting rod cover and remove it;
- pull the piston along with the connecting rod out of the cylinder, pushing it upward with a wooden strip;
- clean the piston from carbon deposits. Based on its marking, determine the piston class, purchase a new set of piston rings corresponding to it;
- Before installation, each new ring is first inserted into the cylinder to check the clearance in the lock. The gap must correspond to the value specified in the vehicle's operating manual. If it is less than necessary, then the ends of the lock are carefully filed with a file;
- The pistons are thoroughly cleaned of carbon deposits. The holes intended for draining oil are also cleaned with a suitable wooden stick. The cleaned grooves are lubricated with clean engine oil;
- The rings are put on starting with the oil scraper. On one side of the ring is marked “TOP” (up), which indicates how it should be installed in the piston. The locks must be installed at 120 degrees relative to each other. This will prevent gases from penetrating through them. You cannot put the rings on in a “twist”; such installation may be accompanied by the appearance of microcracks, which will lead to their breakage;
- Reassemble in the reverse order, simultaneously cleaning everything with a clean rag and lubricating it with fresh engine oil. Pistons must be installed exactly in the cylinders from which they were removed. Also, the connecting rod caps with connecting rod bearings must be put on the same connecting rods from which they were removed.
If the wear of the connecting rod bearings allows them to be reused, then there is no need to replace them, since this will require boring the crankshaft journals. You won’t be able to do this kind of work on your own without experience.
Tools required for work
To replace the rings you will need:
- sets of open-end and ring wrenches, as well as wrenches with an extension and heads with a nominal value of 10 – 19;
- torque wrench;
- specialist. crimp (mandrel).
In addition, you will need an oil-resistant sealant. It will come in handy when installing the oil pan and valve cover gaskets.
And there seems to be nothing complicated in the steps listed above, if the replacement is made without removing the engine from the car. However, there are nuances without which an engine with new rings will not work for a long time. When the cylinder reaches the extreme stage of wear, a “step” is formed on the surface of its mirror. Having hit it, the new ring will either break immediately or get a crack, which will ultimately lead to its failure. In addition, the grooves of the old piston also have wear, so grinding new rings to the cylinder will be difficult or completely impossible. This means that it is better to entrust the troubleshooting of the piston group and cylinders to professionals.
Boring and honing of cylinders should also be carried out by qualified specialists. In addition, this work cannot be done without removing the engine. Therefore, before getting down to business, you should think carefully and realistically assess your strengths and capabilities. So that the result of the repair would not be the replacement of the piston group as a whole, or even worse, it would not be necessary to submit the engine for a major overhaul.
VAZ 2107: replacing the piston yourself
Attention
The tightening torque should be from 43 to 53 Nm.
- Next, the remaining connecting rods are installed in the same way and the ease of rotation of the crankshaft is checked.
Then you need to put back the pan with a new gasket, the cylinder head, put back the timing chain drive - in a word, the assembly order is the reverse of the disassembly order. After the engine is assembled, oil is poured.
Run-in Run-in of the engine is carried out with the vehicle stationary. The engine starts and runs for half an hour. Gradually it is necessary to increase the speed to approximately 2000 revolutions.
First start While the engine is running, listen for any extraneous noise, which is extremely undesirable.
Piston rings for VAZ 2106
The pressure of the working gases after ignition of the fuel mixture exceeds 60 kg/cm2, which creates an axial load of more than 3000 kg. and lateral load up to 250 kg. High temperature contributes to accelerating the destruction process, when the VAZ 2106 piston needs to be replaced.
Replacement
Personally, I carried out this procedure with the engine removed, since the car was almost completely disassembled. But everything can be done even with the engine installed, but then it is most convenient to carry out repairs on a pit or a lift.
So, after the pan cover is removed, you can take a 14mm socket with a wrench and unscrew the two nuts securing the connecting rod cover. This is shown more clearly below:
When both nuts are unscrewed, you can remove the cover by hand; it can usually be easily removed without any problems:
Then, with a certain force, you need to press the connecting rod bolt with your hand or even with the handle of a hammer:
Until the piston comes out from the back of the cylinder. It will roughly look like this:
This should be done quite carefully so as not to damage either the piston itself or the cylinder walls:
Next, you can begin to remove and replace the piston rings if the cylinders are not yet worn out. To do this, carefully pry the edge of the ring with your fingernail or finger and remove it from the piston groove:
And carefully turn the ring until it is completely free from the groove:
After all the rings, both compression and oil control, have been removed, you can measure the clearance by inserting them into the cylinder and inserting a feeler gauge into the hole between the two edges:
The nominal ring gap ranges from 0.25 to 0.45 mm. The maximum permissible gap at which it is necessary to urgently change the rings is 1.0 mm.
If the values exceed the nominal values, we replace the rings with new ones. After which you can install all the parts in the reverse order of removal. It is worth paying special attention that when installing the rings, their locks should be directed in different directions for greater tightness of the cylinder.
Changing the oil in the rear axle at the link.
Installation
Before installing new piston rings, you need to check the gap at their joints.
It is assumed that the gap between the ring and the landing groove area has already been checked and complies with the standards.
Arrange the pistons and connecting rod assemblies and new piston rings in such an order that the set of rings matches the given cylinder on which the joint clearance will be measured.
Insert the top ring into the first cylinder and push the piston bottom inward so that the ring inside the cylinder becomes perpendicular to its axis. The ring should be at the bottom of the cylinder, in a position corresponding to bottom dead center.
The gap at the piston ring joint is measured with a feeler gauge. Compare the result with the set value.
If the gap is larger or smaller than specified, repeat the measurement to ensure that the ring can be installed.
If the gap is too small, then it must be increased, since otherwise, during engine operation, the ends of the ring will close, which can cause serious damage. The gap at the piston ring joint can be increased by carefully filing the ends with a thin file. Clamp the file in a vice with soft jaws and carefully move the ring along it, removing excess material.
The gap may exceed the established one, but should be no more than 1 mm.
The measurement should be repeated to ensure the suitability of the ring.
Repeat the measurements for each ring installed in the first cylinder, as well as for each of the rings installed in the other cylinders.
After measuring the gaps at the ring joint and adjusting it, the rings can be installed on the pistons.
The oil scraper ring (the lowest one on the piston) is installed first.
This ring consists of three parts.
Install a separator/expander into the groove.
Install the lower oil scraper ring guide. When installing the guides, you cannot use the device for putting on the rings, as they may break. Insert one end of the guide into the groove of the piston, between the separator and the horizontal platform of the groove, and, holding it firmly, insert the second end of the ring into the groove with your finger. Install the second guide in the same way.
After installing all the oil scraper ring parts, make sure that the upper and lower guides rotate freely in the groove. Arrange the joints of the oil scraper ring according to the picture.
The middle ring (number 2) is installed next. This ring is stamped with an “R” mark, which should face the piston bottom.
How to choose
You take the ring, insert it into the cylinder and see what thermal gap you have left. 0.2-0.3 mm is the norm.
The gap in the piston grooves for the upper one is 0.04-0.07, for the lower one 0.03-0.06; if the gap between the cylinder and the piston is more than 0.15, then a different piston group should be selected.
Source: vz06-up.ru
We remove the piston with connecting rod from the cylinder block (see Replacing crankshaft liners).| In the lower heads... |
| ...and steel-aluminum liners are installed on the connecting rod caps. |
They are prevented from turning by locks inserted into the slots of the beds.
| We clamp the connecting rod in a vice and, unclenching it, remove the upper... |
| ...and lower compression rings. When installing them subsequently, the “TOP” or “TOP” mark should be directed towards the piston bottom. |
| There may not be an inscription on the ring, but the lower compression ring is always installed with the chamfer facing down. |
| Remove the oil scraper ring... |
| ...with an expander. |
| Having installed the piston on a wooden mandrel with a hole or holding it suspended, we knock out the pin. |
We assemble the connecting rod and piston group in the reverse order.
| We select a new piston. The piston class is indicated by a letter, and the pin category is indicated by a number (see table of mating parts). |
The gap between the piston and cylinder for new parts is 0.05–0.07 mm. When worn, the maximum allowable gap is 0.15 mm. A correctly selected finger, lubricated with engine oil, should fit into the piston holes under the force of the thumb and not fall out of the piston in a vertical position.
| Having installed the ring in the cylinder, use a set of feeler gauges to check the gap in its lock. It should be 0.25–0.40 mm for all rings. If the gap is increased, the rings must be replaced. |
| We also check the gap between the ring and the piston groove with a set of feeler gauges. For the upper compression ring it should be 0.045–0.077, the lower one – 0.025–0.057, the oil scraper ring – 0.020–0.052 mm. The maximum permissible wear gap is 0.15 mm. |
We install the rings in the piston grooves, then orient them as follows:
- We orient the upper compression ring lock at an angle of 45° to the piston pin axis;
- turn the lock of the lower compression ring relative to the lock of the upper ring in the opposite direction;
- We set the oil scraper ring lock at 90° relative to the locks of the other rings. In this case, the joint of its expander should be on the opposite side of the lock of the ring itself.
| We heat the upper head of the connecting rod to 240°C, holding it in a vice. |
The finger can be pre-cooled in the freezer.
| We put the piston on the connecting rod and, using a mandrel, quickly press the pin. |
| The numbers on the connecting rod and its cover, indicating the cylinder number, must be on the same side and coincide. |
| The “P” mark on the piston should be directed toward the front of the cylinder block. |
Replacing piston rings
If compression is insufficient, the VAZ 2106 engine loses power and begins to consume excessively not only gasoline, but also oil. In the best case, you can get by with a simple replacement of the piston rings, in the worst case, a complete overhaul of the engine, starting from turning the cylinders, replacing the piston group and ending with repairing the car’s crankshaft.
If you decide to change the rings yourself, there should not be any special problems when performing this repair. Of course, you will need a considerable list of tools to do this as quickly and conveniently as possible. And also, it is necessary to perform a number of preparatory work to get to the pistons:
Personally, I carried out this procedure with the engine removed, since the car was almost completely disassembled. But everything can be done even with the engine installed, but then it is most convenient to carry out repairs on a pit or a lift.
Replacing the Rings of a VAZ 2106 Without Removing the Engine
replacement
piston
rings VAS 2106 no removal engine
replacement piston rings
. VAZ-21012107 When clouds of blue smoke escape from the exhaust pipe, people come to their senses with sad thoughts. There is nothing to be done, engine repair is a nasty, but inevitable step in the current life of the car.
In Lada engines that have run about 100 thousand km, the piston group is noticeably worn out. Signs of this are excessive gas consumption, engine compression below 10 kgf/cm2, the highest oil consumption (from the mark to a maximum of min per year of 1000 km), gray exhaust gases. In this case, the oil consumption after replacing the classic valve seal is unusually small. At the same time, it is often possible to replace the piston rings without removing the engine from the car. In this case, only new gaskets for the head block and pan.
Other useless parts will be dismantled. We do ditch work, as it's called flying. Using a special tool, a torque wrench and a piston ring
. Remove the battery, air filter housing, carburetor, distributor, vent hose and engine compartment oil drain.
Replacing Rings on a VAZ 2106
Replacing pistons and piston rings VAZ 2107
December 19, 2011
replacement piston rings and VAZ 2107 pistons are made in cases where the gap between the ring, piston and cylinder surface increases, which, in turn, is accompanied by an increase in oil consumption, a decrease in engine power and an increase in fuel consumption. Typically, piston wear is accompanied by wear of the compression rings, and may also require erosion of the cylinder block . Complete repairs involving opening the block should be carried out in a specialized workshop, since without special skills and experience it is impossible to carry out such work; the most that can be done is to remove and replace the piston and piston rings.
To replace piston rings and pistons, the car needs to be driven into a pit, you will need a standard set of tools. The repair procedure is as follows:
- Drain the engine oil from the crankcase by unscrewing the drain plug on the crankcase pan. Also remove the pan by unscrewing the ten screws on the pan using a wrench.
- Remove the cylinder head by first removing the air filter, the cylinder head cover and, unscrewing the nuts securing the head, remove it from the block.
- We remove the pistons one by one, starting with the first cylinder. Unscrew the nuts After fixing the connecting rod caps, remove the steel aluminum insert from the cap and slide the piston assembly together with the connecting rod upward.
- Remove the piston assembly using the connecting rod and secure it in a vice. Rinsing with a screwdriver, remove two compression and one oil scraper lasso ( if the pistons are removed, replace the rings; if necessary replace the pistons themselves, then there is no need to remove the rings). Using a suitable metal mandrel, we diameter the pin and remove the piston.
Replacing a piston after overheating in a VAZ (classic). Do it yourself!
The video was very long! Someone who wants to learn a lot from what is not in one book.