Signs that the VAZ clutch fork needs to be replaced are unsatisfactory clutch performance, which is restored after adjusting the free play of the clutch release fork. The adjustment lasts literally for several days and has to be done again, which should immediately suggest a malfunction in the car’s clutch assembly.
The gap cannot change so quickly, as it is associated with wear on the clutch disc, which cannot be adjusted in a few days. Most likely the culprit is the clutch release fork, which has a crack. The fork bent slightly along the crack, and the free play immediately increased, which was reflected in poor gear engagement and required adjustment of the free play of the clutch fork.
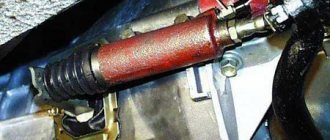
You can check your suspicions of a crack in the fork using an inspection hole or a lift. From the bottom of the car we move the protective boot of the fork and, using a carrier, carefully inspect the fork; as a rule, the crack is clearly visible. Usually it is located closer to the place where the fork itself goes into the plane. If this is the case, then the clutch fork needs to be replaced.
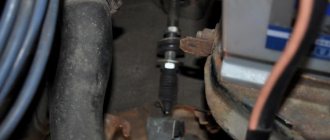
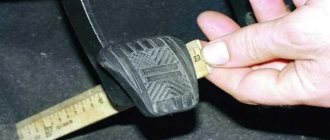
To replace the fork, the gearbox is usually removed, which takes a lot of time and the work itself is quite labor-intensive. You can replace the clutch fork without removing the gearbox, or rather, without disassembling anything at all. Unless, of course, you consider that it is necessary to remove the clutch slave cylinder. To do this, release the two bolts securing it and move it to the side on the clutch hose. Yes, if there is a cotter pin at the end of the rod, it must be removed, otherwise it will be impossible to pull the rod out of the clutch fork. By the way, from experience, most owners do not have it, it is advisable to install it.
Having removed the rod, we pull out the damaged plug along with the protective cover. Then we proceed as follows.
We sand the new clutch fork, or rather grind the edges of its “horns” at an angle of approximately 45 degrees. This is necessary so that the edges of the fork can fit between the release bearing and the curved edges of the spring, which holds the fork during operation.
If possible, you can use a small flashlight by simply inserting it inside the clutch housing, after tying it with suitable twine or a piece of wire. Its lighting will be quite enough so that you can see what you are doing.
After repeating several trial attempts, you will eventually get exactly between the edges of the spring and the thrust bearing. To do this, make the hook shown in the figure, which is convenient for placing the spring on the fork. The existing leaf spring on the fork, which, by the way, is also made in the shape of a fork, must be placed under the ball of the stand (soldier), on which the fork swings during operation.
After placing the clutch fork on the release bearing, make sure that both edges of the spring fit exactly into the protrusions of the fork. If one edge has passed by, you will have to repeat the operation.
If everything is fine, then take out the flashlight, put a cover on the fork and adjust the free play of the fork, which is 3-4 mm. This completes the replacement of the clutch fork. Good luck!
The problem of fork failure can be considered a disease of these car models. This kind of breakdown often occurs among owners of “Sevens”, and they have already learned how to solve it without dismantling the gearbox. Therefore, now we will tell you how to replace the clutch fork without.
Clutch VAZ 2106
On modern cars, the clutch may have a design slightly different from older cars, but the essence of the application of this mechanism remains the same. Like any other vehicle component, the clutch consists of a number of parts that wear out and become unusable over time. Therefore, it is worthwhile to dwell in more detail on identifying the causes and eliminating malfunctions of the VAZ 2106 clutch.
What is the clutch used for?
Equipping a car with a clutch is necessary to separate the gearbox and power plant, their smooth connection at the start of movement, as well as when changing gears. The mechanism is located between the gearbox and the engine, with part of the clutch elements fixed on the engine flywheel, and the other part in the clutch housing.
What does it consist of?
The main structural elements of the node in question are:
- master cylinder;
- working cylinder;
- basket;
- driven disk;
- release bearing;
- fork.
Master cylinder
The clutch master cylinder (MCC) ensures effective transmission of force from the pedal to the clutch fork through brake fluid and the working cylinder, interacting through the release bearing with the spring elements of the basket. The main circulation pump is located under the hood near the expansion tank and communicates with the working cylinder using a hose. The unit in question consists of a housing, two cylinders with seals and a spring.
Working cylinder
The function of the clutch slave cylinder (CLC), although simple, is important - to receive the force transmitted from the master cylinder for subsequent movement of the clutch release fork. On the VAZ 2106 the RCS is installed on the clutch housing. Structurally, it is similar to the working cylinder, but has one piston.
Basket
By means of a pressure disk (basket), the interaction of the driven disk with the flywheel is ensured. If problems occur with the shopping cart, the system stops working. The pressure plate (PD) is pressed against the driven one by means of special springs, which, at the moment the clutch is disengaged, act as return springs, i.e., they press out the PD. This method of operation ensures smooth gear shifting, which increases the service life of gearbox elements.
The basket is made of a diaphragm spring, a pressure disk and a casing. The spring presses on the LP and creates a compression force, transmitting rotation. The spring structure with its outer part acts on the edges of the pressure plate. The inner diameter of the spring is made in the form of petals, onto which the release bearing presses.
Driven disk
The driven disk provides a soft connection of the box to the motor. It is located between the basket and the flywheel of the power plant. To ensure that the clutch engages without jerking, the disc design includes springs that help dampen vibrations. Both sides of the disc are equipped with linings made of friction material that can withstand high temperatures.
Release
The purpose of the release bearing is to separate the basket from the driven disk by pressing the LP petals. The bearing is installed in the clutch housing and moves through the clutch fork.
Video “Removing the release bearing and clutch fork of a VAZ 2110”
This video shows in detail how to remove the release bearing and BC.
In order for the transmission system to operate without breakdowns, it is necessary to monitor the serviceability of all its components. One of these elements is the clutch fork. It is important to be able to perform repairs yourself. The article describes the function of the clutch fork and how to change it on a VAZ 2110.
The clutch fork (CL) is an important element of the vehicle transmission system. It is a lever with which the pressure plate is retracted, resulting in the clutch being released. The BC is sometimes called the cut-off plug.
BC is mainly part of a mechanical gearbox, less often in hydraulic drives. The design of the VS in the gearbox on a VAZ 2110 is quite simple: a metal rod on which a lever and two legs are attached.
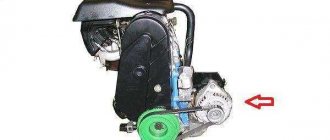
At number 5 VS
When you press the clutch pedal (CS), thanks to the BC, the release bearing clutch moves, thus, the inner edge of the spring moves forward and the device turns off. Naturally, the correct engagement and disengagement of the clutch depends on the serviceability of the aircraft.
Aircraft replacement is required in the following cases:
- Deformation of the part is detected;
- cracks were detected on the body;
- curvature of the aircraft;
- Defects in the tabs were identified at the points of contact with the release bearing coupling;
- paws are worn out.
The photo shows a broken down aircraft.
Aircraft with a broken lever
If there are cracks on the aircraft, then this reduces the quality of the PS operation, late setting occurs, the machine may slip, and the pedal may sink when pressed. There is a need to regulate free play. Along the crack, the aircraft deviates from the release bearing. Regulation is enough for only a few days, and in case of a significant defect it is necessary to adjust after a few hours
Damage must be corrected immediately, as this can lead to rapid wear. If the aircraft breaks down completely, the pedal will fail and the vehicle will be unable to move.
You can detect a crack by visual inspection, place the car on an overpass or inspection hole, and find the fork protective boot on the bottom of the car. Having moved the boot, you need to inspect the fork for cracks; it is more convenient to use a flashlight.
Required Tools
To carry out the aircraft replacement procedure, it is necessary to install the machine on a lifting device or inspection groove. You can lift the car with a jack and place it on supports.
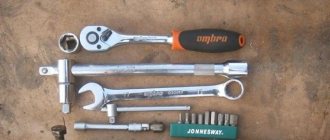
From tools and materials you need to prepare:
- new aircraft;
- a set of keys;
- pliers
- screwdriver;
- flashlight;
- jack.
Having prepared all the tools, you can begin the replacement process.
New replacement part
Stages
In order to change the aircraft to a VAZ2110, you need to remove the gearbox. After dismantling the box, the following steps are performed:
- First you need to remove the clutch release bearing.
- Then, using a screwdriver, you need to pry up the protective cover of the aircraft and remove it. If it has signs of wear, abrasion, or has lost elasticity, it should be replaced.
- Next you need to remove the plastic sleeve BC. To do this, use pliers to squeeze the tabs securing the bushing and remove it.
- Next, you need to assess the condition of the bushing. If there is damage, signs of wear, or the locking tabs are broken, the part should be replaced.
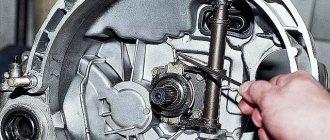
- Then you need to lift the BC and remove it from the bushing located in the clutch housing (CC), and also remove the fork lever from the holes of the CL.
- Next, you need to remove the spring retainer from the aircraft. If it is damaged or has lost elasticity, it must be replaced.
- It is advisable to replace the metal sleeve pressed into the KS with a new part.
- Before installing a new aircraft, all bushings inside should be lubricated.
- Installation of the aircraft is performed in reverse order.
- When inserting a plastic bushing, you need to make sure that the petals securely hold the bushing in the joint.
Thus, replacing the aircraft together with removing the gearbox will take about 3-4 hours. The main thing is to have at least a little experience in locksmith work and know the structure of the VAZ 2110 car.
Photo gallery
Pull out the rubber boot Take out the plastic bushing Remove the clutch fork Check the metal bushing Remove the spring retainer Check for correct installation
Video “Removing the release bearing and clutch fork of a VAZ 2110”
This video shows in detail how to remove the release bearing and BC.
AvtoZam.com
Clutch problems
The VAZ 2106 clutch, although rare, still causes problems for the owners of this car. Malfunctions can be of various types and they also manifest themselves in different ways. Let's take a closer look at them.
Brake fluid leak
The working medium of the “six” clutch mechanism is brake fluid, which sometimes leads to some problems:
- Fluid leakage due to damage to the hose between the master and slave cylinders. The connecting element may become unusable when installing a low-quality product or as a result of rubber aging. To eliminate the problem, the hose will need to be replaced;
Drives the clutch
The concept of “clutch drive” is used when the mechanism is not completely disengaged. This can happen for several reasons:
- The driven disk was damaged, causing axial runout. The most correct solution is to replace the part;
- Cracks have formed on the driven disk linings. The appearance of defects is reflected in the inability to engage the clutch in a timely manner. In this case, you should replace the entire disc or the pads themselves;
- The rivets of the friction linings have failed. When the rivets wear out, the fixation of the linings weakens, which leads to problems when the clutch is disengaged and increased wear of the linings themselves;
- Air has entered the hydraulic system. The problem is “treated” by pumping fluid;
- basket distortion. Although the malfunction is rare, if it occurs, you will have to purchase a new pressure plate.
The clutch is slipping
When clutch slip occurs, the mechanism does not engage completely, but this happens for the following reasons:
- oil got on the friction elements of the driven disk. You will have to remove the gearbox and disassemble the clutch mechanism to clean the linings with white spirit;
- The compensation hole in the main circulation system is clogged. To fix the problem, you will need to remove the cylinder, remove the blockage, and then rinse the product in kerosene;
- Friction linings are burnt. The malfunction is eliminated by replacing the driven disk.
Clutch pedal squeaks
The pedal may squeak due to lack of lubrication in the bushings or when the bushings themselves are worn out. To fix the problem, the pedal will need to be removed, the bushings checked for wear, replaced if necessary, and lubricated.
Noise when depressing the clutch pedal
On a VAZ 2106, noise when releasing the clutch pedal may appear for the following reasons:
- bearing failure on the gearbox input shaft. The problem appears in the form of a characteristic cracking sound when the clutch pedal is released. In this case, the bearing will have to be replaced;
- release bearing wear. The part fails due to lack of lubricant, which is squeezed out over time. To eliminate the malfunction, the bearing must be replaced.
If the setting didn't help
If adjusting the VAZ-2106 clutch pedal did not bring the desired effect, then the reason for the large free play lies in the basket and disc. It is advisable to install a new kit, which includes:
- Basket (drive disc is mounted directly on the crankshaft flywheel).
- Driven disk (located inside the basket, connected to the gearbox input shaft by a splined connection).
- Release bearing (mounted on the input shaft and driven by the fork).
- Bolts and lock washers.
After installing all the new elements, it is necessary to adjust the VAZ-2106 clutch and make sure that the brake fluid in the system is of good quality and does not contain any impurities. Try to change the fluid at least once every two years.
Replacing the VAZ 2106 clutch
It is necessary to remove the clutch infrequently and, as a rule, due to the occurrence of certain problems. To carry out the work, you first need to prepare the tools:
- set of keys and sockets;
- wrench and extension;
- support under the gearbox.
Removing the gearbox
To repair the clutch mechanism, you will need to dismantle the gearbox. We do this as follows:
- We install the car on the inspection hole, remove the negative terminal from the battery and place wheel chocks under the wheels.
- We unscrew the fasteners and remove the cardan from the car.
Removing the clutch
We remove the clutch mechanism from the car in this order:
- Using a 13mm wrench, unscrew the bolts holding the basket to the flywheel, turning the latter using a pry bar.
Video: replacing the clutch on a “six”
Rejection of parts
After the clutch is removed, all elements are thoroughly inspected. To do this, perform the following steps:
- We clean the clutch elements, as well as the working surface of the flywheel, from dirt.
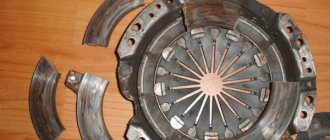
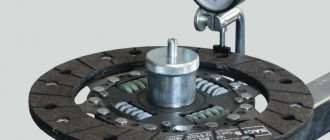
- Inspect the clutch disc. The presence of cracks is unacceptable. If the thickness of the linings to the rivet heads is less than 0.2 mm or the rivets are weakened, the driven disk or the linings themselves must be replaced. We check how securely the disk springs are fixed in the sockets. If there are damaged springs, the disc must be replaced.
The basket is a non-separable and non-repairable unit and in case of any damage must be replaced.
Fork and spring
The fork and spring element, like other components of the clutch mechanism, must be in good condition. Cracks on the fork are unacceptable, and if they are found, the part is replaced with a serviceable one.
Release bearing play
Since there is no such tool for checking the release bearing, during diagnostics it is necessary to visually inspect the condition of the mechanism, rotate it to identify play, jamming, loud noise, and possible damage. If large play or defects of any other nature are detected, the bearing needs to be replaced. If the part has no visible damage, but still makes noise, then it must be cleaned of dirt and filled with lubricant, for which molybdenum lubricant is suitable.
Replacing the clutch bearing
For convenience, replacing the release bearing is done with the box completely removed. The only tool you need is a flathead screwdriver. The procedure consists of the following steps:
- We remove the ends of the spring from engagement with the fork.
Replacing linings
If the driven clutch disc of a VAZ 2106 has serious damage to the friction linings, it is not necessary to replace the disc with a new one - it can be repaired by installing new linings. For this you will need:
- a set of overlays and rivets for the “six”;
- electric drill with a 6–7 mm drill;
- flat screwdriver.
The sequence of actions is as follows:
- We rest the disk against a wooden block and drill out the old rivets on both sides, avoiding damage to the disk itself.
Video: replacing clutch disc linings
Replacing the release bearing
The difficulty of replacing a bearing lies in the fact that it is impossible to do without dismantling the gearbox (gearbox). And in order to remove the gearbox, figuratively speaking, you need to disassemble another “half” of the car. Next, let's talk about everything in order.
Work on replacing the release valve of a VAZ 2110, that is, dismantling the car in order to get to the clutch bearing, should begin by placing the car in a pit or on a lift. After this, we dismantle, disconnect or unscrew the following components and parts:
- battery;
- air filter box with mass air flow sensor;
- clutch cable;
- upper gearbox mounting bolts and starter mounting nut.
Next, after unscrewing the left and loosening the right hub nuts, loosen the front wheel bolts and raise the car on a lift. If you do not have a lift at your disposal, you should jack up the car until its front wheels lift off the surface.
To tear them off, it is necessary, paying special attention to safety, to install supports one by one under each side of the car body.
We remove the wheels. Then, in turn: the dirt-proof apron (engine protection), loosen the fastening on the gearshift drive torque rod (before loosening the clamp, it will be useful to mark the old installation location in order to facilitate adjustment of the gearshift lever during assembly), free the gearbox from the gearshift drive rod and jet rod , after unscrewing the remaining nut, dismantle the starter, remove the left suspension arm with a brace and a ball joint. To do this, you will need to unscrew the anti-roll bar from the lever, the ball joint and all connecting fasteners of the lever.
The clutch housing cover is removed after unscrewing the three bolts securing it, drain the oil from the gearbox, disconnect the terminal from the speed sensor and the reverse light switch wire, dismantle the left drive (to ensure the immobility of the satellites in the gearbox, instead of the drive, you can insert a wooden plug, a piece of rubber hose, or simply magazine rolled into a tube according to the diameter of the hole). The right drive may not be dismantled; in this case, it will be enough to just loosen the nut on its hub, but by removing the drive, it will be much more convenient to work.
Next, you need to hang the engine (install a support under it), which will avoid distortion of the power unit and breakage of the heater hoses after removing the gearbox. Then we unscrew the nuts securing the support(s) located on the gearbox, unscrew the bolts and nut securing the clutch housing to the cylinder block and the bracket to the gearbox. All that remains is to move the gearbox away from the engine and remove it. The support installed under the engine remains until the transmission is installed in place and the nuts on the support(s) are tightened.
We proceed to replacing the release bearing of the VAZ 2110. To do this:
- We release its lock.
- Remove the release bearing assembly from the shaft and then from the holder.
- We remove the bearing itself from the coupling.
Before replacing the old bearing, check the free rotation and absence of jamming of the new release bearing. When installed, its protruding side faces the coupling. The bearing is secured with a holder and installed on the shaft, where it is secured with a spring bracket. When replacing the release valve, it is recommended to inspect the clutch basket and driven disc. Work on installing the gearbox is carried out in the reverse order.
After assembling all components and assemblies, it is necessary to check and, if necessary, adjust the operation of the VAZ 2110 clutch. Carrying out the replacement without an assistant, if you have all the necessary tools, the work will not take more than 5 hours. If the replacement takes place at a service station, the cost of the issue in terms of time will be even less.
Choosing a clutch for VAZ 2106
The “six” is equipped with a clutch with a pressure plate diameter of 200 mm and 130 mm for the driven one. Today there are many manufacturers of these mechanisms, but the most popular ones are still worth highlighting:
- VALEO (France). Manufactures clutches whose operation is distinguished by its softness and precise operation. Car owners who use kits from this manufacturer note the high reliability of the mechanism, which runs without any nuances for more than 150 thousand km. The only disadvantages include the high cost of about 2600 rubles;
Clutch installation
After repairing or replacing the clutch, installation is carried out as follows:
- We lightly lubricate the gearbox input shaft, as well as the ball joint of the fork, with CV joint-4.
Adjusting the "six" clutch
The procedure is carried out in an inspection pit using the following tools and materials:
- open-end wrenches for 8, 10, 13 and 17;
- measuring ruler;
- pliers;
- mites;
- WD-40.
Clutch pedal adjustment
Adjusting the pedal comes down to setting the correct free play, which should be 0.5–2 mm. The operation is carried out from inside the vehicle by adjusting the required height of the pedal stop. The event consists of the following steps:
- Using a 17-size open-end wrench, we loosen the limiter nut, and with another of the same size we turn the limiter itself, setting the required length.
Adjusting the working cylinder rod
The free play of the fork rod is determined by the distance between the heel of the basket diaphragm spring and the release bearing. To make adjustments, the car is placed on the inspection hole, after which the following steps are performed:
- Use pliers to tighten the return spring.
Video: adjusting the clutch drive
When adjusted correctly, the clutch should operate clearly and without jamming, and the gears should engage without extraneous noise or any difficulties. The driven disk should not slip while driving.
Troubleshooting clutch problems on a VAZ 2106 is not an easy task. However, to carry out repair and adjustment work, a standard set of tools, minimal skills in auto repair and following step-by-step instructions will be sufficient.
Work under the car
This is perhaps the most difficult part of the entire repair, since there are many more steps to be taken here. So make yourself comfortable and proceed to the following operations:
- Unscrew the last (lower) nut securing the starter and remove it. This nut is the nastiest, since it is difficult to get to it using simple wrenches; you will need to use a socket, a ratchet and a cardan. True, it was possible to work with an ordinary open-end wrench installed in the end.
- Unscrew the suspension bearing mount.
- Disconnect the cardan and rear axle flange. Hold the bolt head from turning with a 12mm open end wrench.
- Apply sharp blows to the driveshaft to dislodge it from the rubber coupling on the transmission shaft. Move the cardan to the side.
- Unscrew the mounting of the pillow, install a support under the gearbox.
- Remove the slave cylinder from the clutch fork. Be careful not to lose the bar underneath and the spring.
- Remove the speedometer cable.
- That's all, now all that remains is to unscrew the four bolts that secure the box to the engine block.
How to replace the clutch on a VAZ 2101-VAZ 2107?
Note! Before you start replacing, be sure to make sure that the clutch malfunction is not caused by any other reasons, because replacing this unit itself is very labor-intensive and time-consuming compared to replacing the same clutch slave cylinder, due to which the same problem may occur. the effect that the clutch “Drives”! (If you want to take a closer look at the malfunctions of a particular unit of the entire clutch system, then use the “Search” form, which is located in the upper right corner of the site, and enter into the search the malfunction that you specifically need, for example: “Clutch is slipping” and you will get all results in which this combination of words was found)
Removal: 1) First, to get to the clutch itself, you will need to remove the box for this. (For information on how to remove the box, see the article entitled “Replacing the gearbox on a VAZ”)
2) Next, after the box is removed, pick up the purchased mandrel for centering the clutch disc, and then install it in the central hole as shown in the photo.
Note! The mandrel must be installed all the way until it rests on the crankshaft bearing!
3) Then, to prevent the flywheel from turning, screw one thick bolt, which is indicated under the letter “B,” into the lower left side of the block, and then using a screwdriver to secure the flywheel from turning “A,” unscrew all the bolts that secure the housing and the clutch pressure plate itself.
Note! When unscrewing the bolts securing the casing and the clutch pressure plate itself, hold this same disc by its casing so that it does not turn! (Please note that you only need to hold the disk by the casing, because if you, for example, grab the thrust flange of the pressure spring with your hand, you can easily damage it, so hold only the casing with your hands)
4) Next, remove the clutch pressure plate together with the casing, but when removing it, hold it with both hands by its casing.
5) After removing the clutch pressure plate along with its casing, proceed to removing the driven disc, to do this, take the installed disc in your hands and then remove it together with the mandrel from the place where it is installed.
Adjusting the pusher on the working cylinder
The clutch adjustment of the VAZ-2106 is carried out in the following order:
- Clean all elements from corrosion and dirt. Treat threaded connections with penetrating lubricant.
- Unscrew the nut located on the working cylinder pusher.
- Use one wrench to hold the bolt for adjustment, and use the other to loosen the locknut.
- Secure the pusher so that it cannot turn.
- Adjust the free play empirically and tighten the locknut.
- Reinstall the spring.
Check the operation of the entire clutch system, measure the free play of all elements. If it is larger than expected and there are gaps, you need to repeat the adjustment.
Replacing the clutch of a VAZ sixth model with your own hands
Russian car enthusiasts often ask how to change the clutch of a VAZ 2106 on their own, without involving the efforts and resources of repair authorities. In this case, you need to know that sometimes replacement is required due to wear and tear of individual components and mechanisms of this unit. This type of clutch repair can be carried out either as a whole or individual components.
For example, replacing a VAZ 2106 clutch disc of the driven type, as well as the drive disc, is usually carried out in one step. Technological operations of this type are considered quite complex, requiring special skills and a certain dexterity. In the absence of repair practice and poor knowledge of the “six” structure, it is better to take the car to a service center and carry out the necessary work there. This clutch replacement is carried out in 2 ways:
- with removal of manual transmission;
- without removing the gearbox.
Similarly, without removing the manual transmission, the VAZ 2106 clutch fork is replaced, although such repair operations in the service station workshops are carried out with the removal of these transmission elements. If you remove the clutch in full, it will take a long time. If these repair operations are carried out at a specialized service station for passenger cars or at a regular VAZ service center, then it will be quite expensive.
To replace a VAZ 2106 clutch, you must have certain skills for performing plumbing work and have on hand the necessary set of tools and a new product to be replaced. Let's consider the procedure for removing the clutch without dismantling the manual transmission, which is carried out in compliance with the following repair operations:
- We place the car on a level surface and support the wheels with anti-tilt stops. At the same time, we leave the manual transmission in first gear so that the driveshaft and wheels are relatively stationary.
- We disconnect the cardan transmission and manual transmission, and perform the same actions with the control center.
- We open the contact group for connecting the stern light.
- We unscrew the clutch protective cover from the engine side and disconnect the chassis crossbar from the bottom.
- We dismantle 2 fasteners of the gearbox support.
- We shift the manual transmission to the maximum permissible distance.
- Taking into account the fact that the gear shift unit will rest on the resonator, it is necessary to install a safety support under the stern of the gearbox.
- With the pry bar resting on the flywheel, use a wrench to unscrew the clutch basket fasteners.
- By rotating the engine crankshaft, we create a comfortable position for removing the fasteners.
- We move the basket to the previously moved gearbox and use the freed space to dismantle the driven disk and then remove it.
- Next, if necessary, we replace the clutch fork and remove the release bearing from the primary gearbox shaft.
- Subsequent clutch installation follows the opposite scenario.
- Before installing the unit, you need to clean it and wipe all removable components with a fresh cloth.
- We center the pressure plate in relation to the end bearing of the crankshaft using a removed similar primary shaft or a specially shaped mandrel, which can be purchased at specialized outlets selling accessories and auto parts.
- At the final stage, we tighten the fasteners of the clutch basket to the flywheel.
On the Internet you can watch a video “replacing the clutch of a VAZ 2106”, which clearly shows the sequence of operations performed.
Replacing the clutch cylinder VAZ 2106
This replacement of the main clutch cylinder is carried out in the following order:
1. Place the vehicle on a vehicle inspection pit, overpass or electric lift. 2. Using a special bulb made of rubber alloys or a similar product, we select brake fluid from the clutch drive hydraulic reservoir. 3. Slightly unscrew the rubber clamp securing the expansion tank to contain antifreeze and move the product onto the plane of the power plant. 4. Unscrew the fitting hole of the metal tube with a wrench set to “13”, disconnect it from the inlet channel of the GCS and move it for ease of repair work. 5. Unscrew the metal band-type clamp a little and tighten the GCS fitting hose. 6. Using a “13” socket wrench with a knob, unscrew the 2 fasteners of the GCS and release it from the fastenings. 7. We install the repaired or new GCS and all previously unscrewed spare parts in the reverse order. 8. Pour “brake fluid” into the clutch hydraulic reservoir to the required amount and bleed the clutch on the vehicle.
When all these stages of the technological process are completed, the replacement of the VAZ 2106 clutch cylinder is considered complete.