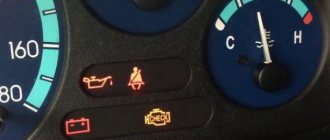
The check engine icon appears: reasons
- Tank cap. The notification often appears when the seal is broken: if you have not closed the fuel tank cap tightly, you will probably see a corresponding icon.
- Fuel quality. You have to deal with low-quality fuel everywhere, and it is not always possible to fill the tank with really high-quality gasoline. If the icon appears immediately after refueling the car, to resolve the problem you will have to drain the old fuel and fill in new fuel.
- It is recommended to refuel only at reliable services.
- Oil. Often the Check engine error indicates problems with the oil. The simplest situation: the lubricant has simply run out, which can be checked using a level. Sometimes the deficiency is caused by problems that appear as a result of a violation of the tightness of the structure (see if there are any cracks). The “symptom” is the appearance of extraneous noise.
- Gasoline pump. If the pump is excessively noisy, it can be assumed that the root cause of the failure is its failure or incorrect position.
- Injectors. The injectors must be cleaned periodically; otherwise, they cease to cope with their tasks. The “symptoms” here are known to almost every experienced motorist: weak engine thrust, increased fuel consumption, “floating” speed, strange jerks when accelerating sharply.
- Electrical and electronics. Sometimes high-voltage wires or coils become unusable, which can cause the icon to appear. Sometimes the ECU “glitches” or an excessive number of errors accumulate in the control unit’s memory. Try resetting the negative terminal from the battery so that the lamp goes out and the clock resets to zero.
- Spark plug. Check engine can often be seen when the spark plugs are faulty, the condition of which must be checked; If problems are found, damaged elements must be replaced. To analyze, you need to unscrew the elements and assess their condition by eye. The fact is that it is the spark plugs that can begin to pass current, which is due to the presence of deposits on the electrodes. The resulting plaque contains metals. Another option is that the distance between the electrodes is too large (more than 1.3 millimeters).
- Cleanliness sensors. Many modern cars are equipped with special cleanliness sensors that assess the condition of engine oil, gasoline and other substances involved in the operation of the car. If the indicators exceed the permissible norm, the check engine icon invariably lights up, and to resolve the situation, you need to replace the filters or the fluids themselves. This item partially overlaps with the “fuel quality” item.
- Oxygen sensor. The lambda probe (the strict name for the oxygen sensor) monitors the amount of oxygen remaining in the combustion chamber. If the sensor is faulty, gasoline consumption may increase significantly and engine power may decrease. The vast majority of cars have several such sensors - from two to four.
- Mass air flow sensor. It often breaks due to the incorrect position of the air filter or the obsolescence of the latter. The consequence of the problem is an increase in fuel consumption.
- Catalyst. It often fails due to irregular maintenance. The problem can arise from a malfunction of the lambda probe (the oxygen sensor described above), and due to problems with the spark plugs - all this leads to overheating of an element not designed for such loads.
Reasons that can cause a malfunction of the oxygen sensor
The oxygen controller is an exhaust system component that can easily break. The car will drive, but there will be a significant decrease in its dynamics, and fuel consumption will increase.
Important! In such a situation, the car needs urgent repairs.
A malfunction of the oxygen controller can be caused by the following reasons:
- mechanical failures caused by housing defects or damage;
- the use of low quality fuel leads to clogging of the active elements of the part;
- problems with oil scraper rings, oil gets into the exhaust system;
- incorrect operation of the vehicle ignition system;
- use of silicone sealant when installing the sensor;
- poor contact of the electrical circuit of the device or short circuit.
Self-analysis: continuation of the study
Another method of analysis is to find a correspondence between the issued designation and a specific technical problem. However, it is impossible to provide universal instructions here: the correspondence of the flashing frequency to a specific type of problem varies depending on the specific vehicle. Accordingly, you will always have to check the official technical documentation (sometimes it can be found on the Internet). You can also use conventional equipment: you can connect a laptop to a modern car after installing special software on it. You can synchronize devices using a cable that connects to the machine's ECU. Often, specialists even use computers to program the machine: they enter commands, thereby correcting the error, but this can only be done with a certain competence. Another option is to use a smartphone on which you can download an ECU communication and analytics application. To synchronize the car and phone, you need to connect a special Bluetooth adapter to the electronic unit, which allows you to read the device information. Do not forget that each vehicle has its own error codes, and they can only be interpreted by using all kinds of technical reference books. If the problem has still not been identified, it is recommended to measure the pressure level in the fuel system. This can be done using a pressure gauge. The normal level is usually three atmospheres, but this figure may vary from one machine to another. A low level usually indicates a breakdown of the fuel pump or dirty injectors. In the first case, the pressure is constantly low, in the second, it drops when the engine starts. In conclusion, it is recommended to analyze the condition of high-voltage wires. You can hardly do anything here “by eye”: you will have to use a tester that switches to ohmmeter mode. The minimum value is 0.5 Mohm. If you see that this parameter is lower, you will have to replace the wire.
Diagnosing a faulty oxygen sensor
Important! To diagnose the operation of the oxygen controller, special equipment is required. It is best to contact a car repair shop to carry out this operation. Experienced specialists will quickly and efficiently determine the cause of your car’s malfunction and offer solutions to the problems that arise.
You need to disconnect the wires from the controller connector and connect a voltmeter. Start the engine, increase the speed to 2.5 thousand per minute, then reduce it to 2 thousand. Remove the vacuum tube from the fuel pressure regulator and record the readings on the voltmeter. When they are equal to 0.9 Volts, we can say that the controller is working. If the readings on the device are lower or it does not respond at all, the sensor is faulty.
To check the performance of the controller in dynamics, it is connected to the connector in parallel with a voltmeter and the crankshaft rotation is increased to 1.5 thousand per minute. When the sensor is working, the voltmeter readings will correspond to 0.5 Volts. If there are other readings, the sensor is faulty.
Diagnostics can also be carried out using an electronic oscilloscope or multimeter. The controller is checked with the motor running, because only in this state can the probe fully demonstrate its functionality. It needs to be replaced, even if minor deviations from the norm are detected.
The check engine light is on: is it safe to drive?
If you independently analyzed the condition of the machine using the above information, but did not find a problem, the only option to resolve the problem is to contact a specialist. However, this raises the question of whether it is possible to go to the service by car without any risks. We will give certain tips, but let’s make a reservation right away: they are not universal, since each car has its own characteristics. We present only the most general and widespread principles:
- No changes are felt. If you do not feel any changes in the operation of the car, and the Check Engine lights up continuously , the car can be used; If the icon blinks, it’s impossible.
- The car suddenly changed its behavior. If you feel obvious changes: problems with speed, vibration, a strange smell, etc., then you should not use the machine.
- Other indicators. If you see other indicators appearing: coolant light, overheating, oil can light, catalyst icon, then it’s clearly not worth continuing to drive.
- Emergency mode. If the engine has become “weaker” and the speed does not rise above a certain value, then if the icon is constantly lit, you can drive, but if it is blinking, you cannot drive.
Replacing the oxygen sensor
When the controller displays error P0134, there is absolutely no need to rush into purchasing a new probe. The first step is to check the glow circuit. It is believed that the probe independently checks for an open heating circuit, and if it is detected, error P0135 will appear. In fact, this is what happens, but small currents are used for testing. Thus, it is only possible to determine the presence of a complete break in the electrical circuit, but it cannot detect poor contact when the terminals are oxidized, or when the connector comes off.
Poor contact can be determined by measuring the voltage in the controller's filament circuit. At the same time, he must be “at work.” It is necessary to cut the insulation from the white and purple wires of the controller and measure the voltage in the heating circuit. When the circuit is working properly, when the engine is running, the voltage changes from 6 to 11 Volts. It is completely useless to measure the voltage on an open connector, because in this case the voltage will be recorded on the voltmeter, and when the probe is connected it will disappear again.
Typically, the weak point in the glow circuit is the lambda probe connector itself. If the connector latch is not latched, and this happens quite often, the connector comes off under the influence of vibration and the contact deteriorates. You need to remove the glove compartment and press the probe connector more tightly.
Important! When no problems are found in the glow circuit, the sensor must be replaced completely.
To replace, you will need to cut off the connectors from two sensors and solder the connector from the original probe to the new controller.
When replacing the oxygen controller when removing or replacing the catalytic chamber, a blende is installed on the oxygen controller.
Important! The fake should only be installed on a working lambda probe!
Precautionary measures
If you decide to go to a car service station, you must take precautions. There are not so many of them:
- The maximum speed is 60 kilometers per hour.
- Maximum revolutions - 2500 per minute.
- Turn off the air conditioning, multimedia system and all equipment that may in any way load the engine.
- Drive smoothly: without harshness when starting or braking.
How to manually reset a check engine error
If you managed to figure out the situation yourself and fixed the problem, but the error does not go away, you will have to turn it off manually. In order to remove the icon, you need to perform a simple reset: warm up the power unit to operating temperature, remove the plus terminal from the battery for 15 minutes, and then return it back. Next, you need to start the car by turning the key to the last position before starting the internal combustion engine from the starter and leave it in this position for about a minute. This algorithm of actions is the simplest answer to the question of how to remove the check engine error manually. We hope you found this article helpful and wish you good luck!
Lifan Solano lambda probe decoy
The lambda probe deception is necessary to deceive the car's ECU after removing the catalytic chamber or replacing it with a flame arrester.
Mechanical blende – mini-catalyst. A special spacer made of heat-resistant metal is placed on the ceramic tip of the controller. Inside it there is a small piece of catalytic honeycomb. Passing through the honeycombs, the concentration of harmful substances in the exhaust gases decreases, and the correct signal is sent to the vehicle's ECU. The control unit does not notice the substitution, and the car engine runs without interruption.
Important! An electronic deception – an emulator – is a kind of mini-computer. This type of decoy corrects the readings of the oxygen sensor. The signal received by the control unit does not cause suspicion, and the ECU ensures normal engine operation.
You can also reinstall the software of the car's control unit. But with such manipulation, the environmental status of the car is reduced and environmental standards are lowered from Euro-4, 5, 6 to Euro-2. This solution to the oxygen sensor problem allows the car owner to completely forget about its existence.