Correct replacement of the VAZ 2114 clutch step by step with photos
In general, what can I say... I bought a clutch. I decided to change it. Everything in the book is written that everything is simple... well, I went for a drive, and everywhere everyone had notes like “I went to a hundred to change the clutch.” But since the clutch died, and the pre-session budget does not allow me to pay 2.5 k to the service to change the clutch, and in general I want to change it myself! I went at 5 am to change it with a friend... well, we thought we’d get it done by 12 noon, so that we could then drive to the highway in Glinkovo near Sergiev Posad to break in the new clutch)) but that was not the case I faced many difficulties due to the fact that among us there were no car mechanics or specialists in this matter, but only a book...
How to change the clutch on a VAZ 2114 step by step instructions
what you will definitely need:
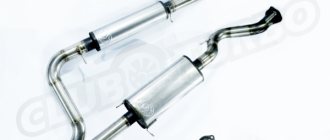
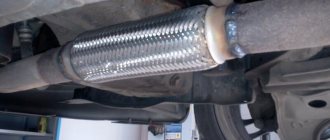
- clutch guide for VAZ 2114 (photo 1) (required! without it, the box will never fall back into place)
- a 30mm powerful head (to unscrew the hub) or a hub puller
- a stronger wrench (to break off the hub nut)
- a set of heads with all sorts of extensions and cardan shafts (this was much easier and more convenient)
- jack and two wheels (or bricks)
- 8 head is powerful enough to unscrew the basket (mine was firmly seated)
- 17 key for adjusting the clutch (and keys in general can be useful)
- a garage with a bunch of nuts, cogs, washers (you never know;) ), straight arms, a friend with straight arms (better than two), a pit, and so on little things...)
don’t be lazy and take a lot of jars or a suitcase with compartments and put all the nuts, bolts, washers from each part in different cells
stage 1.
we tear off two hub nuts on both sides of the front with a 30mm socket and a powerful wrench (under the plastic cap on the brake disc) (if you first jacked up the car, then have a friend get in the car and press the brakes or set it to speed 1), loosen the wheel. Jack up the car , we throw two wheels and a board under it (this height was enough for us, and the jack was all screwed out), take out the jack, it will come in handy, and it’s dangerous to do it on a jack, remove the wheel.
stage 2.
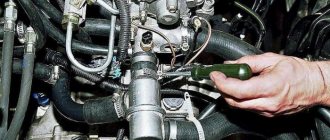
remove the battery and air filter (required) and immediately below it there will be a clutch cable and disconnect it from the release rod, fall into the hole and unscrew the protection (crankcase and engine, which is on the side of the box) and two engine supports: rear and left. Next, unscrew the bolts and the nuts that connect the box and the engine together. They are all big there (I won’t say how many of them there are, because I don’t remember... I visually found and unscrewed 5-7 pieces: from below, from above 2 or 3, the ignition module mounting bolt (this is also will hold), then from the hole we find a rod that holds the box to the internal combustion engine (such a tube), we dodge, install an extension cord and remove it too (ONLY where it is attached to the box) in general, we unscrew all the bolts, nuts, studs that we like and come across eyes)))) just look there and you can see everything that holds it. Now the box is held only by the drive rods that go to the wheels.
stage 3.
we unscrew the stabilizer, which is on the side of the box and everything that holds it, and the molt holds it (two rubber cushions like that, connected and the holes point in different directions) and something else... you will see what and how. Our task is to take it out the rod and grenade from the hub (in short, remove the rod from the wheel) it can be easily removed. Put it down, unscrew it and take out the rocker switch (it’s next to the rear support there), check if anything is holding our box by placing 1-2 boards under the box in the hole to put it down.
stage 4.
We stand with a partner on both sides of the box and try to get its
attention!
remove your hands and heads from under the box, so that nothing has fallen, it is not that light
, if nothing is holding it, then it will come out together with the rod from the other wheel and voila (photo 2). basket, release. (photo 3) lay down box and unscrew the basket (I think there are 8 bolts per 8). We remove it, install a new one, this is where the holy guide
(photo 1). We lean the new basket with the disk, insert the guide into the hole until it stops and, without removing it, screw the basket. Take it out, tug everything and everyone is there, put it back in again, if it goes in and out without problems, then we move on: we change the release valve. Well, everything is clear and simple here.
here another friend joined us and there was a memorable photo (photo 5)
stage 5.
We changed everything, looked at it, checked the car's running speed along the way and put it in the reverse order.
It was
around this moment that I touched with my foot all the bolts that were lying on the floor, which were holding everything together. Fortunately, they didn’t fly far and I assembled them, but recognizing them was not easy))) Further, I suffered (because shit doesn’t work and doesn’t fit). Half of the nuts are extra, half are missing - it’s a joke, of course, but it was difficult) we put everything in place and screw it in as it was, and then we set up the clutch and the drive shaft.
stage 6.
RULER RULE:
The criterion for the need to adjust the clutch drive is the full travel of the clutch pedal (all the way to the mat), which should be 120–130 mm. As the clutch disc lining wears, the pedal rises and its full travel increases. The maximum allowable stroke is 160 mm. Rule: 1. Place a ruler next to the clutch pedal pad, resting it perpendicular to the floor mat. Use a ruler to determine the distance from the mat to the surface of the rubber pad of the pedal pad. If it is more than 160 mm, adjust the clutch drive. 2. Adjust the pedal by rotating nuts 1 and 2 3. Press the clutch pedal at least three times until it touches the floor mat and check the distance from the pedal pad to the floor mat again. 4. If necessary, adjust the full pedal stroke with the adjusting nut and tighten the lock nut.
clutch cable adjustment
we put the cable back, the pedal rested against the dashboard due to the tension))) and we begin to adjust the mount (photo 3) according to the “ruler” rule and voila, we’re done. We collect everything that is missing in the engine compartment. We collect all the suspensions, stretch everything nuts and bolts. We put the wheel on, tighten the hub nuts, use a blunt chisel to hammer in the “stopper” notches (photo 4, the letters b indicate the holes where to “knock down” the iron for the stopper) it is undesirable for the old ones to coincide with the new ones, it’s better to make new notches, it’s more reliable.
setting up the drawstring cord,
we seat a friend in the cabin, he holds the handle strictly in the middle. Meanwhile, you fall into the hole and secure the drawstring with the cord with a clamp. We check: 1 - everything is fine, we are happy.
2-the crap is hanging out and crooked. Let's try again, I actually secured it as before, in the old place and everything turned out OK :)
Well, that's all. I hope it will be useful to someone. I apologize if I didn't write something. I tried my best, if something is not written, you will see for yourself along the way)
P.S.
Before changing, think three times ;) the clutch is installed, I’m happy with the result. I’m happy as an elephant)) thank you all for your attention)) I apologize for the many letters, but after I didn’t find anyone’s blog entry on this matter, I decided in detail describe the process, in case it will help someone. and a small photo report) I, unfortunately, am absent from the photos. Don’t blame me for the quality))
How much does it cost to replace a clutch on a VAZ 2114
Replacing the clutch on a LADA Samara at a service center will cost you approximately 1.5 thousand rubles. In addition, you will need to purchase additional materials worth approximately 3-4 thousand rubles.
If you are just planning to take your car to a service center, then find out in advance what the cost will be; perhaps you can do it yourself, without the help of specialists, it will be faster and cheaper.
After the replacement, noise when shifting gears will disappear, the car will move smoothly, without jerking, and the gearbox will last longer.
What exactly is a clutch?
Let's imagine a car in which the engine is directly connected to the gearbox. Do we start the car and drive? Of course not. The car will start to twitch from the very beginning of driving, changing gears will become unrealistic, and when you come to a complete stop you will have to completely turn off the engine. After such use, the gearbox will not last more than a few days. The lifespan of an internal combustion engine will be reduced significantly. How do you like this course of events? The clutch helps to avoid such unpleasant moments.
Clutch faults
- The clutch does not disengage. The oil may have contaminated the driven disc. Then there will be no need for repairs, you just need to clean the disk. Air may accumulate in the hydraulic system. The piston seal in the slave cylinder may also become damaged or deformed.
- The speed of the car does not increase even though the engine speed increases. The clutch will need to be adjusted, it is better to have this done by professional mechanics. During diagnostics, it may be discovered that the flywheel is deformed or the diaphragm spring is damaged.
- When you engage the clutch, you notice vibration. Most likely, the transmission or engine has become loose. The flywheel or pressure plate may have been deformed.
- The clutch is fully engaged and extraneous sounds are heard. The pedal free play may be set incorrectly. It is necessary to adjust the clutch, and also better check the driven disc to ensure there are no cracks on it.
- Extraneous sounds when the clutch is completely disengaged. This means that the clutch release bearing is broken or has become unusable. It is likely that the sectors of the diaphragm spring of the pressure plate are also faulty.
What determines the price of clutch replacement?
The price for this procedure depends on the complexity of the technical task, the cost of spare parts (clutch) and additional services.
Which clutch to choose
When choosing a new clutch kit for the VAZ-2114, you should definitely study the manufacturer. This is very important, because if you sell cheap, then after some time you will have difficulties again. Very often, cheap replicas quickly fail because they are not suitable for such loads. So the new renovation will not take long to arrive. In addition, both your safety and the safety of those who ride with you will depend on the quality of the clutch kit. Therefore, cost fades into the background.
Replacing the clutch yourself
Generally speaking, changing the clutch on a Lada Samara is not so difficult and every car owner can do it. You just need to study the main stages of this process and it is better to ask for help from someone who already has experience in replacing it yourself. This will make the replacement process easier. First you need to find a viewing hole, as it will be much more convenient. If you don’t know where to find the inspection hole, then you can simply lift the front side of your car, place it on bricks, for example, and then begin to replace it.
How, where and from whom to replace the clutch
You can use a professional clutch replacement at a service station in any city. At the first sign of a problem, you should make an appointment to have your vehicle inspected. Turning to professionals has its advantages. Service stations offer both complete and partial clutch replacement. No need to waste your time searching for spare parts. A guarantee is given for all materials and all types of work.
If you live in a large city, then there are hundreds of offers at your disposal from which you can choose the best.
How much does a replacement cost?
On average, you can change a clutch for 6 thousand rubles; the cost depends on who the manufacturer of the parts is, as well as on how much the service station will ask for the replacement. It is better to replace the entire mechanism completely, because after long use all the parts are no longer in the best condition.
The most budget-friendly, but of poor quality, are Chinese and Russian kits, which will cost between 2,400-2,800 rubles. With them it will be possible to travel up to 50,000 kilometers without breakdowns. The highest quality and most expensive ones are composite or ceramic; they will cost you 5-7 thousand rubles, but you will travel 120,000 kilometers.
Disassembly and removal of the clutch
When calculating the cost of replacing a VAZ 2114 clutch, you need to focus on the price of the parts and add to it the cost of a specialist’s work. If you do the work yourself, this will save you a little money. If the repair is planned to be carried out in the garage, the presence of an inspection hole is welcome. You can do without it, but this will cause additional inconvenience and unnecessary trouble.
To successfully complete the work you need to have:
- a standard set of open-end (spanner) wrenches and preferably heads, including those for unscrewing the nut on the hub (No. 30);
- ball joint remover;
- wrench for unscrewing bolts on wheels ("bolt");
- jack;
- a hoist, or a piece of timber with a rope for hanging the engine;
- mount;
- screwdriver for fixing the flywheel;
- mandrel for centering the driven disk;
- wooden blocks, for installation under a car.
Clutch release bearing VAZ 2114 and its replacement
Which bearing to choose?
Currently, the automatic transmission is becoming increasingly popular, but there are still quite a lot of adherents of the manual transmission. The most important component of a manual transmission is the clutch release bearing. Thanks to technological progress, this part has undergone large estates. Instead of mechanical bearings that move the clutch discs due to a mechanical connection, hydraulic bearings have come. In these units, the function of the cable is performed by a hydraulic line; they have a more complex design, but at the same time they are highly reliable.
Thus, there are two types of release bearings on the automotive market:
- roller, using a rigid connection of its own rods;
- hydraulic, transmitting force thanks to hydraulics.
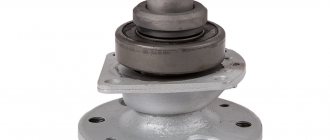
The photos show examples.
Release bearings for VAZ 2114
Price policy
When choosing replacement parts when repairing a clutch, including the release bearing on a VAZ 2114, you need to make sure of the quality of the product, find out its manufacturer, and familiarize yourself with the certificates confirming the quality. This is of great importance, since inexpensive parts break faster, which will require repeated repairs. Experienced drivers have long come to the conclusion that inexpensive analogues cannot withstand the loads provided for the VAZ 2114 car.
Thus, there is no need to skimp on components. When purchasing new products, you need to pay attention to both price and quality, which must be confirmed by certificates. Quality should come first, as reliable components will ensure safety on the road. The price difference is usually not so high as to risk your life. Below is a table of approximate prices for a release bearing.
| Manufacturer | Price, UAH. | price, rub. |
| F.A.G. | 150,00 | 654,00 |
| UBP (Kursk) | 53,50 | 230,00 |
| AvtoVAZ | 172,00 | 740,00 |
| DK | 111,00 | 480,00 |
| SB TZA, (Khmelnitsky) | 122,00 | 425,00 |
| LSA | 102,00 | 440,00 |
Signs of bearing failure
The release bearing comes into operation only when changing gears, the rest of the time it is at rest. Its malfunction makes it impossible to further move the car. Therefore, at the first sign of failure, the part should be replaced.
It is important to know!
- Every motorist should have a universal device for diagnosing his car.
- You can read, reset, analyze all sensors and configure the car’s on-board computer yourself using a special scanner...
- This part can deteriorate due to uneven loads on it: when the clutch is depressed, it moves back along with the driven disk. Therefore, manufacturers do not recommend holding the clutch pedal depressed when the gear is engaged, as this will increase wear and accelerate the failure of the part. The product is quite durable, reliable, and rarely fails; most often this happens on the cars of novice car enthusiasts.
- Signs of a malfunction are the appearance of a knocking or crackling sound when the driver depresses the clutch pedal. This increases the free play of the pedal. The appearance of sound in the summer clearly indicates a breakdown; in winter it can be caused by a change in the size of the bearing cup when the air temperature drops.
- Thanks to the large safety margin, even if a knock occurs, you can drive for a while to make sure that the part is faulty if the sound increases. Other signs are the appearance of a burning smell when the car slips, engine overheating, and increased fuel consumption.
Replacement process
It is more convenient to carry out work on replacing and repairing the clutch on an inspection pit, overpass or lift. The photo shows the clutch diagram:
Car clutch diagram
Tools
To complete the work you will need the following materials and tools:
- flat screwdriver;
- a set of keys;
- lubricant "Shrus-4".
Stages
Replacement consists of the following steps:
- First of all, you need to remove the gearbox.
- Next, the ends of the retainer are retracted from the place where the clutch associated with the bearing engages.
- Then the release bearing is removed from the guide sleeve along with the coupling.
- After squeezing out the four tabs associated with the spring holder, you should remove the holder itself.
- After complete release from the clamps, remove the release bearing from the clutch.
Release from the retainer
- Each removed part must be inspected. If damaged or faulty, parts must be replaced.
- Before installing a new bearing on a VAZ 2114, it must be checked. It is easy to determine serviceability: it should rotate freely without stopping, in addition, there should be no even slight play.
- If the check shows that the part is in good condition, it is installed on the coupling. When installing, pay attention that the protruding part of the inner ring must be directed towards the coupling. After checking that the installation is correct, you can clamp the part onto the coupling using a spring holder.
- Now you can mount the release bearing on the guide sleeve. To extend the life of the part, a preliminary procedure should be carried out: a thin layer of special lubricant must be applied to the surface of the guide bushing.
Car clutch repair
- At the last stage, using a spring clamp, the coupling along with the bearing fixed in it is fixed.
- After the replacement is completed, the gearbox is put back in place.
Replacement does not present any difficulties, you just need to follow the correct disassembly and assembly process without violating the sequence. After carrying out the work, it is necessary to adjust the tension of the handbrake cable and check the functionality of the clutch drive.
Important points
- When replacing the clutch, it is necessary to pay close attention not only to the condition of the discs, but also to the condition of the release bearing, which was mentioned above. After removing it, you need to turn it several times by hand. If rotation is difficult or a creaking or crackling sound is heard during scrolling, then the bearing needs to be replaced. If this is not done, all the work on replacing the clutch discs will be useless, since they will again become unusable.
- The gearbox shaft and adjacent parts should be cleaned of dirt very carefully; it is best to wash everything with kerosene and wipe dry with a clean rag.
- The above is a method for replacing the clutch with complete removal of the gearbox. But sometimes car enthusiasts do without removal. To do this, the bolts that secure the box to the engine are carefully unscrewed (one at a time). In their place, studs are installed, which are slightly thinner and at least three times longer than the mounting bolts. These pins serve as guides along which the box can be moved slightly to the side. This creates a gap between the engine and the gearbox, through which the clutch discs are removed. This method is less labor-intensive, but it has its drawbacks: it will be impossible to get to the release bearing and it will not be possible to thoroughly clean the gearbox shaft from dirt.
As you can see from this article, replacing a clutch is a very labor-intensive operation. Therefore, it is necessary to follow the proposed instructions exactly. You should also not forget about safety precautions, especially when it comes to removing the gearbox. This is a very heavy unit and you should be extremely careful when handling it.
- Author: Alexey Stepanov
Copywriter with five years of experience. Rate this article:
- 5
- 4
- 3
- 2
- 1
(0 votes, average: 0 out of 5)
Share with your friends!
Replacing the release bearing VAZ 2113, 2114, 2115
Checking the release bearing
The bearing allows the disk to come out of the coupling with the basket, and also ensures that the clutch is engaged and disengaged.
There are two types of release bearing:
- Roller - functions due to the rigidity of the linkage.
- Hydraulic - provides force thanks to the hydraulic system.
If problems arise with the clutch, the driver will definitely recognize this by the corresponding sounds while driving the car, difficulty appears when changing gears, while overtaking the clutch may completely disappear, slippage may occur, and other unpleasant moments. Accordingly, if any corresponding sign of malfunction occurs, the driver is obligated to carry out appropriate repairs.
How to change the release bearing on a VAZ 2114
To perform this work, it is better to use a pit, a lift or an overpass, for convenience. Before replacing the release bearing and clutch, the gearbox must be disconnected.
Then the following actions are carried out:
- To remove the release bearing, you need to unfasten the clamps and then remove everything together with the clutch.
- remove the input shaft from the bearing.
- After fully releasing the clamps, remove the bearing from the coupling.
- We carry out the installation procedure for a new bearing model, first checking it for quality. If the bearing moves perfectly without problems, freely, then it is in good condition.
- the clutch is lubricated, and the release bearing is installed on the release sleeve, pre-lubricated with engine oil, and then secured with special clamps.
The clutch plays a significant role in the operation of the VAZ 2114. One of the important elements of the clutch is the clutch release bearing on the VAZ 2114, photos of which will allow you to understand exactly what this component looks like.
This device acts as a thrust mechanism by transmitting pressure from the clutch to the drive disc hub and the basket spider.
How to change: sequence of actions
- The car is installed on the inspection hole. Wheel chocks are placed under the rear wheels. The front wheels are jacked up and removed.
- The hood opens and both terminals are removed from the battery.
- Using open-end wrenches, the air filter and the sensor next to it are removed.
- Access to the clutch cable is provided. This cable is disconnected with a 10mm open-end wrench.
Clutch cable that needs to be disconnected
- Now the starter is removed and the bolts on the upper part of the clutch housing are unscrewed (there are 4 of them).
- The gear shift drive and the support located to the right of the gearbox are unscrewed. After this, use a 10-mm open-end wrench to unscrew the flywheel protective cover.
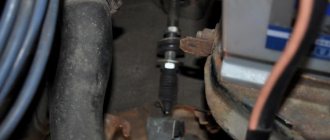
- Using a spanner, unscrew the fastening bolts of the ball joints. Next, the drive shafts are disconnected from the gearbox and the oil is drained.
The mounting bolts of the ball joints are unscrewed
- Removing the box begins with unscrewing the bolts holding the box to the cylinders. The bolts are unscrewed using a socket head 8. A wooden beam tied to a rope is placed under the box, on which it is hung next to the engine. Next, using the same 8mm wrench, unscrew the bolts that secure the pressure plate to the flywheel.
The pressure plate is unscrewed with an 8 key
- The clutch pressure and driven discs are removed.
Clutch discs ready for removal
- Using a screwdriver, pry up the release spring holding the release bearing, after which the bearing is removed.
The gearbox input shaft is cleaned of dirt
- Access to the gearbox input shaft is provided. It is thoroughly cleaned of residual grease and contaminants. The release bearing and spring are installed in place (replaced with new ones if necessary), then the shaft is centered using a mandrel. Only after this are the clutch driven and pressure plates installed on it. Then all components of the car are reassembled.
Video: how to replace the clutch on the fourteenth VAZ model
Examination
To make sure that the clutch really needs to be replaced with a clutch releaser on a VAZ 2114, it is first recommended to check it thoroughly for malfunctions. This will allow you to determine whether this device is really the cause of the problem.
The bearing allows the disc to disengage from the basket, plus it additionally ensures that the clutch is engaged and disengaged.
There are two types of squeezers:
- Roller . They work on the basis of a rigid bunch of rods.
- Hydraulic. The hydraulic system ensures power transmission.
Even an inexperienced car owner can detect a faulty release bearing. The failure of this element manifests itself as follows:
- When moving, extraneous sounds and noises arise;
- Gear shifting is difficult;
- When overtaking, the clutch may completely disappear;
- Slippage occurs during acceleration, etc.
If the squeezer turns out to be truly faulty, it is the responsibility of every car owner to replace it immediately. This can be done with the help of service station technicians, or with your own hands.
Replacement
The procedure is not so simple, therefore, if you lack experience, it is not recommended to do it yourself. If you have enough skills and abilities, get to work.
- Disconnect the clamps and remove the release bearing along with the clutch.
- Remove the input shaft from the bearing.
- After fully releasing the clamps, remove the damaged bearing from the coupling.
- Install a new part, but first make sure of its quality. If the bearing moves freely, there is no need to worry, it works well.
- Lubricate the clutch and the release tool itself. This device loves high-quality lubrication. Then install it on a release sleeve that has been pre-treated with machine oil.
- Using special clamps, place the new element in its rightful place.
- The final stage will be reassembling and installing the gearbox in its original position.
The work can be considered completed. It is quite possible to do it yourself, but just do not forget about the accuracy and consistency of your actions.
A high-quality squeezer lasts a long time, so you won’t have to perform such operations regularly. Of course, provided that you have correctly replaced the old bearing and your clutch is functioning efficiently.
conclusions
Replacing a VAZ-2114 clutch with your own is quite difficult, but it can be done with your own hands if you use step-by-step instructions. Particular attention should be paid to the choice. Many manufacturers provide a wide selection of clutch parts. Therefore, every motorist can decide what to set according to the “price-quality” indicator.
The design features of cars determine the replacement of the clutch of the VAZ 2114 and other models in the assembly. This operation is labor-intensive, but the owner can easily do the repairs with his own hands. To understand how to repair this machine component, you need to carefully study the diagram.
The work will be as productive as possible, and during the process you will not have to interrupt the search if you prepare spare parts and tools in advance.
Replacing the clutch disc on a VAZ 2114
How much does a clutch assembly cost?
Clutch system VAZ 2114
At current prices, a good clutch kit will cost you approximately 4,000 rubles, but you may have to pay a little more due to the constant rise in prices. And it is better to purchase from a seller with a good reputation.
Which one is better?
When choosing a new clutch kit for a VAZ 2114, you should definitely pay attention to the manufacturer of the kit. This is very important, since by purchasing a cheap kit, you run the risk of encountering this problem again after a certain time. Often inexpensive fakes break quite quickly, unable to withstand the load. As a result, such savings will soon become the reason for repeated repairs. And the important point is that not only your personal safety, but also the safety of the passengers you transport and those around you depends on the quality of the kit you purchase. Since it is impossible to predict when a particular part, unable to withstand the load, will fail. As a result, when purchasing a new clutch kit, you must definitely think about the quality guaranteed by the manufacturer, and only then about its cost. The difference in cost is small, but the possibility of failure at the most undesirable moment is much higher for fakes.
Replacement instructions
When replacing the VAZ 2114 clutch, you can resort to a simplified option - without changing the oil and removing the right CV joint. But if it is necessary to replace the fork or release bearing, then you cannot do without draining the lubricant.
Also note that if the gearbox is removed, the car is in a suspended state, which makes access to the space under the hood difficult. To simplify further work, while the vehicle is still on wheels, unscrew or disconnect everything that will subsequently interfere with dismantling the box.
Tools
- keys, heads are better;
- removable key for ball;
- wheel wrench;
Balloon wrench
- jack;
- beam for hanging the motor;
- rope;
- pry bar or small crowbar;
Mount
- screwdriver;
- a mandrel used to center the driven disk.
Replacing the VAZ-2115 clutch with your own hands: detailed instructions and repair methods
On a VAZ-2115 car, replacing the clutch is usually carried out provided that the gearbox is removed. It’s much easier this way – it’s convenient to work, nothing gets in the way. But repairs can be performed without removing the gearbox. True, you will have to try for this - there is jewelry work ahead. But before carrying out repairs, be sure to make sure that it is the clutch that has failed. Very often the gearbox itself breaks down, and drivers are at fault with the clutch.
Symptoms of failure
If the clutch is moving, then this is a clear sign that the friction linings on the disc are worn out. This leads to the fact that with a sharp increase in engine speed, the speed is gained slowly, as if not all the movement is transferred to the wheels. The only correct solution is to replace the VAZ-2115 clutch. And you can do this yourself, without resorting to expensive car services.
Repair tool
You will need the following tools and supplies:
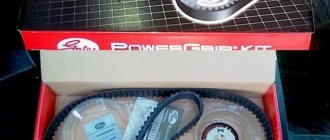
- Clutch kit - disc, release bearing, basket, bolts. The driven disk needs to be replaced. The leader (basket) is changed less often and has a much higher resource.
- A set of open-end wrenches, spanners, and sockets.
- Screwdrivers, pliers, chisels.
- Container for draining oil from the box. It will be required in any case, regardless of the replacement method you choose.
- Preferably two jacks. When removing the box, install the second one under its crankcase to keep it at the same level and prevent it from falling.
- Supports for the car and wheel chocks.
- The presence of an overpass, pit or lift is welcome.
Having all these devices, you can begin the repair. If you have experience, then the whole procedure should take an hour or two. But if you are doing this for the first time, it will take more time.
What needs to be done before removing the gearbox
To remove the gearbox to replace the VAZ-2115 clutch with your own hands, you will need to perform the following steps:
- Drain the oil completely - this will kill two birds with one stone. Firstly, the weight of the box will become smaller. Secondly, you will not lose lubrication while working. Pay attention to how much mileage the car has done on oil. If it has exhausted its service life, replace it after installation.
- Remove the left wheel by lifting the side on a jack.
- Remove the two ball joint mounting bolts.
- Remove the pin and unscrew the nut from the tie rod end. Remove the tip using a puller.
- Carefully remove the inner left CV joint from the hole in the box. To do this, use a chisel and a small hammer.
- Leave the right drive in place for now; you need to remove it the moment you start removing the box.
- Suspend the left drive so that it does not get dirty and interfere with you.
- Remove the starter, first disconnecting the negative terminal from the battery.
That's it, almost everything is ready to dismantle the gearbox. But before you completely remove it, you need to do a few more steps.
Final dismantling of the box
Finally, do the following:
- Unscrew the nut securing the ground wire.
- Remove the clutch cable. If it is torn or damaged, be sure to replace the clutch cable on the VAZ-2115.
- Unscrew the bolts and nuts securing the side and rear airbags. In this case, it is advisable to install a jack or support under the crankcase so that the box does not sag too much.
- Loosen the clamp securing the rocker and remove it.
- Now all that remains is to unscrew the three bolts and nut that secure the gearbox and engine block.
- To separate the engine and transmission, you will need a spade and a lot of effort. If the assembly has not been disassembled for a very long time, removing the input shaft from the splines will be problematic.
- Carefully, trying not to damage the aluminum elements, move the box towards the left wheel. It is at this moment, when it begins to move away from the block, that you need to remove the inner right grenade.
When carrying out repairs, it is advisable to suspend the box using a cable from a crossbar installed under the hood. Treat all threaded connections with WD-40 lubricant in advance. This will help you unscrew the bolts and nuts much faster.
Removing and replacing the clutch block
To remove the basket and disc, you will need to unscrew the bolts in a circle. It is advisable to do this crosswise, this will prevent damage to the basket. The release bearing is located on the input shaft of the box and is fixed with a spring clip. It needs to be removed and a new one installed immediately. It is advisable to apply a little graphite-based lubricant to the new one - this will slightly extend its service life.
Install in the following order:
- Place a guide inside the crankshaft - a small piece of pipe or a piece of the gearbox input shaft.
- Install the clutch disc and basket onto it.
- Tighten the bolts, but do not tighten them.
- Make sure the disc and basket are centered.
- Tighten the bolts in a crisscross pattern.
This completes the replacement of the VAZ-2115 clutch disc; upon completion of the entire procedure, remove the guide sleeve. Now everything is ready to install the box in place. Installing it is much more difficult, since even with a slight deviation in the centers of the holes in the disk and crankshaft, the first one simply will not go in all the way. Everything will have to be disassembled and re-aligned. Therefore, carry out all the work correctly before installing the box.
Is this possible without removing the box?
Many motorists are wondering whether it is possible to replace the VAZ-2115 clutch without removing the box. And there is only one answer: it’s possible, but it’s a little more difficult to do. But it depends on which side you look at - if you take into account that you don’t need to lift a heavy box, then the task, of course, looks simpler. To work, you will need two long bolts - they will act as a slide along which the box will move to the side. The bolts that are used to fasten the upper suspension arm of VAZ 2101-2107 cars are ideal. All work is the same as in the case of completely removing the gearbox, but with one amendment: it is bolted to the left. The disc is replaced through the gap formed between the gearbox housing and the engine block.
fb.ru