Fiat Albea 1.4 timing belt replacement
Replacing the timing drive on a Feat Albea 1.4 is not such a complicated procedure, but it still requires some preparation.
Incorrect installation of the belt drive can lead to engine damage, so you need to take it seriously. This manual has been compiled by those who have extensive experience in car repairs. By following it exactly, you can install the belt drive without any problems. Proper installation largely depends on the correct location of the shafts. It is very important that they continue to be in the same position as after removal. If even one shaft moves slightly, this will cause a disruption in gas distribution. When dismantling the belt, check the condition of the tension roller. If it is unsatisfactory, then it is better to replace the roller too. If you leave the defective roller, then after some time it will still need to be replaced, but in this case you will again have to disassemble the entire mechanism.
Replacement period for timing belt
It is highly advisable to check the condition of the belt at least after 25,000 km. But what external signs may indicate that his condition is unsatisfactory:
- the edges are frayed;
- oil stains appeared on the surface;
- the surface is cracked;
- There are blisters or abrasions on the belt.
All these defects indicate that the belt needs to be replaced. If this is not done, it may break. In this case, the valves will collide with the pistons. Because of this, the valves will bend, and this is a rather serious and expensive repair. Here are the factors that cause belt wear:
- aggressive driving;
- bad roads;
- certain climatic conditions.
Of course, the timing belt can also be replaced by professionals by taking the car to a service station. But in this article we will talk about carrying out this type of repair yourself. This way you can not only save money, but also gain serious experience in repairing equipment.
Time for a change - when to change the timing belt
View gallery
Every driver should know that regular inspection and visual independent monitoring of all important mechanisms are required, while checking the belt every 25 thousand km. Wear is typical for any spare part, and the visible reasons listed below will help the motorist understand that it is time to replace the timing belt on a Fiat Albea:
- mohra around the edges indicates fair wear;
- the surface of the product is covered with oil stains;
- swelling and abrasions appeared.
If defects are neglected and ignored, if the timing belt on a Fiat Albea is not replaced, the part will inevitably face a disastrous fate - it will simply break. What does this mean? The valves and pistons will collide, and due to their damage, the motorist will say goodbye to a large sum of money for expensive repairs.
Sequencing
Here are the tools we need:
- screwdrivers with different tips;
- pliers;
- keys and heads;
- jack;
- new tension roller;
- purchased belt.
Now let’s start doing things step by step:
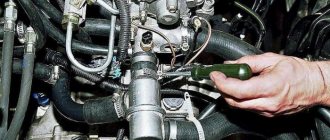
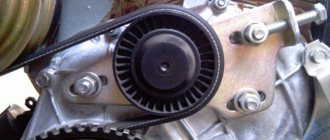
1. Take a jack, use it to lift the car and remove the right wheel. 2. Remove the engine protection. To do this you will have to unscrew several screws. 3. Remove the generator belt, having first loosened the generator. 4. Unscrew the power steering mounting bolt. 5. Remove the power steering strap. In the photo below you can see the timing kit, which includes all the rollers and pulleys. This is the kit you should buy.
6. Now we need a partner. He will need to press the brake pedal at 4 speed. And at this time you should remove the pulley, having first removed the top cover of the timing belt assembly. Then you will need to remove the bottom cover. 7. Now is a very important stage - setting marks. There is already a mark on the crankshaft, we need to install a second one opposite. It is placed on the block. 8. Now we put a mark on the camshaft block and after setting the mark on the tooth, we put another mark on the head. 9. Now it’s time to unscrew the tensioner. 10. Now you can start dismantling the old belt drive. We remove the belt. 11. When putting on a new belt, make sure that the marks remain in the same place as they were. In addition, pay attention to the direction of the arrows on the belt. They must look in the direction of travel. If you install a belt without following this rule, its teeth will wear out very quickly.
By the way, you can buy a belt without a kit. If you already have the remaining parts of the kit or they do not require replacement, then there is no need to buy them. See photo below:
12. Now turn the crankshaft 2 turns to the right. We tighten the roller. The car should not be at speed during this time. Now you need to check the placement of the marks again. 13. Be sure to check whether the belt is tight enough. Its tension is checked using a special device, but this can be done without it. Simply press down on the belt with your hand. By the way, the belt tension must be correct in all senses - the belt should not sag, and it should not be overtightened either, as this will definitely stretch it. 14. Return the pulley to its place. 15. Now you need to start the car. 16. If the belt is not put on correctly, the warning indicator will light up. Also in this case, extraneous noise may be heard. If this does not happen, then everything was done correctly. 17. If all is well, install the remaining components in their places. Installation must be done in reverse order.
After the belt is installed, be sure to drive the car for a while to break in the new belt. 2-3 kilometers will be enough.
Step-by-step sequence of work
View gallery
The car is raised using a jack, and the right wheel is removed. This is the main point at the start. Next you will need to perform the following procedure:
- If you are replacing the timing belt on a Fiat Albea 1.4 with your own hands, you will have to remove the screws and remove the vehicle protection.
- The generator belt is removed, loosening the generator slightly.
- The bolts of the power steering consumable (power steering), which is responsible for transmitting rotations, are loosened.
- Next you will have to disassemble the power steering strap. Experts advise purchasing a kit with pulleys and rollers. Some people buy a complete belt if they have important parts.
- Here, call a neighbor or friend. His “mission” is to press the brakes at fourth speed. At this time, the owner of the vehicle himself has to remove the pulley. Do not forget to remove the cover on top of the mechanical assembly, then on the bottom, in advance.
- This step is extremely important! Remember, when replacing the Fiat Albea timing belt, marks are a responsible matter that requires care and accuracy. A mark installed on the crankshaft facilitates the process; the car enthusiast’s task is to correctly mark the second one. It should be installed on the block.
- A mark is placed on the camshaft block, marks are made on the tooth and head.
- The next step is to unscrew the tensioner and dismantle the outdated belt drive.
- When putting on a new belt, you must not allow the marks to move. The direction of the arrows on the belt is taken into account: they should look in the direction of movement. If you ignore this advice, the teeth will wear out very quickly.
The above steps will be followed by turning the crankshaft two turns to the right. The speed should not be turned on and the roller should be tightened. Checking your marks again won't hurt things at this stage.
Replacing the timing belt on a Fiat Albea: procedure, whether the valve bends
It is rightly said about the Fiat Albea that it is a typical people's car. Buyers saw the first cars in 2002, followed by modernization in 2005. Since 2006, it was produced at the automobile plant in Naberezhnye Chelny. 2012 was the last year for the production of this model; no replacement was invented.
Fiat Albea power units have a timing belt in the valve mechanism drive. Such a drive requires careful, high-quality maintenance, so it will be useful for owners to learn how to replace the gas distribution mechanism on a Fiat Albea.
Video “Tension Check”
This video shows how to check the timing drive on a Fiat Albea 1.4. It also shows how to check its condition to prevent a break. If defects and cracks are found, you may need to install a new one.
It is rightly said about the Fiat Albea that it is a typical people's car. Buyers saw the first cars in 2002, followed by modernization in 2005. Since 2006, it was produced at the automobile plant in Naberezhnye Chelny. 2012 was the last year for the production of this model; no replacement was invented.
Fiat Albea power units have a timing belt in the valve mechanism drive. Such a drive requires careful, high-quality maintenance, so it will be useful for owners to learn how to replace the gas distribution mechanism on a Fiat Albea.
Engines
This car was supplied mainly to the automobile market of Russia and Turkey; it was equipped with a 350A1000 engine. It is an in-line engine with four vertical cylinders. The engine displacement is 1400 cm 3, the power supply system is injection, the recommended fuel is AI 95 gasoline. Features of the engines include the ability to electronically control changes in valve timing.
The motor can develop a power of 78 hp. The cylinder head is cast from aluminum, in which 8 valves and a camshaft are installed. The intake and exhaust valves are located on opposite sides of the cylinder head. The thermal clearance of the valve mechanism is adjusted using calibrated washers.
Replacement procedure
Most owners trust the replacement of timing belts to repair shop specialists; this will require additional costs for the work performed. If you have experience in servicing and repairing vehicles, you can independently successfully replace the timing belt in the Fiat Albea timing drive. Desire alone will not be enough; you will also need to have a place to carry out the work, the necessary tools, and new spare parts. The work can be done in the garage above the inspection hole.
To work you will need to prepare:
- car jack;
- a set of wrenches and socket wrenches;
- car jack;
- stand for car body;
- wheel chocks;
- round nose pliers;
- Screwdriver Set;
- rags.
The work of replacing the Fiat Albea timing belt can be done approximately in this order:
- The car is installed at the selected repair site, the handbrake cable is tightened, wheel chocks are placed under the rear wheels, and the wheel bolts of the right front wheel are removed.
- Use a car jack to lift the front right side of the car.
- After this, the front right wheel is dismantled.
- The work is hampered by the plastic protection in the front right wheel arch; it must be removed. To do this you will have to remove several screws.
- The next step is to remove the drive of the auxiliary mechanisms, loosen the tension of the generator, the belt can be easily removed. And also release the tension on the power steering drive and remove its belt.
- Next, you will need the help of an assistant to remove the crankshaft pulley. He must engage the 4th gear of the gearbox and press the brake pedal. At this time, remove the top cover, dismantle the crankshaft pulley, and the bottom cover of the timing mechanism.
- Install the crankshaft and camshaft according to the installation marks, lock the camshaft and crankshaft.
- If the marks are set, you can release the timing belt tensioning mechanism and remove the old timing belt from the engine.
- Before installing a new belt, you should once again check the position of the alignment marks. The belt begins to be put on from top to bottom, the arrows on the belt should point in the direction of movement.
- The new belt is tensioned using a tensioner, turning it counterclockwise, then the tension roller mounting bolt is tightened. Do not over-tighten the drive; the belt may stretch and then jump over the teeth on the crankshaft or camshaft pulleys.
- Turn the engine crankshaft two turns and check that the alignment marks match. If no violations are found in their installation, continue working further.
- The crankshaft pulley is installed in its place; it should rest on the protruding pin of the crankshaft.
- Now you should do a test run of the power unit; the warning light should not light up; if this happens, it means the drive has shifted by at least one tooth. If the alarm does not go off, work continues.
- Reinstall the protective plastic covers of the timing mechanism, drive belts of auxiliary mechanisms, and check their tension.
- Replace previously removed parts in their places.
At the end of the work, you should do a test run; it will be enough to drive 2–3 kilometers. If no problems are found, the work can be considered complete.
No alignment marks
The 350A100 engine has this feature; the installation mark can only be found on the crankshaft pulley. On the cylinder block, the mark is applied independently opposite the marks on the pulley. The belt in this place should be marked with paint. Then, in the same way, a mark is placed on the camshaft pulley and the cylinder head; a mark is also placed on the belt, indicating the direction of its movement.
After removing the drive, count the number of teeth between the marks. A paint mark is placed on the new product, the required number of teeth is counted, and a paint mark is also placed. This is necessary for the correct position of the Fiat Albea timing mechanism drive.
Due to the peculiarity of the gas distribution mechanism, it is necessary to lock the camshaft and crankshaft using special tools.
Replacing the timing belt on fiat albea. everything you need to know
The 350A1000 engines (1.4 8 valves) that are installed on the AM FIAT Albea (as well as on the Grande Punto and Doblo) have a “classic design with adjustable valves,” that is, the thermal clearances are adjusted by selecting the thickness of the washer. Checking the thermal clearances (and, if necessary, adjusting) is carried out every time the timing belt is replaced at mileage multiples of 75,000 km. This is done to save money for owners, since the operation of replacing the timing belt includes the operation of removing the cylinder head cover. With the cylinder head cover removed, the operation of checking the gaps
takes a few minutes (standard sets of probes are used). The construction materials used in the production of the valve group of these modern engines are of the highest quality, so more frequent checks are not required. This is confirmed by our two-year observation of these engines in Russia. Checks have shown that even with the second replacement of the timing belt (150,000 km), the gaps remain within tolerances (0.3 mm for the intake valve and 0.4 for the exhaust valve ±0.05). All of the above is naturally true when using high-quality lubricants that meet the manufacturer’s requirements. Checking the thermal clearances (and, if necessary, adjusting) is carried out every time the timing belt is replaced at mileage multiples of 75,000 km. This is done to save money for owners, since the operation of replacing the timing belt includes the operation of removing the cylinder head cover. With the cylinder head cover removed, checking the gaps takes several minutes (standard sets of feeler gauges are used).
The variable valve timing system dynamically adjusts the position of the camshaft. This system allows you to set optimal valve timing for each moment of engine operation, which, in turn, achieves increased power, better fuel efficiency and lower exhaust emissions. The system mechanism, combined with the camshaft toothed pulley, is connected by channels in the cylinder head cover to the solenoid valve. This valve hydraulically controls the fluid coupling of the variable valve timing mechanism.
The variable valve timing system has one feature that raises many questions for new owners. The peculiarity is this: after parking the car for a long time or with the onset of negative temperatures, after starting the engine, noise is observed for 20-30 seconds. Some owners confuse this noise with the noise of out-of-adjustment valve mechanisms. Don’t be scared and make hasty conclusions, this is how the variable valve timing clutch works (after starting, it needs some time to fill with oil from the internal combustion engine lubrication system). But similar noises heard when the engine is already warm should alert the owner to identify and eliminate them.
ADJUSTING THE CLEARANCES IN THE VALVE DRIVE
To compensate for the thermal expansion of the valve, a gap is structurally specified between the end of the valve stem and the camshaft cam. With an increased gap, the valve will not open completely, and with a decreased gap, it will not close completely. The gap is measured with a feeler gauge on a cold engine (at a temperature of +20°C) between the camshaft cam (the cam should be directed upward from the pusher) and the valve pusher adjusting washer. The nominal clearance for the intake valve is (0.30±0.05) mm, for the exhaust valve - (0.40±0.05) mm. The gaps are adjusted by selecting the thickness of the shims. Spare parts are supplied with washers of various thicknesses (every 0.05 mm). Counting from the camshaft drive pulley, valves 1, 3, 6 and 8 are exhaust, valves 2, 4, 5 and 7 are intake.
Valve adjusting washers for Fiat Albea fit our Samara (VAZ-2114, 2109), verified! But the quality of the metal is an order of magnitude lower than that of the FIAT ones, as well as the diameter of the Samara ones is 30 mm versus 31 mm of the FIAT ones.
From time to time, some owners, especially new ones, have this question? Do the valves on the 350A1000 engine bend or not when the timing belt breaks?
Attention: Today this question remains open! There is still no reliable answer! Of those known isolated cases of belt breakage that are known, nothing criminal happened to car owners. Several other known cases of belt breakage, on the contrary, prove with 100% certainty that the pistons meet the valves. Anyone who has 100% verified information on this matter, please share with us. And we will already share it with all car enthusiasts.
OEM codes for timing gear spare parts.
55183497 — timing belt tension roller; 55203785 — timing belt; 55213710 — variable valve timing; 55203781 – crankshaft gear; 55190344 — valve seal (oil seals);
55195339 — camshaft oil seal; KTB466 — timing repair kit (Dayco); 5601570 — timing repair kit (Ruville).
REPLACING THE TIMING BELT.
To carry out this operation, it is necessary to install the camshaft and crankshaft in a certain position so that the valve timing is not disrupted. If the valve timing is incorrect, the engine will not operate normally. Because the manufacturer does not provide any installation marks on the camshaft and crankshaft pulleys, respectively. Installation of the camshaft and crankshaft is carried out using the following devices: part 1 – 2000004500 for fixing the crankshaft; part 2 – 2000004400 for fixing the camshaft; part 3 – 2000004200 for fixing the camshaft pulley.
Actually the process itself!
Remove the right wheel. Photo 1,2,3: Unscrew the 3 screws (marked with numbers) securing the fender liner to the wing
Photo 4: We take out the fender liner from the bumper and bend it to the rack
Photo 5,6,7,8: Unscrew the 3 bolts (with the head on the protective cover of the attachment belt pulley to the wheel arch and pull out the cover itself
Photo 9,10: Pulling out the air duct from the air filter housing
Photo 11: Disconnect the engine wiring harness from the timing control valve
Photo 12: Having compressed the stoppers on both sides, we pull out the harness holder from the upper timing case
Photo 13,14,15,16: unscrew the 3 bolts (10 key) securing the upper timing case to the engine
Photo 17,18: We take out the harness from the box in the upper timing case and take out the casing itself
Photo 19: First unscrew the lock nut (2-3 turns), and then the bolt (nut and bolt key 13) that regulates the tension of the power steering belt
Photo 20: Disconnect the chips from the crankshaft and oil pressure sensors
Photo 21: Use a 8mm hex to loosen the tightening of the lower and upper bolts securing the power steering pump.
Photo 22: Pull the power steering pump belt down, thereby loosening its tension, until it becomes possible to remove the belt from the pulleys (it’s a little different in the photo, don’t pay attention, it just happened that way) Remove the belt
Photo 23: Take a piece of nail (not thick) - we will use it as a pin to loosen the tension of the automatic roller of the accessory belts
Replacement timing
Owners are informed about this by the vehicle operating instructions. According to the instructions of the car manufacturer, it is necessary to replace the drive after a mileage of 60 thousand km. Its condition is checked during each maintenance of the machine. The condition of the belt is influenced by many factors, such as the operating conditions of the vehicle and the quality of the installed parts. Its performance is negatively affected by the ingress of technical fluids, especially motor oil, into the working area of the drive. The “age” of the product also plays a significant role; if it is large and the mileage is low, the belt must be replaced.
Timing belt Fiat Albea
During operation of the Fiat Albea, the timing belt gradually wears out. Its break leads to the inoperability of the power plant.
To prevent this, periodic timely replacement of the belt is required. It is not particularly difficult to do it yourself, but it is important to know a number of subtleties of successful timing drive maintenance.
Article number and approximate price for the original timing belt for Fiat Albea
The Fiat Albea uses several engine models, which use different belts to drive the gas distribution mechanisms. Thus, an engine with a volume of 1.2 liters and a power of 73 hp uses consumables with article numbers 71719652 and 46526291. The price for a branded product under the Fiat/Alfa/Lancia brand ranges from 540 to 720 rubles.
1.2 liter engines with a power of 80 hp have an original belt, the article number of which is 46403659. The cost of such a consumable ranges from 600 to 800 rubles.
1.9-liter engines use a timing belt with catalog number 46791187. The price of such a consumable is in the range of 1600-4000 rubles.
Article number and cost of good analogues of the original Fiat Albea timing belt from third-party manufacturers
Original timing belts for Fiat Albea have a high price and are not always available in auto stores. Therefore, car owners resort to purchasing consumables from third-party manufacturers.
Since the belt performs a very important function, it is extremely important to purchase a product of excellent quality and high reliability. The tables below present the best alternative options to the original, which have proven themselves well during operation.
Table - Good analogues of the Fiat Albea timing belt with a 1.2 liter engine and a power of 73 hp
| Manufacturer | vendor code | Approximate cost, ruble |
| Dayco | 94860 | 300-350 |
| Contitech | CT999 | 400-500 |
| Bosch | 1987949527 | 450-580 |
| Polcar | BS1987949527 | 600-800 |
| Gates | 5545XS | 480-520 |
Table - The best alternative options for the original timing belt Fiat Albea with a 1.2-liter power plant with a power of 80 hp.
| Brand | vendor code | Approximate price, ruble |
| Contitech | CT1049 | 560-710 |
| Gates | 5503XS | 460-510 |
| Dayco | 94709 | 450-500 |
| Polcar | BS1987949542 | 800-1000 |
| SKF | VKMT02204 | 500-700 |
Table - Recommended analogues for the branded timing belt Fiat Albea with a 1.9 liter engine
| Manufacturer | Catalog number | Approximate cost, ruble |
| Bosch | 1987949616 | 1000-1500 |
| Dayco | 94593 | 840-900 |
| Gates | 5462XS | 650-890 |
| Contitech | CT995 | 820-950 |
Third-party manufacturers produce not only analogues of the original belt, but also kits for servicing the Fiat Albea timing drive. The table below presents the best sets, which have mostly positive reviews and are recommended for purchase.
Table - Recommended kits for replacing the Fiat Albea timing belt
| Manufacturer | Catalog number | Approximate cost, ruble |
| INA | 530046230 | 3000-4000 |
| Metelli | 3008661 | 3200-4500 |
| Hepu | PK10581 | 3300-4700 |
| Dayco | KTBWP2853 | 4000-4800 |
| SKF | VKMC022062 | 3000-3900 |
Maintenance and repair of Fiat Albea
The Fiat Albea car has gained quite wide popularity due to its simple and reliable design. 1368 cc naturally aspirated four-cylinder engine. cm paired with a 5-speed manual transmission show good dynamics and fairly modest fuel consumption. With regular maintenance and timely repairs of the Fiat Albea, the power unit can easily survive up to a mileage of 300 thousand km or more, without serious intervention. It is important to follow the recommendations and instructions of the manufacturer so that the components and parts of the vehicle can withstand operating loads.
You can view the list of mandatory works and the timing of their implementation in the service book, and you can also download routine maintenance work for Fiat Albea.
Scheduled maintenance work includes regular replacement of oil and fluids, replacement of Fiat Albea filters, replacement of the Fiat Albea timing belt, replacement of the drive belt (alternator and air conditioning compressor), replacement of the power steering belt.
Required tools and materials for DIY replacement
In order to replace the timing belt on a Fiat Albea, the tools from the table below are required.
Table - Tools and materials required to replace the timing belt
| Name | Note |
| Screwdriver | With straight and cross blade |
| Head | “at 8”, “at 10”, “at 12”, “at 13” |
| Hexagon | "at 8", "at 15", "at 16", "at 17" |
| Spanners | Set |
| Spanners | Kit |
| Pliers | Can be replaced with pliers |
| Penetrating lubricant | For loosening stuck bolts and nuts |
| Wire brush and rags | To clean dirt |
The manufacturer does not provide any timing marks. They are missing on both the crankshaft and the camshaft. For this reason, many car repair shops refuse to undertake the replacement of a timing belt. If there are no violations of the valve timing, you can install a new consumable by putting the marks yourself and transferring them to the new belt. Car owners recommend counting the number of teeth, but you can also use the simple overlay method.
If there is a violation of the valve timing or the belt was removed early or broke, then additional special tools will be required to correctly install the consumable. Due to the lack of marks on the pulleys, for servicing the timing drive and monitoring the valve timing, the following is necessary:
- crankshaft clamp;
- camshaft retainer;
- camshaft pulley retainer.
We change the timing belt on a Fiat Albea ourselves
Timely replacement of the Fiat Albea timing belt is a very important procedure. You can correctly replace the timing belt yourself. It is important to carefully study all the steps in the guide we offer, which was compiled by experts with extensive experience in this matter.
In many ways, the correctness of the replacement depends on the competent and accurate setting of the position of the camshaft and crankshaft. It is important that they remain in the same position as before removing the belt. If one of the shafts in the power unit is displaced, the gas distribution phases will be disrupted. According to the instructions of the manual that comes with the Fiat Albea 1.4, the timing belt needs to be changed every sixty to seventy thousand kilometers. When replacing, as a rule, the tension roller also changes.
Important points
The camshaft and crankshaft need precise alignment of their position, only then can we talk about the correct progress of the work. They should take exactly the same places as before removing the mechanism. Otherwise, the driver will only achieve a disturbed rhythm in the operation of the camshaft phases. According to the recommendation, it is better to do it after 60 thousand km. The procedure must be accompanied by changing the tension roller.
We change it ourselves
Of course, you can replace the timing belt at a service station. But for this simple procedure they will charge you more than one thousand rubles. Therefore, it makes sense to master this not very labor-intensive process yourself.
Required Tools
- hydraulic lift;
- a set of keys;
- round nose pliers;
- socket head;
- screwdrivers;
- tension roller;
- replacement kit;
New kit
- Unscrew the bolt and remove the phase sensor (1);
— Loosen the bolt (1) connecting the high-pressure hose on the power steering pump to gain access to the belt protection bolts;
— Loosen the mounting bolts (2a) and remove the belt protection (2b) from the power steering pump; — Loosen the front (1a) and rear (1b) bolts securing the power steering pump to the mounting bracket, and also loosen the screw (1C) of the belt tension device;
— Thus, we gained access to the timing belt (1c), tension roller (1b);
— Unscrew the nuts (1a) and remove the timing belt;
- Remove the plug (1) of the camshaft timing pulley (2b) and, holding the camshaft in the flats with a wrench, unscrew the bolt (2a); - Secure the camshaft with the tool (1);
— Fix the crankshaft by installing the device (1) previously screwed to the crankshaft toothed pulley;
— Using tool (1a), install and tension the new timing belt, aligning the marks (1c), of the semi-automatic timing belt tensioner roller (1d);
— Unscrew the bolts (1) and remove the side protection of the timing belt;
— Use a special lock (1a) to fix the camshaft gear;
— Tighten the gear to the camshaft, then remove the locking devices, all three. Rotate the crankshaft several times. Check the tension of the semi-automatic timing belt roller; the marks must match. We are installing blockers again
phase installation control. After all the checks, remove the clamps and reassemble the car in the reverse order.
- clean rags.
Stages
- After raising the car on a lift or with a jack, remove the right wheel.
- After unscrewing the screws, remove the plastic protection.
- Loosen the generator tension and remove the belt.
- Next, you need to loosen the power steering tension by unscrewing the tension bolt.
- Remove the power steering belt.
Complete set with all pulleys and rollers
The part can be purchased separately without a kit
After completing the test work, we drive 1-2 kilometers and at this point the work of installing a new timing belt on the Fiat Albea 1.4 can be considered completed.
Check after timing belt change
View gallery
The car owner must ensure good belt tension. The verification technique is carried out using a special device or without its use. Sometimes it is enough to just press with your hand and understand the tension force of the element. You shouldn’t tighten it too much, but it’s also not recommended to allow it to sag. After this, the pulley returns to its previous installation location.
A test drive is a great way to test properly produced techniques. If the replacement rules are incorrectly interpreted, the machine will give a signal in the form of a lighted indicator. Suspicious noise is an alarming “bell” for the vehicle owner, indicating an illiterate installation. In the absence of “symptoms,” you can be calm and confident that the installation is correct. The reverse order of assembly follows a strict work sequence scheme. To clearly understand the correctness of judgment during repairs, it is worth driving several miles to make sure that the “steel horse” is in perfect order, allowing you to once again enjoy the kilometers of the road, as well as to overcome them safely.
Fiat Alba timing belt replacement
The time has come to replace the timing belt on a 1.4 8V engine equipped with a vanos (variator).
Follow this procedure:
— Start the engine without pressing the accelerator pedal, warm up the engine to 20 ° C and turn it off; — Disconnect the negative terminal of the battery; — Place the car on a lift or hang the front of the car using a jack, placing it on the stops;
— Having unscrewed the bolts in the front part (1a), rear part (1c) and from the protection under the wings (1b), remove the motor protection (1d); — Unscrew the fastening bolts and lift the air filter (1); — Release the clamps and disconnect the crankcase ventilation pipes; — Disconnect the vacuum pipe (2); — Remove the air filter housing from the intake manifold;— Disconnect the electrical connectors (1a), unscrew the bolts and remove the ignition coils (1b);— Disconnect the electrical connectors of the engine computer (1a), unscrew the nuts (1b) and remove the control unit (1C); — Remove the engine ECU bracket (2);— Unscrew the bolt and remove the ground cable (1a), disconnect the electrical connector of the phase sensor (1b);— Remove the drive belt (1b) from the crankshaft pulley and from the power steering pump pulley; — Insert the key (1a) into the seat of the belt tensioner (1b) and turn it in the direction indicated by the arrow; - Remove the alternator belt; (1b) and power steering fluid reservoir (2b);— Unscrew the nuts (1a) and remove the right engine mount, in the direction of travel, from the timing drive side;— Unscrew the bolts (1b) and remove the right engine mount bracket (1b); — Remove the electrical connector of the camshaft vanos solenoid valve (2a) and unscrew the bolts and remove the valve cover; Slight variations in replacing the timing belt on cars equipped with air conditioning. In the same way we change the timing belt on Fiat Albea and Fiat Grande Punto cars.If the timing belt is installed incorrectly, an engine error in crankshaft/camshaft synchronization may occur,
The engine only picks up 3000 rpm, the “Check” light is constantly on. Some diagnosticians try to “reset values”
adaptation", after "Check" begins to flash. Solution: - install the timing belt correctly, after the engine has warmed up to
operating temperature, depress the accelerator fully three times.
| Camshaft (fixation) | ||
| 2000004500 | Template | Crankshaft (fixation) |
| 1860987000 | Spanner | Tensioner |
| 2000004200 | Counter-torque | Camshaft pulley retainer |
The table shows the original FIAT numbers for ordering accessories from official dealers
| Set of clamps for replacing timing belt 1.2/1.4 8V |
We replace timing belts in Belgorod using original fasteners (conductors) on FIAT, ALFA ROMEO, LANCIA cars with gasoline engines of 1.2-2.4 and diesel engines of 1.3-3.0, as well as repair of engines, transmissions, chassis, steering, electrics and electronics . Tel. 89192293545
Article rating:
Fiat Albea timing belt replacement Link to main publication
Related publications
- Chevrolet Cruze won't start in cold weather