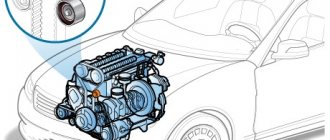
Nine generator drive
In the factory configuration, Lada Samara cars are equipped with 3 types of gasoline engines with a volume of 1.1, 1.3 and 1.5 liters. On all these engines, the gas distribution mechanism is driven by a timing belt. The manufacturer recommends changing this consumable every 50,000 kilometers.
Failure to promptly replace the timing belt on engines leads to costly repairs to the cylinder head. The exception is cars equipped with a 1.5 liter engine. The pistons of this engine have factory stampings for the valves.
To replace the timing belt on a VAZ 21099 car with your own hands, if it has an injector installed, no special skills are required. If a carburetor is installed on the car, then the sequence of actions is the same, but the crankshaft pulley is removed differently.
How to tighten or replace the timing belt on a VAZ 2109 yourself
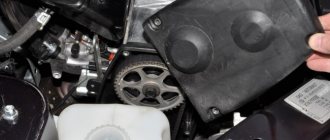
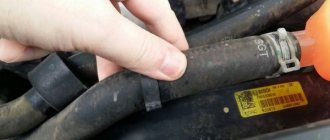
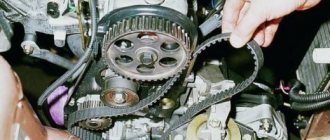
Step-by-step instructions for tensioning and replacing the timing belt on a VAZ 2109, 2108, 21099 with your own hands using a minimal set of tools. To get to the timing belt, you need to remove the protective cover. To do this, use a 10mm wrench to unscrew the two bolts on the side.
and one in the center
Removing the timing cover
To replace the belt, turn the crankshaft counterclockwise so that the mark on the camshaft pulley moves down from the rear cover antenna by two teeth.
Remove the generator drive belt, the right wheel and the right mudguard of the engine compartment. Using a 19mm socket, turn the crankshaft clockwise using the pulley bolt.
until the mark on the camshaft sprocket aligns with the mounting lug on the rear timing cover.
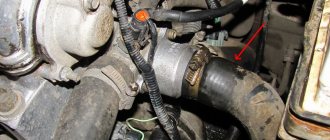
After removing the rubber plug at the top of the clutch housing,
make sure that the mark on the flywheel is located opposite the slot in the clutch housing cover (the coolant supply hose to the radiator has been removed for clarity).
This is how the mark should be located on the engine flywheel (with the gearbox and cylinder head removed).
We fix the crankshaft from turning by inserting a screwdriver through the hole in the clutch housing between the flywheel teeth. Unscrew the bolt securing the generator drive pulley. Remove the generator drive pulley.
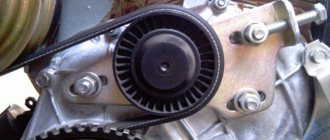
Using a 17mm wrench, loosen the nut securing the tension roller.
We turn the tension roller to a position in which the belt will be loosened as much as possible and remove the timing belt.
When replacing the tension roller, unscrew the nut securing it and remove the roller from the stud.
A spacer washer is installed under the roller.
Install the timing belt in reverse order. We put the belt on the crankshaft pulley. Then we put the rear branch on the coolant pump pulley and place it behind the tension roller. We put the belt on the camshaft pulley.
By inserting a screwdriver between two screws or rods with a diameter of 4 mm installed in the hole of the tension roller, turn the roller counterclockwise, tensioning the belt. Tighten the tension roller mounting nut.
We screw the bolt securing the generator drive pulley into place and using the 19-inch head, turn the crankshaft two turns clockwise by the bolt.
We check the alignment marks of the crankshaft and camshaft.
With the generator drive pulley removed, it is convenient to control the position of the crankshaft by aligning the marks on the crankshaft timing pulley and the oil pump cover. If the marks do not match, repeat the operation to install the belt.
Replacement for VAZ 21099
This operation can be performed independently in the garage or on level ground. In addition to having new spare parts for replacement, the driver needs to prepare:
To quickly and efficiently carry out the planned work, you need an assistant, this is possible without technical education and plumbing skills. First of all, set the car on a level surface, tighten the handbrake and install wheel chocks. Next, open the hood, unscrew the three bolts securing the protective plastic housing of the timing drive, and remove it from the engine.
After this, the wheel bolts on the right wheel are removed, this side of the car is raised with a car jack, a stand is installed under the body, and the wheel is removed from the hub. Next, replacing the VAZ 21099 carburetor belt will be done as follows:
- Align the camshaft and crankshaft pulleys according to the marks. To do this, use a wrench to turn the crankshaft pulley clockwise. This is done by an assistant, and the driver monitors the position of the marks on the pulleys and cylinder block.
- Next, remove the generator set drive belt; just loosen the nut on the tensioning mechanism and move the generator close to the cylinder block. To remove the pulley from the crankshaft, you will again need the help of a partner. He engages the fourth gear of the gearbox, presses the brake pedal all the way, and the driver tries to unscrew the nut on the crankshaft pulley. If this does not work, you can fix the CV motionless by installing a powerful screwdriver or pry bar between the shaft teeth and the clutch mechanism housing.
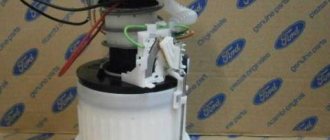
- If the pump is replaced, drain the coolant into a previously prepared container.
- To remove the belt, you need to loosen its tension. To do this, loosen the nut on the roller axis and turn it. We remove the tension roller from its axis; there is a washer under it, try not to lose it. This is done when the roller needs to be replaced. If replacing the roller is not planned, then simply loosen its tension.
- Now you can remove the belt from the engine. Attention! For engines with a displacement of 1300 cm3, it is strictly forbidden to rotate the crankshaft after removing the toothed belt. After this action, the valves on this engine are damaged.
- After removing the drive, carefully clean the pulleys from foreign deposits and check for engine oil leaks. If they exist, they are eliminated immediately.
- Installation of a new product is carried out in the reverse order of removal.
- Before doing this, it is imperative to check the alignment of the installation marks on the pulleys. At the end of the work, check the timing belt tension. To do this, turn it around its axis with two fingers without much effort. If necessary, adjust the tension again using the roller. Experts recommend that before starting the power unit for the first time, make two full turns of the crankshaft while simultaneously checking that all installation marks match exactly.
How to tighten the timing belt on a VAZ 2109
With normal belt tension, its front branch should be twisted 90 degrees with the thumb and forefinger of the hand with little effort. Excessive tension will reduce the life of the belt, as well as the coolant pump bearings and tension pulley.
Using a 17mm wrench, loosen the nut securing the tension roller.
By inserting a screwdriver between two screws or rods installed in the hole of the tension roller, turn the roller counterclockwise, tensioning the belt. Tighten the tension roller mounting nut.
Next, you need to make two full turns of the camshaft so that the belt is tensioned along its entire length.
This can be done either by holding the crankshaft with a 19 key,
and using the front right wheel, you first need to jack it up and put it in 5th gear.
Why does the timing belt break on a VAZ 2109?
Many people wonder why the timing belt breaks only after it has happened. You will be lucky if such a breakdown occurs, for example, somewhere in the yards while the engine is warming up, and not on the highway between cities. Therefore, so that you do not find yourself in such situations, you need to know why this happens.
There are several reasons for belt breaks:
- Natural wear of the part.
- Buying a defective belt.
- Contact with technical fluids on the belt.
- Malfunction of timing drive parts.
Let's discuss each point in more detail.
Natural wear of the part.
During operation, the belt not only wears out, but also bends, resulting in microcracks that subsequently grow and lead to belt breakage.
Each node has its own service life. The timing belt of the eight-valve VAZ engine operates for 60 thousand kilometers.
Buying a defective belt.
Don't skimp on critical spare parts. By saving 100-200 rubles you can be stuck on the road for a long time.
Contact with technical fluids on the belt.
Oil or coolant can easily get on the timing belt. Oil gets in due to wear on the camshaft and crankshaft seals, and antifreeze can leak out when the pump wears out.
Malfunction of timing drive parts.
Timing drive parts include:
- Camshaft and crankshaft gears.
- Tension roller
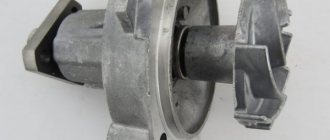
- Pump drive gear
Over many thousands of kilometers, the timing gears wear out and the possibility of the belt jumping over a gear tooth increases.
Due to a poor-quality belt tension roller or due to its long use, it may jam. Also, do not overtighten the belt. A belt that is too tight begins to whistle and can break very quickly.
During operation, the pump bearings wear out and play appears at the pump shaft, as a result of which the pump drive gear is crooked and the timing belt begins to slip and rub against the protective casing or the block.
If you change the belt on a VAZ before it breaks.
Rotate the wheel until the marks on the gear and on the plate match.
After the marks coincide in this place, open the inspection hole plug in the clutch housing and check whether the slot on the housing coincides with the mark on the flywheel.
If there are no marks on the flywheel, then rotate the wheel so that the camshaft gear makes one more revolution. If this time no risk appears near the mark in the clutch housing, read how to change the timing belt on a VAZ 2109 if the belt breaks. If the mark coincides with the mark, unscrew the crankshaft bolt and go to the section “Lower timing mark of VAZ 2109”
How to properly tension the timing belt on a VAZ 2109.
The belt can be tensioned either with or without a special key. A special key can replace a screwdriver and 2 nails or self-tapping screws. We insert the nails into the holes of the roller, insert a screwdriver between them and twist counterclockwise. A good tension is considered to be the moment when the belt between the camshaft and crankshaft gears can be twisted 90 degrees with little effort. With the engine running, in this place the belt should run straight like a string, without beating. It should also make noises such as creaks and whistles.
After tensioning the belt, turn the crankshaft 2 turns and see if the marks on the gears match. If everything matches, then we collect the rest in reverse order.
I hope in the article “How to change the timing belt on a VAZ 2109” you found answers to all your questions. If something is unclear, leave your question in the comments.
If you find an error, please select a piece of text and press Ctrl+Enter.
Checking the timing belt on VAZ 2108, 2109, 21099 engines
The timing belt is checked once every 15 thousand kilometers. The following is checked:
— degree of wear of the timing belt;
— degree of tension of the timing belt.
Preparatory work
— Remove the cover of the gas distribution mechanism drive.
— We stock up on a special key for rotating the belt tension roller.
Checking the timing belt
- Check the belt wear. Visually inspect the belt along its entire length. To do this, turn the crankshaft clockwise (using a screwdriver at the flywheel splines in the clutch housing hatch). If cracks are found on the belt, its delamination, teeth are torn off, or oiling occurs, replace the belt with a new one.
- Check the belt tension. The belt should not be overtightened or loosened. Using two fingers, turn the belt 90º (see photo above). The turning force should be within 15-20N.m (1.5-2.0 kgf.m), which is not too large.
If the applied force is not enough to turn the belt, it means it is too tight and needs to be loosened; if the belt can be turned to a larger angle, it means it is not tensioned enough and needs to be tightened.
To do this, use a 17mm wrench to loosen the tension roller nut.
Using a special wrench, we rotate the tension roller, loosening or, conversely, tightening the belt.
Check the belt tension again and tighten the roller fastening nut. Tightening torque 33.2 - 41.2 N.M (3.4-4.2 kgf.m). You should not apply more force, as you can bend the roller pin and then the belt will be driven off the pulley.
- We check the alignment of the engine timing marks. See "Timing marks for engines 21083, 21081, 2108".
— Drives the belt from the pulley forward or backward. The causes of the malfunction and methods of elimination are in the article “Drives the timing belt off the camshaft pulley, causes of the malfunction, methods of elimination.”
More articles on engines of VAZ 2108, 2109, 21099 cars
Frequency of replacement of mechanisms
The operating instructions for VAZ 21099 cars say that you need to change the timing belt when the car has driven 50 thousand km. If this frequency is not observed, the power unit can be seriously damaged. In addition, you should check the condition of this part approximately every 10 thousand km. This is not difficult to do, just remove the protective plastic cover and you will have access to the timing drive.
Inspect the condition of the belt, its teeth, and the presence of engine oil leaks. If even minor defects are found in the drive, the damaged part is replaced with a new product. At the same time as the inspection, the belt tension is checked and adjusted if necessary.
Read more: Electric additional pump for the stove of VAZ and other cars, selection and installation
The procedure for replacing the timing belt VAZ 2109 1.5 liters 8 valves
Old VAZ 2109 with a 1.5 8 valve engine, timing belt replacement. In general, it could be a VAZ 2114 or 2110, there is no difference in operation, the eight-valve engine is the same everywhere. Together with the belt, we will change the pump, the tension roller and two pulleys, the camshaft and the crankshaft. If the timing belt breaks, the valves on this engine do not bend, but it is better not to let it get to that point. Changing the pump and roller is a prerequisite so that after a thousand kilometers you don’t have to disassemble everything again. But it’s up to you to decide for the pulley, the price is 150 rubles per pair. There were cars where a slightly bent pulley caused the belt to slip and gradually wear out, reducing its service life. On this car the belt was worn down in half.
If the timing belt breaks
In those cars, when the camshaft freezes, the crankshaft continues to rotate with a strong blow to the pistons, bending and breaking the valves that were open at that moment. And this led to quite expensive repairs. In later engine models with a volume of already 1.5 liters, this no longer happens, thank the designers. But still the feeling is not pleasant. However, there is no need to panic. Of course, you can tow the car to a service station, pay the technicians and wait for the result. But if you have a little patience and skill in working with keys, you can do this repair yourself.
Begin
Everything we need.
We unscrew the three ten bolts securing the protective timing cover and remove it.
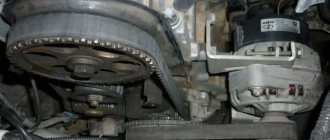
Next, loosen the nut thirteen that secure the generator and unscrew the tension bolt ten.
We take the generator to the engine and remove the belt.
Remove the engine protection and drain the antifreeze. We set the camshaft mark by turning the crankshaft clockwise. The ebb on the pulley should be opposite the bend of the protective cover fastening.
Unscrew the crankshaft pulley mounting bolt. We put the assistant in the cabin and force him to engage fifth gear and press the brake. And at this time we easily and naturally unscrew the bolt using a 19 meter head and a pipe of one and a half meters. It must be screwed properly, and some craftsmen lubricate it with sealant and then wait for kind words addressed to them.
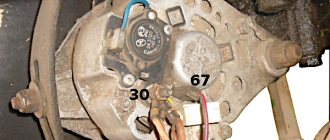
On the left side we see the crankshaft position sensor. We will need it to subsequently check the correct installation of the timing belt. We remove the crankshaft pulley and see that the marks match.
Unscrew the nut on the tension roller 17 and remove it along with the belt. Then unscrew the camshaft pulley bolt and remove the last one. Be careful not to lose the key. We unscrew everything that secures the protective metal shield, namely one ten-point nut and a bolt securing the cover, three bolts securing the pump.
Remove the protective cover and pump. Antifreeze remaining in the block may leak out if you have not drained it. Carefully, it's sweet.
We clean all the parts from oil and belt residues, as well as the pump seat from the old gasket and sealant.
Lubricate the gasket of the new pump with sealant and put it in place. We install the metal protection and tighten all the bolts and nuts securing it. We tighten the pump bolts evenly in a circle, then check whether the pump is spinning. Recently a client brought in an original pump, which turned out to have slightly larger petals and after installation it began to bite. I had to modify it with a grinder and take measurements several times. These are the spare parts we have.
We check if the key is lost on the camshaft and install the pulley. We tighten its bolt to seventeen.
Preparation for repair
Place chocks under the left rear wheel and slightly lift the front right side with a jack.
Loosen the disc to the hub.
Now lift the side of the car so that the wheel is lifted off the ground. Without this procedure, replacing the timing belt is impossible.
After this, unscrew the bolts and remove the wheel from the car.
Now you can begin to dismantle the remaining units. You will need to loosen the nut on the generator and remove the belt from it, as it interferes with repairs.
Using a 10 mm spanner, unscrew the three bolts that secure the protective cover to the VAZ-2109 engine block. Here under it there is a timing belt with a tension roller.
But before removing the drive, you need to install the shafts according to the marks. To do this, use a 19 mm wrench to turn the crankshaft clockwise.
There is a rubber plug in the clutch block (under the distributor). If you remove it, you can see the flywheel. There is a mark on it that should line up with a notch on the bar attached to the engine.
There is also a mark on the camshaft that should align with the bar.
Now comes the fun part - installing a new belt.
We check that all marks match. We first place the belt on the crankshaft and pump. Then we tighten the right descending branch of the belt and put it on the camshaft pulley and tension roller. We check all the marks again and tighten the belt with a roller. The tension is considered sufficient if, with the force of two fingers, you can twist the longest branch of the belt by a maximum of 90 degrees. It’s easier to take the right branch of the belt with two fingers and twist it, if more than 90 is not very bad, but less is very bad. An overtightened belt will wear out quickly and will also reduce the life of the pump.
We place the bottom protective plastic cover. And on the crankshaft pulley we mark the twentieth tooth after skipping two teeth. We count counterclockwise.
This mark corresponds to the top dead center of the first cylinder. We put the pulley in place and the mark should be against the crankshaft position sensor. More precisely, against the small iron core of the sensor. Sometimes it gets into the gap between the teeth, this is considered acceptable. We tighten the pulley in the same way as we unscrewed it, with the help of a partner.
We turn the crankshaft two turns and check the marks; this is where our mark on the pulley comes in handy.
If everything is in trouble, we collect everything that we took apart. As they say in smart books, install the parts in the reverse order of removal. Don't forget to add antifreeze.
We start the car, accept congratulations from family and friends and head off to adventure.
How to change the timing belt?
Replacing the belt is done on a cold machine. If the car has not cooled down, the product placed on hot parts may stretch. As a result, the tension will be weak, and the strap will slip off the gears during operation or slip on the teeth.
Sorry, there are no surveys available at this time.
Set of tools
To perform a replacement on a VAZ 2109 car with both a carburetor and an injector, you need to prepare the following tools:
- set of wrenches;
- set of heads;
- extension;
- screwdrivers;
- jack.
Along with the timing belt, it is recommended to change the tension roller, as well as the pump if chips and scratches are found on its surface.
Timing consumables
Stages
To perform work, the vehicle must be placed in a comfortable position and secured so that it does not roll, placing something under the rear wheels.
Replacement work consists of the following sequence of steps:
- First you need to remove the timing belt protective cover by unscrewing the three mounting bolts.
Removing the timing belt protective cover
Placing marks on the pulley and cover
Shifting the tension roller to the side
We put the product on the camshaft pulley
After replacing the belt, you need to start the engine and check its performance. It is important that the labels are set correctly.