In this article we will talk about such an unpleasant phenomenon as oil leakage from the gearbox due to a failed gearbox rod seal. Replacing the VAZ 2108-2109 gearbox seal can be done in two ways; in the first case, it is necessary to dismantle the box, in the second, the replacement is carried out directly on the car.
Today I will tell you how to replace the stem box seal without removing the gearbox. Perhaps the first option is more suitable for someone, but in my opinion there is no point in removing the box if everything can be done without removing it. In addition, the method that I will tell you about today is faster and simpler.
INDEPENDENT DIAGNOSIS.
Signs indicating the need to replace the gearbox seal are most often oil traces that remain on the asphalt after the car has been parked for a long time. Before replacing the gearbox seal, you should make sure that this is the problem, since oil leaks are often caused by a poorly tightened oil filter. The danger of untimely detection of a problem associated with the oil seal and oil leakage is fraught with serious problems; if the oil leaves the box, and you do not detect this in time, then instead of replacing the box seal, you will have to change the box. To prevent this, it is necessary to regularly check the oil and constantly monitor its level both in the gearbox and in the engine. A faulty oil seal can make itself known by a characteristic crunch that occurs when switching certain speeds.
Weak oil seal leakage
It is not always possible to recognize deterioration in the quality of the oil seal by the appearance of oil stains under the car. Often the leak is small and the leaking oil spreads inside the housing. The most common consequence of a leak is the coating of the clutch discs with oil, as a result of which their functioning deteriorates and slipping occurs. You can understand that the oil seal needs to be checked by the following signs:
- when the car starts moving, the clutch usually slips a little, but then works properly;
- if the discs close sharply, the smell of burnt oil is felt;
- This smell can be felt even after a long trip.
The presence of at least one of the “symptoms” is a reason for an urgent inspection of the car, since oily discs and a leaking oil seal can most likely cause a much more serious breakdown.
REPLACING THE VAZ 2108-2109 GEARBOX SEAL WILL REQUIRE YOU TO HAVE THE FOLLOWING TOOLS:
- Keys to “10″, “13″.
- Awl.
- A slotted screwdriver in the shape of a crochet hook or something similar.
- Plastic stopper.
The oil seal is replaced on a lift or inspection pit. If you don't have either, a cheap alternative is two spare tires laid flat. Take two stronger boards and drive out onto an impromptu hill.
Attention! When driving into a pit or any other device for repair, take care of your own safety - secure the car using wheel chocks and a handbrake.
How to properly drain oil from a box
There may be some inconvenience with the oil draining process. Indeed, it is necessary to have some experience here.
- To supply oil to the gearbox, you need to find the cap. It is made of rubber. It must be unscrewed and thoroughly wiped with a dry cloth to remove dust, dirt and oil residues. The same action should be done with the drain hole.
- The oil drain plug is unscrewed. Place a container under the car to allow any remaining oil to drain into it.
- The dipstick is removed, which indicates the amount of oil.
- We change the oil. New oil is poured to the mark indicated on the dipstick.
- The dipstick must be cleaned of any remaining oil with a dry cloth.
- After new oil enters the gearbox, you need to check its level again. To do this, the probe is placed in place. If the level readings do not correspond to the mark, you must add the required amount.
Note: in earlier car models, there is no oil indicator. The hole is located on the right side of the gearbox housing. Oil must be filled to the bottom edge of the hole.
Some materials are available in specialized literature. Videos and photos of the replacement process can be easily found on the Internet. Replacing oil seals is not expensive. If necessary, if you can’t do it yourself, this work must be entrusted to professionals. They can be found at your nearest service station. But if you do everything as required by the instructions, no problems should arise. And why overpay, especially since the price for services of this kind is not cheap.
HOW TO REPLACE THE OIL SEAL OF A VAZ 2108-2109 GEARBOX ROD - STEP-BY-STEP INSTRUCTIONS.
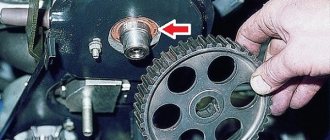
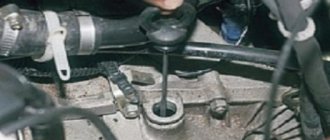
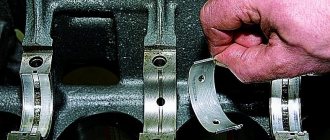
1. Get to the box stem; it is covered with a rubber boot. If the oil seal is faulty, then it will be very easy to find it by the characteristic oil stain, see photo.
Replacing the VAZ 2108-2109 gearbox rod seal
2. Bend down the wide part of the boot; under it there is a cardan attached to the rod.
3. To gain access to the oil seal, you need to disconnect this universal joint from the rod and gear shift lever. To do this, use the key at “13″.
4. Unscrew the nut completely, this will loosen the connection between the cardan and the lever.
5. Remove the lever from the cardan, thereby engaging 1st or 3rd gear.
6. Disconnect the cardan from the rod using a “10” wrench; to do this, move the lever to the side.
7. Remove the cardan.
Replacing the VAZ 2108-2109 gearbox rod seal
8. Next, remove the rubber boot, after which you will see the very reason for the repair - the gearbox rod oil seal. The oil seal is located in the recess - this is where the rod enters the box. It is impossible to remove the box seal without using a special tool, so take an awl and get to work. As an option, you can use a self-tapping screw, the principle is simple - you need to screw in the self-tapping screw and “uncork” the stem seal as if with a corkscrew.
9. Once the old rod seal is removed, you can begin replacement.
10. Before replacing the VAZ 2108-2109 oil seal, you need to thoroughly clean the seat from oil, sand and other dirt.
11. If everything is ready, press the new box seal into the seat.
12. Replacing the VAZ 2108 gearbox seal is easier using a plastic bottle cap. This is done as follows: the inner part of the plug is cut out and a new oil seal is installed through it. I, for example, managed without her; in short, it was the boss’s business.
13. After installing the new rod seal, begin assembly; it is done in the reverse order.
Replacing the drawstring cuff
First you need to arm yourself with the necessary set of tools, which includes:
- Set of keys (10, 13);
- An ordinary awl or other sharp metal object;
- Screwdriver;
- Hook;
- Plastic stopper.
The oil seal must be replaced in a viewing pit or overpass.
If this is not possible, then an option with a lift will do. In addition, there is another option, which involves placing two spare tires flat under the car, like stops. Two strong boards are placed on them, and the car drives onto a makeshift overpass. Simple and brilliant.
Advice. If a motorist drives into a hole or other device, he must take care of the safety rules. In particular, it is necessary to secure the vehicle using the parking brake and wheel chocks.
Let's start the replacement process:
- It is almost always covered with a special rubber boot. If the cuff is faulty, then this same boot will be covered in oil, which will once again indicate the need for replacement;
- We take the wide part of the anther and bend it;
- We see the cardan located at the bottom;
- We disconnect this same cardan from the rod and lever, thus gaining access to the cuff (we use a 13 key in our work);
- The nut is turned out completely, which allows you to loosen the connection between the cardan and the lever;
- The lever is removed from the cardan;
- First or third gear is engaged;
- The cardan is completely disconnected from the rocker;
- The cardan is removed;
- Now you should remove the rubber boot.
We see the cuff itself, which is located in a certain recess. This is where the rocker seal fits in and needs to be removed from this recess.
Note. It is almost impossible to remove the cuff from the rod without using a special tool. An awl and a special hook will help in the work.
So:
- We insert the awl and the hook inside and thus remove the cuff (you can also use a self-tapping screw, which we screw inward, thereby uncorking the seal, like a corkscrew);
After removing the old cuff, you should begin replacing:
- We clean the place where the new cuff will be placed;
- We press the new cuff inside the rod.
Advice. It is easier to replace the seal using a stopper from any plastic bottle. The new oil seal is inserted into the inside of the plug, which is cut out in advance. And then it is pressed in.
- Assembly is carried out in reverse order.
That's all. As you can see, the instructions are not complicated at all and you can easily do everything yourself. During the work process, you can watch a useful video or study photo materials. This way you can save a lot of money. And why overpay if the price for repairs at a service station is not low today.
2. Using a screwdriver, remove the inner hinge oil seal from the box housing.
3. Press the new oil seal using a suitable mandrel until it stops with the working edge inside the box.
Note:
The oil drainage grooves on the seals of the right and left internal joints are directed in different directions.
For identification, arrows and part numbers are marked on the seals: on the right seal a (part number 2110–2301034–01) the arrow is directed counterclockwise, on the left seal b (part number 2110–2301035–01) – clockwise.
The arrows show the direction of rotation of the wheels when the car moves forward. 4. Install all removed parts and assemblies in the reverse order of removal.
The reason for oily clutch discs may be a leak in the gearbox input shaft oil seal or the crankshaft rear oil seal. Engine oil and transmission oil have different smells. Therefore, having a certain skill, you can determine by smell which of the oil seals is defective: the input shaft oil seal or the rear crankshaft oil seal.
Helpful advice
There is another way to determine the type of oil. Drop the oil into a thin layer of water poured into the vessel. The transmission oil will spread over the entire surface of the water in the form of a rainbow film, and the motor oil will remain in the form of a drop, similar to a lentil grain.
To replace the input shaft oil seal, you must remove the gearbox from the vehicle.
You will need: the same tools as for replacing the clutch release bearing, as well as a “10” wrench and a screwdriver.
1. Remove the clutch release bearing.
2. Remove the three bolts securing the guide bushing. Remove the guide sleeve.
3. Using a thin wire hook or a screwdriver, remove the oil seal. Press in the new oil seal using a suitable mandrel. The working edge of the oil seal must be directed inside the gearbox.
4. Install the removed parts in the reverse order of removal. The gear shift rod seal can be replaced directly on the car. You will need: a 10mm wrench, a thin chisel, a hammer, and a mandrel for pressing the oil seal.
1. Remove the dirt boot from the joint and slide it over the shift rod. 2. Remove the bolt securing the hinge to the gear shift rod...
3. ...and disconnect the gear selector rod together with the hinge from the rod.
Notes
The bolt securing the hinge to the rod differs in length and color from similar bolts used in the gearbox to secure the forks and gear shift lever.
This bolt is cadmium-plated (gold-colored), the rest of the bolts are phosphated (dark-colored). Do not replace this bolt with others. Replace a bolt with a damaged taper shank or thread. The bolt is fixed with special glue TB-1324. Before screwing in the bolt, clean it of old glue, degrease the threaded part and apply new glue. If special adhesive is not available, use a commercially available anaerobic thread locker. 4. Remove the dirt cover. Note Replace the torn or cracked dirt cover.
5. With the chisel resting on the collar of the rod seal race, using gentle hammer blows, press the race out of the gearbox housing...
6. Remove it from the rod assembly with the oil seal. 7. Using a suitable mandrel (you can use the socket from the tool kit), press out...
8.Remove the oil seal from the cage. 9. Press the new oil seal into the race until it stops with the working edge inside the gearbox. 10. Lubricate the working edge of the oil seal with transmission oil and, using light hammer blows, press the race along with the oil seal into the gearbox housing until it stops. 11. Install all removed parts and assemblies in the reverse order of removal.
Our instructions will tell you in detail how to eliminate the problem of oil leakage from the gearbox due to failure of the gear shift rod seals, input shaft, or inner CV joint seals. Replacing the VAZ 2109 gearbox seals can be done in two ways. The first method (when replacing the input shaft oil seal) requires dismantling the box. The second method (replacing the oil seal on the rod or the CV joint oil seal) is done without removing the gearbox on the car itself. The method without removing the box is faster and simpler, which is why we are talking about it first.
IMPORTANT POINTS!
Sometimes, after replacing the gearbox seal or similar work related to fastening the cardan and gearshift lever, the rocker in the cabin moves greatly, which in some cases makes it impossible to switch some speeds. The problem lies in the mounting screw at “13″; it connects the cardan and the gearshift lever. Few people know that this screw is not only a fastening screw, but also an adjustment screw, so upon completion of work, check the position of the lever and, if necessary, adjust its position. Only after this can you safely collect all the tools and go wash your hands.
After assembly, check the oil level, top up if necessary, then you can check the operation. Do a few laps and make sure nothing is leaking anywhere. That's all for today, I hope the article was useful to you. As you can see, replacing the gearbox oil seal is not anything complicated, so there is simply no point in overpaying for a service station.
What is a gear selector rod and why is it needed?
Older cars had a classic layout, with the rear wheels driving and the gearbox located under the car's interior. The gearshift knob was brought into the cabin and made it possible to control the transmission directly. In front-wheel drive cars, there is an urgent need for a special mechanism that would allow control of the gearbox located under the hood, while sitting in the car's interior. This device is called the gear selector rod, or, as drivers are accustomed to calling it, the rocker.
This part is inserted into the gearbox and connected to the gear shift handle mechanism. Using special levers, the gearbox handle acts on the rod and changes its position, which leads to a gear change.
The rod is connected to the gearbox through an oil seal, since there is oil inside the box that is under constant pressure. To prevent pressure from squeezing the oil out, a system of seals is provided in all parts of the gearbox connecting to external mechanisms.
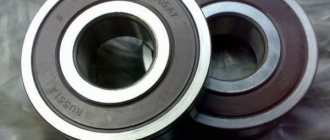
The oil seal is a round rubber product, inside of which there is a hole for the rod. The material used may vary. It all depends on the make and model of the car, although many manufacturers make oil seals of the same size but from different materials. They all differ in their properties, but they have the same function - preventing oil leakage from the car transmission by increasing the tightness of the moving parts of the unit.
Diagnostics of VAZ 2107 gearbox seals
The transmission system needs to be checked if there are leaks of transmission oil under the car, noise, or grinding noise from the gearbox. The leak may be between the gearbox and the transfer case. Also, if the sealing elements are worn out, difficulties may occur when changing speeds. In most cases, the need to replace the gearbox seal occurs after 60,000 km.
The gearbox shaft seal must also be checked. If this component of the box has become unusable, liquid leaks are noted. Wear of the shank oil seal may be due to natural wear or mechanical damage. High-quality products will not lose their properties even after 70,000 km.
Causes of clutch oiling
The reason for oily clutch is a leak of the crankshaft rear oil seal or the gearbox input shaft oil seal. Transmission and engine oils have different smells. Therefore, an experienced car enthusiast can recognize by the smell of oil which of the seals has failed and requires replacement. In this case, you will have to remove the gearbox from the car.
It will be useful: How to change brushes on a VAZ 2101 generator
Replacing the input shaft oil seal
- To remove the box, remove the CV joints as described above.
- Instead of one of the CV joints, we insert an old one or a special plug to prevent the differential from falling apart.
- We unscrew the fastening bolts (there are three of them) and remove the clutch housing shield.
- Loosen the bolts and nuts securing the clutch housing to the block.
- We place suitable wooden blocks located in the area of the strut supports on the wing flanges and install a cross beam on them to hang the engine.
Warning: The beam rests solely on the wing flanges! Otherwise, you risk denting the body.
- We attach the engine to the beam using a long bolt with a hook.
- A strong rope or wire is also suitable for this.
We hook the engine by the eye to the beam. The beam rests only on the wing flanges
- Unscrew the two nuts securing the rear engine mount to the body.
- Unscrew the nut and take out the left support bolt.
- Unscrew the three nuts securing the left engine mount to the gearbox and remove the mount.
Unscrew the three nuts securing the left support to the gearbox
- We finally unscrew the bolts (three pieces) and the nut (on the back of the gearbox).
- When removing the gearbox from a VAZ 2109, we first move it horizontally away from the engine to remove the input shaft from the clutch discs.
- Be careful not to damage the clutch spring petals.
- Remove the clutch release bearing.
- We unscrew the three bolts securing the guide bushing (there are spring washers under the bolts).
- Remove the guide sleeve.
We unscrew the bolts that secure the guide sleeve. After removing the bushing we take out the oil seal
- Using a suitable wire hook, remove the oil seal from the gearbox.
- We press in a new one using a mandrel of suitable diameter.
- The working edge is directed inside the gearbox.
Tip: Before installing the gearbox on a VAZ 2109, it is recommended to lubricate the outside surface of the guide bushing and splines of the input shaft, as well as the release bearing, with grease. Align the clutch driven disc using a special drift (an old input shaft with good splines will do)
- We install a gearbox on the car.
- Before attaching the front wheel drives, we replace the retaining rings at the ends of the inner CV joints.
- Otherwise, there is a possibility that the drives will jump out of the gearbox when the vehicle is moving.
- We finally tighten the nut that secures the brace to the lever on the loaded suspension while the car is already on the ground.
- Change the oil in the gearbox (see VAZ 2109 changing gearbox oil - do it right).
This is how oil seals are replaced, there is nothing super complicated about it, in addition you can watch the video.