Large and small seal
In the process of evolution, man stood on his feet, and this made his stomach and internal organs defenseless. In order to reduce their possible trauma, an additional organ was formed. The greater omentum is a duplicate of the peritoneum (four layers), which starts from the lateral surface of the stomach and descends to the transverse colon. This area is called the gastrointestinal ligament by anatomists. Vessels and nerves pass through it. The free edge of the omentum descends lower and, like an apron, covers the loops of the small intestine. The duplication of the peritoneum also goes behind the transverse colon, intertwining with the mesentery and then with the parietal peritoneum.
The space between the sheets of connective tissue is filled with fatty tissue. This provided the specific name for the organ - the greater omentum. The anatomy of the lesser omentum is somewhat different from the structure of its “bigger” brother. The lesser omentum consists of three ligaments that pass into one another:
- hepatoduodenal (starts from the porta hepatis to the horizontal branch of the duodenum);
- hepatogastric (from the liver to the lesser curvature of the stomach);
- ligament of the diaphragm.
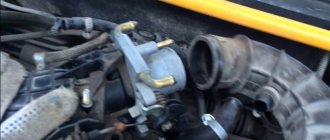
Description and functions of the crankshaft oil seal
For a powertrain to function properly, it needs to be properly lubricated. This is why there is a lubrication system in which oil moves under high pressure. It lubricates all the rubbing surfaces of the internal combustion engine, spraying under pressure. The lubricant can also move by gravity. Typically, power plants use a hybrid-type lubrication system, where one half of the oil is sprayed and the other half flows by gravity.
Omental bag
This is a large gap formed by the peritoneum. Anteriorly, the bag is limited by the posterior wall of the stomach, the lesser and greater omentum (gastrointestinal ligament). Posteriorly there is a parietal layer of the peritoneum, a section of the pancreas, the inferior vena cava, the upper pole of the kidney and the adrenal gland. Above is the caudate lobe of the liver, and below is the mesentery of the transverse colon.
The omental bursa has a cavity called the foramen of Winslowi. The significance of this organ, like the rest of the omentum, is that in case of injury to the abdominal cavity, it closes the damage, preventing infection from spreading throughout the body, and also prevents the eventration of organs. If an inflammatory process occurs, such as appendicitis, the omentum adheres to the visceral peritoneum and limits the organ or part of it from the rest of the abdominal cavity.
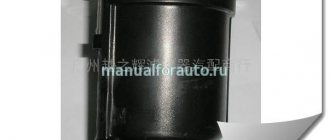
Features of the choice of oil seals and cuffs
The first parameter that you need to pay attention to when purchasing sealing parts is the standard sizes. Also consider the following characteristics:
- maintained temperature range (overheating can lead to melting, overcooling can lead to loss of elasticity and cracking);
- peripheral speed (the value depends on the rotation speed and shaft diameter);
- maximum permissible pressure on the cuff;
- operating features, including the likely degree of external contamination;
- compatibility with specific sealed media.
Sometimes it is also necessary to take into account the direction of movement. In this case, it is indicated by an arrow on the oil seal.
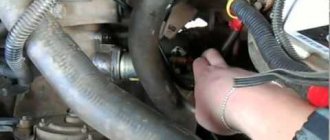
Removing the oil seal
Removal of the greater omentum is not an independent operation, but part of the treatment of oncological diseases of the intestinal tube. This step is taken with the aim of destroying all metastases, which are found in large numbers in the thickness of the peritoneum. It is not advisable to remove them one by one.
An important feature is that the abdominal cavity is opened with a wide longitudinal incision to provide good access to the surgical wound. If the greater omentum is removed through a transverse approach, there is a danger of leaving the affected area and causing a relapse of the disease. There will be no consequences for the body after the removal of this organ.
Work progress
To install a new oil seal, you will have to completely disassemble the washing machine. To do this, you will need a standard set of tools available in every home. The parsing algorithm includes the following steps:
- disconnect the top cover from the housing; to do this, unscrew the bolts holding it located on the rear wall of the unit;
- unscrew the bolts located around the perimeter of the rear part of the case and carefully remove the back wall;
- tighten the drive belt, the procedure is easiest to perform by rotating the shaft with your free hand;
- remove the cuff surrounding the hatch door; to do this, disconnect the metal ring holding the rubber seal;
- disconnect the wires from the heating element and the electric motor, not forgetting to disconnect the ground;
- remove all hoses and pipes attached to the tank;
- separate the water intake level sensor;
- remove the shock absorbers and springs supporting the drum;
- remove the counterweights located inside the housing;
- remove the motor of the machine, to do this, unscrew the mounting bolts and move the engine forward;
- remove the tank with the drum from the machine;
- open the tank body, gaining access to the drum, using a hexagon, unscrew the pulley.
After disassembling, you will gain access to the oil seal, bushing, and bearings. Removing the O-ring is very simple; just pry it off with a screwdriver. Next, you need to inspect the system elements; if replacement is necessary, install a new oil seal. To do this, it is advisable to well lubricate not only the installed parts, but also the seat.
It is important to install the removed ring correctly. The question may arise, which side should the oil seal be placed on? This issue is really important, so inspect the seal carefully. If there are no factory marks on it, install it so that it most tightly covers the niche in which the moving elements of the bearing are located. Water should not get inside.
Should I use silicone sealant in my work? It will come in handy in cases where the washer tank was non-separable and had to be cut to gain access to the seal and bearings. Sealing and re-gluing the tank will be a necessary measure during the subsequent assembly of the machine.
Omental tumors
There is such a thing as primary tumors of the omentum. They can be benign (cysts, dermoids, lipomas, angiomas, fibromas and others) and malignant (sarcomas, endotheliomas, cancer). Secondary formations manifest themselves as metastases from the stomach or intestines, as well as any other organ. In the terminal stage of the disease, the greater omentum is densely covered with altered lymph nodes and neoplasms. It takes the form of a wrinkled ridge and is easily identified by deep palpation of the abdominal wall. This phenomenon can cause intestinal obstruction.
Benign tumors of the omentum are quite rare. They do not cause discomfort to patients, so they can reach significant sizes. It is difficult to diagnose them: there are no specific symptoms, markers or any other indicators. Of the malignant tumors, sarcomas are the most common. They manifest themselves as intoxication syndrome, as well as stool retention and weight loss. These warning signs should prompt the doctor to think about cancer.
Features of wear of oil seals and cuffs
The parts are used in aggressive conditions, so it is necessary to follow the instructions for use. Please note the following:
- wear of oil seals and cuffs accelerates at high pressure;
- when the mechanism is idle for a long time, rubber parts may stick to metal surfaces;
- the main sign of excessive wear or damage to the sealing elements is leakage of liquid or passage of gases (in pneumatic mechanisms).
Worn parts cannot be restored; when their service life is exhausted or damaged, they must be replaced.
Tight omentum syndrome
Large diameter omentums appear due to the developing inflammatory process. Parts of the organ fuse with the peritoneum in various areas of the abdominal cavity and stretch it. Such adhesions can develop after surgery, with chronic inflammation of the genitourinary system.
Stretching of the omentum causes pain and disrupts the patency of the intestinal tube. Most often, patients complain of constant pain in the navel and above the womb after eating, as well as bloating and vomiting. A characteristic symptom of the disease is increased pain if the patient tries to bend back. The final diagnosis is made after ultrasound, computed tomography, and radiographs. The ideal option for diagnosis is laparoscopic surgery. If necessary, access can be expanded and adhesions removed.
Symptoms and causes of inflammation of the omentum
Inflammation of the omentum can occur as a result of an infectious infection, or after surgery
Omentitis is a disease accompanied by inflammation of the omentum. It is a fold of the visceral peritoneum. Depending on the etiology of the inflammatory process, the disease is divided into primary and secondary.
The primary form develops as a result of infectious infection, traumatic injury and/or intraoperative damage to integrity. Secondary inflammation is more common in surgery. It develops as a result of exposure to the following provoking factors:
- Surgical intervention. For example, removal of the appendix or strangulation of a hernia can cause the omentum to twist and disrupt blood circulation in it. This inevitably leads to the formation of inflammation and the development of ischemia.
- Contact transmission of infection. The development of the disease is accompanied by the transition of inflammation from nearby organs as a result of appendicitis, pancreatitis, cholecystitis, etc.
- Intraoperative infection occurs as a result of violation of antisepsis during surgery, for example, insufficient sterilization of medical instruments, dirty hands of the surgeon and/or his assistant, possibly leaving foreign objects inside a person.
- Infection of the body in an endogenous manner. Pathogenic and pathogenic microorganisms circulate through the body with the flow of lymph or blood. When it gets into the omentum, it becomes inflamed.
In an acute inflammatory process, severe pain occurs without a specific location
The omentums quickly become involved in inflammation due to the large amount of adipose tissue with a loose structure and abundant blood supply.
Symptoms of the disease depend directly on the nature of the inflammatory process and provoking factors. In the acute form of the disease, patients report acute pain that does not have a specific localization. At the same time, all signs of poisoning of the body can rapidly develop: dizziness, headaches, fever and vomiting.
If omentitis is suspected, you should immediately seek advice from a medical facility. During the examination, the doctor notes muscle tension in the area where the omentum is located, and sometimes a seal is palpated. As a rule, a person is in a half-bent state because he cannot fully straighten his torso.
If measures are not taken in a timely manner, inflammation will lead to the formation of adhesions that disrupt the passage of food through the intestines, contribute to the formation of constipation, as well as complete or partial intestinal obstruction.
Omental cyst
A cyst occurs due to obstruction of lymphatic vessels or as a result of the proliferation of an obliterated area of lymphoid tissue that is not connected to the general system. These cysts resemble thin round sacs filled with clear liquid. Their size can vary from five millimeters to several centimeters. The disease does not manifest itself in any way, but when the formation reaches a significant size, it can be felt through the anterior abdominal wall.
Treatment of this pathology is exclusively surgical. The cysts and the omental area are removed, preserving most of it. The prognosis for such patients is favorable.
How is the crankshaft oil seal replaced?
To successfully complete the task, you first need to arm yourself with all the necessary tools and prepare an inspection hole in the garage to perform a whole range of work.
Developments from the following manufacturers are recommended for purchase:
| Name | Manufacturer | Price |
| Victor Reinz | Germany | 350 rubles |
| Elring | Germany | 300 rubles |
| Ajusa | Spain | 650 rubles |
| Espra | Spain | 250 rubles |
| Goetze | Germany | 600 rubles |
Screwdrivers, wrenches, sockets, and new seals should be on hand. All work comes down to separate replacement of the front and rear crankshaft oil seals.
Changing the front oil seal
Access to the front crankshaft oil seal largely depends on the specific make of the car, so before carrying out all the work, it is advisable to read the operating instructions with all the necessary information. For owners of domestic cars, in particular the VAZ brand, all work comes down to the following steps:
- At the first stage, the tension of the generator belt is weakened
- The belt is completely removed from the pulley
- The nut that serves to clamp the pulley is unscrewed
- Remove the pulley from the shaft
- In car modifications with a transverse engine, the oil pump housing is removed
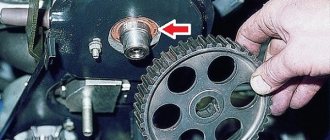
- Pry a screwdriver under the oil seal and remove it from its seat
- Installing a new seal
- We assemble the parts in reverse order
It is advisable to treat the junction of the oil seal with the crankshaft with machine oil and apply the substance to the outer surface of the seal and the output end of the shaft.
Changing the rear oil seal
This type of work requires a lot of time and effort from the car owner. To get to the rear oil seal, you need to disassemble the cardan and disconnect the box and clutch housing. The next steps are as follows:
- We dismantle the gearbox along with the clutch basket, do not touch the flywheel
- Loosen the bolts securing the flywheel to the engine
- To set the flywheel to a static position, fasten one gearbox mounting bolt and insert a screwdriver, resting the teeth against the mechanism
- We remove the retaining plastic, and only after that the flywheel itself
- Unscrew the rear clutch shield and release the fasteners connecting the rear engine cover
- Find the rear oil seal and remove it with a screwdriver
- Lubricate the seat
- Press in a new copy with a screwdriver
It would not be superfluous to replace the rear cover gasket; it is also advisable to lubricate all contacting parts with machine oil during work. Then we assemble the entire assembly in reverse order.
Additional Tips
Here are some more important recommendations:
- You cannot install an oil seal that has an internal diameter that does not correspond to the standard one. This most often forces additional manipulations, which will result in a violation of the seal or a change in the seating surfaces of the products.
- The surface is lubricated before installation. One of the important nuances that should be taken into account in recommendations on how to properly press in the oil seal.
- The oil seal is removed from the packaging by hand using caution.
- The shaft must not have sharp corners or edges.
- No heavy objects are used to tap the seal during installation.
- The placement of the product must be coordinated with the center of the shaft.
- Before installing the seal into the socket, it is necessary to ensure that its temperature matches the environmental conditions.
- When using PTFE products, it is necessary to ensure that no lubricant gets on the working edges.
And one more important note - a dismantled product cannot be reinstalled!
Rules for installing oil seals
The seals are designed for installation in existing communication systems. Accordingly, the product body is made in the form of a detachable structure, upon completion of installation of which the connection to the communication element is fixed using gas welding or electric arc manual welding.
For recommended communications, the gland body is made as a visible one-piece structure only if it is possible to first (and also after installation in the foundation of the building) put the walls onto the communications with further pulling through the communications elements. In case of construction, it is advisable to use the oil seal housing as an embedded part. The oil seal bodies of models C-1 and C-4 are made of sheet metal, and the oil seal bodies of models C-2 and C-3 are made of pipes.
Installation of oil seals excludes autonomous operation of the oil seal device and the building foundation. Together they form a single whole, their subsidence is carried out together, while the installation of compensating devices is carried out outside the perimeter of the foundation, both from the outside and from the inside. The compensating device must be made in accordance with existing regulatory rules.
Padding. The gaps that arise between the pipes being passed through and the bodies of the mounted seals must be tightly filled with hemp strands twisted into a bundle in accordance with the requirements of GOST 9993-74. The thickness of the pre-fabricated bundle must exceed the dimensions of the gap. The hemp strand must be well dried; it should not contain fires, oil, soil or other contaminants. The strand stuffed into the gap should be compacted layer by layer using strong hammer blows on the caulk or using pneumatic tools. It is possible to impregnate hemp strands with petroleum bitumen of the BN70/30 series, manufactured in accordance with GOST 6617-76 and diluted in gasoline GOST 8505-80. By weight, the composition of the mixture is 5% bitumen and 95% gasoline. After bituminization, the strands must be dried.
Caulking. It is carried out immediately after sealing the gap with a hemp strand, using an asbestos-cement lock that secures the packing. An asbestos-cement mixture is prepared from cement of grade no lower than 400, produced in accordance with GOST 10178-85, and asbestos fiber of grade no lower than fourth, produced in accordance with GOST 12871-93 with the addition of 10% water from the total mass of the mixture. Before use, asbestos fiber must be dried; the presence of lumps of foreign impurities in it is not allowed. Before adding water, the cement and asbestos fiber should be thoroughly mixed until a homogeneous mass is obtained. Add water immediately before using the solution. The resulting solution must be used within half an hour from the moment of its preparation. Subsequently, the cement begins to set and cannot be used in the future.
Putty. By weight, the putty mastic contains about 70% petroleum bitumen BN70/30, prepared in accordance with GOST 6617-76 and 30% asbestos powder, produced in accordance with GOST 12871-93.
Corrosion protection. Oil seals must be painted with XC-019 enamel, produced in accordance with GOST 21824-76. The thickness of the enamel is 80 microns over a layer of primer GF-021, produced in accordance with GOST 25129-82.
1-stuffing gland S-2 (S-4), 2-stuffing, 3-caulking, 4-putty. Figure 1a - Seal of water supply (sewage) inlet in the basement (basement) floors of buildings in dry soils.
1-pressure seal C-1 (C-3), 2-packing, 3-caulking, 4-putty. Figure 1b - Heating pipeline in the channel. Sealing of inlets in the ground (basement) floors of buildings.
Pressure seal S-1
1 – body, 2 – ground bushings, 3 – washer. Figure 2 – General view of the pressure seal C-1.
| Designation | Outer diameter of the passing pipeline, DH, mm | Weight, kg at L, m | |||
| 0,3 | 0,4 | 0,5 | 0,6 | ||
| 5.905-26.08.1-7.00 | 57 | 7,54 | 8,40 | 9,26 | 10,12 |
| -01 | 76 | 9,00 | 10,04 | 11,08 | 12,12 |
| -02 | 89 | 10,42 | 11,60 | 12,78 | 13,94 |
| -03 | 108 | 12,14 | 13,44 | 14,76 | 16,08 |
| -04 | 159 | 18,96 | 20,80 | 22,66 | 24,52 |
| -05 | 219 | 25,28 | 27,70 | 30,10 | 32,54 |
| -06 | 273 | 31,58 | 34,60 | 37,60 | 34,64 |
| -07 | 325 | 54,44 | 49,04 | 52,50 | 55,96 |
Packing oil seal S-2
1 - body, 2 - stop, 3 - annular rib, 4 - thrust ring. Figure 3 – General view of the stuffing box S-2.
| Designation | Outer diameter of the passing pipeline, DH, mm | Weight, kg at L, m | |||
| 0,3 | 0,4 | 0,5 | 0,6 | ||
| 5.905-26.08.1-8.00 | 22-38 | 4,18 | 5,02 | 5,86 | 6,68 |
| -01 | 45, 57 | 4,86 | 5,82 | 6,80 | 7,76 |
| -02 | 76, 89, 108 | 8,34 | 9,88 | 11,40 | 12,94 |
| -03 | 159 | 12,70 | 14,82 | 16,94 | 19,06 |
| -04 | 219 | 22,04 | 25,20 | 28,38 | 31,54 |
| -05 | 273 | 27,38 | 31,06 | 34,74 | 38,40 |
| -06 | 325 | 32,98 | 37,16 | 41,32 | 45,48 |
Pressure seal S-3
1 – body, 2 – ground bushings, 3 – washer. Figure 4 – General view of the pressure seal S-3
| Designation | Outer diameter of the passing pipeline, DH, mm | Weight, kg at L, m | |||
| 0,3 | 0,4 | 0,5 | 0,6 | ||
| 5.905-26.08.1-9.00 | 57 | 8,46 | 9,46 | 10,44 | 11,40 |
| -01 | 76 | 9,82 | 10,90 | 11,98 | 13,08 |
| -02 | 89 | 11,18 | 12,44 | 13,66 | 15,88 |
| -03 | 108 | 13,22 | 14,68 | 16,14 | 17,28 |
| -04 | 159 | 20,44 | 22,56 | 24,70 | 26,82 |
| -05 | 219 | 26,66 | 29,08 | 31,38 | 35,06 |
| -06 | 273 | 32,70 | 35,88 | 39,04 | 42,20 |
| -07 | 325 | 46,92 | 54,40 | 54,28 | 57,94 |
Packing oil seal S-4
1 - body, 2 - stop, 3 - annular rib, 4 - thrust ring. Figure 5 – General view of the stuffing box S-4.
| Designation | Outer diameter of the passing pipeline, DH, mm | Weight, kg at L, m | |||
| 0,3 | 0,4 | 0,5 | 0,6 | ||
| 5.905-26.08.1-10.00 | 22-38 | 4,18 | 5,02 | 5,86 | 6,68 |
| -01 | 45, 57 | 4,86 | 5,82 | 6,80 | 7,76 |
| -02 | 76, 89, 108 | 8,34 | 9,88 | 11,40 | 12,94 |
| -03 | 159 | 12,70 | 14,82 | 16,94 | 19,06 |
| -04 | 219 | 22,04 | 25,20 | 28,38 | 31,54 |
| -05 | 273 | 27,38 | 31,06 | 34,74 | 38,40 |
| -06 | 325 | 32,98 | 37,16 | 41,32 | 45,48 |
Packing oil seal S-5
1 - body, 2 - stop, 3 - annular rib, 4 - thrust ring. Figure 6 – General view of the stuffing box S-5.
| Designation | Outer diameter of the passing pipeline, DH, mm | Weight, kg at L, m | |||
| 0,3 | 0,4 | 0,5 | 0,6 | ||
| 5.905-26.08.1-8.00 | 22-38 | 4,18 | 5,02 | 5,86 | 6,68 |
| -01 | 45, 57 | 4,86 | 5,82 | 6,80 | 7,76 |
| -02 | 76, 89, 108 | 8,34 | 9,88 | 11,40 | 12,94 |
| -03 | 159 | 12,70 | 14,82 | 16,94 | 19,06 |
| -04 | 219 | 22,04 | 25,20 | 28,38 | 31,54 |
| -05 | 273 | 27,38 | 31,06 | 34,74 | 38,40 |
| -06 | 325 | 32,98 | 37,16 | 41,32 | 45,48 |
Pressure seal S-6
1 – body, 2 – ground bushings, 3 – washer. Figure 7 – General view of the C-6 pressure seal.
| Designation | Outer diameter of the passing pipeline, DH, mm | Weight, kg at L, m | |||
| 0,3 | 0,4 | 0,5 | 0,6 | ||
| 5.905-26.08.1-12.00 | 57 | 8,46 | 9,46 | 10,44 | 11,40 |
| -01 | 76 | 9,82 | 10,90 | 11,98 | 13,08 |
| -02 | 89 | 11,18 | 12,44 | 13,66 | 15,88 |
| -03 | 108 | 13,22 | 14,68 | 16,14 | 17,28 |
| -04 | 159 | 20,44 | 22,56 | 24,70 | 26,82 |
| -05 | 219 | 26,66 | 29,08 | 31,38 | 35,06 |
| -06 | 273 | 32,70 | 35,88 | 39,04 | 42,20 |
| -07 | 325 | 46,52 | 54,40 | 54,28 | 57,94 |
Purpose
Oil seals of this type are used in the design, installation, repair and operation of engineering systems, the installation of which involves passing through the walls of the basement or through the foundation of a building. These include:
- water pipes;
- sewer pipes;
- heating pipelines;
- electrical communication cables.
Pressure seals are designed to seal the above-mentioned utilities in the walls of basements and basements, as well as in the foundation of a building. The use of these seals is possible in any communications of existing buildings, structures without a foundation, the presence of water back-up and seismicity up to 6 points, with the exception of heating mains.
The process of sealing heating main inputs is intended for:
- laying pipelines in reinforced concrete channels;
- channelless installation.