Causes of wear
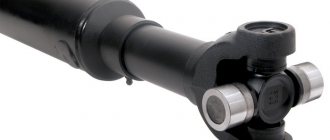
Replacing the input shaft bearing of a VAZ 2110
You can find out about wear and when it is necessary to replace the bearings of the primary shafts of gearboxes based on such signs.
- in neutral gear, with the engine running, extraneous noise may be heard;
- When the car is moving in any gear, you can hear a knock in the gearbox;
- transmissions may switch off spontaneously;
- the clutch may not disengage (this often occurs due to jamming of the bearing);
- If the bearing is misaligned, the clutch disc may be destroyed.
Note! If you do not pay attention to the above listed signs of malfunction of this part, in the future you will not be able to do without serious repairs to the clutch or gearbox. By changing the gearbox shaft bearings in a timely manner, you can avoid unwanted problems and additional cash costs for repairs.
Causes of breakdowns
Many different factors can influence an element to wear out and break down. Often the culprit is poor quality parts. When purchasing a product, you should not give preference to the cheapest options, but rather purchase a quality product. It is necessary to carefully inspect the unit and make sure that it is reliable and made of strong materials. Also one of the possible reasons is the way you drive the car. If the driver uses an overly aggressive style, literally pulling out the shift lever, then this does not add service life to the bearing, but seriously reduces its service life.
The conditions in which the car is operated are also important. If the car is constantly stored in a garage, if there are no overloads, then all this will have the best effect on the resource of each unit. And finally, the most popular reason why the VAZ input shaft bearing fails is ignoring the maintenance of the vehicle’s mechanisms and components. Owners of inexpensive cars who use them for work, as well as novice drivers who are just learning, can ignore maintenance.
When do you need to change the gearbox input shaft bearing?
Replacing the input shaft bearing on a VAZ 2110
Surely, many car enthusiasts are asking the question “when do you need to change bearings?” In fact, there is no definite answer, since the resource of this mechanism directly depends on:
- bearing quality;
- vehicle operating conditions;
- driving style;
- regularity of technical inspection.
Typically, problems that occur due to a worn bearing are detected during the next technical inspection. Diagnostics of the gearbox can be carried out in specialized technical centers, and it becomes possible to evaluate the resource of the components of the unit that remains. The same applies to PV bearings. In certain situations, you can get by with simply lubricating the bearing. Such measures will help normalize operation and eliminate noise in the gearbox. When undergoing vehicle maintenance, experts strongly recommend doing a clutch diagnostic (see: Repairing the VAZ 2110 clutch - we do it ourselves).
Where is the bearing located, how to dismantle it?
On domestically produced cars, the input shaft bearing is located on the secondary shaft, directly behind the oil seal. When the gearbox is completely removed from the car, take out the bell, as well as the retaining rings. There is no need to disassemble the assembly further.
In order to replace the part, you need to use a screwdriver to hook the bearing into its annular groove. Next, the input shaft is pushed forward using the bearing as a support. Then slowly pull the bearing off the shaft by tapping it with a hammer. There's no need to rush. Replacing the VAZ input shaft bearing can take from several minutes to one hour.
Replacement process
Often, replacing the VAZ 2110 input shaft bearings will in any case involve removing the gearbox from the car. Let's consider this situation using the example of a VAZ 2110 car.
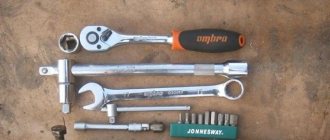
Note! To change the bearings on the input shaft, you will need an inspection pit or a lift.
Removing the gearbox to change bearings on the input shafts
- The machine is installed on the inspection pit.
- The oil is drained from the gearbox.
- The cardan moves away.
- The functioning clutch cylinder is dismantled.
- To make removing the gearbox to change the front shaft bearing convenient, it is recommended to remove the “pants” from the exhaust system.
- The starter, the cable from the speedometer, and also the wires for the reverse gear are moved away.
- The shift rocker is removed from the interior.
- All fastening bolts of the box are unscrewed.
- Now it can be easily removed to change the bearings on the input shafts. It must be removed by moving it away from the engine; the rocker arm must pass freely into the body cutout.
- Before disassembling the gearbox, it must be cleaned and washed to remove dirt.
Replacing bearings on the input shaft begins with dismantling the gearbox clutch housing. Before these steps, you need to remove the clutch release fork and release bearing. These parts are checked for suitability for subsequent use.
Note! There should be no cracks on the release plug. The bosses intended for mounting on the release bearing must not be very worn, the spring bracket for the “soldier” (there is a stand in the casing for fixing the fork) must be absolutely intact. The “soldier” is not allowed to have signs of wear on the ball part.
Procedure for disassembling the gearbox
- The clutch cover is unfastened and moved out of place. If easy actions are not possible, you can easily hit it with a wooden mallet or a small hammer through a wooden spacer.
- The clutch cover is removed together with the gearbox input shaft.
- Now we begin to analyze the shaft defects.
There is a needle bearing in the input shaft; it needs to be removed and repaired. In most cases, this bearing is replaced because the needle mount wears out. It is also recommended to check the release bearing by sharply twisting it. If the element rotates easily and without noise, it is left, in the worst case, replaced with a new one. This shaft should not show any signs of scoring or wear. Generally, a suitable puller is required to remove main shaft bearings, but if you don't have one, a stand will do just fine. In the second case, to carry out the blow you need a hammer and a small sledgehammer. So:
- The bearing is wrapped in thick fabric to prevent injury from fragments during impacts.
- The prepared element is placed on the anvil and hit with a sledgehammer through the nose of the hammer. In a normal situation, the bearing bursts from a couple of sharp blows, so you can easily dismantle the upper race and separator together with the balls.
- With the help of chisels, decisive blows are used to knock down the remaining inner race of the part.
Main shaft bearing
After manipulating the bearing, you need to evaluate the quality of the seating surface on this shaft. If there are signs of wear, it will need to be replaced with a new element. If the condition of the shaft is satisfactory, repairs can only be made by replacing the bearing. To carry out this procedure, you need to heat the bearing and sharply lower it onto the shaft until it stops. Of course, the bearing can be pressed even in a non-heated state; for this you will need a suitable cut of pipe, which will need to be used to hit exclusively the holder located inside the part. At this stage, the work is completed, now all that remains is to assemble all the parts in the reverse order of disassembly.
Note! If the gearbox has already been removed, it is recommended to find half an hour of time to remove the clutch basket. It is necessary to evaluate the condition of the clutch disc, as well as the internal crankshaft bearing and rear engine oil seal. You can install the basket in its place using a mandrel.
Of course, if you don’t have time for urgent repairs, you can contact specialists at a service station, but this will cost more than replacing the PV bearings yourself. The effectiveness of the instructions will be higher if you watch a video with a detailed description of the repair. It is also necessary to use visual aids, such as photos, pictures, diagrams, etc. Carrying out this operation with your own hands is a job that is performed strictly according to the instructions. This way, you can avoid mistakes and save a lot of money, because the price for services of this kind at service stations is not cheap.
The meaning of the primary and secondary shaft oil seals
The vehicle's transmission helps transmit the required torque to the vehicle's wheels in accordance with the vehicle's speed.
In this article we will look at what a gearbox secondary shaft is, and also touch upon such important parts as the bearing, secondary shaft oil seal and their replacement. The gearbox consists of many parts that are connected to each other, allowing them to interact and ensure reliable transmission of torque. Initially, the torque is transmitted from the clutch disc to the gearbox input shaft.
The primary shaft has a short length and a common fastening device with the secondary shaft. However, there is no rigid mechanical connection between these two parts, and they rotate independently of each other.
The third element of the transmission is the intermediate shaft, which is located under the primary and secondary shafts.
All these elements have a large number of gears, each of which, paired with the other, forms a gear ratio, and the pair, in turn, forms a gearbox stage. The intermediate shaft provides connection between the primary and secondary shafts through certain gear ratios. It is on it that the gear ratios change and, as a result, the gear changes when driving.
The output shaft plays a concluding role in the gearbox. It transmits the converted torque to the shank, and then it goes to the driveshaft of the car. Thus, the secondary shaft provides connection between the gearbox and the chassis of the car, and the level of its operation determines whether the car will move or not.
The bearing of the secondary shaft ensures free rotation of its end in the place where the shaft already leaves the gearbox. From the inside, the bearing is filled with a lubricant, which facilitates the rotation of the part.
The gearbox secondary shaft oil seal is installed in the same place. The oil seal is a rubber O-ring that fits onto the shaft and fills the gaps between the shaft and the transmission housing. The oil seal is designed to prevent oil leakage and ensures the tightness of the system.
Over time, both the seal and the bearing are subject to natural wear. Parts of the bearing are destroyed and begin to loosen the shaft. Gradually, the friction between the parts increases, and the bearing begins to disrupt the shape of the shaft. The balancing of the shaft becomes unbalanced over time and it begins to vibrate.
The very first to suffer is the oil seal, which will lose its shape and will no longer be able to hold oil in the gearbox. The oil gradually disappears and the lubrication of gearbox parts is disrupted. In addition, the oil seal may fail due to wear, which occurs in any case.
The fact is that a rubber product has a certain service life, which is determined by mileage and the oil seal begins to crack and also lose its sealing properties.
You can diagnose a seal malfunction visually. To do this, it is enough to look from time to time at the junction of the cardan and the secondary shaft. If traces of transmission oil are found there, then we can confidently say that the oil seal has become unusable and needs to be replaced.
Bearing failure is quite difficult to determine. To do this, you need to have good hearing and know your car perfectly. When driving in gears, a hum and vibration may appear from the gearbox; when the clutch is depressed or the gear is disengaged, the hum disappears, but this sound should not be confused with the sound of a faulty clutch release bearing or gearbox input shaft.
The direct and main purpose of these small parts is to reliably seal the metal parts and connections of the gearbox housing and other parts of the vehicle system to prevent transmission oil from leaking. Oil seals are made of durable polyurethane alloy using special compounds, since they are constantly in an aggressive environment.
Oil is constantly present inside the parts, which negatively affects the condition of the part over a long period of time. Externally, these parts can be damaged as a result of mechanical stress due to breakdown or under the influence of an aggressive natural environment. The average resource or lifespan of units largely depends on operating conditions.
The manufacturer does not provide a specific guarantee for these parts; accordingly, it does not limit their service life; planned replacement is not required at certain mileages. However, in most cases, under normal operating conditions, the service life of the parts is sufficient for runs of up to 200 thousand kilometers. When used in harsh natural conditions, reliability decreases accordingly, and with it the service life of up to 100 thousand kilometers.
Read more: How to soundproof Niva 21214
Warning! At the same time, the problem of the “floating” quality of parts from AvtoVAZ does not disappear; there are well-known cases in practice when oil seals failed without “traveling” even 30 thousand kilometers.
These parts are located at the junction of the transmission with the clutch in the case of the primary shaft, and the secondary one is located directly inside at the junction of the flange and the gearbox housing. Sealing of pipes and hoses, as well as metal parts, is achieved by tightly connecting two parts directly to the seals, which is a circle with several layers of polyurethane material.
It is precisely because of the unsatisfactory condition of these small parts that transmission fluid often leaks outside the box. Therefore, responsible owners, when the first signs of malfunction appear, replace the part with a new one. Due to their simple design and the absence of any moving parts, these units cannot be repaired; they are simply replaced with new ones.
VESKO-TRANS.RU
AutoNews / Reviews / Tests
Replacing the Primary Bearing of a VAZ 2110 gearbox
Replacing the input shaft bearing on a VAZ 2114
Many people replace the input shaft bearing without outside help, without the help of professionals with 100. Algorithm for replacing a VAZ 2115 radiator. Replacing a VAZ 2110 clutch without removing the box, etc. To do this, you need to know the location of the required element and signs of its malfunction. Plus we will tell you carefully how you can understand it.
Element appearance
Location
Since we are talking about a VAZ 2114, we will first determine the location of the element.
In the fourteenth, the primary bearing is located on the shaft behind the seal.
Catch this on some gearboxes, this bearing additionally plays the role of an oil seal, bearing the load along with the output bearing.
To get to the deformed transmission component, you need to remove the transmission. When choosing a new product, be sure to read the operating instructions for the VAZ 2114 car to find out its overall dimensions.
Signs of failure
All bearings in a car show approximately the same signs of failure. Replacement of VAZ 2110 Transmission shaft bearing. But, as you understand, the location of the bearing Input shaft , discovering that the difficulties that arise specifically with it will not be so difficult.
There are several relevant signs of failure.
Sign
Characteristics
Dimensions of oil seals in the VAZ 2107 gearbox
To correctly replace VAZ 2107 gearbox seals, precise geometric dimensions are required, as well as the weight of the product. Otherwise, when installing other parts, the operation of the entire gearbox may be impaired, which may also lead to breakdown. The manufacturer has established clear dimensions for the VAZ 2107 gearbox seals; these parts must fit under them, regardless of the company that will produce them for installation on this model.
The primary oil seal has the following data - length 28 mm, height 47 mm, width 8 mm and weight only 20 g. These values will allow the owner to be guided by quality indicators when purchasing a new copy to replace the old one.
Read more: How to replace the VAZ 2114 heater motor
Location
Since we are talking about the VAZ 2114, the first thing we will do is determine the location of the element.
On the fourteenth, the primary bearing is located on the shaft behind the oil seal.
It is noteworthy that on some gearboxes this bearing additionally plays the role of an oil seal, taking on the load together with the release bearing.
To get to the damaged transmission component, you will have to remove the transmission. When choosing a new element, be sure to check the recommendations from the instruction manual for your VAZ 2114 regarding the overall dimensions of the component.
Device
Needle bearings are mainly used to support the shaft. The use of thin and long rollers allows the thickness of the ring to be minimized while maintaining high load resistance.
Fastening the part has its own characteristics. During operation, the element wears out its installation location. Due to increasing play and vibrations, the part is gradually destroyed, and then it is necessary to replace it.
Signs of failure
All bearings, of which there are quite a few in a car, have approximately the same signs of failure. But since you know the location of the input shaft bearing, it will not be so difficult to determine that the problem arose with it.
There are several characteristic signs of its breakdown.
Sign
Peculiarities
Howling when the clutch is released in a parking lot
The element has failed and needs to be replaced. The howling is usually caused by the formation of chips, cracks, or the destruction of 1-2 rollers
Whistle when driving
The bearing is partially damaged or there is no lubrication. The problem in the absence of lubrication can only be determined by dismantling and visual inspection. To solve the problem, sometimes it is enough to simply lubricate the element and return it to its place
Clutch won't engage or disengage
Most likely the bearing is stuck. If the damage is serious, the input shaft may need to be replaced.
Knock in the area where the element is located
The bearing knocks only when the part is completely destroyed. If you do not replace it in time, the bearing will be welded to the shaft, so you will also have to replace the shaft itself
If you notice the first signs of a malfunction of the input shaft bearing on your gearbox, you should immediately check the condition of the element and, if necessary, replace it.
Replacement
Many people turn to a service station to replace this bearing. It is noteworthy that car services often refuse to perform such work. It’s understandable, because the procedure is painstaking, and you can’t get a lot of money for it.
Dismantling works
To do the job yourself, follow the instructions.
- You can often find advice about the need to completely disassemble the gearbox to replace the bearing. But this is optional. You can do without such complex manipulations.
- In any case, you will have to remove the box, so familiarize yourself with this procedure.
- Before removing the gearbox, remove the negative terminal from the car battery.
- All the chips are removed from the box, the wire from the speedometer is unscrewed.
- Next, the trousers of the vehicle exhaust system are dismantled.
- After this, you can completely remove the gearbox.
- At the next stage, the bell is dismantled. You can try to do without it, but then it will definitely constantly interfere with your work.
- Thoroughly clean the box from accumulated dirt.
- The bearing is secured using retaining rings. To remove them you will need a flathead screwdriver.
- The rings are pryed off and loosened a little, after which there will be no more problems with removal.
- To make it more convenient, arm yourself with tweezers that can be used to remove the ring.
- Using a flat-head screwdriver, pry the bearing by the ring groove, and at the same time move the input shaft slightly forward.
- Insert a pry bar between the gearbox and the bearing. It is unlikely that you will be able to do this without an assistant.
- You will operate the tools, while your friend will hold the pry bar.
- Your main task is to press out the bearing. To do this, precise, strong, but most accurate blows are applied to the input shaft.
- In the process of striking, the shaft must rotate.
- This work will take you about 20 minutes. But if you have a special puller at your disposal, you can speed up the work. Although it is really convenient to work with a puller only if you decide to disassemble the gearbox.
- Before installing a new input shaft bearing, be sure to lubricate the element with regular engine oil.
- Carefully press the component into place using gentle, light blows with a hammer. It is better to use a pipe of diameter or a stand.
- When pressing, apply blows to the inner race, in a circle, as evenly as possible.
- Once the bearing is pressed in, make sure it is seated properly. Scrolling should be calm, without obstacles.
- Reassemble the box in reverse order and install it on the car.
It will be useful: What kind of oil to pour into the VAZ 2115 gearbox
Location at checkpoint
Lubrication issue
Many people do this kind of work on their own, and quite efficiently. But their main mistake is that the bearing does not always need to be replaced. Sometimes just lubricant is enough.
- Check the bearing for dryness. There is no lubricant on it, as well as visible damage, then all extraneous sounds can be caused precisely by a lack of lubricant;
- Treat the element with high-quality lubricant. Plain motor oil is often used;
- Reinstall the old, greased bearing.
Lubrication can be accomplished in two ways.
- Digestion in lithol. It is recommended to use a water bath for this procedure.
- Injection. The method is safer. To perform it, you need to draw lithol into a syringe and pour it into the element. The process is long but effective.
When choosing a lubrication method, it is better to focus on safety rather than the speed of repairs.
The gearbox is a constantly working element of the car, which leads to the inevitable occurrence of malfunctions. Try to detect the failure of the input shaft bearing as early as possible and carry out repair or preventive measures aimed at preventing complications of the situation.
Repair of VAZ 2110 gearbox
Something bad happened and a VAZ 2110 gearbox needed to be repaired. Unit repair is required when:
- It is difficult to switch gears off and on.
- automatic switching off of gears.
- noise occurs when shifting gears.
- transmission oil leak.
The reasons for the breakdown may be different, perhaps the oil was not changed in a timely manner or the mechanism has simply exhausted its resource.
How is a VAZ 2110 gearbox repaired? Do-it-yourself VAZ 2110 gearbox repair, video.
Diagnostics of VAZ 2107 gearbox seals
A responsible car enthusiast, owning a domestic rear-wheel drive car, is obliged to constantly monitor the condition of many units and components. One of these are oil seals. There are simple but quite labor-intensive means of checking and preventing these parts. To do this, you need to lift the car on a lift or drive it into a pit and conduct a visual inspection of the box body.
In the places where the oil seals meet parts of the clutch or rod there should be no fogging in the form of oil stains or drips of this substance. Fogging at the place where the part is attached is the first sign of failure; even if there are small spots, it is necessary to replace it, since the leak will only increase in the future.
It is also necessary to wipe and clean the parts from dirt and dust and inspect them for cracks, which may subsequently leak.
The simplest method of prevention without using a lift is to periodically check the oil level in the crankcase using a dipstick.
Warning! If the level is constantly, even after topping up, at the minimum level of the dipstick, this may also indicate a leak.
In addition, one of the signs of failure of parts and the subsequent need to replace the seal of the VAZ 2107 five-speed gearbox is a crunching sound when shifting gears both down and up. Also, this situation may be accompanied by a parasitic hum, which is not inherent in this type of box. At the first signs of malfunctions, it is necessary to urgently carry out a visual inspection, either yourself or go to a specialized service.
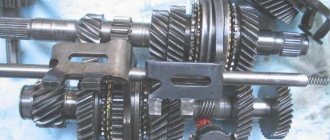
Gearbox device
There are situations when removing the gearbox is not at all necessary; adjusting it is enough. The VAZ 2110 very often has problems with gear shifting, they get knocked out. To eliminate this problem, it is not at all necessary to remove the box; it is enough to adjust the gear selection drive mechanism. It is enough to make do with adjustment in the following cases:
- not so long ago, the input shaft bearing was replaced or any other repair was carried out where the gearbox was removed.
- Only one speed comes out.
- When the car is moving, the speed shifts poorly or completely jumps out.
To adjust the gearbox you need:
- Loosen the nut and bolt, which is located under the machine, tightening the clamp securing the box rod.
- Using a screwdriver, move the clamp and grooves of the rod apart. Set the rod to the neutral position.
- Remove the cover from the gearbox.
- In order to block reverse gear, you need to place a lever in the window of the bracket lining.
- Adjust the axial play in the rear direction and by turning to the left.
- Place the clamp in place and tighten it with a bolt.
We are replacing the gearbox
First of all, we dismantle the device from the car. We clean the mechanism from dirt, then wash all the parts.
To remove the box, you will need an assistant, since the mechanism is quite heavy, at least thirty kg. Or use special equipment, if available.
To extract you will need to do the following:
- the splash guard in the engine is disconnected, drain the oil from the gearbox;
- remove the battery, remove the air filter and battery shelf;
- remove the starter and remove the clutch cable;
- the time has come to disconnect the wire in the block, the rear light switch and the speed sensor;
- bracket, clamp for attaching the wiring harness, as well as a nut that needs to be unscrewed. All these parts are removed from the car.
You do everything exactly the same for the drive gear for gear shifts. Remove the drives in the front wheels. Lifting the engine slightly, remove the power unit from the left side.
Now unscrew the fastening nut and remove it. There are bolts on the cover at the bottom of the crankcase in the clutch. Remove the bottom cover. Using a 19 mm socket wrench, the mounting bolts are unscrewed. In the same way, the nut in the gearbox is removed.
It is very important to take one point into account. On the top of the gearbox, on the right, there is a slightly smaller bolt, all the rest. When removing the box, be sure to not place the input shaft on the spring in the clutch. You can damage a fairly thin device.
Removal of the device is done by rocking in different directions. Try to make movements smooth, not abrupt. This way you can easily remove the box from the car. Remove the first shaft and remove the gearbox directly.
Disassembling the gearbox
In the situations described above, a simple gearbox adjustment will be sufficient. This is much better than repairing the VAZ 2110 gearbox, disassembling and assembling the gearbox.
Procedure for disassembling the gearbox:
- Remove the oil indicator from the gearbox. Unscrew the bolts that hold the clutch cable.
- Unscrew the bolts that hold the back cover. The lid is hermetically sealed, so when removing it, you can use a hammer.
- To prevent the shafts from turning while disassembling the gearbox, turn on the third or fourth speed. Then unscrew the bolt that secures the fifth gear.
- Remove the fifth gear and fork together.
- Afterwards, remove the gear from the secondary shaft and the fork. Then remove the plate that protects the bearings.
Below you can see a DIY video repairing a VAZ 2110 gearbox.
How to remove the transmission?
To remove the box you need an inspection hole or a lift. Also, for work you need a standard set of tools - a wrench, sockets, wrenches and a pry bar. The dismantling process is carried out in several stages:
- First of all, disconnect the terminal on the battery. Then the neutral gear is engaged and the parking brake is released. Raise and remove the rear axle. Next, unscrew the bolts holding the cardan and the gearbox flange. After this, you can disconnect the driveshaft.
- Then unscrew the bolts and dismantle the exhaust pipe of the exhaust manifold, disconnect the oxygen sensor, and remove the starter. Next, inside the car you need to dismantle the console and
- After this, remove the box protection and unscrew the clamps that connect the exhaust pipe to the catalyst. After this, you can dismantle the slave cylinder of the clutch system. Next, unscrew and remove the boot and reverse gear cable. Now you can remove the driveshaft. Then the traverses are unscrewed (you must hold the box so that it does not fall). Finally, you can unscrew and remove the gearbox assembly.
Dismantling the VAZ 2110 gearbox housing
Having started repairing the VAZ 2110 gearbox, after all the steps described above, it is necessary to disassemble the crankcase and the operating mechanism. Let's get started:
- We unscrew the spring plugs that hold the gear rods. Once the plugs are unscrewed, the end balls will fall out of the holes. We do the same with the plug that holds the reverse gear. If the balls have not fallen out of the holes, you can get them out using a magnetic screwdriver.
- Next, we unscrew the bolts that secure the gearbox housing to the clutch housing. After the bolts are unscrewed, you can use a screwdriver to disconnect the crankcases.
- Next step. Unscrew the rod from the first and second gear fork.
- We do the same with gears third, fourth and fifth, respectively. To remove the rod, it must be removed together with the gear shift parts.
- You need to remove the axle from the reverse gear and, of course, the gear.
- Next, take out the differential and two shafts with gears. Unscrew the three bolts that secure the gear mechanism and remove it from the crankcase.
- Unscrew the rear lever bolt and remove the rod.
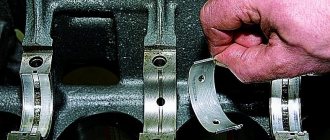
- If necessary, remove the bearings of the primary and secondary shafts with a separator.
Dismantling of the VAZ 2110 gearbox has been completed.
Repair of a VAZ 5-speed gearbox photo instructions. Assembly procedure for gearbox 5 of the new model
This photo report presents to your attention a detailed description of the assembly of a manual 5-speed gearbox of a new model VAZ car (Niva).
The only difference with classic models is the speedometer drive device.
There will be no description of the defect, since a detailed inspection of the gears and bearings will make everything clear. The main attention will be paid to the synchronizer locking ring (popularly synchronized), as well as the gear shift fork.
The synchronizer blocking ring should not have a circular groove at the end where the teeth are (the presence of this fact indicates that the clutch reaches the synchronizer blocking ring with its teeth, which means the pair does not work with cones). A yellow coating should be present on the forks.
The photo shows a secondary shaft with a clutch hub and a third-fourth gear clutch installed on it; insert the third gear gear (all parts must be lubricated with transmission oil during installation).
Second gear gear.
First and second gear clutch.
First gear gear.
Secondary shaft bearing
There should be no shells where the needle bearing fits.
Bearing rollers should have a mirror appearance, if they are dark matte, replace them!
We fix the secondary shaft.
There must be washers.
We insert the rocker of the first and second gears.
Insert a long barrel.
In a horizontal position, insert the slider into the third and fourth gear linkage, insert the linkage into the fork, and only then unfold it until the holes on the fork match, then secure it.
Insert a small barrel.
We adjust the intermediate shaft.
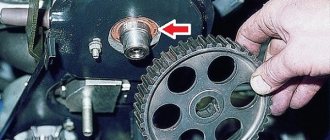
Insert the front bearing. Then secure it.
Install the clutch housing.
Assembling the rear part of the gearbox. Place the reverse driven gear and washer onto the shaft.
We put the bushing on the drawstring.
We put on the fifth gear clutch hub and retaining ring.
We insert the fork with the link, the fifth clutch and the intermediate gear of the reverse gear.
Thrust washer (also called plain bearing).
Rear and fifth gear gear block - secure.
Put on the oil reflective washer, bushing and bearing (by the way, on classic models, instead of a bushing, a speedometer drive gear is installed).
Then put the bearing on the gear block.
Install the balls and springs (the fifth gear spring is black and is the longest), then screw on the cover.
Install the gearbox onto the clutch housing, then install the rear cover.
Screw on the cover and secure the gearbox shank flange.
As well as an elastic coupling with an intermediate shaft.
Screw on the gearbox housing and tighten the plug.
Add oil. 1.5 liters.
Place the gear shift lever, then shift through all gears.
We install the fork and pressure bearing.
The gearbox is ready! Can be installed.