It is useful for every driver to know generator malfunctions and how to eliminate them. After all, this is a rather important element of the car’s electrical system. The adequate functioning of the car largely depends on its correct operation. But not everyone is able to determine the cause. However, an experienced car enthusiast simply must understand the problems that arise with the generator. In fact, most of the breakdowns can be easily repaired in a regular garage. To do this, you just need to make the correct diagnosis. Checking the generator should also not cause problems; this requires a minimum of instruments.
Generator malfunctions and methods for eliminating them are mostly due to the peculiarities of its structure. For a successful repair, a mechanic should know what elements this unit consists of.
Content
Its structure is quite simple. First, you need to clarify that there are 2 types of generators:
- Alternating current;
- Direct current.
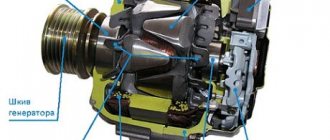
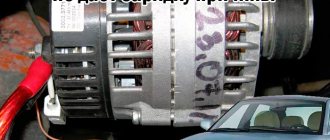
Passenger car owners are only interested in the alternator. Devices that produce direct current can only be found on some trucks. An alternating current generator consists of a stator with a stationary winding, in which the current is induced. And also from the rotor, which creates a magnetic field. The design includes a shaft with a drive pulley.
The generated alternating current is subject to rectification, which occurs using a diode bridge, as a three-phase full-wave rectifier is colloquially called. There are brushes, usually assembled into a brush assembly. To normalize the voltage, a relay regulator is used; with its help, the system maintains a voltage of 13.5-14.5 V.
Causes of generator howling under load
Articles Loading...
Malfunctions of vehicle electrical equipment are very common and occupy one of the leading places in the list of breakdowns. They can be roughly divided into faults of power sources (batteries, generators) and faults of consumers (optics, ignition, climate, etc.). The main sources of power for a vehicle are batteries and generators.
. The malfunction of each of them leads to a general malfunction of the car and its operation in abnormal modes, or even to immobilization of the car.
In the electrical equipment of a car, the battery and generator work in an inextricable tandem. If one fails, after a while the other will also fail. For example, a damaged battery leads to an increase in the charging current of the generator. And this entails a malfunction of the rectifier (diode bridge). In turn, if the voltage regulator coming from the generator malfunctions, the charging current may increase, which will inevitably lead to systematic recharging of the battery, “boiling off” of the electrolyte and rapid destruction.
Malfunctions
Problems with a generator can arise for a variety of reasons. There are certain signs by which you can determine the source of the malfunction. Knowing these signs and correctly diagnosing, you can easily find a breakdown. Below we will look at the most common problems.
On most cars they are approximately the same, they may differ only in small nuances. If there is any sign of a problem, the connections should be checked first. In some cases, it is enough to simply clean them.
Try our service station selection service
Creating an application is absolutely free and will take you no more than 5 minutes
A lot of motorists are interested in the power of a car generator. After all, there are now a lot of electrical devices (for example, inverters) that can turn your car into practically a power plant for a country house. Many carry loads of 1000 – 1500 and even 2000 W! Is it a lot or a little? Can a running car do this? Some write that – NO! Others that - YES! But often they have a “mess” in their heads; I often see such statements on forums: the power is no more than 300 - 600 W. Where these numbers come from can be seen from the ceiling. Let's correctly define power, and also find out what it depends on...
In this article I will introduce you to the approximate power of your car alternator, this is physics grade 7. Let's take into account that we have direct, not alternating current.
The charge lamp does not light up, some of the devices do not work?
The most common cause of this problem is a blown fuse.
. First of all, you should check it. To determine which fuse belongs to the generator, you can look at the diagram on the cover of the mounting block.
Power circuit problem
. Check the wires going to and from the mounting block. This is done by measuring resistance. Also check that the unit itself is working properly. Sometimes the problem occurs due to a failure of the contact group in the ignition switch. If necessary, replace the contact group and other damaged parts.
Difficulty starting the engine
One of the sure signs of a generator breakdown is an uncertain start of the car engine. When the alternator stops working correctly, the battery does not receive enough charge and is unable to crank the starter normally. A discharged battery is usually a direct consequence of a generator failure. In this case, the battery may not only receive less charge, but also, on the contrary, be recharged.
This happens due to a breakdown of the electronic relay-regulator unit: the generator produces more current than required, and this leads to boiling off of the electrolyte and rapid failure of the battery. Note that many modern cars stop starting when the voltage in the on-board network drops below 12 volts. In this case, the battery is able to crank the starter.
The indicator lamp does not light up, do the devices work?
First of all, check the lamp itself, most likely it has burned out. Replace it. The breakdown may be caused by problems with the wire connecting the lamp and the generator, check it. Change if necessary. It’s also a good idea to clean the contacts on the generator; often these are the cause. On models with a brush assembly made separately from the regulator relay, it is possible to disconnect the wires from the brush assembly.
Separately, we need to discuss the malfunction of the relay regulator. This element is extremely important for the operation of the entire generator. If you suspect it is broken, it needs to be checked. To do this, it is removed and connected to the battery. A working relay should output normal ( 13.5-14.5 V
) voltage. Any deviation from this norm indicates a failure of this relay.
How to remove brushes from a generator located on a car
All work on the vehicle's electrical equipment should begin by disconnecting the battery.
- The voltage regulator is removed;
- The production of brushes is measured;
- Old brushes are unsoldered;
- Contacts are cleaned;
- New brushes are soldered;
- The free movement of the generator brushes is checked;
- The regulator is installed in place;
- We connect the battery and start the car.
If everything went without errors, you won’t have to worry about how to check the generator brushes for a long time. Now, knowing perfectly the structure of the generator after disassembling it, it will not be difficult for you to fix other generator malfunctions with your own hands.
The warning light is on, but the generator is not charging?
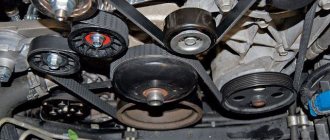
On some car models it will burn at full heat, this depends on the characteristics of the electrical circuit. But, in any case, first of all you should check the belt
. When it slips, the generator does not operate at full capacity. Try to tighten it. If this does not work, you will have to replace the belt. Experienced drivers always carry a spare belt in their car.
This is also a sign of a regulator relay failure.
. Be sure to check the operation of the voltage regulator. How to do this is described above. But, before checking with a multimeter, be sure to pay attention to the condition of the brush assembly. Often the brushes become worn out, which leads to a lack of charging. In most cases, one of the brushes turns out to be noticeably smaller than the other. If they are the same, then it makes sense to measure their length. For most generators, brushes should not be shorter than 15 millimeters.
Low charge can also be caused by problems with the diode bridge
.
To check, you will have to remove the rectifier from the generator. Working diodes pass current in one direction. You will need a tester; it is set to 1 kOhm mode. Next, we check all the diodes one by one. First, the probes are applied to the diodes at the ends, then they are swapped. A working diode will show 400-600 Ohms
, and in the other this indicator will tend to infinity.
If it does not pass current in both directions or vice versa, then the desired fault has been found. The diode bridge should be completely replaced or repaired. To repair it, it is enough to replace the damaged diodes.
Checking the functionality of the generator
The VAZ 2114 generator should be checked every six months, even if the device itself is operating in normal mode.
If the unit breaks down, all systems that consume electricity are affected: if the generator produces a charge of insufficient power, the battery will simply discharge and the car will stop, but if it produces excessive voltage, then serious problems may arise with the wiring and electrical equipment of the fourteenth.
The first signs of a malfunction, upon detection of which it is necessary to check the generator on the VAZ 2114:
- The battery light on the instrument panel glows excessively brightly even when the engine is running, this indicates that the battery is overcharged;
- Battery light after ignition activation, turn signals, wipers and similar devices do not turn on - the battery is not charging because the generator is not working;
- The generator is very noisy
The noise indicates that the bearings are worn out. As a rule, the front one wears out most often. You cannot drive with such a problem, since the bearing may jam, which will lead to damage to the rotor and stator, after which the entire device will become irreparable
Now let's figure it out, the generator. To do this, we need a multimeter; you can purchase it at any auto store for 400-600 rubles. The check is performed according to the following algorithm (the method can be used on the VAZ 2113 and VAZ 2115):
- Turn on the ignition. We make sure that all the dashboard lights are on;
- Let's start the fourteenth. The battery light on the dashboard, if the device is working properly, should go out;
- Warm up the engine to °C). Now you need to create the maximum load on the car’s electrical network, for this you will need to turn on all devices that consume electricity - radio, high beam, cigarette lighter, heated glass;
- Set the multimeter to voltmeter mode. Here we need an assistant who will sit in the driver’s seat and maintain engine speed at 3200-3500 rpm;
- We connect the multimeter probes. During the heaviest load on the on-board electrical network, the generator must produce a voltage of at least thirteen volts. If the multimeter shows a reading less than the required one, it means that due to a malfunction, the generator on the VAZ 2114 produces low voltage;
- Next, turn off all energy consumers and check the electrical appliance at minimum load. We do the same thing - we take measurements when the engine is running at 3200-3500 rpm. Now the multimeter should show at least 14.7 Volts.
Checking with a multimeter
Knowing how many volts the generator on the VAZ 2114 should produce, after detecting inconsistencies, it is necessary to begin troubleshooting and, if necessary, replacing the device.
Typical problems with the VAZ electric motor
First, let's discuss what are the typical malfunctions of the VAZ 2107 passenger car.
- A particularly common type of breakdown is wear of the electric motor brushes. This problem can be indicated by too low output voltage, which means frequent discharge of the battery.
- Also, car enthusiasts often have to deal with bearing failures. Many VAZ owners complain about characteristic noises, after which they have to replace the bearing.
- There are reviews about the failure of the diode bridge. This sometimes happens due to improper handling of the electric motor.
To more specifically determine the breakdown of the generator of this seventh generation classic car or, say, a VAZ 2106, you need to prepare:
- a set of keys;
- screwdrivers;
- puller;
- block, rubber hammer.
By the way, the typical generator problems of the VAZ 2109 are the same. In general, in order to identify them all, you must first remove the unit from the car.
- But to do this, we first disconnect the battery and wires from the electric motor.
- We dismantle the unit. Now it will be easier to identify all problems with the assembly unit.
- After removing the device, we separate the pulley, while simultaneously fixing the rotor with a tool.
- Here you can immediately inspect the voltage regulator relay; it also sometimes fails. For example, if the battery is constantly boiling, it is worth checking this relay.
- By unscrewing the nuts, you can remove the electric motor cover.
- There is a bearing in the cover, which sometimes makes noise. This refers to the main malfunctions of the domestic generator. If the bearing falls apart, it must be pressed out using a puller and replaced.
- Using a block with a hammer, you can squeeze out the rotor and check it, but rotor failures are extremely rare.
- Having separated the stator from the cover, it is worth inspecting the stator winding, but a break in the circuit is unlikely. The cause of such a malfunction may be its operation at extreme conditions.
- Next, you can remove the diode bridge; it often fails. You can check it with a multimeter.
- And of course, the brushes of the electric motor - they need to be measured, if the length is too short, replace them.
- Assembly and installation of the unit is done in reverse.
Here it should be added that the faults of the VAZ 2110 are of the same nature. However, the Chevrolet Niva generator usually has the same malfunctions.
Bottom line: what are the signs?
Now let's try to summarize the above, in other words, summarize all the signs of typical generator malfunctions.
- The first is signs of a malfunction of the diode bridge of a junk generator. Namely: frequent voltage drops, the battery is either recharged or not properly charged. After all, the diode bridge serves as a kind of check valve and is responsible for ensuring that the electric current flows directly from the unit and does not return back.
- There are also frequent cases of failure of the voltage regulator relay, as evidenced by frequent recharging of the battery.
- Next is the wear of the motor brushes, which is indicated by a voltage drop.
- Bearing failure is indicated by a characteristic hum that can be heard even from under the hood.
- Less common is winding breakage, which is diagnosed after a complete failure of the unit.
Video “Repairing GU at home”
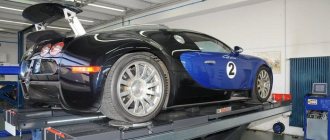
Visual instructions for repairing a power unit with your own hands are presented in the video below using the example of a Ford Transit car (the author of the video is Ramanych).
The generator is the main component in the vehicle's electrical power supply system. Sometimes it breaks down, but you shouldn’t throw it away and rush to buy a new one. Often the problem is that the generator brushes are worn out and it is enough to replace them for further uninterrupted operation of this unit. Replacing generator brushes is a fairly simple procedure, but first you should find out what signs may indicate brush wear.
Often, when carrying out a preventive inspection of a car, attention is not paid to various details. Generator brushes are one of these little things; if they wear out, the generator will stop charging the battery
Experts recommend inspecting the brush assembly once every 45-55 thousand kilometers. Diagnostics of the brushes can be carried out without removing the generator, and in some cases it may even be possible to replace them without removing the main unit.
- The car's electrical appliances suddenly turn off (even while driving);
- Headlights, dimensions and even interior lighting dim and flicker;
- A sharp decrease in the voltage of the vehicle's on-board network;
- A sharp discharge of the battery, which will be very difficult to recharge in the future.
Types of generator faults
Mechanical faults include malfunction of bearings, mechanical damage to the housing, fasteners, springs, belt drive, pulleys, etc.
Electrical - these are brush burnout, rotor runout, interturn short circuits, diode bridge breakdowns, breakdowns, winding breaks, relay malfunctions, etc.
Signs of a faulty generator:
You should think about possible generator malfunctions if
- the battery discharge indicator lights up or flashes while the engine is running;
- the battery has been discharged or boiled out (overcharging);
- the brightness of the headlights has decreased;
- Squeaking, howling, and other extraneous sounds come from the generator.
Generator fault diagnosis
Unstable operation of the generator does not recharge the battery. The moment the battery is completely discharged, the engine will stall and the car will stop in the most inappropriate place. To avoid this situation, you should periodically check the serviceability of this unit and the battery.
Generator diagnostics should only be done using a voltmeter or ammeter.
When diagnosing or repairing a generator, safety regulations must be strictly followed. In order not to destroy the generator during testing, under no circumstances should you:
- Check by short circuit, “for spark”. Significant voltage drops will most likely damage all electronic systems of the car.
- Connect terminal “30” or “B+” to “ground” or terminal 67 (“D+”).
- Allow the generator to operate when the battery is disconnected or without load, that is, when there are no consumers turned on.
- Weld the body with the generator and battery wires connected.
- When turning on the battery, carefully monitor the polarity of the battery. Otherwise, there is a high probability of damaging the rectifier diodes.
- When disconnecting the generator wires, you should carefully monitor where they are so as not to accidentally short them together. Careless connection of wires can damage the generator components.
- If you need to replace the wiring, you can only use wires with similar parameters (cross-section and length).
How does the main power source work?
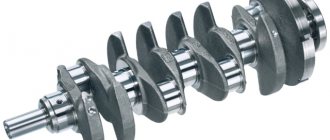
The generator consists of two main parts: the stator and the rotor. These parts are housed in an aluminum housing. The stator is fixedly fixed, and the rotor is fixed to the shaft and rotates on bearings. The rotor shaft is connected to the crankshaft of the car via a drive belt.
The generator, through a relay regulator, is directly connected to the battery. When you start the car, electricity comes from the battery. After starting the car, current from the generator begins to flow into the on-board electrical system.
The battery restores density by consuming electricity from the vehicle's on-board system. With a working generator, the entire electrical system works smoothly. When the generator fails, electricity comes only from the battery. If you do not recharge it, then soon the entire energy reserve will be used up and the car will stall.
How to check if the generator is working in a car?
It is carried out in the following order:
1) Checking the fuse. If it is not working, it is replaced.
2) If the fuse is working, inspect the housing, its integrity and location. It is necessary to check the rotation of the rotor, the integrity and tension of the belt, and whether the wire connections are damaged.
3) Check slip rings and brushes. During operation, the brushes wear out and can sometimes jam. Slip rings become dirty over time and their grooves become clogged with graphite dust.
4) Check bearings and stator. Bearing wear is indicated by a howling or whistling sound during generator operation.
5) The rotor is diagnosed: the field windings are checked for breaks and short circuits. The multimeter must be switched to measure resistance and connected to the slip rings of the generator. If the measured resistance is below 1.8 ÷5 Ohms, there is a short circuit in the turns. If it is higher than this interval, there is a winding break.
6) To check the field windings for ground, you need to disconnect them from the rectifier. If the multimeter gives an infinitely high resistance reading, it means that the stator windings are not touching the housing (“ground”).
7) Having disconnected the multimeter from the stator windings, you need to switch the device to the “diode check” mode. The plus of the multimeter is connected to the rectifier terminal, the minus to the phase terminal. They take readings. Then the probes are swapped. Readings are taken again. A faulty diode bridge will have the same readings. If the readings are very different from each other, then the unit is working. The diode bridge fails if the contacts oxidize due to overheating of the radiator.
Why does the generator break down in a car?
- wear during operation, corrosion;
- installation of low-quality components;
- improper operation outside the recommended operating modes;
- influence of external unfavorable factors (road chemicals, high temperature, dirt, salt).
How to replace brushes on a removed generator
With the generator removed, work on replacing the brushes will be much easier. Having access from all sides, it is easy to examine the wear of the brushes and replace them. The main problem in this option will be removing the generator from the car. You need to unscrew the generator mounting bolt, loosen the belt tension, remove it and unscrew the mounting bolts connecting the generator to the engine housing. If you can get the generator from above, consider yourself lucky. There are often cases when, to remove the generator, you have to remove not only the air filter and pipes, but even the radiator.
First of all, you need to clean the mounting area of the brush holder from dirt and dust. You can wipe it with solvent and then blow it with compressed air. After this, you need to remove the brushes; to do this, you need to unsolder them. Leaving the generator without brushes, be sure to clean all contacts and check the springs for elasticity. It is advisable to polish the slip ring after this.
Installation of new brushes should be done in the reverse order, after which the generator is assembled and installed on the car. It is recommended to change the generator bearings when replacing the brushes. When installing a generator on a car, the main thing is to correctly adjust the belt tension. If the tension is insufficient, the belt will slip on the rollers.
It happens that the computer in the car begins to show a malfunction of the generator immediately after replacing the brushes. This occurs due to insufficient grinding in of new parts. During operation they will rub in and the error will disappear. If the error persists, the reason is that the case is stuck due to excess dirt. This problem can easily be eliminated by blowing the parts with compressed air. Before checking the operation of the generator, be sure to inspect the brushes for chips and cracks. New parts often have manufacturing defects.
It happens that the brushes are replaced together with the relay and generator regulator. In this case, the replacement process proceeds as follows:
- The negative terminal is disconnected from the battery;
- You need to remove the rubber tip from the positive wire;
- The generator is dismantled (if necessary, the air filter housing must be removed);
- You get a brush block with a relay regulator;
- The fixing springs are removed;
- The brushes are unscrewed;
- All associated wiring is disconnected;
- A new block is being installed.
The generator is connected only after checking the absence of defects on the new brushes. After assembly, we put the generator in place, tighten the belt, connect the battery and start the car.
Troubleshooting and repair of car generators
Any worn or faulty parts found are replaced with new ones. The previously practiced rewinding of rotor or stator windings is now unprofitable. More often, brushes, bearings, and belts require replacement. You can easily do small jobs yourself. For example, solder wires torn off from the output terminals. Wash the slip rings with gasoline and dry.
You can handle simple repairs that do not require professional skills and highly qualified auto mechanics yourself. We must remember that repairs should be approached wisely, and do not repair the part that is easier to buy and replace with a new one. After all, the old one will fail faster, and repairs will turn into an endless process.
Obviously, you can diagnose the operation of the generator components yourself. This requires desire, very few tools and time. If you don’t have the desire or time, you can always turn to an experienced master. The main thing is not to ignore such an important component, so that traveling by car brings pleasure, and does not force you to solve new problems.
«>
Other causes of low voltage
A small potential difference in the system is not always associated with a breakdown of the generator or a bad battery
If the diagnosis of these elements does not reveal any problems, then you should pay attention to the following:
- condition of the battery terminals - connection density and oxidation;
- electrical wiring problems - oxidation, violation of its integrity;
- output contacts to electrical appliances;
- correctly selected energy consumers.
Each contact must be tightly adjacent and intact, that is, there must be no formations (for example, sulfation) that will disrupt the flow of current. Incorrect connection of contacts leads to accelerated battery discharge even when the car is not running.
To improve the connection of the elements of the car's electrical system, it is necessary to clean all contacts and restore the integrity of the wires by replacing them or connecting them and wrapping them with insulating tape.
In conclusion, I would like to repeat that stable operation of the car requires constant monitoring of all elements, and the generator should attract special attention. The battery is charged from it and provides electricity to the entire car system
Pay attention to all elements: generator brushes, slip rings, voltage regulator, equipment winding.
The most correct measurements should be carried out when the battery is fully charged and in various modes. Remember that the manufacturer links the characteristics of the generator to the number of engine revolutions - they help produce a certain current.
Detailed video on how to check the generator: