How to install the clutch disc correctly and which side? Even this can be learned
Awareness of how to correctly and which side to place the clutch disc when repairing or replacing a unit will allow you to avoid repeated disassembly of the unit and prevent the occurrence of additional malfunctions of the car and its elements. Thanks to the clutch, the vehicle can start smoothly without overloading the power unit, facilitating the normal and long-term operation of its units and gearbox components. The disc is usually replaced along with the entire clutch basket. There are two ways to carry out the work: with and without dismantling the gearbox. The latter method is less labor-intensive and more convenient. The work process is carried out on a lift or inspection pit.
Where is it used?
Automakers use this element on systems with two disks - a slave and a master. The first element receives torque from the second and transmits it to the transmission. Further, through the cardan transmission, the force is transmitted to the gearbox, and then to the wheels. The drive disc is tightly secured to the crankshaft. In order for the driver to move from one gear to another (no matter whether it is high or low), it is necessary to separate these two elements. This operation is carried out precisely thanks to the bearing. The force is controlled by pressing the clutch pedal. When it is pressed to the floor, the transmission of torque stops - the bearing rotates at the same speed as the flywheel. As it is released, the two disks are connected to each other. At this time, high loads are observed on the clutch release bearing. Malfunctions of these elements arise precisely because of heavy loads.
It is worth noting that while driving, when the car is in gear, this element is in a calm state. But as soon as you need to switch to the next or previous speed, it immediately starts working. Despite its small size, this element performs an important function. In the event of any malfunction, further operation of the vehicle will be impossible or difficult. Therefore, at the first symptoms you should pay attention to it. What signs of malfunction does the clutch release bearing have (Kalina included), we will consider further.
Removing the clutch
How to place the clutch disc correctly and which side to use is a question that often arises among novice motorists who do not pay attention to some nuances when performing work, ignoring which can lead to useless repairs and serious problems with the car.
When starting to remove the unit in question, the following requirements must be met:
- Stop the vehicle with special wedges;
Why does the clutch break?
The reasons for the failure of this necessary unit can be various facts, but most often the following can be identified among the reasons for this:
- “jerk” from a standstill at high speeds;
- holding the clutch pedal depressed while driving is strictly prohibited by all car manufacturers;
- initially low quality of parts used in assembly.
Separately, it is worth noting the excessively intensive operation, which is so typical for domestic GAZelle cars. Quite often, dissonance in the operation of the clutch is caused by “crooked” mechanics who can install an accidentally oiled disc, which will lead to slippage - in this case, only replacing them will help.
But not in every case it is necessary to change the entire assembly. The clutch slave cylinder often needs to be replaced - this unit also operates under fairly high loads. Problems with changing gears or braking occur when the system becomes airy. In this case, checking the entire pipeline and bleeding the system helps. If the problem returns again, you should pay attention to the tank. It can be damaged quite easily, then replacing the clutch reservoir with a GAZelle will help.
Replacement
The assembly is installed in a mirror disassembly sequence. First, apply a special lubricant to the bearing hole of the gearbox input shaft, and clean the friction area and the pressure disk with a cloth. Installing the disk in its place is done with the protruding part facing the basket. Pre-applied marks on the housing and flywheel are aligned to prevent imbalance.
During the work, it is necessary to center the driven disk in relation to the crankshaft axis. For this procedure, a special rule is used (simulates the splined part of the input shaft), which should be easily removed after installation. The fastening bolts must be tightened alternately with even force to prevent the casing from moving.
Replacing the VAZ 2114 clutch
- VAZ-2112 . This model uses a dry single-plate clutch assembly with a pressure-type central spring. Its casing is fixed to the flywheel with 6 bolts. The pressure plate (PD) is connected to the casing by 3 pairs of plates. The driven disk (VD) is located on the splines of the gearbox PV (primary shaft). The clutch drive is implemented on the basis of a backlash-free cable connection and a closed engagement bearing. To distinguish the leading elements of the clutch, which comes complete with the VAZ-2112 engine, there is a special marking in the form of a mark in the slot on the petals of the pressure spring (NP) and white stripes on the HP springs.
- VAZ-2114 . The design of the 14th version uses a dry single-plate clutch mechanism, on the driven disk of which, in addition to a pressure-type diaphragm spring, a vibration damper is installed. A disk with a set of friction linings and a damper is mounted on the gearbox shaft splines. When the pedal is pressed, the HP is pressed against the flywheel by the pressure plate. The clutch housing is centered with 4 pins and secured with 6 mounting bolts to the flywheel.
Functions and structure of the clutch disc
On the side of the casing there are three evenly spaced recesses in the shape of a rectangle. Three pressure plate hubs fit tightly into them. This structure guarantees the transmission of torque to the working disk and the ability to move it relative to the axis when the clutch is activated.
Between the pressure disk element and the casing there are 18 springs, placed in pairs, which have versatile curls to prevent the part from jamming. To counteract distortion of the working disk and obtain optimal force, spring elements are placed from the same group. The springs are protected from excessive heating in the event of clutch slipping by washers made of heat-insulating pressed asbestos material.
Spherical nuts with conical springs are attached to the ends of the tail forks of the unit in question, providing some rolling of the element required to dampen the change in the distance between the axles when the disk is retracted. In the grooves of the protrusions of the guide disk element there are three steel levers, which are connected to the disk and support forks by means of needle-type bearings and axles.
Causes of slippage
The causes of clutch slipping are:
- reducing pedal free play;
- operational wear of friction clutches;
- diaphragm spring failure;
- oil getting on the friction pads.
The first step
On the way to identifying the true reasons for the inadequate behavior of the clutch mechanism, there should be a measurement of the real range of displacement of the clutch pedal until the clutches engage.
- for Tavria it is 20-30 mm;
- for "Volga - 24-10" - from 12 to 28 mm;
- For the VAZ 2109 this figure is at 38-40 mm.
When the elasticity coefficient of the release springs decreases, flywheel wear increases
, and due to the friction of the flywheel on the pressure disk, deformation processes begin in it. To eliminate traces of warping on the flywheel surface, it is processed by grinding.
You can finally verify that the clutch is slipping using a very simple method, without disassembling the mechanism. You need to start the engine, then put it on the handbrake, depress the clutch pedal, engage first gear and slowly press the accelerator to release the clutch.
If the clutch mechanics are functioning normally, the engine should stall.
. If he did not do this, the answer will be clear - the clutch is slipping.
One of the reasons for changes in the free movement of the pedal may be operational wear of the friction cuffs
. If the wear is within 0.2 mm, then the problem can still be solved by adjusting the free play, but if they are “worn out” below this limit, it is no longer possible to do without replacing the driven disk with all the gaskets in a complete set.
When gasoline or mineral oil gets into the brake housing, the rubber gaskets in the hydraulic cylinder swell. A similar phenomenon can be observed when filling in a fluid that does not correspond to that recommended for use on this type of clutch or the quality of which is poor.
In any case, you need to dismantle the hydraulic drive mechanism
, disassemble and wash it. Alcohol or new brake fluid is suitable for flushing. All components in the manufacture of which rubber took part must be replaced, and the compensator hole must be thoroughly cleaned.
When the springs lose their elasticity, the pressure pressure on the driven disk of the mechanism is lost. It is almost impossible to check the springs in a garage, therefore, it is better to use the services of a service station
, which has equipment and instruments for checking such parameters.
Some tricks
Experienced drivers advise, when performing the process of replacing the presented unit, to place evenly small dots of glue (moment or high-quality analogues) on the working surface of the basket. The disk is placed on the basket with the springs facing away from you and aligned along the edges. The glue will help secure the parts while they are attached.
Considering how to place the clutch disc correctly and which side, this method involves a slight continuation. After installing the gearbox, you need to engage the gear and squeeze the clutch and turn the mechanism with the starter. This method is suitable for most machines.
How to change a clutch: how to install a clutch disc
As you know, a manual transmission is characterized by fairly high reliability and unpretentiousness. For such a gearbox, a very realistic indicator of mileage without repair is about 250-300 thousand km. and more. At the same time, the clutch deserves special attention, as it needs to be changed much earlier for one reason or another.
Replacing the clutch on a manual transmission (unlike a manual transmission) itself is not an extremely complicated procedure, but it does require certain skills and tools. Also, during the installation process, some owners do not know how to install the clutch correctly. Next, we will look at the nuance of how to install the clutch disc when replacing it.
About the flywheel and clutch
As you know, a serviceable cast-iron flywheel guarantees the normal functioning of the internal combustion engine. The element is also intended as a coupling stronghold. And the permissible wear values of the element must be calculated together with other clutch elements.
ATTENTION! A completely simple way to reduce fuel consumption has been found! Don't believe me? An auto mechanic with 15 years of experience also didn’t believe it until he tried it. And now he saves 35,000 rubles a year on gasoline!
For this reason, if we talk about the flywheel, we will mean the entire clutch system. Obviously, this part is directly connected to the clutch and is its support.
Let's look at the operation and location of clutch elements in more detail.
- A metal hoop is placed along the entire outer border of the flywheel, the teeth of which engage with the starter part when starting the engine. The hoop is steel and durable. To increase the strength properties, the crown is subjected to high voltage hardening. It is initially put on the crank shaft balancer after previous and uniform heating to a temperature of 180 degrees.
- The flywheel sphere in contact with the clutch disc is subject to heavy load. The part is fixed with bolts to the end of the crank shaft, and the bolts must be secured with a special washer so that the fasteners can withstand such a load.
Attention. Flywheels must undergo a mandatory static balancing process (in this case, the imbalance should not exceed more than 0.1 Nm).
Important points:
- the flywheel is also adjusted after seating on the crank shaft assembly;
- during operation, the reverse plane of the flywheel, which is in direct contact with the clutch disc, is mostly subject to abrasion;
- The metal hoop-crown wears out most often.
If the rear plane of the flywheel wears out, it is ground on a machine in compliance with the basic rules. If the crown wears out, it must be replaced. The hoop is replaced as follows: the crown is knocked out of the part.
In some cases, if the crown sits very tightly, you should do this. Drill several holes in the base of the hoop so that the hoop splits. In this case, you must try not to damage the cast iron material of the flywheel itself.
The new hoop is installed either “cold” or “hot”. Both methods have their pros and cons. A crown placed “cold” will last much longer, but such installation can be difficult. On the contrary, it is much easier to put the crown “on hot”, but this must be done with great care, otherwise the heating will be uneven.
So, here is how the flywheel and clutch elements are located in the diagram (we are talking about a single-plate clutch):
- clutch pedal lever;
- a shaft that transmits pressing energy;
- clutch release fork;
- pressure disk;
- driven disk;
- damping system consisting of drive disk springs;
- release lever;
- thrust bearing;
- ferodo or overlays;
- gearbox input shaft.
Table of factory permissible dimensions and clearances of the main coupling parts
| Designation and name of associated parts | Nominal size and tolerance, mm | Gap, mm | Permissible wear limit, mm |
| 2141-1701030 — gearbox input shaft | 1.595+0.046+0.029 (shaft tooth height) | 0,02 — 0,132 | 0,3 |
| 2141-1601142 — driven disk hub | 1.661+0.066+0.033 (hub cavity) | ||
| 2141-1601036-10 — guide sleeve | 31-0.080-0.180(diameter) | 0,08 — 0,219 | 0,4 |
| 2141-1602055 — pedal roller | 20-0.033 (diameter) | ||
| 2141-1601242 — clutch release shaft | 20-0.033 (diameter) | 0,04 — 0,325 | 0,6 |
| 2141-1601222 — large shaft sleeve | 3.48-0.12 (wall thickness) |
Clutch disc installation: what to pay attention to
Let's start with the fact that thanks to the clutch, the car is able to move off smoothly, gears are switched smoothly, which contributes to the normal operation of all elements of the transmission and the internal combustion engine itself, preserving the life of components and assemblies.
Taking into account the fact that the load on the clutch is high, the service life of the clutch itself is, on average, about 100 thousand km. Its wear is indicated by loss of traction, slipping of the clutch, incomplete disengagement of the clutch, difficulties when shifting gears, the clutch pedal may become soft or, conversely, too tight, etc.
As a rule, replacing the disc is carried out together with replacing the clutch basket, but in some cases only the disc is replaced. Let's move on. For many cars, there are two ways to replace the clutch:
- replacing the clutch with removing the gearbox;
- replacing the clutch without removing the box;
It is not surprising that it is the second method that is more convenient. At the same time, for a car with rear-wheel drive, replacement is easier. It is more difficult to change the clutch on a front-wheel drive car, but it is also possible to do it yourself. Let's look at the main stages.
- To implement the task, you will need a lift, overpass or pit. Before removing the clutch, it is necessary to place wheel chocks under the vehicle wheels.
- First of all, you need to disconnect the cardan from the gearbox and the working cylinder. Next, you will need to disconnect the wiring ends of the reverse light switch;
- Then, using a spanner wrench, you will need to unscrew the mounting bolts that secure the gearbox cushion. Now the pillow needs to be removed;
- Next, you need to move the box away from the engine as far as possible (so that the switch rests on the bottom); The transmission will actually rest on the inlet pipe of the exhaust system. For this reason, the back of the box must be additionally supported with a support or jack;
- Next, retracting the flywheel, you will need to unscrew the 6 mounting bolts on the clutch basket. In order to gain access to the fixing elements, you need to periodically turn the crankshaft;
- Then the disc itself is removed into the groove that appears and by moving the clutch basket. To remove the basket, you need to slide it towards the engine. The last step will require removing the fork and release bearing;
- Replacing the clutch is done in the reverse order. In this case, a special lubricant is first applied to the bearing hole of the gearbox input shaft, and the friction and contact area of the pressure disk is wiped with a rag.
Also, during work, you need to center the driven disk relative to the axis of the crankshaft. To implement the task, you need to use a rule that is an imitation of the splined part of the input shaft. The rule should be easily removed after installation.
The indicated recesses fit tightly into the 3 pressure plate hubs. This design solution guarantees effective transmission of torque to the disc at the same time as the possibility of its displacement relative to the axis when the clutch is engaged.
Between the pressure plate and the casing there are 18 springs, which are arranged in pairs. The springs have coils that are made in different directions. This eliminates the risk of possible jamming. Also, so that the working disk does not warp and at the same time a suitable force is achieved, the installed springs must be from the same group.
The springs are protected from excessive heating during clutch slipping by washers made of pressed asbestos material, which is heat resistant and has the ability to dissipate heat.
There are also spherical nuts with conical springs at the ends of the tail forks. This solution can provide a certain rolling of the element, which is necessary in order to level the distance between the axes at the moment the disk is removed.
Removing clutch discs from a Gazelle car
We remove the clutch housing (see article - Removing the clutch housing (ZMZ-406 engine)
We use a core to mark the relative position of the casing and flywheel.
1. While holding the flywheel from turning with a screwdriver or a spade, a wrench or a 12mm socket, unscrew 6 bolts
2. Remove the drive disk assembly (basket) and driven disk
After disassembling, the clutch parts should be washed in kerosene and inspected. Cracks, burrs and deep grooves are not allowed on the surface of the drive discs.
If present, replace the flywheel and basket assembly.
We replace the driven disk with linings worn to the rivets, warped, cracked, oiled and burnt.
The protrusion of the ends of the diaphragm spring petals is controlled using a spacer.
When moving the ends of the petals 8.5 mm down, the pressure plate offset must be at least 1.3 mm, otherwise we replace the drive disk (basket) assembly.
note
Any cracks or breaks are not allowed on the crankcase. During assembly, we coat the rubbing surfaces of the fork, coupling, pushers and shaft splines with CV joint-4 lubricant.
Install the disks in the following sequence
We insert the centering mandrel into the engine flywheel bearing.
We put the driven disk on it.
On one side the disc hub protrudes less than on the other. This side should be facing the flywheel.
We attach the basket to the flywheel and fasten it with 6 bolts (the holes match only in one position). After tightening the bolts, remove the mandrel
Dismantling the clutch of a car with an engine model ZMZ-402
We carry out the work in an inspection ditch.
We remove the gearbox.
We remove the hydraulic clutch slave cylinder (see article - Replacing the master and slave cylinders of the clutch of a Gazelle car
1. Using a 10mm wrench, unscrew the fastening bolt
2. Remove the clutch release fork along with the protective cover.
3. Remove the clutch release bearing (release bearing).
4. Using a 12mm wrench, unscrew the two lower bolts
5. Using a 14mm wrench, loosen the two upper bolts securing the clutch housing amplifier.
Similarly, loosen the amplifier mount on the other side of the engine.
6. Using a 12mm wrench, unscrew the four bolts securing the lower part of the clutch housing
7. Squeeze out with a mounting spatula and remove the lower part.
A cardboard gasket is installed between the pan and the crankcase.
Advice
In order not to disturb the joint balancing of the flywheel and the clutch drive plate when assembling the unit, we mark their relative position with a chisel or punch
9. While holding the flywheel from turning with a mounting blade, use a 12mm wrench to unscrew the six bolts securing the “basket” to the flywheel.
Semicircular plates are installed between them.
To facilitate access to the bolts, periodically rotate the flywheel.
11. Remove the “basket” and the driven disc of the clutch
We install the clutch parts in reverse order, centering the clutch driven disc with a special mandrel.
If there is no mandrel, you can center the clutch driven disc using the gearbox input shaft.
To do this, when installing the clutch “basket”, we only tighten its fastening bolts, leaving the driven disk free to move.
Having installed the box and tightened the nuts securing it, rotate the flywheel, evenly tightening the bolts securing the “basket”.
How to install a clutch disc: step-by-step instructions
The clutch performs the most important function - it ensures smooth gear shifting, so that the car starts smoothly, the transmission and engine function correctly and do not fail ahead of time.
Due to the fact that the clutch experiences increased loads, it has to be changed quite often, every 100,000 kilometers. How do you know when it's time to install a new clutch disc?
The following signs indicate that this element has become unusable: slippage appears, the clutch does not disengage completely, gears are difficult to shift, the clutch pedal becomes too tight or falls, and the car loses traction.
Not every car owner is well versed in how to properly replace this element. What happens if you install the clutch disc incorrectly? The result of such a repair will be the following: you will have to disassemble the unit again, because the disk will not be able to function properly and will begin to malfunction.
Most often, a new clutch basket is also installed, but there are situations when you can get by with replacing one disc. Although this is generally not a very complicated procedure, many car owners do not know how to properly install the clutch disc. There are 2 methods for performing this operation:
- install the clutch after removing the gearbox;
- install a new part without removing the gearbox.
Of course, the second method is much simpler. By the way, if the car is rear-wheel drive, then even a beginner can handle this job. Installing the clutch if the car has front-wheel drive will not be easy, but if you apply the right amount of effort, you can do it yourself. Let's figure out how to install the clutch correctly step by step.
To install the clutch yourself, the car is driven onto an overpass or a hole in the garage. Before you begin dismantling, you should place a special stop under each wheel to prevent the car from rolling away.
- To install the clutch, first of all we disconnect the cardan from the box, as well as the slave cylinder. Then we disconnect the limit switches of the reverse light switch wiring.
- Using a spanner, unscrew the bolts that secure the gearbox mount. Then remove the pillow.
- Now we move the gearbox as far as possible from the engine, while the switch should rest against the bottom. This way the transmission will rest on the inlet pipe of the exhaust system. Therefore, the rear gearbox must be supported with a jack or support.
- We remove the flywheel and unscrew the six bolts that secure the clutch basket. To get to them, you will have to turn the crankshaft from time to time.
- After this, a groove will appear into which you will need to slide the clutch basket, so the disc will be removed. To remove the basket, move it towards the engine. Then remove the fork, as well as the release bearing.
- To install the clutch, proceed in reverse order. It is necessary to apply lubricant in advance to the bearing hole of the gearbox input shaft. The area that the pressure disc comes into contact with should be wiped with a cloth.
Is it possible to put the clutch disc in reverse? Which side should it be on? It must be installed so that the protruding part faces the basket. In this case, you should first apply marks to the housing and flywheel. Subsequently, they must be combined; this is the only way to install the clutch correctly.
We recommend
When carrying out this procedure, the driven disk should be centered relative to the crankshaft axis. To do this, use the rule, it will play the role of the splined part of the input shaft. Once installation is complete, the rule should be easy to remove.
The bolts that secure the casing must be tightened one at a time with the same force, otherwise it will move out of place. On the side of the casing there are rectangular recesses that are evenly distributed over the entire surface.
Three pressure plate hubs should fit into these recesses. This design allows torque to be transmitted to the disc as efficiently as possible, while it can be shifted relative to the axis when the clutch is engaged.
There are 18 springs located in pairs between the casing and the pressure plate. They have turns, they are made in different directions. Thanks to this solution, the mechanism never jams. To prevent distortion of the working disk and achieve the required force, all installed springs must be from the same group.
To prevent the springs from overheating when the clutch slips, washers are used. They are made of pressed asbestos; this material is not afraid of high temperatures and effectively removes heat.
In addition, there are spherical nuts at the ends of the tail forks, as well as cone-shaped springs. As a result of this, a rolling mechanism appears; it is necessary to level the gap between the axles when the disk is retracted.
So, we have figured out how to properly install the clutch disc and basket. This procedure can be performed by any motorist if he has some experience in carrying out repair work. The hardest part will be getting directly to the clutch, especially when you have a front-wheel drive car.
To avoid confusion when replacing this mechanism about how to install the clutch driven disc, remember: it is placed towards the basket on the side where the damper springs protrude.
Replacing the clutch, disc, basket, release lever with your own hands
Any car with a manual transmission needs to have its clutch replaced regularly. Replacing the clutch yourself is not particularly difficult if you have the necessary equipment and you know the procedure.
The mileage of the disc is 70–150 thousand kilometers and depends on the operating conditions of the vehicle. Other clutch parts are changed as needed. After reading the article, you will learn how to change the clutch without going to a car service center.
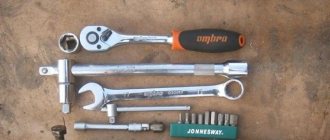
Equipment and tools required for work
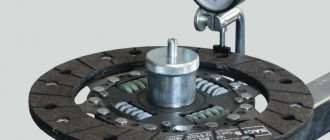
Clutch alignment guide
To work you will need:
- pit, overpass, lift or jack;
- a set of open-end and socket wrenches;
- mount;
- winch;
- input shaft of the gearbox (manual transmission) or a special mandrel corresponding to the type of gearbox;
- brake fluid (for vehicles with a hydraulic clutch);
- extension cord with carrying lamp;
- assistant.
Clutch replacement
Complete replacement of the clutch kit involves the following procedure:
- removal and installation of manual transmission;
- replacement:
- disk;
- baskets;
- master and slave cylinders (if any);
- cable;
- release bearing.
Technologies for removing and installing manual transmissions on cars with rear-wheel drive and front-wheel drive are different. On rear-wheel drive vehicles, it is necessary to disconnect the clutch connecting the manual transmission to the driveshaft.
On front-wheel drive vehicles, you will need to remove the drive shafts and insert plugs in their place.
After this, disconnect the cables or links of the gear selection device, unscrew the fastening nuts, then remove the gearbox input shaft from the bearing in the engine flywheel.
Be sure to check the condition of the gear selector seal. Oil stains in the area of the rod indicate oil seal wear.
When installing, it is necessary to rotate the box shaft so that it fits into the flywheel splines. When removing or installing a manual transmission on vehicles with all-wheel drive or a large engine capacity, use a winch. After installing the manual transmission on the car, it is necessary to adjust the length of the rod that presses the fork.
Replacing the disk and basket
Replacing the clutch disc is done as follows. Unscrew the basket mounting bolts, then remove all parts from the flywheel. There should be no traces of oil on the flywheel or driven disk surface.
If there are marks, it is necessary to check the condition of the gearbox oil seal, otherwise the oil leak will continue, which will reduce the service life of the disc. Droplets of oil falling on the surface of the lining or driven disc damage them.
If the condition of the oil seal is unsatisfactory, replace it. If the surface of the driven disk is covered with deep scratches or cracks, change the basket.
Important
Wipe with a rag, then degrease the surface of the flywheel and the basket driven disk with gasoline. Insert the disc into the basket, then slide both parts onto the manual transmission input shaft or mandrel, and then insert into the hole in the flywheel. When the mandrel reaches the stop, guide the parts along it to the flywheel and screw the basket with standard bolts.
Pull out and then reinsert the mandrel a few times to make sure the disc is seated straight. If everything is normal, insert the mandrel and tighten the bolts with a force of 2.5–3.5 kgf-m. More precisely, the force is indicated in the repair instructions for your machine. This completes the replacement of the clutch disc. Replacing the clutch basket is done in the same way.
The maximum mileage of the basket is 150–250 thousand kilometers and depends on many factors.
Remember, replacing a clutch disc is a responsible operation, so do not perform it in a hurry or while intoxicated.
Vibration after replacing the clutch appears due to improper alignment of the disc or weak tension of the basket. If this happens, you will need to remove and reinstall the drive and cage.
Replacing cylinders
- Replacing the clutch master cylinder is necessary if installing new O-rings does not improve system performance.
- Replacing the clutch slave cylinder is necessary if brake fluid continues to leak even after installing new seals.
b - working cylinder pusher
To remove the slave cylinder, remove the spring that returns the fork when the pedal is released. Next, remove the 2 nuts that secure the slave cylinder to the transmission housing. Holding the working cylinder suspended, unscrew the rubber hose that fits it.
To avoid brake fluid leakage, immediately screw the new slave cylinder to the hose. To remove the master cylinder, pump out all the fluid from the reservoir. Unscrew the fitting with the copper tube that goes into the cylinder and close it with a rubber plug to prevent brake fluid from leaking out.
Move the tube to the side so it is out of the way, then unscrew the two nuts securing the master cylinder to the car body. Pull towards you and unclip the joint to which the pedal is connected. Pull out the pin and disconnect the cylinder from the pedal. Install the master and slave cylinders in the reverse order.
Don't forget to adjust the length of the rod that pushes the clutch fork.
Master cylinder
Advice
After installing new cylinders, pour new brake fluid into the reservoir and be sure to bleed the clutch. To do this, put a rubber tube on the valve and lower it into a transparent container, pour brake fluid into it, then ask him to smoothly press/release the pedal 4 times. After this, ask to press the pedal again and not let go without your command.
When the assistant presses the pedal for the fifth time, unscrew the valve to drain the fluid. Then tighten the valve, and then ask an assistant to release the pedal. It is necessary to pump the clutch until you are sure that the fluid comes out without air. Add brake fluid to the reservoir in a timely manner so that the cylinder does not suck air.
If the brake fluid level drops too much, re-bleeding will be required.
Replacing the cable
The cable replaced the hydraulic clutch. Higher reliability, low maintenance requirements and low price made the cable very popular.
The cable must be changed if the mileage has exceeded 150 thousand kilometers or more than 10 years have passed since the previous replacement. Replacing the clutch cable is not difficult even for an inexperienced driver. Release the fork from the return spring, then remove the cable.
After this, unpin the connection and remove the cable from the pedal. Pull out the pin, then remove the old cable through the interior. Install the new cable in the same way. This completes the replacement of the clutch cable.
The cable must be changed if even slight damage is found on it. If this is not done, the cable will break while driving, making it impossible to change gears.
Replacing the release bearing
The mileage of the release bearing should not exceed 150 thousand kilometers. In addition, replacement of the release bearing will be required if the gears begin to shift indistinctly or if there is noise when pressing the clutch pedal. The procedure for replacing the release bearing is described in detail in the article replacing the release bearing.
Conclusion
If you have the right equipment, tools and you know how to work carefully, then replacing the clutch yourself is not difficult. Now you know what replacing a clutch is, what the procedure is, and you can carry out this operation on your car yourself.
How to install the clutch disc correctly: the opinion of motorists
- Which side should the clutch disc be placed towards the engine?
“What happens if you put the clutch disc in reverse? I learned this the hard way. After assembly, I began to test the operation of the car, but there was simply no clutch, and extraneous sounds appeared, everything in the mechanism was grinding. As a result, I dismantled the gearbox again to install the element on the other side. I'll tell you what happens when the clutch is installed incorrectly.
The disc hub will rest against the flywheel support bearing, and the damper springs will rest against the bolts that secure the flywheel. As a result, a gap of 2-3 mm will appear between the disk and the flywheel. But the working area of the disk must be in full contact with the surface of the flywheel.
On the reverse side, the basket will put pressure on the disk, and as a result it will be sandwiched between the basket and the flywheel. If you press the clutch, the release bearing will not be able to perform its function. The disk will be clamped, and torque will be transmitted from the internal combustion engine through the clamped hub and the damper spring housing.
We recommend
How to install the clutch correctly? There are 3 methods.
Method one. Some disks are marked on both sides from the factory so that it is clear which side should be facing. There are also marks on the damper springs. The inscriptions will be made in the language of the country in which the parts were manufactured; this point is also worth paying attention to.
For example, on the side of the gearbox you can find the following inscriptions: “GEARBOX SIDE”, “PP”, “Getriebeseite”, “GB SIDE”, “TRANS SIDE”, “T/M SIDE”.
And on the engine side it may be written: “COTE VOLANT”, “FLYWHEEL SIDE”, “ENGINE SIDE”, “MOTOR SIDE”, “FW SIDE”, “SCHWUNGRAD-SEITE”.
Method two. We take the disk and apply it to the flywheel, first with one side, then with the other. If everything is correct, it should fit perfectly to the surface, nothing should catch. However, you can make a mistake here, because on many discs the hub offset is almost identical, no matter which side you apply it to, nothing will cling.
Method three. This is the best option to determine how to install the clutch correctly if nothing is written on it. Just conduct a visual inspection of the element using a caliper.
The side that faces the box will fit snugly against the basket, with the hub on that side sticking out.
There is an opening in the basket for the housing of the damper springs, in addition, the springs are also 75% placed towards the basket.
On the side adjacent to the engine, the springs will hardly stick out, by a maximum of 25%. The body is located flush with the work area. The hub will also be installed correctly.”
Replacing the clutch on a VAZ 2101-VAZ 2107
Welcome! The clutch is one of the important parts of the car, because with its help we change gears. The main job of this unit is to disconnect it from the flywheel while squeezing the clutch and for further switching the box. This unit looks like two disks on top of one of which there is a clutch housing, and the clutch also includes a release bearing and clutch assembly. But over time, one of the disks or the release bearing itself becomes unusable, which is why they will need to be replaced.
Note! To replace the clutch you will need to stock up on: A 13mm wrench, and in addition to all this you will also need to take two different types of screwdrivers (Flat and Phillips in this case), and you also need to stock up on a mandrel for centering the clutch disc which in a car store it costs literally 100 rubles! (You can see what this mandrel looks like, which is discussed in the article, just below in the section: “For beginners!”)
Summary:
When should you change the clutch? During operation, the clutch of any car wears out over time, and the first signs of a worn clutch that a car will show are:
1. Increased noise which begins to appear very clearly when changing gears in the car.
2. Jerks can also occur when starting off in a car, and they can also occur while driving when you depress the clutch pedal, then engage a gear, and then when you release the pedal, your car jerks forward a little.
Note! This mainly happens due to the damper springs that are installed on the driven disk, and in the photo below they are shown by arrows. These springs are needed so that the clutch disengages smoothly and thus does not cause discomfort when driving, and when these springs become unusable, when the clutch is disengaged, as mentioned earlier, a jerk occurs, which often has a very negative effect on the comfort of driving a car!
3. In addition to all this, if the clutch malfunctions, the effect that the clutch “slips” may occur. This is when you are driving a car and at the same time you press the gas pedal, let’s say to the floor, and your car does not accelerate, but the engine speed increases sharply and even reaches the red zone, this effect is popularly called the clutch “Slipping”.
4. And in conclusion, let’s note another effect called the “Leads” clutch. The first signs of this effect are as follows: let’s say you engage first gear and at this time the clutch pedal is still fully depressed, but even despite this the car starts to roll. This effect is called the “Leads” clutch.
device
The GAZ 53 clutch is dry, with one drive and one main clutch plate. The entire clutch system includes the following elements:
- Clutch basket (drive disc);
- disc (driven);
- Release the bearing assembly (the bearing itself and the coupling);
- Fork;
- Stock;
- Tubes and hoses;
- Clutch slave cylinder;
- Clutch master cylinder.
Return to content
If the clutch stops working, you may understand the following symptoms:
- It is impossible to turn on any speed;
- Transmission is affected by crunching and wheezing;
- The pedal is pressed very easily and fails;
The cause could be any part, but signs of failure are typical:
- The master cylinder is faulty - the pedal fails, is pressed too lightly, the clutch periodically disappears;
- The working cylinder is faulty - the pedal rises with the bar, but is not pressed fully. If the cylinder is leaking and the fluid disappears, it will be difficult to engage any speed;
In general, there are many options, but the main ones have already been listed.
GAZ-53 is equipped with a single-disc dry clutch, on the driven disk of which a damping device is installed.
In recent years, lawn baskets have appeared on the lawn market; They are more convenient than foot baskets because they do not require adjustment. But whether they are more reliable is another question. And baskets with claws are better, because they can always be repaired - kits for repairing lever baskets are sold in every specialty store and are inexpensive.
Foot basket installed
regulation
If your paw feels tight, you can try adjusting it.
There are two ways to adjust your feet on a work machine, the first is like a "book", the second is often used in auto repair.
- We parked the car in a pit.
- Remove the clutch housing pan.
- Remove the clutch cover so it can reach the paws.
- We take a rod (slightly longer than a match) and use it as a measuring tool. Rotate the flywheel, select the least hanging leg and use a rod to measure its height from the flywheel. The other two legs should be set at the same height. Turn the nuts in the desired direction for adjustment, the nuts are on the outside near the tabs.
- Having installed all the levers (paws) at the same distance, we check the operation of the clutch while driving. If everything is set up correctly, be sure to secure the adjustment nuts to the basket.
The first method is not always able to adjust the clutch. The fact is that the legs go into needle bearings, and wear may occur as a result. Then the second adjustment method will be somewhat more effective. All operations are performed the same way, only the essence of the adjustment itself is slightly different.
The work here needs to be done together:
Replacing the clutch basket or disc
Having learned that the basket or disc is faulty, we change the clutch:
- We parked the car in a pit;
- Removes the gear shift lever in the passenger compartment;
- Unscrew the entire drive shaft and remove it from the side. The markings are pre-installed on the rear driveshaft cross member and on the rear axle flange. Installing the shaft in one position will avoid vibration after assembly;
- Remove the output bearing plug.
Clutch removed. Everything is upside down, but a mandrel is required to center the clutch disc. You can use the old input shaft from gearbox 53, 3307, gas 66. When installing the basket, the bolts should rotate the flywheel evenly in a circle. And you don't have to tighten the bolts all at once from one end to the other, you need to buy all six fasteners first.
How to remove clutch 2112
To replace the VAZ-2112 clutch, after first dismantling the battery, it is necessary to remove the air filter along with the casing and mass air flow sensor. Using a flat-head screwdriver, pry the latches and pull them out of their regular places. After this, unscrew the starter to have access to the gearbox mounting to the engine. After this, unscrew the bolts and disconnect the gearbox speed sensor.
After completing the above operations, set the vehicle to the parking brake and place shoes under the rear wheels. “Tear off” the left wheel nuts, and then lift the car so that the front wheels hang in the air. Remove the wheel and unscrew the hub locknuts. After this, unscrew the ball joint and the suspension arm mount. Then remove the lever. If a mudguard or crankcase guard is installed, remove them as well.
Place a jack under the engine and place a pre-prepared board. It is needed to avoid damage to the crankcase. Raise the jack and support the engine. Remove the jet rod, and then loosen and dismantle the rocker.
Place a container under the gearbox and unscrew the plug to drain the fluid. After draining the liquid, remove the boot, disconnect the connectors of the reverse and speed sensors. Remove the bracket and use wrench 19 to unscrew the bolts securing the gearbox to the engine. Lower the engine slightly with a jack to make it easier to remove the box. Alternatively, you can jack up the gearbox itself without lowering the engine. Pull out the right and left drives, plugging the holes with previously prepared plugs. After this, remove the box. It is advisable to use the services of an assistant for this.
Having gained access to the clutch, unscrew the mounting bolts with a wrench or socket 8 and remove the basket. In this case, it is necessary to unscrew the bolts one by one and evenly. First, unscrew the 1st bolt one turn, then the next fastener in a circle. Then again unscrew the 1st one by one turn and so on until all the bolts have been unscrewed. After unscrewing the bolts, remove the basket and disk, remembering its position.
Spare parts prices
There are no problems with spare parts for the truck; spare parts can be purchased at any store specializing in the sale of GAZ spare parts. But the prices are different, and in addition to factory products, there are now many non-original goods. Non-original parts are often of poor quality. If you think that replacing a clutch disc or clutch basket takes a lot of time, then it is better to immediately buy quality products.
How to buy quality spare parts?
- Do not be tempted by a suspiciously low price; the quality of a “cheap” one is unlikely to be normal;
- It's best to shop at a specialty store that sells specialty products;
- The product must have its own packaging; if in doubt, you can ask the seller to show the quality certificate for the product;
- You must keep the sales receipt for the duration of the product warranty period.
New clutch basket for GAZ 53
- Drive disk (basket) - 1850-4000 rubles;
- Leading disk (basket) of the petal – 2500-2500 RUR;
- Driven disk - 700-1500 rubles;
- Clutch feet (3 pcs., complete with needle bearings) - RUB 350-500;
- Working cylinder - 370-480 rubles;
- Main cylinder - 350-500 rubles;
- Fork output bearing - 150-250 rubles;
- Production of a bearing assembly with a coupling - 200-270 rubles.
When replacing the clutch disc and clutch basket, pay attention to the condition of the flywheel working surface. When the disc is badly worn, it “eats” this plane and installing a new clutch disc sometimes does not solve the problem.
The process of installing the clutch on a GAZ 53
- Sand the surface using a milling machine (hand over to the company);
- Buy a new flywheel.
A new flywheel is expensive (3000-4000 rubles), you can try looking for used spare parts. But there is one warning with the replacement - there may be vibration. Therefore, carving an airplane would be a more reasonable solution.
When is it necessary to install a new clutch on a VAZ 2110 car and why?
Restoring a car on your own has always required not only some effort, but also financial investment. It is precisely because of the last factor that car owners try to carry out repairs themselves, thus saving on payments to service station workers. Clutch repair, of course, is not comparable in labor intensity to changing the working cylinder , but even if you have basic skills, it is quite doable in a garage.
To prevent replacing a VAZ 2110 clutch disc from becoming a waste of time and money, it’s a good idea to find out the symptoms indicating the need for repairs; experienced car enthusiasts already know them, but it will be useful for beginners:
- Loss of engine power.
- Vibrations when pressed or a “cotton” pedal.
- Switching on gears occurs with slipping or is accompanied by crunching and jerking.
- Spontaneous gear shutdown.
- Difficulty switching on speeds.
- Friction lining smell.
It is important to clearly identify the source of the problem; for example, a “stuck” pedal may also indicate that drive cable . Experienced motorists regularly check the condition of the friction mechanism every 80,000 km so that the installation of the VAZ 2110 clutch is fully justified.