Installation and connection of the start/stop button on Lada cars
One of the features of expensive cars is the presence of an engine start/stop button instead of the usual ignition key. AvtoVAZ does not yet provide the “Start the engine with a button” option, but any owner of a Lada car can modify the design with their own hands.
- Installation of a ready-made kit with a button, control unit and wires (price about $35);
- Self-production of one of the most popular circuits based on automotive relays (costs about $6).
In both cases, the scheme can be implemented on any Lada car (XRAY. Vesta. Largus. Granta. Kalina. Priora or Niva 4x4), including foreign cars. The button is installed in place of the ignition switch.
The ignition switch can be:
- put away;
- leave. Connect the start/stop button to the ignition switch connector (allows you to return to the key-start scheme within 10 minutes), and to prevent the steering wheel from being blocked, leave the key cut off and turned in it.
Installing the engine start/stop button (ready kit)
The easiest option to start the engine with a button is to buy a kit, which in a Chinese store is called something like this: “push start button start/stop car engine function working with car alarm system and remote central lock blue color back light.” Judging by the name of the product, the button and control unit can be connected to the alarm.
The most popular scheme among car enthusiasts is when the engine starts with a button while the brake pedal is pressed. All presses are short, that is, you do not need to hold it for the starter to operate. This is exactly the algorithm we get:
- One press ─ ACC mode;
- second press ─ ignition on;
- third press ─ ignition is turned off;
- To start the engine, you need to press the brake pedal and briefly press the start/stop button (if it doesn’t start well, you can press and hold the button, then the starter will work).
Universal connection diagram for the start/stop button included in the kit:
Now you can only carry the alarm key fob in your pocket.
How to disassemble the instrument panel
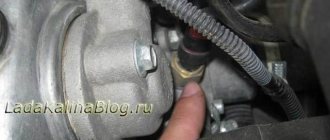
To understand how to disassemble the dashboard, consider the situation for the VAZ 2109. It is also suitable for many other VAZ models. To do this, we need to disassemble the plastic column and get to the chip that goes to the central lock. Then you need to find the wire that is responsible for starting the starter. This can be done using a tester. We are looking for the direct current that comes.
Be sure to be safe before searching for wires. To prevent the starter from working during testing, there is a starter relay. Disconnect the connector from it and check the voltage.
You need two contacts that must be connected to the button. You need to take the red and blue wires, which are connected diagonally in the block. Otherwise, the starter will operate even when the ignition is turned off, which is not necessary. Replace the relay block and try to start the engine. If the installation is done correctly, the motor will definitely start.
We looked at the question of how to install an engine start button. We carried out this installation for the case when the lock broke at the wrong time. In general, the engine start button can be installed at any time. No need to wait for the lock to break. Many people like to start the engine with a button, it’s cool. This is such a magic button.
Start/stop button installation diagram (minimum costs)
- Non-latching start/stop button (sold separately on the Chinese market for $5);
- 4-pin relay with normally open contact (3 pcs);
- 5-pin relay with normally closed contact (1 pc);
- Rear fog lamp relay (ZPTF), catalog number 2114-3747 (23.3777);
- Wires and terminals.
Description of connections to the ZPTF relay (wire colors are indicated for VAZ 21214 (Niva)):
- Relay working contact (+) - connect +12V from the battery (brown color in the ignition switch block).
- The permission signal (+) is also +12V from the battery, because There is a jumper between pins 1 and 2.
- General (-) - mass.
- Relay operating contact (load) - +12V is connected when the ignition is turned on (blue wire in the ignition switch block).
- Control signal (-) - connect the start/stop button.
- Permissive signal (+) - empty.
General connection diagram for the start/stop button:
There will be three connection points in the car:
- Ignition switch block (pin 15 - +12V after ignition, pin 30 - +12V from the battery);
- To the brake pedal end;
- To the starter control (interlock) wire so that the starter does not operate after the engine starts. You can find a suitable contact in the engine compartment (for Niva it is a black-red wire), or connect to the oil pressure lamp or battery lamp.
In case of using an alarm system. You can add another 5-pin relay to the circuit, which will block the button when arming the car:
What do you think, should we abandon the usual ignition switch with a key in favor of a button? Which version of this tuning suits you best? Let us remind you that the article presents only two connection diagrams; in fact, there are many more. By the way, do you know how to automatically open the trunk on a Grant?
https://xn--80aal0a.xn--80asehdb
As you know, starting a car engine is done by turning the key in the ignition. However, this technology is considered outdated, since many modern cars today have a Start-Stop button, which allows more optimal use of engine resources. We will tell you more about this system below.
How to remove the ignition lock cylinder of Passat B3
> Miscellaneous
02.02.2020
Information applicable to car repairs:
Volkswagen Passat B3 / Volkswagen Passat B3 (312) 1988 - 1994 Volkswagen Passat Variant B3 / Volkswagen Passat Variant B3 (315) 1988 - 1994
Volkswagen Passat B4 / Volkswagen Passat B4 (3A2) 1994 - 1997 Volkswagen Passat Variant B4 / Volkswagen Passat Variant B4 (3A5) 1994 - 1997
The procedure is also suitable for other cars.
From the tools we need a set of hexagons, a screwdriver head or a socket wrench (24*22), an open-end wrench of the same size, a hammer, a drill and a drill bit of about 2 mm and hands.
This is what the steering wheel looks like.
use a screwdriver to pry up and remove the signal button and disconnect the two chips from the signal terminals. (be careful not to tear it out like I did)
then unscrew the steering wheel nut with a 24mm socket and gently rock it and remove it from the steering rack splines
The steering wheel has been removed.
After this, unscrew the three screws securing the plastic casing and remove it
Then disconnect all connectors from the switch block and the connector of the contact group
switch group connector
ignition switch contact group connector.
removed ignition switch connector.
After this, remove the group of switches (windshield wipers) by unscrewing 3 screws. This is what remains.
Bushing that can be removed with a puller
Then you need to knock down the bushing. To do this I used a 22 mm wrench and a hammer. There is a protrusion on the bushing under which I inserted the key and began to knock it down with light blows of a hammer. You can, of course, use a puller, but I didn’t have one. In the photo above it has almost come off the slots.
After removing the bushing, remove the spring only carefully; it may bounce off.
Then unscrew the bolt holding the aluminum ignition switch housing with a hexagon.
then remove the plastic sleeve
insert the key into the lock and remove the entire lock body (use the key to remove the steering wheel locking device)
Removed everything needed from the steering rack
unscrew the screw securing the contact group and pull it out of the housing
Broken socket of an old contact group
new contact group
after that we change the lock cylinder itself; for this you need to have a drill and a drill bit of about 2 mm. There is a locking groove in the body to hold the cylinder, it holds the cylinder
and there is a stopper on the cylinder
you need to press on it, otherwise you won’t be able to pull it out; to do this, you need to drill a hole in the body in the right place
press with a nail or something and remove it from the case
insert a new one to replace the old one until the lock is triggered and assemble everything in the reverse order. We set the steering wheel in the same way as it was removed so as not to disturb the orientation of the wheel and wheels. We connect all the connectors and are glad that we can do at least something.
Our contact group and larva cost 500 tenge each (1 Russian ruble = 4.75 tenge) everything is pure China, but so far no one has complained about them, I apologize for not immediately posting the article, I explained it as best I could , so try it.
Addition from belonozhkin:
Photo of tools for removing the bushing:
Addition from siroman:
When I went through the lock, I also suffered for a long time to remove the bushing. and guessed, just to the point of disgrace - I stuck an open-end wrench on the side (either 19 or 22, I don’t remember, you can choose) and pulled off this sleeve with a puller with 2 claws
And I was disassembling the lock because it periodically jammed and could not turn the key, especially when I locked the steering wheel. I opened it, lubricated the steering wheel locking device and that was it. I left the larva tighter, just replaced the contact group.
Addition from Kelman:
Today I had to change the KGZZ for a VW Passat B4. I have an idea to slightly add to the report:
1. First of all, I removed the + from the battery. 2. Removed the steering shaft casing (there are two self-tapping screws on B4)
3. Disconnected the airbag loop:
4. Unscrewed the pillow, gently folding it on top of the steering wheel and holding it, unscrewed the steering wheel. I took them off together.
5. Disconnected all connectors. There is also a connector attached to the 3Z housing from below (as I understand it, MFA). It can be removed by moving it away from you, and then you can disconnect it:
6. Carefully prying two latches on the immobilizer, removed it from the lock and left it dangling in the air.
The photo below shows these latches:
7. The most interesting thing was with the bushing. Where was the author of the topic able to slip the key to 22? 27 and cannot be knocked down with a hammer. I bought a three-legged puller at the nearest basin store. I didn’t sharpen the hooks, I put it directly on the carob 27.
In general, and all the differences. And I was also in a hurry at the end: I rushed to check the ignition switch without connecting the airbag. It’s good that Vasya was at hand. Otherwise the error will not be cleared.
If you have not found information on your car, look at the cars built on the platform of your car. Most likely, the information on repair and maintenance will be suitable for your car.
Ignition lock cylinder. How to disassemble?
Actually the problem is the following. I removed the cylinder from the ignition switch (it was changed, so the car has two sets of keys. one for the doors, one for the rear lock) I want to try to sort it out to fit it to the old key. But the thing is that I can’t figure out how to pull the larva itself out of the body. As I understand it, you first need to remove the immobilizer antenna. I have no idea how to do this. I don't want to use force. That's if you know exactly what needs to be done. If anyone has experience, please help me figure it out.
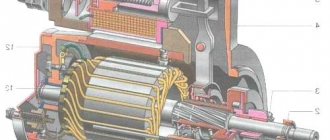
Overview of the Start-Stop system
On what principle does the engine autostart device work, how is the system installed, what do you need to know about starter recuperation? You will find diagrams for connecting and starting a car engine below, but now we suggest you familiarize yourself with the design features and operating principle of the system.
Device
So, what elements are included in the ignition start system:
- Instead of a traditional ignition switch, a special, more powerful starter equipped with a button is installed.
- Bendix, as one of the components of the starter mechanism. For example, starting equipment for Bosch cars is equipped with special silent bendixes.
- A controller installed in the connection diagram. Its purpose is to display information about.
- Perhaps the most important component of the system is the control module, which monitors and controls the operation of the equipment. That is, this is, in fact, the “brain” of the system. Using the control module, the basic parameters are read, as well as the values transmitted by the speed sensor. In addition, thanks to the module, the engine crankshaft speed and the position of the gas pedal while driving are determined. The control module, receiving data, subsequently transmits it to the ECU.
Principle of operation
How should the system work? It should be noted that most of the modern devices that can be found on sale today have undergone various changes. New functions can be introduced into them, for example, a car alarm, but, nevertheless, the principle of operation is the same. The car's power unit automatically turns off if the car is standing still and not moving and subsequently starts if the driver plans to start moving.
It doesn’t matter whether the vehicle is equipped with an alarm or not, to activate the equipment with an automatic transmission, you must completely stop the car. The driver should then press the brake pedal. After the pedal is released, the equipment is automatically activated and the motor starts working again.
If we talk about cars with a manual transmission, then in this case the principle of operation is somewhat different. For the equipment to start working, you will need to engage neutral gear and disengage the clutch. After this, the car engine will turn off on its own until the driver of the vehicle presses the clutch again (the author of the video is the CARDOT channel).
Possible faults
If the power unit is equipped with such equipment, then one way or another, it is subject to more frequent starts. This means that the use of conventional starter mechanisms in such cars is irrelevant. In addition, the vehicle must be equipped with an additional battery, which will allow it to easily cope with an increased number of discharge and charge cycles.
It must be taken into account that if problems occur in the operation of the power unit, the system will still work in the following cases:
- If the fault affects the generator device. Even if the generator malfunctions, the motor will continue to function.
- In the event that it is discharged and the charge available in it is not enough to restart the engine after stopping.
- If for some reason the coolant in the system does not warm up and its temperature is less than 25 degrees. In this case, the engine will continue to function even if the driver does everything to stop it, since the unit will try to warm up the antifreeze to operating temperatures.
- Also, the system will not work if the car’s steering wheel is turned to the maximum left or right position (the author of the video is Dmitry Gerasimov).
As for the Start-Stop faults themselves:
- The control module has failed. This problem happens infrequently, but, nevertheless, it cannot be ruled out. If the unit breaks, it will be impossible to start the engine, so you will have to remove the module and repair it or replace it. Malfunctions of the control device may be caused by wear or burnout of the board.
- Failure of the starter mechanism, in particular the bendix. Like any other equipment, the starter tends to wear out over time, so no one is immune from its breakdown.
- Damage to the electrical connection circuit. Such malfunctions are solved by replacing the damaged area.
If a fault is detected by the control unit, the Check Engine button should appear.
Replacing the ignition switch Volkswagen Passat B3
» Volkswagen » Replacement of the ignition switch Volkswagen Passat B3
Information applicable to car repairs:
Volkswagen Passat B3 / Volkswagen Passat B3 (312) 1988 - 1994 Volkswagen Passat Variant B3 / Volkswagen Passat Variant B3 (315) 1988 - 1994
Volkswagen Passat B4 / Volkswagen Passat B4 (3A2) 1994 - 1997
Volkswagen Passat Variant B4 / Volkswagen Passat Variant B4 (3A5) 1994 - 1997
Installation Guide
Installation of an electronic stop system can be done at home. As reviews show, for car owners with experience in electronics, installation of equipment will not cause problems. To begin with, we suggest that you familiarize yourself with the possible diagrams that can be used for connection. In our example we will use the first scheme.
Photo gallery “Diagram for installation and connection”
How to connect correctly?
To independently install the equipment in accordance with our diagram, you will need the button itself, three relays with 4 contacts, one with five contacts and one relay for fog lights. You will also need mounting wires and clamps for connection.
The process of connecting the equipment is as follows:
- To begin with, the positive contact of the relay should be connected to the battery power, that is, to the positive terminal.
- Then the enabling signal is connected to the same output.
- After this, take the negative cable and connect it to ground, that is, the vehicle body. You can connect it to the existing ground or screw a new bolt into the body.
- Next, the operating output of the load relay should be connected to 12 volts when the ignition is activated.
- The negative control signal is connected to the Start-Stop button, which is mounted inside the vehicle on the center console.
- There is one positive enable signal left; it must be left empty.
In total, there are three connection points in the car - directly on the lock block, on the brake pedal, in particular, to its limit switch, another point will be the control wire. This circuit will allow you to turn off the starter mechanism after starting the engine.
Lada Granta color burgundy › Logbook › Instructions for installing the Star Line alarm system on Granta
Hello everyone and assalamu alaikum, I started installing the signaling, in principle there is nothing complicated, the main thing is to do everything according to the instructions, I’ll take pictures of the process (I’ll post a report later) but for now I’ll post here for myself the information I need so that I can look into the phone during installation if anything happens I'll forget =)
1. Remove the steering shaft trim of the Lada Granta (fastening with 7 screws)
2. Unscrew the 3 screws securing the Lada Granta instrument panel and remove it (the lower right part is secured with latches). Then unscrew the 4 screws securing the instrument panel, disconnect the connector and remove it
4. We install the LED in the left windshield pillar of the Lada Granta, the shock sensor on the body bracket to the left of the steering wheel, the service button in any convenient place, the antenna on the windshield
5. Install the siren, temperature sensor and hood switch. We route the wires into the cabin through the standard seal.
6. We install the alarm unit behind the instrument panel of the Lada Granta
7. Connect the alarm mass
8. Most connections are made in the left threshold, rear door limit switches are installed additionally, the handbrake is connected according to diagram 1
9. Connect the trunk limit switch near the standard limit switch according to diagram 2
10. To control the central locking, an additional drive must be installed in the driver's door. Remove the door trim by unscrewing 3 screws on the front panel and 2 at the bottom of the trim
11. In the ignition switch harness we connect the ignition, starter and alarm power
12. We connect engine operation control to the ignition module
13. Set up the shock sensor and program the engine starting parameters
14. Check the operation of the system.
15. Assembling the interior is done in the reverse order.
Open the connection diagram in a separate window (shown at the end of the instructions)
Lada Granta connection points
Circuit Color Polarity Location + 12V Pink Positive Ignition Switch IGN_1 Blue Positive Ignition Switch Start Red Positive Ignition Switch Turns Blue; Blue/black Positive Left threshold Fuel pump Gray Positive Driver's limit switch Red/green Negative Handbrake Brown/blue Negative Driver's limit switch Red/green Negative Tidy Handbrake Brown/blue Negative Central locking Install an electric drive in the driver's door if there is no electric drive in the door Trunk White/black Negative Harness in the trunk (install a diode) Tachometer Brown/red Pulses In the configuration, the standard can be taken from the electric power steering unit
If the car has painted bumpers (standard equipment), then there is no need to install an additional activator; we connect pins 2 and 7 on the door lock using a power circuit. The locks on the doors are Kalinovsky, the activator is built inside, but the wires are not routed. There is only a driver's door switch. The rest need to be installed and connected to the driver's limit switch, i.e. to red/green in the threshold. The limit switches are the same as the engine compartment on the Priora. The limit switches will have to be taken with a connector and wiring.
source
Video “Visual instructions for installing a button”
How to install the button correctly and what features should be taken into account - see the video below (the author of the video is Andrey Lyubochaninov).
If desired, a true car enthusiast can do anything. And this is not a joke, but the real state of affairs. But more often we try to make management more comfortable, to remove useless and routine operations. Try replacing the key and installing the start-stop button yourself according to the diagram below.
The car's ignition key has long lost its original security functions; if your car has a full-fledged high-quality alarm system, the point of using the key will remain only to bypass the immobilizer or open a frozen door in winter.
How to install a button yourself
The button can be installed anywhere by making a hole for it. To connect the wires, you need to connect the cable from the control unit to the factory wiring of the car.
Start button - diagram
Connecting the start button kit is similar for many VAZ models, since the ignition switch is installed of the same type. The start button kit includes the diagram shown above. Using it you need to connect the positive and negative wires to the control unit.
Connect the wire from the block to the starter to connector No. 5 of the chip, it is usually red. The ACC pin must be connected to connector No. 3. To turn on the ignition, connect terminals ON1 and ON2 from the block to the white conductor that goes to the ignition relay, as well as to the blue conductor, connector No. 4.
If your car has a lock without an ignition relay, then on the 6th connector of the chip you need to connect the same pins ON1 or ON2 to the blue and white conductor.
Options for implementing the start-stop button
There are several most common options for installing a start-stop button:
- the key and ignition switch are not removed, but the functions of starting and stopping the engine are transferred to the start-stop button circuit;
- The key system is completely taken out of use and control is transferred entirely to the button.
For your information! The start-stop function can be implemented either by pressing the button once or by holding it for a long time until the relay is activated.
Replacing the contact group of the ignition switch VW Passat B3 B4
Subscribe here to receive announcements of new articles directly to your email!
The Volkswagen Passat ignition switch is a fairly reliable unit and very rarely fails, but since it directly consists of several mechanical and electrical parts, some breakdowns and malfunctions in the contact group of the ignition switch are possible.
The contact group of the ignition switch of the Volkswagen Passat B3 B4 lasts a very long time, but given the age and mileage of our cars, sometimes it is necessary to replace such an important unit as the contact group of the ignition switch.
More information about the lock itself and the contact group of the VW Passat B3 B4 ignition switch can be found in the article on this site:
Installing a start-stop button instead of the ignition switch
It is clear that the first point is more like an imitation of a start-stop button, but for adherents of this idea there is a completely reasonable justification. The button takes on the functions of an additional service mechanism, which is especially valuable in city driving conditions. At the same time, the lock is less likely to break, and the home-grown start-stop may well “earn extra money” as an additional anti-theft feature.
The first start-stop option is simple, but tasteful
The start-stop button can be made from two relays for the rear fog lights, No. 22.3777. A set of two pieces, with a backlit button, will cost about four hundred rubles. You can throw in any diode you find; there are no large currents there.
Assembling and connecting the circuit is not particularly difficult; you only need an additional piece of wire with double the copper cross-section. We connect it to the 30th leg of the starter relay and connect it with the 87th ignition relay, everything is pink in the diagram. How to connect the wires correctly is clearly understood from the photograph.
If you add a little spare parts and imagination, you can assemble a safer version of the start-stop button with your own hands. This circuit adds a pair of relays and a limit switch for the clutch pedal. Despite its apparent uselessness, a normal, high-quality trailer will greatly protect your supercar from possible surprises, especially if there are teenagers or unpredictable people in the car. In this case, starting the engine will require disengaging the clutch.
It is clear that there should be no trace of play in the clutch pedal.
The relay circuit allows you to easily monitor the performance and even expand the circuit. In some cases, craftsmen use an additional built-in limit switch in the seat of the driver's seat, which closes under the weight of a particular driver, so that a curious passenger does not cause trouble with playful hands.
The logic of the start-stop button is quite transparent. The first long press starts the motor, the second press stops the motor. Such a scheme is reliable, but only if the button operates normally. If there is rattling or unclear activation, it often leads to problems and injuries.
Unlike previous schemes, this version of the start-stop button is built on a microprocessor, so it is difficult to recommend it for production if you do not have the appropriate knowledge of the basics of microelectronics. But for general interest, it is simply necessary to familiarize yourself.
The proposed start-stop system has several undeniable advantages:
- the engine is not sensitive to the rattling of the start-stop button, that is, if the contact is accidentally briefly closed or pressed, the engine will not be stopped;
- the author of the idea included in the program logic the mandatory pressing of the brake pedal and lever, which may make the circuit suitable for automatic machines;
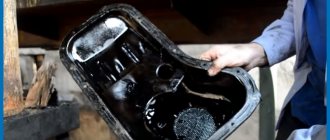
- the system checks the start result based on the jump in oil pressure, so the likelihood of the starter wedge when the engine is running is sharply reduced.
You can start the start-stop circuit yourself after disabling the alarm by long pressing the button without a lock; if unsuccessful, the parameters will be reset and will be ready for a new attempt. The engine is stopped by briefly pressing the brakes.
It would be a sin not to automate the launch process itself. The guy included a simple solution in the circuit - pressing the start-stop button once causes the system to try to start the engine three times, with a short interval. Holding the button for a long time turns the starter until a sign of engine operation appears.
The advantage of this approach is the widest space for creating a variety of conditions for connecting the start-stop button and starting the engine in the most difficult situations. But it’s not enough to just make a circuit; it still needs to be programmed correctly. All operating logic is organized on the PIC16F84A processor, the connection of power circuits is controlled on the KT817G, they have a considerable current reserve.
The start-stop button design is interesting, but, like all experimental options, it requires testing for fault tolerance. Any microelectronic gadgets do not tolerate heat overload and sudden voltage surges. In addition, it is necessary to check the compatibility of the oil pressure sensors, the handbrake and other sensors involved in the vehicle’s electrical system.
How to Remove the Ignition Lock Cylinder Passat B3 ~ AUTOTEXNIKA.RU
page » How to Remove the Ignition Lock Cylinder Passat B3
24.05.2019
Car repair information:
Volkswagen Passat B3 / Volkswagen Passat B3 (312) 1988.1994 Volkswagen Passat Option B3 / Volkswagen Passat Option B3 (315) 1988.1994
Volkswagen Passat B4 / Volkswagen Passat B4 (3A2) 1994.1997 Volkswagen Passat Option B4 / Volkswagen Passat Option B4 (3A5) 1994.1997
operating procedure is suitable for other cars
For tools we will need a hex set, a screwdriver or wrench (2422) with an open end wrench the same size as the impact drill, and a drill somewhere around 2mm and hands.
This is what the control wheel looks like.
connect and remove the signal button using a screwdriver and disconnect the two circuits from the signal terminals. (don't take it lightly like I did)
then unscrew the head on the 24 nut of the control wheel and, turning slightly, remove the guides from the grooves.
Then unscrew the three screws that secure the plastic housing and remove it.
Then disconnect all connectors from the switch block and the connector of the contact group
switch group connector
ignition lock connector connector.
The ignition switch connector has been removed.
- How to Remove the Rear Bumper of a Polo Sedan
- Peugeot 308 seat heating does not work
- Installing a Cooling Fan on a VAZ 2101
- Symptoms of Faulty Spark Plugs VAZ 2110
We then remove the switch group (wiper blades) by unscrewing all 3 screws. Despite all this, this point of view remains.
The sleeve is removed with a puller
Then you need to lower your sleeve. For this I used 22 keys and a hammer. There is a protrusion on the sleeve under which he pushed the key and began to knock it with light blows of a hammer. You can, of course, use a puller, but I didn’t have one. In the photo above she almost left a hole.
How to remove the ignition lock cylinder using the example of Golf3
After removing the sleeve, remove the spring only carefully, it may jump.
Then unscrew the hex head bolt, holding the duralumin lock body.
after we remove the plastic sleeve
insert the key into the lock and remove the lock body completely (remove the steering lock lock)
I removed everything I needed from the control rack
Remove the screw that secures the contact group and remove it from the chassis.
The old connector of the contact group is broken
After replacing the locking cylinder, you need to drill and drill it 2mm. The body has a fixing groove for holding the cylinder, it holds the cylinder
you need to press it differently; not deleted; it is necessary to drill a hole in the appropriate place in the housing
press on a nail or something and remove it from the body
put the new one in place of the old one until the lock works, and put everything back together. the control wheel say it so and is also removed to prevent wheel and wheel misalignment. we connect all the connectors, we are glad that we can do at least something.
- How to Remove Bumper Passat B5 Photo
- Oil change Chevrolet Cruze 1.8
- Nissan Maxima A32 Starts and Stalls
- How to Trick the Lambda Probe of a VAZ
We have a contact group and a larva for 500 tenge each (1 Russian ruble = 4.75 tenge), all in perfect China, but although no one complained about them, I apologize for not publishing the article, since I handled it and explained it, so give it a try,
Addition from Bilozhkin:
Photo cartridge removal methods:
When I passed the castle, I took too long to remove my sleeve. and thought about it, just for the hell of it. put the open key on the side (click on 19, felt on 22, I don't remember, you can lift it up) and pulled this sleeve out with a 2-pin puller
How does the start stop button work?
First of all, “a little history.” Car enthusiasts have mastered installing a button to start the engine themselves quite a long time ago. On a car with a relatively simple electrical circuit, this is not a problem. For example, let's take the VAZ 2108-09.
Installing a start-stop button with your own hands on a car with a relatively simple electrical circuit is not a problem.
On the body panel separating the engine compartment and the interior (popularly called the “chest”), next to the switch, there is a starter activation relay. Many car enthusiasts have encountered a situation where a burnt-out relay coil could be replaced with a finger - just press the contacts, removing the relay cover, with the ignition on. In the same way, you can “ignore” the operation of the ignition switch when turning the key to start. It is enough to “break” the wire coming from the lock to the relay and connect a button with normally open contacts into the break. But such a button can only carry out a start - it will not be possible to turn off the engine with its help. In addition, you still have to turn on the ignition with the key.
How to connect a button to the starter
However, the topic of this article is connecting the starter via a button connected to the same relay. How can this be accomplished?
Connecting a button in a car where there is no additional relay
First of all, you should find the contacts responsible for turning on the starter. Then integrate them with the button.
The modernization algorithm generally looks like this:
- The plastic trim under the steering wheel is disassembled;
- There is a connector connected to the ignition switch contacts (as a rule, this connector has locking tabs);
- Press the tabs to release the connector and pull it out.
As a rule, on older cars, after inspecting the connector, two cables with a large cross-section are found. The red one is responsible for controlling the starter.
Note. You can check whether the wiring is really responsible for controlling the starter like this. Turn the ignition key all the way, short-circuit both wires from the removed connector. If the starter turns on, then that's what they are.
- The button is placed in a place convenient for the driver;
- The found wires are connected to it.
Connecting a button via a relay
In this case, finding the wires responsible for controlling the starter will be much more difficult, because you need to calculate those that are connected to the additional relay.
Experts recommend first ringing all the wires going to the car body with a tester. The identified wires are marked as negative, since they are connected to ground.
Then you need to connect the tester with one end to each of the positive wires, and the other - connect the measuring device to ground. The device itself must be put into a current measurement operating cycle. Test tasks: find a cable that produces 12V when the key is turned all the way.
How to start a car with a start stop button
Start-stop button on the steering column of a car
Modern start-stop buttons have a more complex connection diagram. In addition to the fact that the button installed on the conveyor does not serve not only to start, but also to stop the engine, car creators connect it in such a way as to avoid “unauthorized” start of movement. That is, if the car is “standing at speed” with the gear engaged, so that the car does not “jump off” suddenly for an inattentive driver who mechanically pressed “start”. If the car has an automatic transmission, then to start the engine you need to press the brake pedal - the start-stop button is connected to the “frog” - the brake light switch.
With the start-stop button, the engine cannot be started until the clutch or brake pedal is depressed.
On a car with a manual transmission, starting is impossible if the clutch pedal is not depressed. The designers of some cars even provided a hint for the driver who got behind the wheel of such a car for the first time. So, for example, on the dashboard of a Ford Kuga, a bright inscription lights up, indicating the need to squeeze the clutch to start the engine, and in Russian - if the car was purchased from us. The ignition is also turned on with this button - the first time you press it. Pressing it again turns on the starter. Moreover, depending on the features of the circuit, the starter turns on either for a short time interval, regardless of whether you hold the button pressed or not, or the starter works until you remove your finger from it.
Starting the engine with a key using a button
This scheme is the most elementary and its use is most common among owners of domestic cars. It has the following operating principle. Without the key, the button cannot be activated. To start the car, you need to insert the key and turn it to position 1. After that, hold down the button and hold it until the starter starts the engine. To stop the motor, you must turn the key to position 0.
To implement this, you need to purchase an ignition relay from a VAZ 2109. It has 4 contacts, two of which are high-current circuit contacts, and the other two are low-current circuit contacts. Connect one of the wires coming from the contacts of the high current circuit to pin 15 on the ignition switch, and the second to pin 30 (the first wire should be pink, and the second red). Attach the third wire (low current circuit) to the vehicle ground, and the second to the positive wire (green wire). A start button is mounted between the relay and the green wire.
You can install the button in any desired location. It is very important that it is located as conveniently as possible and at the same time prevents the engine from starting by accidental touch.
basic information
Quite often, buyers decide to purchase cars from a domestic manufacturer.
Naturally, this has its advantages, but there are also disadvantages. As a rule, domestic cars have a low cost and this is their main advantage. The presented fact even covers the fact that such a car will have less efficiency. So, the car that we will discuss today is precisely one of these budget cars. The most popular configuration of the Lada Granta car is the norm configuration.
When choosing such a vehicle, the buyer naturally hopes that it is equipped with a standard alarm system, since, for example, the Lada Kalina is equipped with such an alarm system. But the Lada Granta is not equipped with an anti-theft system; the only thing the buyer can count on is an immobilizer.
- At a car dealership, the buyer will simply be given the keys to the car and wished a safe journey.
- In this configuration, the alarm is triggered when the doors are opened, thus preventing unauthorized entry into the vehicle interior.
When purchasing a luxury Lada Grant from a car dealership on credit, insurers will not require the installation of alarm systems. To activate the standard alarm, the vehicle owner will only need to drive up to the dealer.
The standard alarm is considered part of the electronic system and is equipped with a remote control that is built into the ignition key.
But it is quite possible to install a more effective alarm system with auto start and two-way communication on a Lada Granta car.
- The engine auto-start function, which appears after the alarm installation has been completed, is especially convenient when used in the cold season, since in the cold the oil and engine need to be warmed up.
- The owners of such a system claim that it functions without any failures at a temperature of -35⁰C.
- Installation of alarm system on Lada Granta
Two-way communication is also quite a useful thing, since there is absolutely no need to install a loud alarm, as well as an external signal, which can be easily turned off. If there is an attempt to break into the vehicle, the key fob on the ignition key will emit a fairly loud signal that will be heard throughout the apartment.
In addition to the electronic anti-theft system, it is also possible to install a mechanical alarm. Especially for the Lada Grant, a Garant lock was invented, installed on the steering shaft. The Garant lock is quite resistant to hacking, thanks to improved keys produced by Abloy.
Advantages and disadvantages of the engine starting system
The system in question is not new. At the same time, various design improvements did not eliminate its main shortcomings. Based on this, many car owners are of the opinion that “start-stop” has more disadvantages than advantages and do not see much point in installing it. However, it is worth considering the positive and negative aspects of this system.
- With constant use of the car in city conditions, fuel consumption decreases.
- Emissions of exhaust gases into the air are reduced, since they contain harmful chemical compounds.
- When idling in city traffic jams, the cabin is quiet and comfortable, since the engine is turned off at this time.
- Engine parts are subject to less stress. This is due to the fact that the power unit does not work when idle, and the drive design of the mechanism reduces the load on the crankshaft, as well as on the main elements of the engine.
- The system starts at the touch of a button, and you can choose the most convenient installation location.
Installation Features
Since the start-stop system is installed instead of a very critical unit, the requirements for connection and operational reliability must be at the same level. Any possibility of incorrect operation must be excluded and any suspicion of poor contact must be eliminated. When installing, do not allow any twists or uninsulated connections. In the case of the first and second options, install the relay only with special blocks that do not allow short circuits.
The ignition circuit, when installed on a car with contact ignition, conducts a large current through itself, so you should not skimp on the cross-section of the wires. Particular attention should be paid to the button itself - it should not have false positives or free movement.
Another nuance concerns integration with security systems. The standard immobilizer must either be disabled or its bypass installed. The second option is even more preferable, since it can also be blocked when arming, and if a security alarm with auto start is installed, it is necessary to start the engine. The start-stop system can be blocked using an additional alarm channel. To do this, you will need another relay, which will open when a “minus” appears from arming.
Of course, everyone decides for themselves which option to choose for their car. Different schemes require different approaches, capabilities and material investments. In any case, such modernization can bring any car closer to modern standards and add zest to its operation.