How to identify faults and repair the front axle of a UAZ
UAZ is a common car on Russian roads. Its design features allow you to move without problems on paved areas, as well as off-road. Repairing the front axle of a UAZ is impossible without knowing the diagram of the wheel gearbox, the design of which is similar to a similar part of the rear axle. The key difference is the peculiarity of fastening and installation of the main gear, the design parameters of the ball bearing located in a special compartment-cup.
Device and characteristics
The design of the UAZ front axle in older models has few differences from the similar design in new models (Spicer). The main differences lie in the design of the crankcase, the dimensions of the components of the drive gear and differential, and in a number of units used.
The design of the old model is in many ways similar to the rear axle of the UAZ and consists of the following components:
- The key place is occupied by the split crankcase, consisting of 2 separate parts.
- Each half is equipped with press-in housings with internal axle shafts.
- Safety valves on the casings, responsible for controlling the growth of oil volume in the mechanism.
- The differential and main gear of the casing are made according to the standard design: a small-diameter drive gear is located in the horizontal plane, in contact with the cardan.
- The large driven gear in the longitudinal plane is in mesh with the main gear. It has a built-in differential of 4 satellites.
- The edges of the crankcase housing are equipped with pivot joints made of ball joints with a rotating housing.
A design feature of the Spicer bridge is the presence of a contact system between the wheel hub and the axle shaft. It is a coupling responsible for connecting and disconnecting 2 elements. The mechanism ensures the transmission of torque to the wheel from the differential. The disconnected clutch leads to free rotation of the wheel on the axle, and the vehicle receives a 4*2 wheel arrangement. The engaged clutch leads to the connection of the hub, differential and axle shaft, the car turns into a 4*4 all-wheel drive.
Old UAZ car models were distinguished by the presence of hubs with drum brake units.
Their wheel rotation angle is no more than 29°. The knuckle and linkage arms connected to each other are a wheelbase control tool. In new models (Spicer), the angle of rotation reaches 32°. The rest of the bridge structure is similar.
What is the difference between a UAZ military bridge and a civilian one?
The military axle, unlike the civilian Spicer front axle, is equipped with final drives. This design feature caused the following differences between military models:
- Gear axles are located 4 cm above the wheels. This difference helps to increase vehicle clearance - the distance between the supporting surface and the bottom of the bridge.
- The main pair is smaller in size and has a small number of large teeth, which increases the reliability of the design. The unit weighs more.
- The gear ratio is 5.38 (traction, but not speed).
- The length of the rear propeller shaft is 1 cm shorter.
Advantages of military bridge models:
- increased ground clearance by 8 cm;
- high torque, allowing you to transport heavy objects, tow and move at low speeds over difficult terrain;
- load evenly distributed between the main and final drives;
- larger teeth increase reliability;
- limited slip differential for off-road driving.
The military design of the UAZ was thought out to accompany tank colonies, which indicates the power and reliability of the design.
Do-it-yourself repair and replacement of UAZ engines
“I recognize brother FEDYA.” How can a beginner, just after reading the literature, do a complete overhaul of power units? Practice takes years. And especially since a friend wants it for extreme sports. High-quality spare parts are expensive. High-quality boring, grinding, and polishing are also expensive. Most people want to assemble units for meager money, and on their own, that would compete with the Mercedes.
When it doesn’t work out, you don’t have to yell at the whole forum that the spare parts are g..., and the servicemen are p.... Regarding the new engine from the store. No guarantee. One word substandard, and even for your money. Cost 417- 51,100 rubles, 421- from 52,400 to 59,000 rub. Of course, doing it yourself is cheaper and more pleasing to the soul, but when professionals get down to business, you get quality, and if something doesn’t suit you, you have someone to ask.
Uh-huh! Having looked at several “professionals” I am already starting to shake when I hear the word mechanic. The last time I had my valves adjusted at Oka was by professionals.
This is not a UAZ, where it was easy to open and adjust, there are special tools + a selection of adjusting washers, buying a full set of which is noticeably more expensive than adjusting it in a service center. So I went to the service.
We clamped the exhaust valve, almost burned it out, and put a washer on the second “running-in” valve, as he put it, “so as not to knock,” after which I changed the camshaft, because it ate the cam. Well, there are other examples.
Well, of course, I bought a special tool and also accumulated a set of washers... And then the valve broke completely (as it turned out, the knock was due to a broken guide bushing), and the engine had to be overhauled and the block replaced. But now at XX it rustles like a foreign car, smoothly and quietly, and pulls well. The mileage, however, is still only 6.5 thousand.
The UAZ engine was also capitalized on its own. And also a beginner, in strict accordance with the book (in fact, the first engine I built was already the second). It didn’t turn out to be a Mercedes, of course, in a couple of places I still missed the mark due to inexperience, but the 38th round seemed to pass without incident.
How to turn on the front axle on a UAZ
Engaging the front gear may be necessary if it is necessary to turn from an asphalt road surface onto a country road or terrain with potholes and mud. In the new conditions, rear-wheel drive will not cope with difficulties. Engaged front-wheel drive is a means of solving the problem.
System startup sequence:
- Stop the car and check the operation of the front wheel quick release clutch. It is turned on by turning the wheels clockwise until they stop.
- Move the rightmost lever forward to switch the front wheels to driving status. Now their rotation will be equivalent to the rear.
If the road condition worsens while driving, it becomes more and more difficult to continue driving, the engine stalls, you need to stop the vehicle and engage a lower gear. To do this, you will need to move the middle lever back. In low gear, all 4 speeds are available, and driving becomes easy and smooth again.
After overcoming off-road conditions, it is immediately better to put the middle lever in its original position and move the transfer gearbox to a higher level. On the highway, it is recommended to stop the front-wheel drive and quick-release clutches to save 2 liters of fuel. The measures help reduce noise levels while driving.
How to Remove the Engine from a UAZ Bukhanka ~ AUTOTEXNIKA.RU
UAZ "Tadpole" and "loaf" monotonous engine lineup. So I’ll share my experience of how to remove the engine using a pipe (3.5 meters) in an hour and fifteen minutes with three people in an open field. We twist, unscrew, disconnect everything that holds, strengthens, connects the engine to the UAZ.
We leave the gearbox and transfer case in place, do not touch it, just unscrew it from the engine and pull out the radiator. Then we remove the carburetor and the valve cover, push a pipe across the interior and use a carpenter’s chain to hook the engine onto the rocker arms in the middle. And we begin to pull out through the cabin.
Two of them lift the pipes by the ends, and the third, first from below, pulls the engine forward with a mounting tool behind the gearbox and then helps tilt it to the passenger side in the cabin. Then we put the engine in the place where the passenger should sit, intercept the pipe in a more convenient way, SMOKING. and pull the engine out. Put it in the reverse order.
If three of us take on everything at once, unscrewing, unscrewing, disconnecting, then all the work will take exactly one hour and fifteen minutes (with one smoke break) This is our record! Who can do it faster, please share your experience
I always pull it out from the bottom in 1st) www.drive2.ru/l/5872270/
I sharpened the oil return fluid on all internal combustion engines, but this does not help forever.
but still, at least something like this and where has it been seen that a Russian car is in heat without a leak! A neighbor bought a VAZ KALINA half a year ago, so after 2 thousand kilometers the engine “snotted”, as if it had already passed 100 thousand.
a crankshaft with an oil seal, instead of a packing, this is excellent; install an oil seal imported by our faith neti; instead of the factory oil catch notch, you can cut the reverse thread on a lathe. Then the oil will definitely not leak.
I bought the freshest 100 liters of internal combustion engine here, so there is a crankshaft on the oil seal, I’m thinking of capitalizing the internal combustion engine and inserting it into Golovast. Maybe then it will finish driving the main engine and it will be possible to fill it with solid oil, although at the moment I will not go lower than Lukoil.
Malfunctions and repair work
Common malfunctions of the UAZ front axle and possible repairs:
- Leakage of lubricating fluids. Check the tubes and connecting elements for mechanical damage - the cuffs and flange for functionality, the oil container for the optimal fluid level.
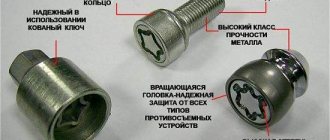
- High wear of fasteners.
- Bearing defects caused by the use of poor quality material by the car plant.
- Broken axle teeth. Adjustment will not help; parts need to be replaced.
- Mechanical defects of the beam.
- Wear of elements. The situation is resolved by replacing it with new spare parts.
- Poor grip of the bearings and main gears indicates the need for tension adjustment.
Bridge repairs begin after diagnosing and searching for the cause of problems in the functioning of the mechanism, which are diverse:
- transmission components of a rear-wheel drive vehicle are faulty due to regular movement over difficult terrain;
- use of consumables and lubricants of unsuitable quality;
- Failure to monitor tire pressure can lead to shaft and bearing failures.
Most often, car owners are faced with a violation of the axial space of the kingpins and are knocked out of the required position. To diagnose, you need to jack up the front of the vehicle and move the wheel in a vertical plane. The presence of axial play indicates the need to adjust the clearance of the pins.
How to adjust bridges
You can adjust the UAZ axles yourself. This will require a number of tools and good knowledge of the mechanism. Access to the necessary parts and assemblies is possible after dismantling the structure and separating the crankcase parts. The first sign of the need to adjust the gearbox is loud noise and malfunctions of the part. Such work is required after diagnosing the condition of bridges. Adjustment includes a number of activities.
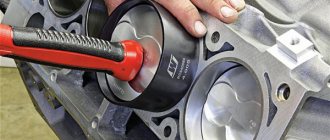
At the first stages of repair work, ensure that the nuts of the brake elements can be loosened freely. The tools you will need are a split wrench, brake fluid and a mixture of WD-40. The bridge is dismantled as follows:
- remove the fasteners between the drive gear flange and the propeller shaft;
- secure the shaft to the side;
- place the front part of the vehicle on jacks, raising the wheels above the surface;
- additionally install safety supports;
- remove the nut between the brake pipe and hose and close the hole with a plug to avoid large losses of fluid;
- after removing the lower fasteners and moving the shock absorbers from the axle, the bridge will lower;
- remove the stepladder nuts and roll out the bridge (without wheels it weighs more than 100 kg).
Video materials
By tradition, we accompany each new product with video instructions. This time her appearance was delayed and the reason for this was the situation “when there is no agreement among the comrades.” On the way to creating a driveshaft, we had to delve deep into the technical problems that a driveshaft can create, the main one being vibration. During the research, it turned out that a high-quality driveshaft in itself is not a panacea for all ills; an integrated approach is required, including a thorough diagnosis of the mating units. And this is where our opinions differed. Some advocated a detailed analysis of all possible faults and methods for eliminating them. The other part believed that by doing this we would intimidate all the UAZ drivers to death and they, in a friendly crowd, would turn over their pepelats for scrap metal and go shopping for maize trucks. For example, according to all GOST standards, the runout of the axle and transfer case flanges should not exceed 0.04 mm. To be honest, I don’t know how to achieve this on our machines. More than one dissertation could be written about the reasons for the incorrect operation of axles and transfer cases. It’s probably possible to fit all this information into one educational film, but it will be a direct competitor to the reality show “Dom-2”. Many times, being faced with an array of information, we stopped filming. After consultations with our representatives, it was decided to adhere to the following algorithm. The UAZ driver, after purchasing our product, should not immediately run to the shops in search of the necessary measuring tools. His task is to remove the old shaft, clean the flanges from dirt and burrs, tactilely check for play in the axle and transfer case shanks, and screw in the new shaft. In 95% of cases, this will be enough and the next driveshaft service will be required after approximately 50,000 kilometers. A small part of consumers will experience vibration, which will be eliminated by turning the flanges 180 degrees. And only about one percent of consumers will encounter a situation in which they will need to carefully check the flanges and other parts of the transmission for correct operation. The source of vibration in a car can be anything, from crooked rims to different weights of pistons. Therefore, we decided not to focus on such problems, limiting ourselves to indicating the methodology for checking the flanges of bridges and RCs. We understand that questions will still arise, but finding answers to them is also part of our daily work.
Increasing the service life of the structure
There are several ways to increase the service life of the UAZ structure. The presence of a front axle in a vehicle imposes special requirements for operation. If you monitor and disable the hubs of the axle shafts and wheels at the right time, this will help increase the service life of the mechanism parts when the front-wheel drive is turned off. To prevent mechanical damage to drive components, turn on after the couplings. After switching from off-road to highway, you should immediately switch to rear-wheel drive. Another reason that contributes to rapid wear of rubber is constantly working clutches.
Machine maintenance must meet a number of requirements:
- Periodicity.
- Regular check of main components and mechanisms.
- Timely replacement of worn parts.
- Monitoring the level of oil and other liquids.
- Checking and adjusting wheel bearings.
- Monitoring the functionality of the main gear axial clearance components.
- Use of high-quality consumables and mixtures.
Regular maintenance, careful operation and following the manufacturer’s recommendations are the key to long and reliable operation of the vehicle.
Do-it-yourself repair of the front axle of UAZ Bukhanka and UAZ 469. If you want to do this
Any motorist can repair the front axle of a UAZ Bukhanka and UAZ 469 with his own hands.
This job is not difficult. Structurally, both of these models are similar. This is especially true for the suspension. The frame design means easy dismantling of the front axle and high reliability of the vehicle. There are some differences in leaf spring and spring suspension. But these features do not greatly affect the complexity of the work. For repairs, virtually no special tools are needed. All work is carried out with a minimum set of tools available to each driver.
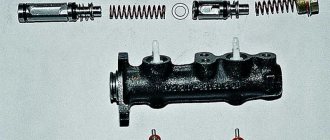
Repairing the UAZ 452 Gearbox Cover with Your Own Hands
If you are the owner of a UAZ and you suspect that the gearbox is failing, then you should definitely take care of repairs. The device fails when the driver must hold the gear lever in motion as they begin to shift on their own (to prevent this, drivers tie them together with ropes). From time to time you can hear a creaking sound.
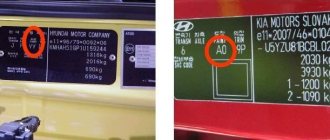
To familiarize yourself with the repair technology, read about repairing the UAZ 452 gearbox yourself. First you need to find the type of UAZ that is on the car. Despite the differences between the car models, they have similar gearboxes. Therefore, we can assume that the repairs are carried out almost identically. To do this you will need a set of wrenches, some tools and auxiliary tools (listed below).
In most cars of this type, both parts are one piece. The weight of this device reaches 75-82 kg, so you will need an assistant. If the vehicle being repaired has a protective cage installed, you can use a hand winch to remove the UAZ 452 gearbox for repairs yourself.
The car should be parked in a uniform place because then you will have to move it 0.5 m forward or backward. First drain the oil. Both boxes have the same volume, but the drain plugs are separate. While the oil is spilling, remove the front seats and unscrew them, and then remove the floor hatches on the floor of the car. Then it’s time to remove the speedometer rods.
When oil leaks, replace the drain plugs. Under the handbrake drum there is a cross member of the frame that must be removed. Disconnect the front axle clutch and unscrew the front universal joint. If you find a nut on it, the item should be removed.
Loaf Purchase and delivery? gearbox cover
Regular work
Do-it-yourself repair of the front axle of UAZ Bukhanka and UAZ 469 is not difficult. Most often, during operation it is necessary to carry out various preventative maintenance. As a rule, they do not require removal and disassembly of the bridge. The list of care activities includes:
- The kingpins are checked for gaps;
- Threaded connections must be periodically tightened;
- The alignment is checked;
- The requirements of the parts lubrication tables are followed.
It is imperative to visually inspect the main components. Particular attention is paid to the serviceability of the fastening bolts. All locking elements must also be securely fastened. Check the maximum steering angle of the wheels. It should not exceed 28 degrees. If indicators differ from those indicated, adjustments must be made. Also always check that the kingpins are tightened and functioning correctly. Failure to correct minor faults in a timely manner may lead to the need for major repairs of the front axle.
Removal
Repair of this unit begins with dismantling the bridge. On a loaf and a goat, these works are performed identically. There are only minor differences. When performing repairs, you need to be extremely careful. Removing the bridge involves a series of simple steps:
Parsing
When carrying out repairs, it is necessary to place the unit on a stand. This will make the disassembly task easier. After this, remove the wheels. Next, proceed to disassembly:
- Dismantle the bipod. The nut securing the rod pin and the steering knuckle lever is twisted;
- Next, unscrew the bolts securing the brake drums. At the same time, remove the couplings used to disengage the wheels;
- Proceed to disassembling the hub. This work begins by straightening the edges of the locking washers. Next, the nut with the locknut is twisted, this allows you to remove the washer immediately with the inner ring and roller bearings of the hub. Then the rest of the hub is removed (see the article “How to remove the front wheel hub”);
- Remove the brake shield, this is done by unscrewing the bolts. The trunnions with the knuckle joints should be removed;
- The steering linkage rod is disassembled; to do this, you will need to unscrew the trapezoid mounting nuts;
- To remove the ball joint, unscrew the bolts securing it to the axle shaft. Remove the limiting supports. The supports are pressed out;
- Remove the shims used for adjustment from the knuckle and lever. Next, unscrew the nuts securing the upper lining of the king pin. The same goes for the bottom. Remove the ball joint seal. Afterwards the pins are pressed out. Disassembly is complete.
Repair
. After disassembly, all spare parts are washed in gasoline and lubricated. Defective ones are replaced with new ones. Assembly occurs exactly the opposite, and some nuances of the process need to be clarified.
When replacing the pivot bushings specifically in the ball joint, you need to tighten them to 25 mm after pressing. It is necessary to put lubricant inside. Repairing the front axle of a UAZ Bukhanka and UAZ 469 with your own hands is not that difficult, but you need to be careful. For example, when installing a ball seal, the ring for it must be soaked in hot oil. After assembly, the operability of the bridge is checked using a stand.
Repair of bridges on UAZ 469
Many Internet users enter a similar request in Yandex or Google - “repair of the front axle of UAZ 469”. This means that they are interested in how to repair the front or rear axle on a UAZ themselves. Of course, the procedure for dismantling and repairing the bridge is described in special books on repair and operation, which are now not a problem to obtain. However, disassembling with your own hands both the front and rear axles down to the last screw is, to put it mildly, not an easy task. It may turn out that you just need to replace some small part, to access which you don’t have to disassemble everything.
Front axle UAZ 469
Here are just some possible options for bridge failures on the UAZ 469 (Hunter, Patriot, “loaf”):
- The differential is worn out, the gear housing is bent
- Critical wear of the main gear in the gearbox
- Wear of the steering knuckle (ball joint, axle) on the front axle
- The appearance of large gaps in the pivot joints
- Bearing wear, resulting in the need for adjustment or replacement
- Injection of elements requiring lubrication
It can be difficult to understand which of the above happened to your car, however, it is often possible to roughly localize the problem even by ear. If you hear increased noise or a hum from the front or rear axle (even in neutral gear), the gearbox is most likely worn out (needs repair), or the bearings require lubrication. If your car “yaws” from side to side and the steering is fine, the problem may be stuck in the axle, CV joint, or incorrect installation of the pins that secure the ball joint, as a result of which play appears and the wheel begins to “walk.”
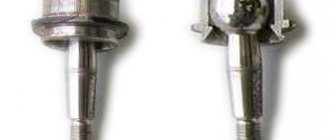
What does a CV joint consist of?
A very common malfunction is the flyout of the ball bearings that are located in the CV joint. They fly out precisely because of incorrect adjustment of the pins, as a result of which the geometric center of the CV joint and the axle do not coincide. As a result, the axle shaft “walks” in the seat and gradually breaks down. The CV joint itself is also damaged. And when turning, you can hear a crunching sound from the side of the wheel and the wheel may jam. During the repair process, some craftsmen simply throw out all the balls, except for the centering one (additionally welding it) - in order to get rid of the problem of their constant flying out.
Steering knuckle of the front axle UAZ 469 assembled
But this does not save for long; there are even cases when the welded ball breaks off while driving, the loads there are so high. It is much more effective to adjust the king pins. It is necessary to achieve a condition in which the line passing through the king pins and the center of the axle shaft intersect at one point. And it is at this point that the center of the CV joint should be located. The displacement of the axle shaft from left to right, as shown in the figure, is unacceptable; it must be rigidly fixed; for this purpose, thrust rings and bushings are provided in the design.
Space for bushing
Repairing the body of a UAZ
UAZ 469 is a domestic SUV, famous for its endurance and ease of operation. In common parlance, the “loaf” easily plows Russian off-road terrain and withstands any conditions. A UAZ can be easily restored with a set of tools, so even a novice driver can get the car back into working order, no matter where it is.
painted UAZ
Compared to foreign cars, a good UAZ repair prolongs its functionality for many years. The new UAZ 469 model is equipped with the following parts:
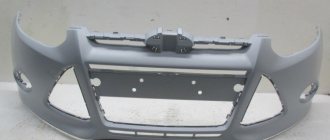
- strong metal bumper;
- 2.7 liter engine;
- split bridges;
- updated gearbox;
- fuel consumption has been reduced to 10.6 liters per 100 km;
- updated power steering;
- disc brakes;
- 2 roof options: awning and metal.
Do-it-yourself UAZ body repair is quite simple, in particular, car lifting. Installing large-diameter wheels allows you to increase the vehicle's maneuverability even in mountainous areas.
https://www.youtube.com/watch?v=vqANcfBcAkw
With the right approach, it is possible to increase the body lift to 27 cm. The lifting is accompanied by strengthening of the subframe and fastening of the body with durable gaskets. At home, they can be easily replaced with hockey pucks.
Stage 1: preparing the car
Due to the conditions in which the UAZ 469 spends almost the majority of its operation, the body wears out quickly. It is important not to wait for holes and breaks to form and to repair worn areas yourself. UAZ 469: repairs take place in 2 stages.
UAZ
The first consists of cleaning, sanding and filling the car:
Stage 2: Car painting
Repair of UAZ 469 is almost always accompanied by priming of the surface. This is the penultimate layer that protects the base from oxidation and destruction.
This stage is complicated by the fact that it is necessary to comply with the hygiene conditions of the room in which the renovation is taking place. It is not recommended to paint a car in a regular garage due to the high amount of dust and dirt.
For repair work, you need a high-quality ventilation system that will clean the air and eliminate dust. In the workshops, painting booths are equipped with everything necessary, so painting takes place without defects.
UAZ - convertible
It is important to choose a paint identical to the old color, since even a slight difference will look unaesthetic and unsightly. Repairing the body of a loaf with your own hands can be done using high-quality automotive paints, primers and varnish:
- UAZ 469 is prone to rust, so before applying paint you need to treat the surface with phosphate primer.
- If the car has been in use for a very long time, it is best to cover it with two types of primer: phosphate and then acrylic.
- After the soil has dried, the surface must be sanded again.
- The paint should be applied in three stages. The first layer is a thin base, which must be made with barely touching overlaps. The second is a denser bright layer. The third is applied almost the same way as the first. After the paint has dried, the car must be coated with protective varnish.
Do-it-yourself repair of a rotten body without welding
Do-it-yourself body repairs are often complicated by the presence of dilapidated holes formed by many years of rust. Holes in the body can be so large that it is impossible to repair them, and the only thing left to do is to weld a piece of metal and repaint it in the desired shade.
Small holes can be repaired without using a welding machine . The main components in the repair work will be fiberglass and ordinary putty. However, this option will allow you to patch the hole for no more than a month, since exposure to moisture has a detrimental effect on fiberglass.
https://www.youtube.com/watch?v=v5JSwYDxeJchttps://www.youtube.com/watch?v=jzn4Wy_gQ5M
UAZ 469 do-it-yourself repair with welding
This method is suitable for more serious body damage and requires a professional welding machine:
UAZ 469: car repairs are much cheaper than with foreign cars. With high-quality repairs, the machine will last a long time and reliably.
Adjustment
Before you start adjusting, prepare everything you need: bushings for the axle (if there is a groove on the axle), 4 thrust bushings, as well as oil seals. The main condition for adjustment is that the two halves of the CV joint do not dangle, both during straight-line movement and when turning! The procedure is as follows:
- Take the ball joint and press the bushing into it so that half of the CV joint does not hang out in the ball joint.
- There is a thrust washer on top; be sure to install a new one, even if the old one appears to be in good condition.
- Take a metal shaft (you can make it from a valve, for example) with cones on both sides and put a washer on it with a diameter similar to the central ball, that is, 27 mm. Place one edge against the center of the kingpin. Ideally, the second edge should also be in the center of the kingpin. If this is not the case, place the adjusting washers in the same place where the thrust washers are, or rather, under it.
Adjustment
During the assembly process after repair, it is necessary to lubricate all the bolts with nigrol so that next time everything can be easily unscrewed. All mating surfaces (the junction of the axle and the steering knuckle housing) must be cleaned of dirt. It is not recommended to lubricate the CV joint with grease, as it is thick. When heated under the influence of centrifugal force, all the solid oil will be scattered over the walls of the ball joint, and it is necessary that the CV joint balls be generously lubricated. To do this, it is recommended to dilute the solid oil by half with nigrol.
After final assembly and repair, one more important adjustment needs to be made. We are talking about an adjusting rotary bolt. This is the bolt that limits the maximum angle of rotation of the wheel. It is important not to overdo it; do not tighten the bolt all the way - otherwise the wheel will jam. Tighten almost to the end, and then try to turn the wheel (more precisely, the shaft on which it will stand). It is necessary to unscrew the bolt back until the wheel stops wedging. The rotation angle should be no lower than the factory one. Well, now you yourself can repair the front axle on the 469 UAZ!
How to remove a UAZ Bukhanka engine - Auto repair
The integrated microprocessor engine control system (CMPSUD) of passenger-and-cargo utility vehicles, UAZ-3741 and UAZ-3909 vans, UAZ-3962 ambulances, UAZ-2206 buses and UAZ-3303 freight vehicles includes an electronic control unit, sensors, actuating electric mechanisms, and diagnostic control malfunction lamp, wiring harness and diagnostic connector.
CMPSUD diagrams for cars of the UAZ-3741, 3909, 3962, 2206 and 3303 families with UMZ-4213, ZMZ-4091 and ZMZ-40911 engines
On freight-passenger cars of the UAZ-3741, 3909, 3962, 2206 and 3303 models, depending on the engine and its class, a KMPSUD with the following electronic control units and controllers was installed:
— For cars with the UMZ-4213.10 Euro-2 engine — MIKAS-7.2 control unit 291.3763000-11 — For cars with the UMZ-4213.10 Euro-3 engine — MIKAS M10.3 control unit 574.3763000-03 — For cars with the ZMZ-4091.10 Euro engine -3 — control unit MIKAS-11 825.3763001-01 or BOSCH M17.9.7 0 261 S04 795
- For cars with a ZMZ-40911.10 Euro-4 engine - a BOSCH M17.9.7 0261 S06 585 control unit for the configuration with a mass air sensor and a BOSCH M17.9.7 0261 S07 322 for the configuration with an absolute pressure sensor.
Wiring harness diagram for KMPSUD vehicles of the UAZ-3741, 3909, 3962, 2206 and 3303 families with UMZ-4213.10 Euro-3 engines and control unit MIKAS M10.3 574.3763000-03
The composition of the UMZ-4213.10 Euro-3 engine control system with the MIKAS M10.3 control unit, its sensors and actuators are discussed in detail in the material.
CMPSUD diagram of cars of the UAZ-3741, 3909, 3962, 2206 and 3303 families with ZMZ-4091.10 Euro-3 engines and MIKAS-11 control unit 825.3763001-01
The composition of the ZMZ-4091.10 Euro-3 engine control system with the MIKAS-11 control unit, its sensors and actuators are discussed in detail in the material.
CMPSUD diagram of cars of the UAZ-3741, 3909, 3962, 2206 and 3303 families with a ZMZ-4091.10 Euro-3 engine and a Bosch M17.9.7 control unit
The composition of the ZMZ-4091.10 Euro-3 engine control system with the Bosch M17.9.7 control unit, its sensors and actuators are discussed in detail in the material.
Electrical diagram of the CMPSUD of cars of the UAZ-3741, 3909, 3962, 2206 and 3303 families with ZMZ-40911.10 Euro-4 engines and a BOSCH control unit M17.9.7 0261 S07 322
The composition, sensors and actuators of the control system of UAZ-3741, 3909, 3962, 2206 and 3303 with ZMZ-40911.10 Euro-4 engines and a BOSCH M17.9.7 control unit are discussed in the material.
Designations of components and circuits in the diagrams:
Source: https://555-shop.ru/remont/kak-snyat-dvigatel-uaz-buhanka.html
Do-it-yourself repair of the front axle of UAZ Bukhanka and UAZ 469. If you want to do this
Any motorist can repair the front axle of a UAZ Bukhanka and UAZ 469 with his own hands.
This job is not difficult. Structurally, both of these models are similar. This is especially true for the suspension. The frame design means easy dismantling of the front axle and high reliability of the vehicle. There are some differences in leaf spring and spring suspension. But these features do not greatly affect the complexity of the work. For repairs, virtually no special tools are needed. All work is carried out with a minimum set of tools available to each driver.
Regular work
Do-it-yourself repair of the front axle of UAZ Bukhanka and UAZ 469 is not difficult. Most often, during operation it is necessary to carry out various preventative maintenance. As a rule, they do not require removal and disassembly of the bridge. The list of care activities includes:
- The kingpins are checked for gaps;
- The alignment is checked;
Threaded connections must be periodically tightened;
It is imperative to visually inspect the main components. Particular attention is paid to the serviceability of the fastening bolts. All locking elements must also be securely fastened. Check the maximum steering angle of the wheels. It should not exceed 28 degrees. If indicators differ from those indicated, adjustments must be made. Also always check that the kingpins are tightened and functioning correctly. Failure to correct minor faults in a timely manner may lead to the need for major repairs of the front axle.
Tuning UAZ-452 (loaves)
In its classic version, the UAZ-452 Bukhanka is popular among many fans of hunting, fishing and just those who like to travel. But there is another reality for this car - tuning the UAZ loaf. In this regard, the car is simply ideal.
The diligence and skillful actions will result in the creation of a completely new exclusive car. The main advantages of the loaf are considered to be a successful platform and a low price, this is what attracts tuning enthusiasts to it. Among other things, the car is distinguished by excellent chassis qualities, a high cross-country ability and the ability to customize the car’s interior to suit any whim.
Theoretically, the “Loaf” could very well become an elegant city car. But more, nevertheless, it is intended for off-road travel, which, in fact, is indicated by its factory design.
Removal
Repair of this unit begins with dismantling the bridge. On a loaf and a goat, these works are performed identically. There are only minor differences. When performing repairs, you need to be extremely careful. Removing the bridge involves a series of simple steps:
- You should start by ensuring that the car is stationary. To do this, anti-roll brake pads are installed;
- Next, on the goat, the brake pipes are disconnected from the hoses. On the Bukhanka, the tubes have adapter pipes. In this case, the hoses are disconnected from the pipes;
Some UAZ 469 cars are equipped with springs. In this case, the penultimate paragraph will look a little different. The penultimate step is to remove the anti-roll bar by disconnecting it from the suspension arms located along the longitudinal. The levers and transverse rod are unscrewed from the bracket.
Parsing
When carrying out repairs, it is necessary to place the unit on a stand. This will make the disassembly task easier. After this, remove the wheels. Next, proceed to disassembly:
- Dismantle the bipod. The nut securing the rod pin and the steering knuckle lever is twisted;
- Next, unscrew the bolts securing the brake drums. At the same time, remove the couplings used to disengage the wheels;
- Proceed to disassembling the hub. This work begins by straightening the edges of the locking washers. Next, the nut with the locknut is twisted, this allows you to remove the washer immediately with the inner ring and roller bearings of the hub. Then the rest of the hub is removed (see the article “How to remove the front wheel hub”);
- Remove the brake shield, this is done by unscrewing the bolts. The trunnions with the knuckle joints should be removed;
- The steering linkage rod is disassembled; to do this, you will need to unscrew the trapezoid mounting nuts;
- To remove the ball joint, unscrew the bolts securing it to the axle shaft. Remove the limiting supports. The supports are pressed out;
- Remove the shims used for adjustment from the knuckle and lever. Next, unscrew the nuts securing the upper lining of the king pin. The same goes for the bottom. Remove the ball joint seal. Afterwards the pins are pressed out. Disassembly is complete.
Repair
. After disassembly, all spare parts are washed in gasoline and lubricated. Defective ones are replaced with new ones. Assembly occurs exactly the opposite, and some nuances of the process need to be clarified.
When replacing the pivot bushings specifically in the ball joint, you need to tighten them to 25 mm after pressing. It is necessary to put lubricant inside. Repairing the front axle of a UAZ Bukhanka and UAZ 469 with your own hands is not that difficult, but you need to be careful. For example, when installing a ball seal, the ring for it must be soaked in hot oil. After assembly, the operability of the bridge is checked using a stand.
They greet you by their clothes.
It's finally time to paint. I thought I couldn’t wait for this day. Sanded (2 days).
Primed (1 day) and painted (1 day). The biggest problem was with sanding. Just an ass.
A MONTH has passed since the start of work. They worked, however, not every day, because... The street lighting poles were being replaced and at times there was no electricity. Sometimes it rained.
There was a can of primer. It was used up. Interior without floors and without engine compartment lid. To disassemble it to this state now, you need about 25 minutes and a screwdriver. The rear messes are under the floor. 2 pcs. The total volume is almost 0.2 cubic meters.
- nuts, etc.
Changing wheels
As you know, the cross-country ability of a vehicle directly depends on the wheels. Considering that the UAZ wheels are covered in fairly hard and not too large rubber, before proceeding directly to the elevator, it is necessary to mention the wheels.
In addition, the tread pattern on the Bukhanka tires leaves much to be desired. All this suggests that it would not be superfluous to install suitable imported wheels on the legendary car. As an option when choosing new wheels for the UAZ “Loaf”, you can use BF Goodrich 33×10.5 R15 tires, and, accordingly, wheels with a diameter of 15 centimeters.
As for the choice of discs for them, it depends on the wishes of the owner. These can be alloy or cast wheels.
Or you can leave the regular standard wheels. However, you shouldn’t stop at this stage, because such tuning makes it difficult to control, since on sharp turns the front wheels catch the edges of the steering rods, and when the effect of crossing the axles appears, the wheels are located directly on the sides of the arches. This causes friction between the tires and the fender. Therefore, an indispensable stage of tuning after installing the wheels is the UAZ Bukhanka body lift.
UAZ Bukhanka body lift
No matter how strange it may seem, the UAZ Bukhanka frame is attached to the body using ten furniture bolts, six of which are located in the area of the passenger seats, two behind the front wheel arches, and two more at the feet of the driver and passenger. The bolts at the bottom are secured with second nuts. Before you begin dismantling the bolts, you need to disconnect the battery, disconnect the ground from the engine - behind the hood compartment and raise the car on a lift. Then, in order, we carry out the following steps:
- Disconnect the wires from the starter; Disconnect the radiator mounts from the bottom or top; Detach the transmission lever drive rods and the brake booster rod; Drain all the coolant and remove the hoses that are connected to the UAZ Bukhanka heaters; Disconnect the brake pedal rod to the vacuum booster; Disconnect the tube leading to tank control valve.
The last point may not seem so important, but failure to comply with it can lead to the plate bending under the mount, as a result of which it will have to be leveled. Next, we proceed directly to unscrewing the nuts. You should start with the six rear body bolts, then slightly loosen the nuts of the front bolts. When lifting a UAZ Bukhanka with your own hands, be careful and careful, since the fasteners on such a car are usually rusty and outdated.