Signal connection points in VAZ-2114, installation of the Starline A91 system
Next we will look at how to correctly connect the signaling system on cars of the VAZ 2114 family. The following will be implemented: connection to the central locking, auto start, reading the status of door limit switches. To control the central locking, the VAZ plant produced BUBD modules.
If such a module is missing, the task will be simplified - you will not connect the central locking system. The same applies to the case when the driver's door only has a switch, but not an actuator.
All tables given here are suitable for the Starline A91 Dialog alarm system, and to set up another system, use the instructions for it.
Central locking control module, connection
DBMS module of the “ninth” family
How to connect the alarm to the central locking system
The wiring of the 6-pin connector mounted on the main Starline A91 module is given below. Carefully study the principle of operation of the circuit: the limit switch here is in the “closed” position.
Before connecting the alarm to the ACU, make sure that a standard 5-wire actuator is installed in the driver's door, and not a toggle switch. It’s unlikely that anyone will be able to install the actuator with their own hands by running two cords to the engine in 5 minutes. In general, it is sometimes better to refuse to connect the signaling system to the central locking system.
Let us take the liberty of revealing VAZ’s proprietary secret:
- If you see a "white" control wire connected to terminal "7", it is responsible for unlocking (as opposed to the "brown" one);
- If terminals “5” and “7” are not used, a “brown” cord will be connected to terminal “8”, and it is then responsible for unlocking.
The locking contacts are terminals 5-6. The two outer terminals are responsible for unlocking. This is true not only for model 2114, but also for BUBD units of the “ninth” family in general.
The instructions for the alarms usually do not say that you will need to buy additional parts before installation. These include:
- Diodes 1N4001 (2-3 pcs.) – designed for current up to one Ampere;
- 1N5401 (1 pc.) – three-amp diode;
- To install any car alarm that does not have separate outputs for turn signals, you need to purchase two power diodes (4-5 Amperes).
The latter, as you might guess, does not apply to the Starline A91 system. And this is great luck.
1N5401 diode wiring
When installing any Starline system, you usually spend less than 100 rubles on parts.
Door limit switch cord
Shown here is the harness going to the dashboard. Let's figure out what is connected where:
- The diode connected to the wire break must conduct current in the direction “towards the limit switches”;
- Above we talked about the 1N5401 diode;
- The second diode connected to the alarm wire may be designated 1N4001 (it is cheaper).
The Starline A91 Dialog alarm is equipped with a set of inputs connected to the door, trunk and hood limit switches. The one you need is the "17" cord from connector X3. In the diagram it is designated as “blue-black”.
Handbrake wiring harness
From the two blue cables shown above, make T-shaped bends and extend the cords to the alarm installation location. And a 1N4001 diode is installed in the gap in the handbrake wire. The cathode of this diode “looks” towards the switch. Finally you will make the connections:
- The “green-yellow” and “green-black” wires from connector X3 are connected to the turn signal leads.
- Another tap coming from the cathode is connected to the “brake input” of the Starline A91 Dialog signaling system. The cord is designated as “orange-purple”.
It was discussed how to connect all the signal wires with your own hands. Queue for the security forces.
The steps listed in this chapter can be completed before installing the alarm. The functionality of standard equipment should not be affected.
In VAZ 2114 cars, unlike the “nines”, an ignition switch with three terminals is used: 50, 15 and 30. The latter is connected to the battery, and contact 15 closes with it when the key is turned. Well, the 50th terminal is the “output "to the starter. Similar designations are used not only by VAZ.
Car ignition switch connector
According to the basic instructions, power for the signaling can be taken from pin 30 (a T-tap is needed). And the “yellow” power cable coming out of connector X1 is connected to terminal 15. Further, if autostart is needed, then:
- The connections above must withstand significant current (up to 30 A);
- The “red” wire coming from the ignition switch is broken;
- The Starline A91 Dialog module is reached by bends coming from the break point;
- The thin wire from connector X1 should connect to terminal 50, while the power cord in “black and yellow” insulation will become the output to the starter.
Also, as stated in the installation manual, do not forget to cut the gearbox selector loop. The action makes sense if autorun is used.
The VAZ 2114 car is equipped with a manual transmission. You can set an alarm without performing the actions from the list. Otherwise, the loop must be opened. The point here is not only to follow the instructions, but also to be safe.
Including a lineman in a wiring break
All those who do not want to break the wire of the standard reader make a crawler with their own hands:
- The additional loop antenna contains 50 turns of PEL-0.3 wire;
- The internal antenna of the unit must contain the same number of turns of any wire;
- Both antennas are combined into a circuit opened by relay contacts.
The instructions cannot be completed here. The method of connecting the tachometer was not considered.
It is clear that the loop antenna will need to be combined with a standard reading device. And all the antennas included with Starline crawlers do not fit well with VAZ immobilizers.
Dashboard diagram 2114
All Starline security systems, as it turns out, are well compatible with any VAZ cars. This applies even more so to the A91 Dialog model. By the way, do not forget to connect the “ground” of the main unit (“black” cord of connector X3).
We will configure only the functions responsible for autorun. You can activate the programming mode as follows:
- The security is turned off, the key in the lock is moved to the “0” mark;
- The Valet button connected to the A91 Dialog main unit is pressed 6 times;
- After step “3”, turn on the ignition immediately;
- 6 beeps sound;
- Use the Valet button to select the function number (see below);
- To set the required value, press the corresponding key on the key fob.
Autorun options table
Information was taken from the installation instructions. Switch the values of the following functions: 12-3, 11-4 and 9-3.
To set the value to “4”, press the third key until the melody appears. Then the button is pressed again. Having chosen the value 4 for function 11, it is better to perform the following check:
- The “yellow” cord coming from block A91 and connected to terminal 15 is temporarily disconnected;
- Start the engine “with the key”;
- The alarm LED should start flashing.
All these tips are given in the standard instructions. True, they advise disconnecting all wires except three.
Screenshot of the basic guide
The A91 Dialog system can forcibly prohibit autostart. To prevent this from happening, you need to get out of the car correctly. First, activate the handbrake, then turn off the ignition (the engine is running). After leaving the car, you can activate the security mode. The motor stops.
Installation of the mechanism
First you need to remove the trim from all the doors. Also, do not forget to remove the plastic panels between the doors. This is where the wiring will be located. Next, we prepare holes for wiring in the rear doors; they are provided in the front ones. We install the spokes into the gearbox rods, only after this we can begin installing the motors on the door.
Installation of central locking
The matter remains small. We pull the wires to our main control unit, which is located on the driver's door. Please note that you need to think in advance about how you will route the wires from the right rear door to the driver's door. After connecting to the central unit, you can check the entire circuit. If there were no problems and everything worked, congratulations, you did it.
You already know that the locks on the VAZ 2109 can be controlled using a button inside the car. Any button that performs the function of a window regulator on a VAZ 2109 will be suitable as such a button.
Connection diagram for central locking button
To connect the button, you need to find the necessary wires under the side panel of your car. We need black, brown and white. There is an option to use a bundle of wires from the driver's door. The same ones we used to install the central lock.
But sometimes when trying to connect to them, problems arise, all doors except the driver's door work. In this regard, we recommend that you do not waste time, but immediately connect to the wires under the dashboard of your car.
Connecting wires, installing the central locking button
We connect them according to the diagram, and all that remains is to embed the button in a place convenient for you. Connect the backlight wires, cut the required hole in the panel, and insert the button into place. This completes the installation of the central lock on the VAZ 2109. The photo above, we hope, helped you with this.
What to choose
Central locks for Zhiguli cars are no longer a luxury, but a very real opportunity to make your life easier. And in order to make your dream come true, you first need to purchase the central locking mechanism itself. There is plenty to choose from on the market for alarms and other accessories. Manufacturers of these devices offer us a wide selection of different variations of the same device for different money, in different designs and, accordingly, of different quality.
In order to buy the right thing and not make a mistake, you need to focus primarily on the manufacturer. Most of the devices are from China. Although, in fact, all such locks are Chinese, build quality still plays a key role. Therefore, you need to look for the most acceptable option.
- A device made of good materials. Their quality must be checked by touch. Everything: wiring insulation, quality of metal parts, remote control design.
- In the required configuration, which consists of a control unit, door actuators, wiring and a pair of key fobs.
- As a cost guide, you can take the average market price for such a device. In this case, you have a minimal chance of purchasing a low-quality lock, and you will not overpay for a Chinese product.
In order not to make a mistake with your choice, it is best to check each device at the point of purchase, opening the boxes and examining their contents. Thanks to such a check, you will have the opportunity to find the most acceptable quality of the lock.
Installing central locking on a VAZ 2109 - connection diagram with video, etc.
Tuning the interior of a VAZ 2108 with your own hands, tips for modernizing and refining the interior, internal tuning of a VAZ 21099, VAZ 2108, VAZ 2109.
Tuning means modifying a car to suit individual needs. You have decided to modernize your VAZ car on your own. You love an individual appearance and a sporty interior, then do-it-yourself VAZ tuning is for you. VAZ 2109 cars have huge potential for tuning. But still haven’t decided where to start? Our sections will help you make your choice; you can make your VAZ 2108 faster, more powerful and more beautiful. On our website you can find photos of external tuning of vases with various body kits and bumpers. As well as advice on tuning the VAZ 21099 and modernizing the main components of the car. You will be able to do engine tuning, brake system tuning, gearbox and transmission tuning, suspension tuning, interior and body tuning, and also get acquainted with interesting materials on modifying the VAZ 21099, tuning VAZ cars.
Today, almost all cars are equipped with a central locking VAZ 21099 (CZ), either it is standard, or it is installed together with an alarm system (well, if not the CZ, then at least activator motors). Also, many alarms have the function of locking doors when the ignition is turned on and unlocking when it is turned off. This function is quite useful and can save your things from the so-called “purse grabbers” who take everything that is not in your car when other people (dummy) distract you. If the doors are closed you are not in danger. But this alarm function is not entirely convenient, because... in order to pick up a person, or vice versa - to let him out, you need to either reach across the entire cabin, or turn off the engine, or use the alarm key fob. It is much easier to install a separate button in the interior of the VAZ 2108 car, which will fit well into the interior and will control the central locking. The easiest way to do this is to use the power window control button - this is exactly what you need. The button wiring is shown in the diagram, and the contact values are in the table.
| Contact no. | Purpose |
| 1 | brown to activator |
| 2 | black, mass |
| 3 | white to alarm |
| 4 | 12V |
| 5 | weight |
| 6 | brown to alarm |
| 7 | white to activator |
You need to lift the trim in the driver's feet and find a harness there with wires of white, brown, black, red and yellow. Of these, we will need white, brown and black. Find the place where the alarm wires are connected to these wires and connect the wires from the table into the gap of these wires so as not to disturb anything. As can be seen from the diagram, contacts 1-6 and 3-7 are constantly closed, it is to these contacts that you connect, to contact 2 you connect ground (black wire in the harness). 12V is constantly supplied to the white and brown wires, the activator is switched by ground (pin 2). Contacts 4 and 5 are needed to illuminate the button, but keep in mind that an LED is used for illumination, and it is critical of polarity, of course it will not burn out, but it will not glow. The button can be placed in the driver's armrest (the trim can be easily cut with a knife), but I abandoned this idea, because... in this case, it is not available to the passenger, and I often leave my wife or friend in the car with the VAZ 2109 engine running, while I run to the store. I placed the button in the place where the choke handle is located on carburetor chisels, i.e. under the immobilizer receiver: easily accessible to both the driver and passenger (if necessary), invisible to prying eyes, fits harmoniously into the existing hole for suction (you just need to work a little with a file, another plus - you don’t have to pull the wires too far.
And finally, I want to warn you: you absolutely cannot hold the button in one position or another for a long time - the activator will burn out! You should press for no more than 3 seconds; in fact, a simple touch is enough.
Any car owner is familiar with the advantages of central locking (CL). But not all vehicles are equipped with this convenient device. This is especially true for domestic cars. The basic configuration of the VAZ 2109 did not include central locking.
Blocking all doors can be solved by installing a car alarm. But a good security system costs a lot of money, and you will have to pay for installation.
An excellent alternative for the “nine” will be a central lock, which every car enthusiast will install.
Central locking allows you to lock and unlock four doors by turning the key in the lock on the driver's side using an electronic key fob or a button in the cabin. The universal mounting kit is sold in specialized stores of electronic car accessories.
We recommend that you pay attention to the kit with remote control. This function will allow you to lock all car doors by pressing one button on the remote control. The second usefulness of the set is the presence of a blank for the ignition key. By contacting a special workshop, you will receive a set of spare keys for your car.
The installation kit contains everything you need to successfully install the central locking system in any car.
The universal central locking kit includes:
- Control block;
- four electric motors with worm gearboxes;
- metal rods;
- wiring;
- fuse;
- auxiliary mounting plates made of metal;
- self-tapping screws
The central locking control unit is connected to the vehicle's electrical network. When receiving a signal from the remote control or after turning the key in the driver's door lock, the electric motors begin to work. Through the gearbox and rods, the force is transmitted to the lock mechanism. As a result, the doors are locked or unlocked.
1 - standard connector on VAZ 2109, 2 - 10 A fuse, 3 - central locking control unit, 4, 5, 6 - electric drives for passenger doors, 7 - electric drives for the driver's door
To independently integrate the central lock into a VAZ 2109 car, you will need:
- installation kit;
- insulating tape;
- s-shaped corrugations for wiring;
- wire cutters;
- screwdriver or drill;
- screwdriver;
- plastic clamps.
Installation kit for central locking Screwdriver Rubber corrugation Wire cutters Electrical tape Clamps
- Before installing the central locking system, be sure to remove the terminals from the battery. This will help avoid accidental short circuits during installation and protect the vehicle's electronic devices.
- The central locking control unit is located under the front panel. This will make it easier to connect to the electrical network.
- An electric drive with four outputs is installed in the driver's door.
- Before installation, consider how the wiring will go to the rear right door. Most often it is placed under the carpet and secured with plastic clamps.
- Remove the door trims and plastic decorative trims from the sills and side pillars.
- Attach the control motor to the door. Use mounting plates and screws.
Mounting strips and self-tapping screws are used to secure the electric drive.
- Connect the kit rods to the door lock rod. If the length is too long, a slight bend is allowed.
- Place the control unit under the dashboard.
The electronic unit is installed under the dashboard
- If there are no standard holes for wiring in the doors and pillars, drill them using a screwdriver or drill.
- Route the wiring from the electric motor to the control unit. Protect the wires from the door to the stand with S-shaped corrugation. Possible twisting points must be insulated.
- For each door, repeat steps 2-6.
- Connect power to the central locking control unit through the fuse.
- Secure the wiring and block with clamps.
- Reinstall the door trim and interior parts.
- Below is a video. It will help you avoid difficult moments when installing yourself:
After watching the video and reading the instructions, every car enthusiast can easily install central locking on a VAZ 2109. The whole process will take about two hours. A ready-made kit will facilitate installation and save time.
Standard anti-theft system "Nine"
Almost all “nines” at one time were standardly equipped with central locks.
The central locking circuit diagram consists of:
- Control module or relay. This device is designed to transmit impulses to gear motors located in the doors. The control module is a circuit that is installed in a plastic case. It has special fasteners with which the device is fixed in the seat.
- The central locking system involves the use of input controllers. They can be made in the form of limit switches that are mounted in the doors, or in the form of special microswitches installed directly in the locks. Limit switches are used to fix the position of the door at a given moment and transmit an impulse to the control module. As for the microswitches, they are designed to fix the position of the main components of the lock itself.
- The central locking system is also equipped with actuators designed to ensure the opening and closing of locks. Such devices include in their design rods connected to the rear door rods.
- A control panel connected to a central unit, used to transmit signals.
Installing a central lock with your own hands is not a particularly difficult procedure, but today such anti-theft devices are no longer relevant.
Immobilizer and its location
Not all Nines were equipped with immobilizers as standard. Immo installation was provided for car modifications with a high center console. The purpose of the immobilizer is to lock the steering mechanism after the ignition key is turned off. This device also allows you to block the engine in case the car is broken into. In VAZ 2109 cars with a high console, the immo block is installed behind the dashboard, in particular, between the steering column and the steering column, where a choke is installed in carburetor versions.
It will be useful Test drive Hyundai solaris 2017
Why doesn't the central locking work?
For what reasons the central locking system may not work:
- The battery in the control panel is dead. Accordingly, the system will not respond to turning the locks on and off from the key fob.
- The keychain is broken. If the remote control fails, most likely, its circuit board will have to be repaired.
- Failure of the control unit. If problems occur in the operation of the control module, this can lead to incorrect operation of the system or its complete failure. The reasons can be different, ranging from wear and ending with damage caused by the operation of the module in vibration conditions. The reason may also be moisture getting on the board. In any case, the board itself must be repaired.
- Failure of input sensors. As practice shows, limit switches and microswitches wear out over time, so it is quite normal that they fail. Failed elements must be replaced.
- Failure of the actuator or solenoid. If this device breaks down, the car owner will face a problem when one of the car doors does not work. A failed solenoid can be easily replaced with a new one.
- Poor contact of sensors or control unit with the on-board network. If the contacts are broken, full operation of the central lock will be impossible. If possible, the contacts can be cleaned; if not, then replaced.
- Damage to the electrical circuit. It happens that as a result of prolonged use, as well as temperature changes, damage to the insulating layer of the wires occurs. In this case, damaged sections of the electrical circuit must be replaced (the author of the video is TAZavod channel 42).
How to disable immo?
How to disable the immobilizer on the injector? There are several options. A more complex method is to reprogram and change the firmware of the immo block using a computer. We will not describe this method, since it is quite complex and not everyone can cope with it. It is better to entrust this procedure to professionals.
But there is a simpler method to disable it:
- First you need to find the control module located behind the center console.
- Then feel with your hand and disconnect the plug connected to the module.
- When the connector is in your hands, you will be able to see that it has many contacts. To be more precise, there are twenty of them.
- Then you will need to count out contacts numbered 9 and 18 from the plug; the wires leading to them should be cut off. After this, they are connected to each other and isolated.
- When the immo is removed, you need to restore the diagnostic line. To do this, install a jumper that restores communication between the control unit and the diagnostic connector. By cutting the wiring and then reconnecting it, you restore the diagnostic line.
- After the manipulations have been completed, the connector is mounted in place.
Adjusting the door lock on a VAZ 2109
If the doors of your four-wheeled beast are not closing well, or are difficult to open, then it's time to take a closer look at them. This situation can be changed by adjusting the door latch.
It is thanks to the sandpaper gasket that the distance between the clamp and the stand is controlled. Thus, the latch does not touch the outer lock cover.
In principle, adjusting the VAZ 2109 door lock is quite simple. If the door dangles and moves away, the latch must be tightened; if it moves tightly, then, on the contrary, loosen it. The same logic applies if the door does not fit tightly. The main thing is to determine exactly how many centimeters and in which direction it is shifted.
For more accurate adjustments, it is recommended to mark the location of the lock before making adjustments.
Door lock adjustment
It must be remembered that in any case the gaps between the body and the door must be the same.
Security alarm installation
To the list of articles
Nowadays it’s fashionable to take your car to a dealership to have an alarm installed. They do it for about $100 and in less than a day. And then perplexed car owners cannot figure out why there were malfunctions in the car or “signaling”, and even more so they cannot say where the blocks and sensors of the system are located.
In addition, if a naive, economical car owner entrusted the installation to a “garage service,” then there is a possibility that the location of the alarm units has become well known to criminals - friends of garage technicians. So, who is interested in installing an alarm on their own in order to know all the nuances and not get confused somewhere? somewhere on the highway, read on.
First, let's decide on the location of the main block. Decide for yourself, I’ll just tell you that it should be in the car and not accessible for quick access, so that thieves cannot quickly turn it off. However, they can also use other methods of neutralizing the “signaling”, for example, disconnecting the battery.
We place it in the engine compartment so that it is inaccessible from the outside (check carefully!), its bell does not “swallow” dirt and, of course, so that the sound from it has the opportunity to spread. It would also be useful to install an autonomous siren. Now let’s decide on the alarm power supply. From the cigarette lighter? In no case! We lead a separate power cable to the battery.
To do this, you can use the technological holes under the panel. Getting to them is difficult, but quite possible. But DO NOT use the hole where the headlight leveling hoses pass through: this hole is easily accessible from the wheel well, which means a thief can turn off the power to the alarm and all your efforts will be in vain.
We pull the ignition switch indicator wire to the ignition switch and plug it in there.
For the front limit switch, we lead the wire into the engine compartment along with the alarm power wire. We place a separate limit switch next to the limit switch of the engine compartment lamp (there is no need to connect it to this limit switch, also because it often works poorly, gets stuck, and split seconds when triggered are important for signaling).
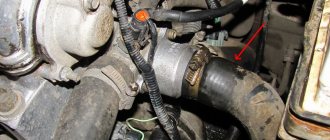
We install the trunk limit as shown in the photo. We run the wire along the left side along the floor. The trunk lighting can be connected to the same limit switch, if you are planning one.
The signal LED can be installed on the instrument panel trim. Please note that the LED there is not always visible from ground level and from the first floor. You must first test its visibility in different places, for example, on a stand, on a panel visor, etc.
We connect the wires of the dimensions not to the dimensions, but to the turn signals - they are more noticeable. It is convenient to make the connection near the alarm button (pins 4 and 12), or you can connect to pins 9 and 2 of the X9 connector of the mounting block.
It is better to use separate limit switches as door opening sensors rather than connecting to standard ones. This is required for models with the APS-4 immobilizer. You cannot connect directly to the limit switch wires: there will be problems with arming.
There are schemes to bypass this issue, but you will be exhausted in getting to the APS wires under the panel behind the trim. It is also worth noting that the limit switches can be installed not as shown, but on the rear pillar (rear wing for 2108), as is done in foreign cars.
Then the limit switches will operate earlier when the door is opened.
Next, we install activators that will open/close the door locks. But in the VAZ-2108 there is no wiring in the door. Well, she's not there! It’s good if you come across a used car, and the previous owner did the wiring.
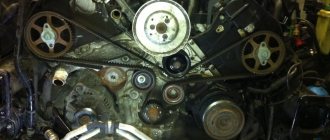
I had a used car, but it was from Finland, and people there don't require alarms, believe it or not. I had to do everything from scratch, which was a bit of a hassle, because... Initially, the condition was set: the instrument panel should not be removed. The photo shows where the holes were drilled.
It’s worth noting that it’s not very successful, because... in the doors, the wires fall into a blind cavity and have to be taken out through the hole. However, it's not scary. In the wing from the inside of the cabin, if you bend the trim, you can find technological holes through which the wires are routed.
Don’t be alarmed: carefully open the casing, everything will be found, and then close it without consequences.
The door activators themselves are installed easily and simply. Let's look at the photo. Something from a “penny” was used as a rubber washer - something that came across in a store. Activators according to this scheme work properly and without problems, incl. in winter.
And finally, do not forget that any alarm system is easily bypassed by hijackers. Don’t rely on it, it won’t protect you from theft, and if it’s stolen from the interior, it will only warn you.
The alarm system lasts almost 4 years. No false alarms or failures were noted. The shock sensor has been tested many times in combat conditions. Sometimes the short communication distance is somewhat annoying, to which there is no answer yet. Perhaps there is interference in the city, but maybe not.
Signaling
about 2000 rub.
NV, PV or MGShV wire about 15 m (roughly)
100 rub.
Installing the trunk lock
Those who have at least once in their life owned a car similar to the VAZ 2109 remember that in the cold season you can basically forget about the trunk. If the trunk lock has not yet rusted, then it is most likely frozen. And the most interesting thing comes when he freezes on the way. That is, you came to the dacha to replenish your supplies of pickles, but upon returning home your beloved “swallow” refuses to open. Or, on the contrary, you are driving happily about your business, but the trunk lid opens on its own, you have to stop and adjust it.
At such moments, the desire comes to install a lock on the VAZ 2109, which will allow you to open the trunk automatically. Instead of suffering, jumping around it with a defrost, a screwdriver or ropes.
To install the trunk lock we will need:
- The castle itself;
- Reciprocal part of the lock;
- Button;
- Any electric drive;
- Grinder, pliers and wire cutters;
- 4 bolts;
- A metal cable and one long wire.
Installing a trunk lock from Kalina on a VAZ 2109 is considered the most successful option. The most important moment in installation is to adjust the lock to the dimensions you need, so that it fits well and the lock tongue does not rest against the trunk lid. For this we use a grinder.
Next, we use the rear wiper motor to connect the electrics. We install the back part of the trunk; it should fit perfectly, since it is no different in size from the one you had before. The only thing is that you may have to hit it a couple of times with a hammer, since it may protrude to the left by 5 millimeters, no more.
Well, now we close the trunk and check the functionality of the lock. If the door moves a little, you should tighten the washers or, on the contrary, loosen them.
Additional option – is it worth ordering?
The presence of a central lock in a VAZ car is considered an additional option, and only if we talk about cars manufactured after 2000. However, in VAZ 2109 models deprived of this advantage, it is not difficult to install it.
The main purpose of the VAZ 2109 central lock is to automatically open and close all car doors simultaneously. The central locking can be controlled using an alarm remote control that interacts with the system, as well as using a key. The central locking mechanism consists of several sensors located in the door envelopes and automatic switches. This entire system is interconnected and looped into the vehicle’s power supply.